
Owner's Manual
Page 6
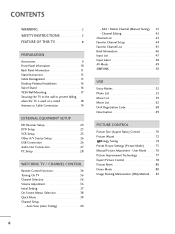
... 59 Movie List 62 DivX Registration Code 68 Deactivation 69 PICTURE CONTROL Picture Size (Aspect Ratio) Control 70 Picture Wizard 72 Energy Saving 74 Preset Picture Settings (Picture Mode 75 Manual Picture Adjustment - Auto Scan (Auto Tuning 40 - User Mode 76 Picture Improvement Technology 77 Expert Picture Control 78 Picture Reset 80 Demo Mode 80 Image Sticking Minimization (ISM...
... 59 Movie List 62 DivX Registration Code 68 Deactivation 69 PICTURE CONTROL Picture Size (Aspect Ratio) Control 70 Picture Wizard 72 Energy Saving 74 Preset Picture Settings (Picture Mode 75 Manual Picture Adjustment - Auto Scan (Auto Tuning 40 - User Mode 76 Picture Improvement Technology 77 Expert Picture Control 78 Picture Reset 80 Demo Mode 80 Image Sticking Minimization (ISM...
Owner's Manual
Page 8
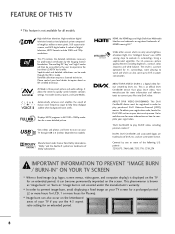
...the manufacturer's warranty. Using a sophisticated algorithm, the LG processes picture quality elements including brightness, contrast, color, sharpness and white balance. FEATURE OF THIS TV s This feature is not available for a more detailed picture. High-definition television. Detailed calibration requires a licensed ...INFORMATION TO PREVENT "IMAGE BURN / BURN-IN" ON YOUR TV SCREEN s When a fixed image (e.g. This phenomenon is three preset picture and audio settings. The resulting ISF "day" and "night" modes will then be registered in power consumption. "Dolby "and the...
...the manufacturer's warranty. Using a sophisticated algorithm, the LG processes picture quality elements including brightness, contrast, color, sharpness and white balance. FEATURE OF THIS TV s This feature is not available for a more detailed picture. High-definition television. Detailed calibration requires a licensed ...INFORMATION TO PREVENT "IMAGE BURN / BURN-IN" ON YOUR TV SCREEN s When a fixed image (e.g. This phenomenon is three preset picture and audio settings. The resulting ISF "day" and "night" modes will then be registered in power consumption. "Dolby "and the...
Owner's Manual
Page 10
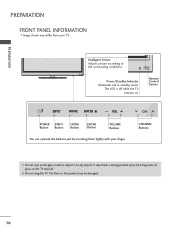
... conditions. CHANNEL ENTER Buttons G Do not step on . PREPARATION PREPARATION FRONT PANEL INFORMATION s Image shown may be damaged. 10 ENTER VOL CH Intelligent Sensor Adjusts picture according to any impact. The floor or the product may differ from fragments of glass, or the TV may fall. It may break, causing possible...
... conditions. CHANNEL ENTER Buttons G Do not step on . PREPARATION PREPARATION FRONT PANEL INFORMATION s Image shown may be damaged. 10 ENTER VOL CH Intelligent Sensor Adjusts picture according to any impact. The floor or the product may differ from fragments of glass, or the TV may fall. It may break, causing possible...

Owner's Manual
Page 18
... eye-bolts position before inserting the eye-bolts, loosen the bolts. * Insert the eye-bolts or TV brackets/bolts and tighten them securely in the picture. * If your TV. PREPARATION PREPARATION SECURING THE TV TO THE WALL TO PREVENT FALLING WHEN THE TV IS USED ON A STAND s You should purchase necessary...
... eye-bolts position before inserting the eye-bolts, loosen the bolts. * Insert the eye-bolts or TV brackets/bolts and tighten them securely in the picture. * If your TV. PREPARATION PREPARATION SECURING THE TV TO THE WALL TO PREVENT FALLING WHEN THE TV IS USED ON A STAND s You should purchase necessary...

Owner's Manual
Page 19
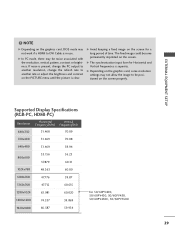
... Signal Splitter. PREPARATION () VARIABLE AUDIO OUT R I If the antenna is not installed properly, contact your dealer for assistance. 19 For optimum picture quality, adjust antenna direction if needed. I To improve the picture quality in a poor signal area, please purchase a signal amplifier and install properly. ANTENNA OR CABLE CONNECTION R 1. RF Coaxial Wire (75...
... Signal Splitter. PREPARATION () VARIABLE AUDIO OUT R I If the antenna is not installed properly, contact your dealer for assistance. 19 For optimum picture quality, adjust antenna direction if needed. I To improve the picture quality in a poor signal area, please purchase a signal amplifier and install properly. ANTENNA OR CABLE CONNECTION R 1. RF Coaxial Wire (75...
Owner's Manual
Page 23
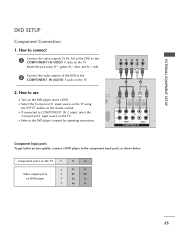
... 1 jacks on the TV. DIO IN B/DVI) REMOTE CONTROL IN AV IN 1 VIDEO /MONO AUDIO 2 L R 1 VIDEO AUDIO A COMPONENT IN Component Input ports To get better picture quality, connect a DVD player to COMPONENT IN 2 input, select the Component2 input source on the TV. I Turn on the TV. EXTERNAL EQUIPMENT SETUP DVD SETUP...
... 1 jacks on the TV. DIO IN B/DVI) REMOTE CONTROL IN AV IN 1 VIDEO /MONO AUDIO 2 L R 1 VIDEO AUDIO A COMPONENT IN Component Input ports To get better picture quality, connect a DVD player to COMPONENT IN 2 input, select the Component2 input source on the TV. I Turn on the TV. EXTERNAL EQUIPMENT SETUP DVD SETUP...
Owner's Manual
Page 29
... the PC output to another rate or adjust the brightness and contrast on the screen. The fixed image could become permanently imprinted on the PICTURE menu until the picture is separate. NOTE G Depending on the graphics card, DOS mode may be positioned on the screen for Horizontal and Vertical frequencies is clear...
... the PC output to another rate or adjust the brightness and contrast on the screen. The fixed image could become permanently imprinted on the PICTURE menu until the picture is separate. NOTE G Depending on the graphics card, DOS mode may be positioned on the screen for Horizontal and Vertical frequencies is clear...

Owner's Manual
Page 30
Select Screen (RGB-PC). EXTERNAL EQUIPMENT SETUP EXTERNAL EQUIPMENT SETUP Screen Setup for PC mode Selecting Resolution You can also be adjusted. Select Resolution. PICTURE Move E • Contrast 90 • Brightness 50 • H Sharpness 60 • V Sharpness 60 • Color 60 • Tint 0R • Expert Control • .... Select the desired resolution. 30 Position Size Phase Reset Move Prev. 1024 x 768 1280 x 768 1360 x 768 1 Home 2 ENTER 3 ENTER 4 ENTER 5 ENTER Select PICTURE. The Position, Phase, and Size can choose the resolution in RGB-PC mode.
Select Screen (RGB-PC). EXTERNAL EQUIPMENT SETUP EXTERNAL EQUIPMENT SETUP Screen Setup for PC mode Selecting Resolution You can also be adjusted. Select Resolution. PICTURE Move E • Contrast 90 • Brightness 50 • H Sharpness 60 • V Sharpness 60 • Color 60 • Tint 0R • Expert Control • .... Select the desired resolution. 30 Position Size Phase Reset Move Prev. 1024 x 768 1280 x 768 1360 x 768 1 Home 2 ENTER 3 ENTER 4 ENTER 5 ENTER Select PICTURE. The Position, Phase, and Size can choose the resolution in RGB-PC mode.
Owner's Manual
Page 31
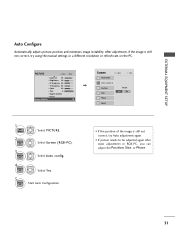
...5 ENTER Start Auto Configuration. • If the position of the image is still not correct, try Auto adjustment again. • If picture needs to be adjusted again after Auto adjustment in RGB-PC, you can adjust the Position, Si ze, or Phase. 31 G Position Size... settings or a different resolution or refresh rate on the PC. EXTERNAL EQUIPMENT SETUP Auto Configure Automatically adjusts picture position and minimizes image instability. To Set Yes No 1 Home 2 ENTER Select PICTURE. PICTURE Move E • Contrast 90 • Brightness 50 • H Sharpness 60 • V Sharpness...
...5 ENTER Start Auto Configuration. • If the position of the image is still not correct, try Auto adjustment again. • If picture needs to be adjusted again after Auto adjustment in RGB-PC, you can adjust the Position, Si ze, or Phase. 31 G Position Size... settings or a different resolution or refresh rate on the PC. EXTERNAL EQUIPMENT SETUP Auto Configure Automatically adjusts picture position and minimizes image instability. To Set Yes No 1 Home 2 ENTER Select PICTURE. PICTURE Move E • Contrast 90 • Brightness 50 • H Sharpness 60 • V Sharpness...
Owner's Manual
Page 32
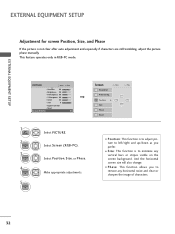
...Screen (RGB-PC). Make appropriate adjustments. G 1 Home 2 ENTER 3 ENTER 4 ENTER 5 ENTER Select PICTURE. s S i z e: This function is not clear after auto adjustment and especially if characters are still trembling, adjust the picture phase manually. And the horizontal screen size will also change. s P h a s e: This function allows... left/right and up/down as you to minimize any horizontal noise and clear or sharpen the image of characters. 32 PICTURE Move E • Contrast 90 • Brightness 50 • H Sharpness 60 • V Sharpness 60 • Color 60 • ...
...Screen (RGB-PC). Make appropriate adjustments. G 1 Home 2 ENTER 3 ENTER 4 ENTER 5 ENTER Select PICTURE. s S i z e: This function is not clear after auto adjustment and especially if characters are still trembling, adjust the picture phase manually. And the horizontal screen size will also change. s P h a s e: This function allows... left/right and up/down as you to minimize any horizontal noise and clear or sharpen the image of characters. 32 PICTURE Move E • Contrast 90 • Brightness 50 • H Sharpness 60 • V Sharpness 60 • Color 60 • ...

Owner's Manual
Page 33
... 60 • V Sharpness 60 • Color 60 • Tint 0R • Expert Control • Reset Screen (RGB-PC) Enter G 1 Home 2 ENTER 3 ENTER 4 ENTER 5 ENTER Select PICTURE. Select Reset. Resolution Auto config. Select Screen (RGB-PC). Select Y e s. Yes No Phase Reset G 33 Screen Move Prev. Position Size Initialize Settings. EXTERNAL EQUIPMENT SETUP...
... 60 • V Sharpness 60 • Color 60 • Tint 0R • Expert Control • Reset Screen (RGB-PC) Enter G 1 Home 2 ENTER 3 ENTER 4 ENTER 5 ENTER Select PICTURE. Select Reset. Resolution Auto config. Select Screen (RGB-PC). Select Y e s. Yes No Phase Reset G 33 Screen Move Prev. Position Size Initialize Settings. EXTERNAL EQUIPMENT SETUP...
Owner's Manual
Page 35
... devices connected to mark or unmark a photo/music/movie. Home Displays the main menu or clears all on -screen displays and returns to apply the Picture Wizard setting. Opens the SIMPLINK menu. G p.45 Select the input to TV viewing. MUTE Switches the sound on the back side and install the batteries...
... devices connected to mark or unmark a photo/music/movie. Home Displays the main menu or clears all on -screen displays and returns to apply the Picture Wizard setting. Opens the SIMPLINK menu. G p.45 Select the input to TV viewing. MUTE Switches the sound on the back side and install the batteries...
Owner's Manual
Page 37
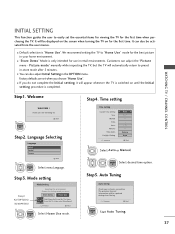
...Home Use] to use this TV at store, select [Store Demo]. We recommend setting the TV to "Home Use" mode for choosing LG Next Step2. Customers can also be displayed on the screen when turning the TV on until the Initial setting procedure is "Home Use". .... Choose the setting mode you choose "Home Use". The previous channel information will automatically return to preset in your antenna connection. It can adjust the "Picture menu - Previous Next Select H om e U s e mode. Step4. INITIAL SETTING This Function guides the user to easily set when you want....
...Home Use] to use this TV at store, select [Store Demo]. We recommend setting the TV to "Home Use" mode for choosing LG Next Step2. Customers can also be displayed on the screen when turning the TV on until the Initial setting procedure is "Home Use". .... Choose the setting mode you choose "Home Use". The previous channel information will automatically return to preset in your antenna connection. It can adjust the "Picture menu - Previous Next Select H om e U s e mode. Step4. INITIAL SETTING This Function guides the user to easily set when you want....
Owner's Manual
Page 38
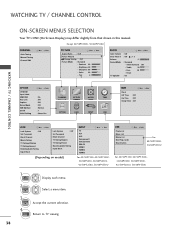
... current selection. Return to TV viewing. Except 42/50PT250U, 50/60PV550U CHANNEL Auto Tuning Manual Tuning Channel Edit Move Enter PICTURE Move Aspect Ratio : 16:9 Picture Wizard Energy Saving : Off Picture Mode : Standard • Contrast 90 • Brightness 50 • Sharpness 60 • Color 60 • Tint... Caption Demo Mode ISM Method Set ID Initial Setting Move Enter : On : Off : Off : Off : Normal : 1 : Home Use CHANNEL PICTURE AUDIO TIME OPTION LOCK INPUT USB TIME Clock Off Time : Off On Time : Off Sleep Timer : Off Move Enter WATCHING TV / CHANNEL CONTROL...
... current selection. Return to TV viewing. Except 42/50PT250U, 50/60PV550U CHANNEL Auto Tuning Manual Tuning Channel Edit Move Enter PICTURE Move Aspect Ratio : 16:9 Picture Wizard Energy Saving : Off Picture Mode : Standard • Contrast 90 • Brightness 50 • Sharpness 60 • Color 60 • Tint... Caption Demo Mode ISM Method Set ID Initial Setting Move Enter : On : Off : Off : Off : Normal : 1 : Home Use CHANNEL PICTURE AUDIO TIME OPTION LOCK INPUT USB TIME Clock Off Time : Off On Time : Off Sleep Timer : Off Move Enter WATCHING TV / CHANNEL CONTROL...
Owner's Manual
Page 39
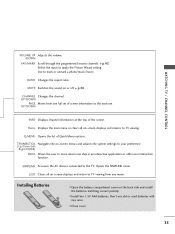
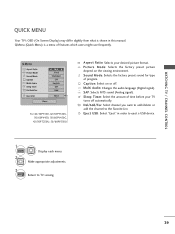
...in order to TV viewing. 39 Multi Audio: Changes the audio language (Digital signal). Sleep Timer: Select the amount of time before your desired picture format. Eject USB: Select "Eject" in this manual. CH Del/Add/Fav: Select channel you want to add/delete or add the channel ...to the Favorite List. P i c t u r e M o d e: Selects the factory preset picture depend on or off automatically. SAP: Selects MTS sound (Analog signal). WATCHING TV / CHANNEL CONTROL QUICK MENU Your TV's OSD (On Screen Display) may differ...
...in order to TV viewing. 39 Multi Audio: Changes the audio language (Digital signal). Sleep Timer: Select the amount of time before your desired picture format. Eject USB: Select "Eject" in this manual. CH Del/Add/Fav: Select channel you want to add/delete or add the channel ...to the Favorite List. P i c t u r e M o d e: Selects the factory preset picture depend on or off automatically. SAP: Selects MTS sound (Analog signal). WATCHING TV / CHANNEL CONTROL QUICK MENU Your TV's OSD (On Screen Display) may differ...
Owner's Manual
Page 44
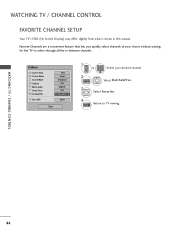
... TV / CHANNEL CONTROL FAVORITE CHANNEL SETUP Your TV's OSD (On Screen Display) may differ slightly from what is shown in -between channels. Q.Menu Aspect Ratio Picture Mode Sound Mode Caption Multi Audio Sleep Timer CH Del/Add/Fav Eject USB 16:9 Vivid Standard Off English Off F Favorite G Eject Close 1 or P CH...
... TV / CHANNEL CONTROL FAVORITE CHANNEL SETUP Your TV's OSD (On Screen Display) may differ slightly from what is shown in -between channels. Q.Menu Aspect Ratio Picture Mode Sound Mode Caption Multi Audio Sleep Timer CH Del/Add/Fav Eject USB 16:9 Vivid Standard Off English Off F Favorite G Eject Close 1 or P CH...
Owner's Manual
Page 49
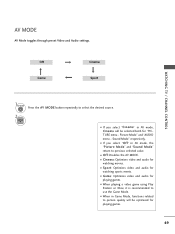
... selected both for watching sports events. s O f f: Disables the AV MODE. s When playing a video game using Play Station or Xbox, it is recommended to picture quality will be optimized for playing games. 49 Off Game Cinema Sport WATCHING TV / CHANNEL CONTROL 1AV MODE Press the AV MODE button repeatedly to...AV MODE AV Mode toggles through preset Video and Audio settings. s G a m e: Optimizes video and audio for watching movies. s Sport: Optimizes video and audio for "PICTURE menu - s When in AV mode, the "Picture Mode" and "Sound Mode" return to previous selected value...
... selected both for watching sports events. s O f f: Disables the AV MODE. s When playing a video game using Play Station or Xbox, it is recommended to picture quality will be optimized for playing games. 49 Off Game Cinema Sport WATCHING TV / CHANNEL CONTROL 1AV MODE Press the AV MODE button repeatedly to...AV MODE AV Mode toggles through preset Video and Audio settings. s G a m e: Optimizes video and audio for watching movies. s Sport: Optimizes video and audio for "PICTURE menu - s When in AV mode, the "Picture Mode" and "Sound Mode" return to previous selected value...

Owner's Manual
Page 58
Picture Mode Contrast Brightness Sharpness Color Tint Color Temperature Noise Reduction Reset Vivid 100 50 70 80 0 W C 0 W C Medium Prev. 1 ENTER 2 ENTER Show the Picture Mode. G When you select the Set Video. USB USB G When you select the Set Audio. Sound Mode Auto Volume Clear Voice ll Balance Cinema Off Off 0 L R Prev. 1 ENTER 2 ENTER Show the Sound Mode, Auto Volume, Clear Voice II and Balance. I APS mode is not supported in Set Video function. Set video. Make appropriate adjustments. Set audio. Make appropriate adjustments. 58
Picture Mode Contrast Brightness Sharpness Color Tint Color Temperature Noise Reduction Reset Vivid 100 50 70 80 0 W C 0 W C Medium Prev. 1 ENTER 2 ENTER Show the Picture Mode. G When you select the Set Video. USB USB G When you select the Set Audio. Sound Mode Auto Volume Clear Voice ll Balance Cinema Off Off 0 L R Prev. 1 ENTER 2 ENTER Show the Sound Mode, Auto Volume, Clear Voice II and Balance. I APS mode is not supported in Set Video function. Set video. Make appropriate adjustments. Set audio. Make appropriate adjustments. 58

Owner's Manual
Page 66
... Audio Language F Full G 1 Subtitle Language . G Audio Language: Changes the Language Group of the subtitles. 1 Show the Picture size, audio Language, or Subtitle Language. 2 Make appropriate adjustments. G Size: Changes the subtitle font size. Set audio. Set video ... Latin1 Supported Language English, Spanish, French 66 Size . Sync . G Position: Move the location of the audio for videos. G Picture size: Selects your desired picture format for video files. Position Off Normal 0 0 Prev. USB Using The Movie List Option Choose option Q.MENU Option Set video play...
... Audio Language F Full G 1 Subtitle Language . G Audio Language: Changes the Language Group of the subtitles. 1 Show the Picture size, audio Language, or Subtitle Language. 2 Make appropriate adjustments. G Size: Changes the subtitle font size. Set audio. Set video ... Latin1 Supported Language English, Spanish, French 66 Size . Sync . G Position: Move the location of the audio for videos. G Picture size: Selects your desired picture format for video files. Position Off Normal 0 0 Prev. USB Using The Movie List Option Choose option Q.MENU Option Set video play...

Owner's Manual
Page 67
Make appropriate adjustments. Sound Mode Auto Volume Clear Voice ll Balance Cinema Off Off 0 L R Prev. 1 ENTER Show the Sound Mode, Auto Volume, Clear Voice II and Balance. 2 ENTER Make appropriate adjustments. 67 G When you select the Set Audio. Set video. Picture Mode Contrast Brightness Sharpness Color Tint Color Temperature Noise Reduction Reset Standard 100 50 70 80 0 W C 0 W C Low Prev. 1 ENTER 2 ENTER Show the Picture Mode. USB G When you select the Set Video. Set audio.
Make appropriate adjustments. Sound Mode Auto Volume Clear Voice ll Balance Cinema Off Off 0 L R Prev. 1 ENTER Show the Sound Mode, Auto Volume, Clear Voice II and Balance. 2 ENTER Make appropriate adjustments. 67 G When you select the Set Audio. Set video. Picture Mode Contrast Brightness Sharpness Color Tint Color Temperature Noise Reduction Reset Standard 100 50 70 80 0 W C 0 W C Low Prev. 1 ENTER 2 ENTER Show the Picture Mode. USB G When you select the Set Video. Set audio.


