User Manual
Page 3
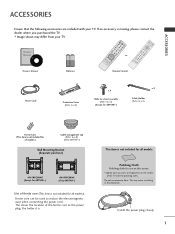
... the power plug closely. 1 This may differ from your TV. The closer the location of the TV with your TV. Do not use on the screen. * Lightly wipe any stains or fingerprints on the surface of the ferrite core to reduce the electromagnetic wave when connecting the power cord. I Image shown...
... the power plug closely. 1 This may differ from your TV. The closer the location of the TV with your TV. Do not use on the screen. * Lightly wipe any stains or fingerprints on the surface of the ferrite core to reduce the electromagnetic wave when connecting the power cord. I Image shown...
User Manual
Page 4
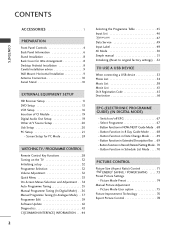
.../NEXT Guide Mode . 68 - Switch on the TV 32 Initializing setup 32 Programme Selection 32 Volume Adjustment 32 Quick Menu 33 On-Screen Menus Selection and Adjustment . . 34 Auto Programme Tuning 35 Manual Programme Tuning (In Digital Mode) . . 36 Manual Programme Tuning... Code 65 Deactivation 66 EPG (ELECTRONIC PROGRAMME GUIDE) (IN DIGITAL MODE) - Button Function in Extended Description Box . . 69 - Screen Setup for Wire Arrangement 8 Desktop Pedestal Installation 8 Careful installation advice 9 Wall Mount: Horizontal Installation 9 Antenna Connection 10 Swivel Stand 10...
.../NEXT Guide Mode . 68 - Switch on the TV 32 Initializing setup 32 Programme Selection 32 Volume Adjustment 32 Quick Menu 33 On-Screen Menus Selection and Adjustment . . 34 Auto Programme Tuning 35 Manual Programme Tuning (In Digital Mode) . . 36 Manual Programme Tuning... Code 65 Deactivation 66 EPG (ELECTRONIC PROGRAMME GUIDE) (IN DIGITAL MODE) - Button Function in Extended Description Box . . 69 - Screen Setup for Wire Arrangement 8 Desktop Pedestal Installation 8 Careful installation advice 9 Wall Mount: Horizontal Installation 9 Antenna Connection 10 Swivel Stand 10...
User Manual
Page 5
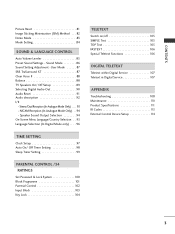
Speaker Sound Output Selection 94 On-Screen Menu Language/Country Selection . . 95 Language Selection (In Digital Mode only) . . . . 96 TIME SETTING Clock Setup 97 Auto On/ Off Timer Setting 98 Sleep Timer ...
Speaker Sound Output Selection 94 On-Screen Menu Language/Country Selection . . 95 Language Selection (In Digital Mode only) . . . . 96 TIME SETTING Clock Setup 97 Auto On/ Off Timer Setting 98 Sleep Timer ...

User Manual
Page 10
... the stand, make sure to lift the TV. - Insert the PROTECTION COVER into the TV until clicking sound. 8 protection cover How to protect the screen from damage. Only 60PS40** CABLE HOLDER Install the CABLE MANAGEMENT CLIP as shown. MENT CLIP 3 Fix the 4 bolts securely using the holes in the ...back of the bolt. 1 Carefully place the TV screen side down on a cushioned surface to remove the cable management clip Hold the CABLE MANAGEMENT CLIP with excessive force, the bolt can tilt forward after...
... the stand, make sure to lift the TV. - Insert the PROTECTION COVER into the TV until clicking sound. 8 protection cover How to protect the screen from damage. Only 60PS40** CABLE HOLDER Install the CABLE MANAGEMENT CLIP as shown. MENT CLIP 3 Fix the 4 bolts securely using the holes in the ...back of the bolt. 1 Carefully place the TV screen side down on a cushioned surface to remove the cable management clip Hold the CABLE MANAGEMENT CLIP with excessive force, the bolt can tilt forward after...
User Manual
Page 14
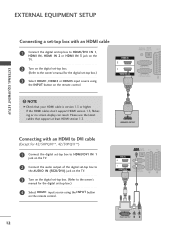
... least HDMI version 1.3. HDMI IN 2 1 HDMI/DVI IN 1 2 12 HDMI IN 2 1 HDMI/DVI IN 1 ! If the HDMI cables don't support HDMI version 1.3, flickering or no screen display can result. EXTERNAL EQUIPMENT SETUP EXTERNAL EQUIPMENT SETUP Connecting a set-top box with an HDMI to DVI cable (Except for 42/50PQ10**, 42/50PQ11...
... least HDMI version 1.3. HDMI IN 2 1 HDMI/DVI IN 1 2 12 HDMI IN 2 1 HDMI/DVI IN 1 ! If the HDMI cables don't support HDMI version 1.3, flickering or no screen display can result. EXTERNAL EQUIPMENT SETUP EXTERNAL EQUIPMENT SETUP Connecting a set-top box with an HDMI to DVI cable (Except for 42/50PQ10**, 42/50PQ11...
User Manual
Page 16
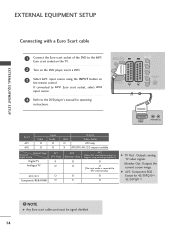
VIDEO L/MONO AUDIO R S-VIDEO HDMI IN 3 ! Monitor Out: Outputs the current screen image. G AV3, Component, RGB : Except for operating instructions. AUDIO/ VIDEO (R) AUDIO (L) Input Scart Video Audio RGB AV1 O O O Output Video, Audio ATV only AV2 O O X ATV, DTV, ...
VIDEO L/MONO AUDIO R S-VIDEO HDMI IN 3 ! Monitor Out: Outputs the current screen image. G AV3, Component, RGB : Except for operating instructions. AUDIO/ VIDEO (R) AUDIO (L) Input Scart Video Audio RGB AV1 O O O Output Video, Audio ATV only AV2 O O X ATV, DTV, ...
User Manual
Page 17
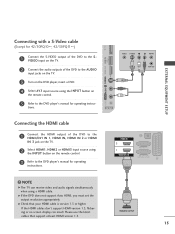
... the HDMI output of the DVD to the DVD player's manual for operating instruc- If the HDMI cables don't support HDMI version 1.3, flickering or no screen display can receive video and audio signals simultaneously when using the INPUT button on the remote control. 3 Refer to the AUDIO input jacks on the...
... the HDMI output of the DVD to the DVD player's manual for operating instruc- If the HDMI cables don't support HDMI version 1.3, flickering or no screen display can receive video and audio signals simultaneously when using the INPUT button on the remote control. 3 Refer to the AUDIO input jacks on the...
User Manual
Page 19
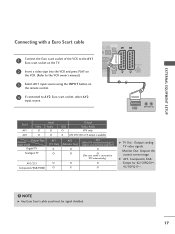
... Video, Audio ATV only AV2 O O X ATV, DTV, AV1/2/3 output is available. G AV3, Component, RGB : Except for 42/50PQ10**, 42/50PQ11**. ! Monitor Out: Outputs the current screen image.
... Video, Audio ATV only AV2 O O X ATV, DTV, AV1/2/3 output is available. G AV3, Component, RGB : Except for 42/50PQ10**, 42/50PQ11**. ! Monitor Out: Outputs the current screen image.

User Manual
Page 25
... by the TV.) G DOS mode may be changed, change the refresh rate to the Audio input on the menu until the picture is set 's screen for Horizontal and Vertical frequencies are not included with the TV). Change the PC mode to another rate or adjust the brightness and contrast on... the TV. (Audio cables are separate. G If the graphic card on the screen. EXTERNAL EQUIPMENT SETUP ! The fixed image may be interference on the PC does not output analogue and digital RGB simultaneously, connect only one of time...
... by the TV.) G DOS mode may be changed, change the refresh rate to the Audio input on the menu until the picture is set 's screen for Horizontal and Vertical frequencies are not included with the TV). Change the PC mode to another rate or adjust the brightness and contrast on... the TV. (Audio cables are separate. G If the graphic card on the screen. EXTERNAL EQUIPMENT SETUP ! The fixed image may be interference on the PC does not output analogue and digital RGB simultaneously, connect only one of time...

User Manual
Page 26
Auto Config. This function works in the following mode : RGB[PC]. SCREEN Resolution Move RETURN Prev. Position Size Phase To Set Yes No Reset G • Press the MENU button to return to normal TV viewing. •...; Sharpness 70 • Colour 70 • Tint 0R G • Advanced Control • Picture Reset 1 MENU Select PICTURE. 2 OK Select Screen. 3 OK Select Reset. 4 OK Select Y e s. 5 OK Run R e s e t. EXTERNAL EQUIPMENT SETUP Screen Setup for PC mode (Except for 42/50PQ10**, 42/50PQ11**) Screen Reset Returns Position, Size and Phase to the previous menu...
Auto Config. This function works in the following mode : RGB[PC]. SCREEN Resolution Move RETURN Prev. Position Size Phase To Set Yes No Reset G • Press the MENU button to return to normal TV viewing. •...; Sharpness 70 • Colour 70 • Tint 0R G • Advanced Control • Picture Reset 1 MENU Select PICTURE. 2 OK Select Screen. 3 OK Select Reset. 4 OK Select Y e s. 5 OK Run R e s e t. EXTERNAL EQUIPMENT SETUP Screen Setup for PC mode (Except for 42/50PQ10**, 42/50PQ11**) Screen Reset Returns Position, Size and Phase to the previous menu...

User Manual
Page 27
...; Tint 0R G • Advanced Control • Picture Reset 1 MENU 2 OK Select PICTURE. To Set Yes No • If the position of the screen position, size, and phase The displayed image will be adjusted again after Auto adjustment in progress. EXTERNAL EQUIPMENT SETUP Auto Configure (RGB [PC] mode only...function is for automatic adjustment of the image is still not correct, try Auto adjustment again. • If picture needs to the previous menu screen. 25 G Position Size Phase Reset Move RETURN Prev. After adjustment, if the image is still not correct, your TV is in RGB (PC...
...; Tint 0R G • Advanced Control • Picture Reset 1 MENU 2 OK Select PICTURE. To Set Yes No • If the position of the screen position, size, and phase The displayed image will be adjusted again after Auto adjustment in progress. EXTERNAL EQUIPMENT SETUP Auto Configure (RGB [PC] mode only...function is for automatic adjustment of the image is still not correct, try Auto adjustment again. • If picture needs to the previous menu screen. 25 G Position Size Phase Reset Move RETURN Prev. After adjustment, if the image is still not correct, your TV is in RGB (PC...

User Manual
Page 28
... Config. Select the desired resolution. Select Screen. Select Resolution. EXTERNAL EQUIPMENT SETUP EXTERNAL EQUIPMENT SETUP Selecting Resolution To view a normal picture, match the resolution of RGB mode and selection of PC mode. ... x 768 1360 x 768 • Press the MENU button to return to normal TV viewing. • Press the RETURN button to move to the previous menu screen. 26
... Config. Select the desired resolution. Select Screen. Select Resolution. EXTERNAL EQUIPMENT SETUP EXTERNAL EQUIPMENT SETUP Selecting Resolution To view a normal picture, match the resolution of RGB mode and selection of PC mode. ... x 768 1360 x 768 • Press the MENU button to return to normal TV viewing. • Press the RETURN button to move to the previous menu screen. 26

User Manual
Page 29
.... D F G E • Press the MENU button to return to normal TV viewing. • Press the RETURN button to move to the previous menu screen. 27 EXTERNAL EQUIPMENT SETUP Adjustment for screen Position, Size, Phase If the picture is not clear after auto adjustment and especially if characters are still trembling, adjust the picture... OK E • Contrast 100 • Brightness 50 • Sharpness 70 • Colour 70 • Tint 0R G • Advanced Control • Picture Reset Select PICTURE. Select Screen.
.... D F G E • Press the MENU button to return to normal TV viewing. • Press the RETURN button to move to the previous menu screen. 27 EXTERNAL EQUIPMENT SETUP Adjustment for screen Position, Size, Phase If the picture is not clear after auto adjustment and especially if characters are still trembling, adjust the picture... OK E • Contrast 100 • Brightness 50 • Sharpness 70 • Colour 70 • Tint 0R G • Advanced Control • Picture Reset Select PICTURE. Select Screen.
User Manual
Page 30
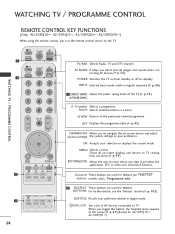
... PROGRAMME CONTROL REMOTE CONTROL KEY FUNCTIONS (Only 42/50PQ10**, 42/50PQ11**, 42/50PQ20**, 42/50PQ30**) When using the remote control, aim it at the screen.(G p.47)(Except for teletext. LIST Displays the programme table.(G p.45) THUMBSTICK Allows you select and set images and sounds when con- AV MODE It ...helps you to navigate the on -screen displays and returns to TV viewing from standby or off to TV. Clears all on -screen menus and adjust (Up/Down/Left/Right) the system settings to the previously viewed programme.
... PROGRAMME CONTROL REMOTE CONTROL KEY FUNCTIONS (Only 42/50PQ10**, 42/50PQ11**, 42/50PQ20**, 42/50PQ30**) When using the remote control, aim it at the screen.(G p.47)(Except for teletext. LIST Displays the programme table.(G p.45) THUMBSTICK Allows you select and set images and sounds when con- AV MODE It ...helps you to navigate the on -screen displays and returns to TV viewing from standby or off to TV. Clears all on -screen menus and adjust (Up/Down/Left/Right) the system settings to the previously viewed programme.

User Manual
Page 31
...(Photo List and Music USB Menu List or Movie List(Only 42/50PQ60**, 50PS60**)). I Close cover. UP/DOWN PAGE Move from one full set of screen information to the next UP/DOWN one. Do not mix old or used batteries with -). I Open the battery compartment cover on or off. WATCHING TV... new ones. MENU Select the desired quick menu source. (Aspect Ratio, Picture Mode, Sound Mode, Audio, Sleep Timer, USB Eject.)(G p.33) INFO i Shows the present screen information. GUIDE Shows programme schedule.(G p.67) FAV Displays the selected favourite programme.
...(Photo List and Music USB Menu List or Movie List(Only 42/50PQ60**, 50PS60**)). I Close cover. UP/DOWN PAGE Move from one full set of screen information to the next UP/DOWN one. Do not mix old or used batteries with -). I Open the battery compartment cover on or off. WATCHING TV... new ones. MENU Select the desired quick menu source. (Aspect Ratio, Picture Mode, Sound Mode, Audio, Sleep Timer, USB Eject.)(G p.33) INFO i Shows the present screen information. GUIDE Shows programme schedule.(G p.67) FAV Displays the selected favourite programme.

User Manual
Page 32
...interaction function. INPUT External input mode rotate in regular sequence.(G p.46) TV/RAD Selects Radio, TV and DTV channel. INFO i Shows the present screen information. MENU Select the desired quick menu source. (Aspect Ratio, Picture Mode, Sound Mode, Audio, Sleep Timer, USB Eject.)(G p.33) MENU ...Selects a menu. Q. When you to navigate the on-screen menus and adjust (Up/Down/Left/ Right) the system settings to standby. Clears all on TELETEXT buttons models only) , Programme edit. 1 TELETEXT...
...interaction function. INPUT External input mode rotate in regular sequence.(G p.46) TV/RAD Selects Radio, TV and DTV channel. INFO i Shows the present screen information. MENU Select the desired quick menu source. (Aspect Ratio, Picture Mode, Sound Mode, Audio, Sleep Timer, USB Eject.)(G p.33) MENU ...Selects a menu. Q. When you to navigate the on-screen menus and adjust (Up/Down/Left/ Right) the system settings to standby. Clears all on TELETEXT buttons models only) , Programme edit. 1 TELETEXT...

User Manual
Page 33
... batteries matching correct polarity (+with +,-with new ones. LIST Displays the programme table.(G p.45) Q.VIEW Returns to the next UP/DOWN one full set of screen information to the previously viewed programme. FAV Displays the selected favourite programme. Do not mix old or used batteries with -).
... batteries matching correct polarity (+with +,-with new ones. LIST Displays the programme table.(G p.45) Q.VIEW Returns to the next UP/DOWN one full set of screen information to the previously viewed programme. FAV Displays the selected favourite programme. Do not mix old or used batteries with -).
User Manual
Page 34
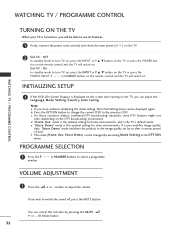
...Press the RETURN button to change the current OSD to adjust the volume. c. INITIALIZING SETUP 1 If the OSD (On Screen Display) is the optimal setting for store environments. For those countries without completing the initial setting, the Initial Setting menu can...control and the TV will switch on the DTV broadcasting environment. f. PROGRAMME SELECTION 1 Press the P number. d "Home Use" mode is displayed on the screen after a certain period of time. The mode (Home Use, Store Demo) can adjust the Language, Mode Setting, Country, Auto tuning. WATCHING TV / PROGRAMME...
...Press the RETURN button to change the current OSD to adjust the volume. c. INITIALIZING SETUP 1 If the OSD (On Screen Display) is the optimal setting for store environments. For those countries without completing the initial setting, the Initial Setting menu can...control and the TV will switch on the DTV broadcasting environment. f. PROGRAMME SELECTION 1 Press the P number. d "Home Use" mode is displayed on the screen after a certain period of time. The mode (Home Use, Store Demo) can adjust the Language, Mode Setting, Country, Auto tuning. WATCHING TV / PROGRAMME...

User Manual
Page 35
.... • Audio : Selects the sound output. • Sleep Timer : Sets the sleep timer. • USB Eject : Selects "USB Eject" in order to the previous menu screen. 33 For Zoom Setting, select 14:9, Zoom and Cinema Zoom in this manual. WATCHING TV / PROGRAMME CONTROL QUICK MENU Your TV's OSD (On... Screen Display) may differ slightly from that shown in Ratio Menu. Q.Menu (Quick Menu) is a menu of features which it deems the best for 42/50PQ10**, ...
.... • Audio : Selects the sound output. • Sleep Timer : Sets the sleep timer. • USB Eject : Selects "USB Eject" in order to the previous menu screen. 33 For Zoom Setting, select 14:9, Zoom and Cinema Zoom in this manual. WATCHING TV / PROGRAMME CONTROL QUICK MENU Your TV's OSD (On... Screen Display) may differ slightly from that shown in Ratio Menu. Q.Menu (Quick Menu) is a menu of features which it deems the best for 42/50PQ10**, ...
User Manual
Page 36
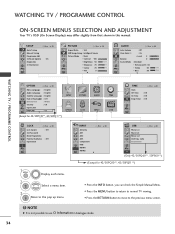
... Input Block : Off : Off 1 MENU Display each menu. 2 OK Select a menu item. 3 OK Move to the previous menu screen. ! WATCHING TV / PROGRAMME CONTROL ON-SCREEN MENUS SELECTION AND ADJUSTMENT Your TV's OSD (On Screen Display) may differ slightly from that shown in Analogue mode. 34 Balance 0L Sound Mode : Standard • SRS TruSurround...
... Input Block : Off : Off 1 MENU Display each menu. 2 OK Select a menu item. 3 OK Move to the previous menu screen. ! WATCHING TV / PROGRAMME CONTROL ON-SCREEN MENUS SELECTION AND ADJUSTMENT Your TV's OSD (On Screen Display) may differ slightly from that shown in Analogue mode. 34 Balance 0L Sound Mode : Standard • SRS TruSurround...


