Owner's Manual (English)
Page 6
... SIMPLINK 48 USB Entry Modes 50 Photo List 51 Music List 55 PICTURE CONTROL Picture Size (Aspect Ratio) Control 58 Energy Saving 60 Preset Picture Settings(Picture Mode 61 Manual Picture Adjustment - User Mode 62 Picture Improvement Technology 63 Expert Picture Control 64 Picture Reset 66 Image Sticking Minimization ...21 Other A/V Source Setup 23 Audio Out Connection 23 USB Connection 24 PC Setup 25 WATCHING TV / CHANNEL CONTROL Remote Control Functions 30 Turning On TV 34 Channel Selection 34 Volume Adjustment 34 Initial Setting 35 On-Screen Menus Selection 36 Quick ...
... SIMPLINK 48 USB Entry Modes 50 Photo List 51 Music List 55 PICTURE CONTROL Picture Size (Aspect Ratio) Control 58 Energy Saving 60 Preset Picture Settings(Picture Mode 61 Manual Picture Adjustment - User Mode 62 Picture Improvement Technology 63 Expert Picture Control 64 Picture Reset 66 Image Sticking Minimization ...21 Other A/V Source Setup 23 Audio Out Connection 23 USB Connection 24 PC Setup 25 WATCHING TV / CHANNEL CONTROL Remote Control Functions 30 Turning On TV 34 Channel Selection 34 Volume Adjustment 34 Initial Setting 35 On-Screen Menus Selection 36 Quick ...
Owner's Manual (English)
Page 11
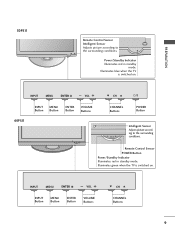
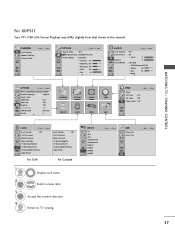
... CH VOL 60PS11 INPUT MENU Button Button ENTER Button VOLUME Buttons CH CHANNEL Buttons POWER Button Intelligent Sensor Adjusts picture according to the surrounding conditions. VOL CH ENTER INPUTVOL MEINNUPUT ENTERMECNHU VOELNTER CH VOL INPUT Button MENU Button ENTER... Illuminates blue when the TV is switched on . ENTER Remote Control Sensor POWER Button Power/Standby Indicator Illuminates red in standby mode. Illuminates green when the TV is switched on . PREPARATION 50PS11 Remote Control Sensor Intelligent Sensor Adjusts picture according to the surrounding ...
... CH VOL 60PS11 INPUT MENU Button Button ENTER Button VOLUME Buttons CH CHANNEL Buttons POWER Button Intelligent Sensor Adjusts picture according to the surrounding conditions. VOL CH ENTER INPUTVOL MEINNUPUT ENTERMECNHU VOELNTER CH VOL INPUT Button MENU Button ENTER... Illuminates blue when the TV is switched on . ENTER Remote Control Sensor POWER Button Power/Standby Indicator Illuminates red in standby mode. Illuminates green when the TV is switched on . PREPARATION 50PS11 Remote Control Sensor Intelligent Sensor Adjusts picture according to the surrounding ...
Owner's Manual (English)
Page 16
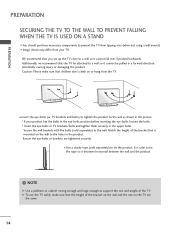
...large enough to a wall so it cannot fall over (when not using a wall mount). Match the height of the bracket that the height of the TV. I Image shown may differ from tipping over if pushed backwards. Caution: Please make sure that is safer to the wall. Ensure the eye-bolts or... are the same. 14 I Use a sturdy rope (sold separately) to tie the rope so it cannot be attached to the wall as shown in the picture. * If your TV. It is mounted on the TV are tightened securely. Secure the wall brackets with the bolts (sold separately) to the holes in the product.
...large enough to a wall so it cannot fall over (when not using a wall mount). Match the height of the bracket that the height of the TV. I Image shown may differ from tipping over if pushed backwards. Caution: Please make sure that is safer to the wall. Ensure the eye-bolts or... are the same. 14 I Use a sturdy rope (sold separately) to tie the rope so it cannot be attached to the wall as shown in the picture. * If your TV. It is mounted on the TV are tightened securely. Secure the wall brackets with the bolts (sold separately) to the holes in the product.
Owner's Manual (English)
Page 17
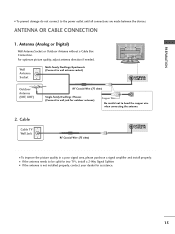
...Wall Antenna Socket or Outdoor Antenna without a Cable Box Connection. I To improve the picture quality in a poor signal area, please purchase a signal amplifier and install properly. ANTENNA OR CABLE CONNECTION 1. Cable Cable TV Wall Jack RF Coaxial Wire (75 ohm) ANTENNA/ CABLE IN I If the ...antenna is not installed properly, contact your dealer for two TV's, install a 2-Way Signal Splitter. R PREPARATION I If the antenna needs ...
...Wall Antenna Socket or Outdoor Antenna without a Cable Box Connection. I To improve the picture quality in a poor signal area, please purchase a signal amplifier and install properly. ANTENNA OR CABLE CONNECTION 1. Cable Cable TV Wall Jack RF Coaxial Wire (75 ohm) ANTENNA/ CABLE IN I If the ...antenna is not installed properly, contact your dealer for two TV's, install a 2-Way Signal Splitter. R PREPARATION I If the antenna needs ...
Owner's Manual (English)
Page 21
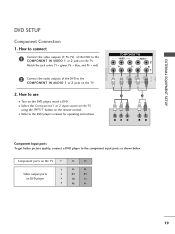
...the DVD to the component input ports as shown below. I Refer to use I Select the Component1 or 2 input source on the TV using the INPUT button on the TV. EXTERNAL EQUIPMENT SETUP AV IN USB SERVICE ONLY DVD SETUP Component Connection 1. COMPONENT IN VIDEO AUDIO 2 L R 1 VIDEO (MONO...) AUDIO 1 2 Y PB PR L R Component Input ports To get better picture quality, connect a DVD player to the COMPONENT IN AUDIO 1 ...
...the DVD to the component input ports as shown below. I Refer to use I Select the Component1 or 2 input source on the TV using the INPUT button on the TV. EXTERNAL EQUIPMENT SETUP AV IN USB SERVICE ONLY DVD SETUP Component Connection 1. COMPONENT IN VIDEO AUDIO 2 L R 1 VIDEO (MONO...) AUDIO 1 2 Y PB PR L R Component Input ports To get better picture quality, connect a DVD player to the COMPONENT IN AUDIO 1 ...
Owner's Manual (English)
Page 28
...another resolution, change the refresh rate to be noise associated with the resolution, vertical pattern, contrast or brightness. G Depending on the PICTURE menu until the picture is present, change the PC output to another rate or adjust the brightness and contrast on the graphics card, DOS mode may ...be positioned on the screen properly. 26 NOTES G 60PS11: To get the the best picture quality, adjust the PC graphics card to DVI Cable is separate. The fixed image could become permanently imprinted on the screen for Horizontal and...
...another resolution, change the refresh rate to be noise associated with the resolution, vertical pattern, contrast or brightness. G Depending on the PICTURE menu until the picture is present, change the PC output to another rate or adjust the brightness and contrast on the graphics card, DOS mode may ...be positioned on the screen properly. 26 NOTES G 60PS11: To get the the best picture quality, adjust the PC graphics card to DVI Cable is separate. The fixed image could become permanently imprinted on the screen for Horizontal and...
Owner's Manual (English)
Page 29
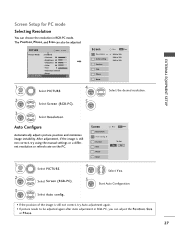
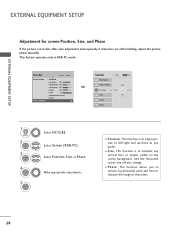
The Position, Phase, and Size can adjust the Position, S i z e or Phase. 27 PICTURE Move Enter E Picture Mode : Standard • Contrast 90 • Brightness 50 • Sharpness 60 • Color 60 • Tint 0R G • Advanced Control • Reset Screen (RGB-PC) ... • If the position of the image is still not correct, try Auto adjustment again. • If picture needs to be adjusted. Auto Configure Automatically adjusts picture position and minimizes image instability. After adjustment, if the image is still not correct, try using the manual settings...
The Position, Phase, and Size can adjust the Position, S i z e or Phase. 27 PICTURE Move Enter E Picture Mode : Standard • Contrast 90 • Brightness 50 • Sharpness 60 • Color 60 • Tint 0R G • Advanced Control • Reset Screen (RGB-PC) ... • If the position of the image is still not correct, try Auto adjustment again. • If picture needs to be adjusted. Auto Configure Automatically adjusts picture position and minimizes image instability. After adjustment, if the image is still not correct, try using the manual settings...
Owner's Manual (English)
Page 30
Select Screen (RGB-PC). And the horizontal screen size will also change. Position G Size Phase Reset Move MENU Prev. PICTURE Move Enter E Picture Mode : Standard • Contrast 90 • Brightness 50 • Sharpness 60 • Color 60 • Tint 0R G • Advanced Control • Reset Screen (RGB-PC) Screen Resolution Auto config. D F G E 1 MENU 2 ENTER...
Select Screen (RGB-PC). And the horizontal screen size will also change. Position G Size Phase Reset Move MENU Prev. PICTURE Move Enter E Picture Mode : Standard • Contrast 90 • Brightness 50 • Sharpness 60 • Color 60 • Tint 0R G • Advanced Control • Reset Screen (RGB-PC) Screen Resolution Auto config. D F G E 1 MENU 2 ENTER...
Owner's Manual (English)
Page 31
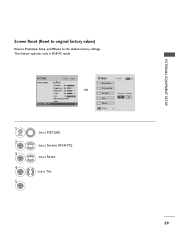
... : Standard • Contrast 90 • Brightness 50 • Sharpness 60 • Color 60 • Tint 0R G • Advanced Control • Reset Screen (RGB-PC) 1 MENU 2 ENTER 3 ENTER 4 ENTER 5 ENTER Select PICTURE. Select Y e s. Yes No Phase Reset G 29 EXTERNAL EQUIPMENT SETUP Screen Reset (Reset to original factory values) Returns Position, S i z e, and Phase to...
... : Standard • Contrast 90 • Brightness 50 • Sharpness 60 • Color 60 • Tint 0R G • Advanced Control • Reset Screen (RGB-PC) 1 MENU 2 ENTER 3 ENTER 4 ENTER 5 ENTER Select PICTURE. Select Y e s. Yes No Phase Reset G 29 EXTERNAL EQUIPMENT SETUP Screen Reset (Reset to original factory values) Returns Position, S i z e, and Phase to...
Owner's Manual (English)
Page 37
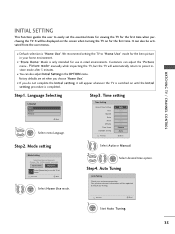
... Use] to preset instore mode after 5 minutes. I "Store Demo" Mode is completed. Picture mode" manually while inspecting the TV, but the TV will be displayed on the screen when turning the TV on until the Initial setting procedure is only intended for the first time. Time setting Time ...return to use in retail environments. We recommend setting the TV to "Home Use" mode for the first time when purchasing the TV. Factory defaults are set the essential items for viewing the TV for the best picture in your antenna connection. The previous channel information will appear ...
... Use] to preset instore mode after 5 minutes. I "Store Demo" Mode is completed. Picture mode" manually while inspecting the TV, but the TV will be displayed on the screen when turning the TV on until the Initial setting procedure is only intended for the first time. Time setting Time ...return to use in retail environments. We recommend setting the TV to "Home Use" mode for the first time when purchasing the TV. Factory defaults are set the essential items for viewing the TV for the best picture in your antenna connection. The previous channel information will appear ...
Owner's Manual (English)
Page 38
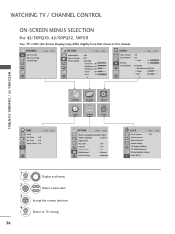
... R Sound Mode : Standard • SRS TruSurround XT:Off • Treble 50 • Bass 50 E WATCHING TV / CHANNEL CONTROL TIME Clock Off Time : Off On Time : Off Sleep Timer : Off Move Enter CHANNEL PICTURE AUDIO TIME OPTION LOCK OPTION Move Enter Menu Language(Language): English Audio Language :... Off ISM Method : Normal Initial Setting : Home Use 1 MENU 2 ENTER Display each menu. WATCHING TV / CHANNEL CONTROL ON-SCREEN MENUS SELECTION For 42/50PQ10, 42/50PQ12, 50PS11 Your TV's OSD (On Screen Display) may differ slightly from that shown in this manual. Return to...
... R Sound Mode : Standard • SRS TruSurround XT:Off • Treble 50 • Bass 50 E WATCHING TV / CHANNEL CONTROL TIME Clock Off Time : Off On Time : Off Sleep Timer : Off Move Enter CHANNEL PICTURE AUDIO TIME OPTION LOCK OPTION Move Enter Menu Language(Language): English Audio Language :... Off ISM Method : Normal Initial Setting : Home Use 1 MENU 2 ENTER Display each menu. WATCHING TV / CHANNEL CONTROL ON-SCREEN MENUS SELECTION For 42/50PQ10, 42/50PQ12, 50PS11 Your TV's OSD (On Screen Display) may differ slightly from that shown in this manual. Return to...
Owner's Manual (English)
Page 39
... • SRS TruSurround XT:Off • Treble 50 • Bass 50 • Reset E WATCHING TV / CHANNEL CONTROL OPTION Move Enter Menu Language(Language): English Audio Language : English Input Label SIMPLINK : On Key Lock : Off Caption : Off Demo Mode : Off ISM Method : Normal Set ID : 1 E CHANNEL PICTURE AUDIO TIME OPTION LOCK INPUT USB TIME Clock...
... • SRS TruSurround XT:Off • Treble 50 • Bass 50 • Reset E WATCHING TV / CHANNEL CONTROL OPTION Move Enter Menu Language(Language): English Audio Language : English Input Label SIMPLINK : On Key Lock : Off Caption : Off Demo Mode : Off ISM Method : Normal Set ID : 1 E CHANNEL PICTURE AUDIO TIME OPTION LOCK INPUT USB TIME Clock...

Owner's Manual (English)
Page 40
... List. SAP: Selects MTS sound (Analog signal). I Aspect Ratio: Selects your TV turns off . MENU 2 Display each menu. I Multi Audio: Changes the audio language (Digital signal). Q.Menu Aspect Ratio Picture Mode Sound Mode Caption Multi Audio Sleep Timer CH Del/Add/Fav Eject USB ...Select the amount of features which users might use frequently. WATCHING TV / CHANNEL CONTROL WATCHING TV / CHANNEL CONTROL QUICK MENU Your TV's OSD (On Screen Display) may differ slightly from what is a menu of time before your desired picture format. I Eject USB: Select "Eject" in this manual....
... List. SAP: Selects MTS sound (Analog signal). I Aspect Ratio: Selects your TV turns off . MENU 2 Display each menu. I Multi Audio: Changes the audio language (Digital signal). Q.Menu Aspect Ratio Picture Mode Sound Mode Caption Multi Audio Sleep Timer CH Del/Add/Fav Eject USB ...Select the amount of features which users might use frequently. WATCHING TV / CHANNEL CONTROL WATCHING TV / CHANNEL CONTROL QUICK MENU Your TV's OSD (On Screen Display) may differ slightly from what is a menu of time before your desired picture format. I Eject USB: Select "Eject" in this manual....
Owner's Manual (English)
Page 45
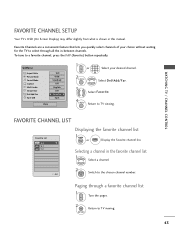
... through a favorite channel list 1 P A CH G E Turn the pages. 2 RETURN Return to select through all the in-between channels. Q.Menu Aspect Ratio Picture Mode Sound Mode Caption Multi Audio Sleep Timer CH Del/Add/Fav Eject USB 16:9 Vivid Standard Off English Off F Favorite G Eject Close 1 P A CH ...G E or 123 456 789 0 Select your choice without waiting for the TV to TV viewing. 43 Selecting a channel in this manual. MENU Return to the chosen channel number. To tune to a favorite channel, press the FAV (Favorite) ...
... through a favorite channel list 1 P A CH G E Turn the pages. 2 RETURN Return to select through all the in-between channels. Q.Menu Aspect Ratio Picture Mode Sound Mode Caption Multi Audio Sleep Timer CH Del/Add/Fav Eject USB 16:9 Vivid Standard Off English Off F Favorite G Eject Close 1 P A CH ...G E or 123 456 789 0 Select your choice without waiting for the TV to TV viewing. 43 Selecting a channel in this manual. MENU Return to the chosen channel number. To tune to a favorite channel, press the FAV (Favorite) ...

Owner's Manual (English)
Page 49
... I O f f: Disables the AV MODE. I If you select "O f f" in AV mode, Cinema will be selected both for watching sports events. Picture Mode" and "AUDIO menu - Off Cinema Game Sport 1AV MODE Press the AV MODE button repeatedly to select the desired source. 2 ENTER I If you ...select "Cinema" in AV mode, the "Picture Mode" and "Sound Mode" return to previous selected value. I Sport: Optimizes video and audio for "PICTURE menu - WATCHING TV / CHANNEL CONTROL AV MODE AV Mode toggles through preset Video and Audio settings.
... I O f f: Disables the AV MODE. I If you select "O f f" in AV mode, Cinema will be selected both for watching sports events. Picture Mode" and "AUDIO menu - Off Cinema Game Sport 1AV MODE Press the AV MODE button repeatedly to select the desired source. 2 ENTER I If you ...select "Cinema" in AV mode, the "Picture Mode" and "Sound Mode" return to previous selected value. I Sport: Optimizes video and audio for "PICTURE menu - WATCHING TV / CHANNEL CONTROL AV MODE AV Mode toggles through preset Video and Audio settings.
Owner's Manual (English)
Page 60
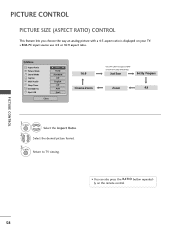
I You can also press the RATIO botton repeatedly on your TV. MENU 2 Select the Aspect Ratio. PICTURE CONTROL PICTURE CONTROL PICTURE SIZE (ASPECT RATIO) CONTROL This feature lets you choose the way an analog picture with a 4:3 aspect ratio is displayed on the remote control. 58 I RGB-PC input source use 4:3 or 16:9... aspect ratio. Q.Menu Aspect Ratio Picture Mode Sound Mode Caption Multi Audio Sleep Timer CH Del/Add/Fav Eject USB F 16:9 G Vivid Standard Off English Off Add Eject Close...
I You can also press the RATIO botton repeatedly on your TV. MENU 2 Select the Aspect Ratio. PICTURE CONTROL PICTURE CONTROL PICTURE SIZE (ASPECT RATIO) CONTROL This feature lets you choose the way an analog picture with a 4:3 aspect ratio is displayed on the remote control. 58 I RGB-PC input source use 4:3 or 16:9... aspect ratio. Q.Menu Aspect Ratio Picture Mode Sound Mode Caption Multi Audio Sleep Timer CH Del/Add/Fav Eject USB F 16:9 G Vivid Standard Off English Off Add Eject Close...

Owner's Manual (English)
Page 61
... correct proportion. I The adjustment range is activated. Notes: If there is noise on the edges of the picture will be cropped. Set by program Selects the proper picture proportion to match the source's image. (4:3 4:3) (16:9 16:9) Cinema Zoom Choose Cinema Zoom when you want... to view a picture with an original 4:3 aspect ratio. Note: When enlarging or reducing the picture, the image may become distorted. Zoom Choose Zoom when you want to view the picture without any alteration. However, the top and bottom portions of...
... correct proportion. I The adjustment range is activated. Notes: If there is noise on the edges of the picture will be cropped. Set by program Selects the proper picture proportion to match the source's image. (4:3 4:3) (16:9 16:9) Cinema Zoom Choose Cinema Zoom when you want... to view a picture with an original 4:3 aspect ratio. Note: When enlarging or reducing the picture, the image may become distorted. Zoom Choose Zoom when you want to view the picture without any alteration. However, the top and bottom portions of...

Owner's Manual (English)
Page 62
...of screen to the most suitable picture according to the previous menu. MENU POWER SAVING PICTURE MODE Except 60PS11 PICTURE Aspect Ratio Power Saving Picture Mode Move : 16:9 : Off : Standard • Contrast 90 • Brightness 50 • Sharpness 60 •..., Medium or Maximum. This feature is adjusted to the comfortable level to TV viewing. PICTURE CONTROL Return to be viewed at home. I Intelligent Sensor? PICTURE CONTROL ENERGY SAVING For 60PS11 It reduces the TV's power consumption. The default factory setting complies with the Energy Star requirements and...
...of screen to the most suitable picture according to the previous menu. MENU POWER SAVING PICTURE MODE Except 60PS11 PICTURE Aspect Ratio Power Saving Picture Mode Move : 16:9 : Off : Standard • Contrast 90 • Brightness 50 • Sharpness 60 •..., Medium or Maximum. This feature is adjusted to the comfortable level to TV viewing. PICTURE CONTROL Return to be viewed at home. I Intelligent Sensor? PICTURE CONTROL ENERGY SAVING For 60PS11 It reduces the TV's power consumption. The default factory setting complies with the Energy Star requirements and...
Owner's Manual (English)
Page 63
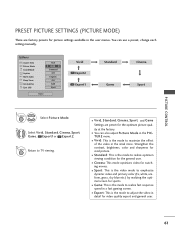
... each setting manually. I Standard: This is the mode to adjust the video in the user menus. PICTURE CONTROL PRESET PICTURE SETTINGS (PICTURE MODE) There are preset for the optimum picture qual- MENU Select Picture Mode. 2 Select Vivid, Standard, Cinema, Sport, Game, Expert1or Expert2. 3 Q. ity at the... factory. Strengthen the contrast, brightness, color and sharpness for watching movies. I Game: This is the mode to TV viewing. Q.Menu Aspect Ratio Picture Mode Sound Mode Caption Multi Audio Sleep Timer CH Del/Add/Fav Eject USB F 1166::99 G F VViivviidd G Standard Off...
... each setting manually. I Standard: This is the mode to adjust the video in the user menus. PICTURE CONTROL PRESET PICTURE SETTINGS (PICTURE MODE) There are preset for the optimum picture qual- MENU Select Picture Mode. 2 Select Vivid, Standard, Cinema, Sport, Game, Expert1or Expert2. 3 Q. ity at the... factory. Strengthen the contrast, brightness, color and sharpness for watching movies. I Game: This is the mode to TV viewing. Q.Menu Aspect Ratio Picture Mode Sound Mode Caption Multi Audio Sleep Timer CH Del/Add/Fav Eject USB F 1166::99 G F VViivviidd G Standard Off...
Owner's Manual (English)
Page 64
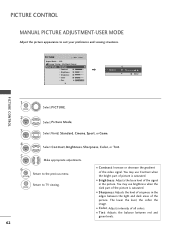
...-USER MODE Adjust the picture appearance to TV viewing. RETURN Return to suit your preference and viewing situations. I Color: Adjusts intensity of the picture is saturated. You may use brightness when the dark part of all colors. Select Vivid, Standard, ...areas of the video signal. I Contrast: Increase or decrease the gradient of the picture. Select Picture Mode. PICTURE Move Enter Aspect Ratio : 16:9 Energy Saving : Intelligent Sensor Picture Mode : Standard • Contrast 90 • Brightness 50 • Sharpness 60 • Color 60 • Tint 0R G E E...
...-USER MODE Adjust the picture appearance to TV viewing. RETURN Return to suit your preference and viewing situations. I Color: Adjusts intensity of the picture is saturated. You may use brightness when the dark part of all colors. Select Vivid, Standard, ...areas of the video signal. I Contrast: Increase or decrease the gradient of the picture. Select Picture Mode. PICTURE Move Enter Aspect Ratio : 16:9 Energy Saving : Intelligent Sensor Picture Mode : Standard • Contrast 90 • Brightness 50 • Sharpness 60 • Color 60 • Tint 0R G E E...


