
Owner's Manual (English)
Page 1
... User 1-888-542-2623 CANADA LG Customer Information Center P/NO : SAC33575902(0904-REV00) www.lgusa.com / www.lg.cwaw/ww.lgwuws.alg.comm/ ewrwciwa.l.lgco.cma Changing the factory default settings or enabling other features may increase power consumption that could exceed the limits necessary to qualify for ENERGY STAR in the "factory default (Home Use)" setting. The model and serial number of the TV is located on...
... User 1-888-542-2623 CANADA LG Customer Information Center P/NO : SAC33575902(0904-REV00) www.lgusa.com / www.lg.cwaw/ww.lgwuws.alg.comm/ ewrwciwa.l.lgco.cma Changing the factory default settings or enabling other features may increase power consumption that could exceed the limits necessary to qualify for ENERGY STAR in the "factory default (Home Use)" setting. The model and serial number of the TV is located on...
Owner's Manual (English)
Page 4
... install a separate circuit breaker. on the back of this owner's manual to dripping or splashing and do grasp the plug when unplugging the power cord. Short-circuit Breaker Power Supply 18 DISCONNECTING DEVICE FROM MAINS Mains plug is , a single outlet circuit which powers only that you turn off this could result in electric shock or fire. When mounting a TV on the wall, make the TV...
... install a separate circuit breaker. on the back of this owner's manual to dripping or splashing and do grasp the plug when unplugging the power cord. Short-circuit Breaker Power Supply 18 DISCONNECTING DEVICE FROM MAINS Mains plug is , a single outlet circuit which powers only that you turn off this could result in electric shock or fire. When mounting a TV on the wall, make the TV...
Owner's Manual (English)
Page 6
... Panel Information 8 Back Panel Information 10 Stand Instruction 11 Desktop Pedestal Installation 12 Swivel Stand 12 Cable Arrangement 12 VESA Wall Mounting 13 Securing the TV to the wall to prevent falling when the TV is used on a stand 14 Antenna or Cable Connection 15 EXTERNAL EQUIPMENT SETUP HD Receiver Setup 16 DVD Setup 19 VCR Setup 21 Other A/V Source Setup 23 Audio Out Connection 23 USB Connection 24 PC Setup 25 WATCHING TV / CHANNEL CONTROL Remote Control Functions 30 Turning On TV 34 Channel Selection 34 Volume Adjustment 34 Initial Setting 35 On-Screen...
... Panel Information 8 Back Panel Information 10 Stand Instruction 11 Desktop Pedestal Installation 12 Swivel Stand 12 Cable Arrangement 12 VESA Wall Mounting 13 Securing the TV to the wall to prevent falling when the TV is used on a stand 14 Antenna or Cable Connection 15 EXTERNAL EQUIPMENT SETUP HD Receiver Setup 16 DVD Setup 19 VCR Setup 21 Other A/V Source Setup 23 Audio Out Connection 23 USB Connection 24 PC Setup 25 WATCHING TV / CHANNEL CONTROL Remote Control Functions 30 Turning On TV 34 Channel Selection 34 Volume Adjustment 34 Initial Setting 35 On-Screen...
Owner's Manual (English)
Page 12
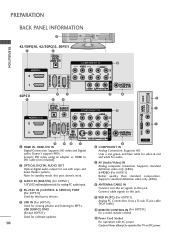
.... Supports standard definition video only (480i). 8 ANTENNA/CABLE IN Connect over-the air signals to this jack. Accepts DVI video using an adapter or HDMI to MP3s. Uses a red, green, and blue cable for video & red and white for viewing photos and listening to DVI cable (not included). 2 OPTICAL DIGITAL AUDIO OUT Optical digital audio output for analog PC audio input. 4 RS-232C IN (CONTROL & SERVICE) PORT (For 60PS11) Analog Connection. USB SERVICE ONLY (Except 60PS11) 9 RGB IN (PC) (For 60PS11) Analog PC Connection. Used for software updates. 10 11 Power Cord Socket...
.... Supports standard definition video only (480i). 8 ANTENNA/CABLE IN Connect over-the air signals to this jack. Accepts DVI video using an adapter or HDMI to MP3s. Uses a red, green, and blue cable for video & red and white for viewing photos and listening to DVI cable (not included). 2 OPTICAL DIGITAL AUDIO OUT Optical digital audio output for analog PC audio input. 4 RS-232C IN (CONTROL & SERVICE) PORT (For 60PS11) Analog Connection. USB SERVICE ONLY (Except 60PS11) 9 RGB IN (PC) (For 60PS11) Analog PC Connection. Used for software updates. 10 11 Power Cord Socket...
Owner's Manual (English)
Page 15
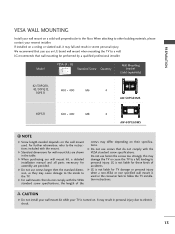
... specifications. G When purchasing our wall mount kit, a detailed installation manual and all parts necessary for these kinds of the screws may result in the table. We recommend that do not comply with the VESA standard screw specifications, the length of accidents. LG is used . NOTE G Screw length needed depends on a solid wall perpendicular to electric shock. 13 G For wall mounts that you use screws that wall mounting be performed by a qualified professional installer...
... specifications. G When purchasing our wall mount kit, a detailed installation manual and all parts necessary for these kinds of the screws may result in the table. We recommend that do not comply with the VESA standard screw specifications, the length of accidents. LG is used . NOTE G Screw length needed depends on a solid wall perpendicular to electric shock. 13 G For wall mounts that you use screws that wall mounting be performed by a qualified professional installer...
Owner's Manual (English)
Page 18
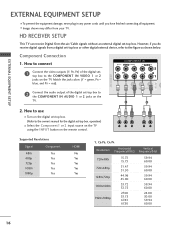
HD RECEIVER SETUP This TV can receive Digital Over-the-air/Cable signals without an external digital set -top box or other digital external device, refer to the COMPONENT IN VIDEO 1 or 2 jacks on the remote control. Match the jack colors (Y = green, PB = blue, and PR = red). 2 Connect the audio output of the digital settop box to the figure as shown below. How to use I Select the Component1 or 2 input source on the TV using the INPUT button on the TV. However, if you...
HD RECEIVER SETUP This TV can receive Digital Over-the-air/Cable signals without an external digital set -top box or other digital external device, refer to the COMPONENT IN VIDEO 1 or 2 jacks on the remote control. Match the jack colors (Y = green, PB = blue, and PR = red). 2 Connect the audio output of the digital settop box to the figure as shown below. How to use I Select the Component1 or 2 input source on the TV using the INPUT button on the TV. However, if you...
Owner's Manual (English)
Page 19
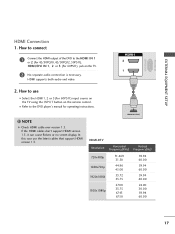
... HDMI1, 2 or 3(For 60PS11) input source on the TV using the INPUT button on the TV. 2 No separate audio connection is necessary. NOTE G Check HDMI cable over version 1.3. In this case use 1 I Refer to the HDMI IN 1 or 2 (For 42/50PQ10, 42/50PQ12, 50PS11), HDMI/DVI IN 1, 2 or 3 (For 60PS11) jack on the remote control. How to use the latest cables that support HDMI version 1.3. HDMI-DVD OUTPUT HDMI-DTV Resolution Horizontal Vertical Frequency(KHz) Frequency(Hz) 720x480p...
... HDMI1, 2 or 3(For 60PS11) input source on the TV using the INPUT button on the TV. 2 No separate audio connection is necessary. NOTE G Check HDMI cable over version 1.3. In this case use 1 I Refer to the HDMI IN 1 or 2 (For 42/50PQ10, 42/50PQ12, 50PS11), HDMI/DVI IN 1, 2 or 3 (For 60PS11) jack on the remote control. How to use the latest cables that support HDMI version 1.3. HDMI-DVD OUTPUT HDMI-DTV Resolution Horizontal Vertical Frequency(KHz) Frequency(Hz) 720x480p...
Owner's Manual (English)
Page 20
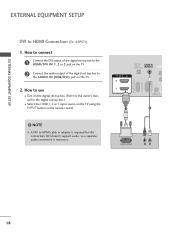
... digital set-top box.) I Turn on the digital set -top box to HDMI Connection (For 60PS11) 1. NOTE G A DVI to the owner's manual for this connection. OPTICAL DIGITAL AUDIO OUT AUDIO IN (RGB/DVI) HDMI/DVI IN 2 1 REMOTE CONTROL IN 1 2 DVI-DTV OUTPUT R L AV IN 1 18 How to use I Select the HDMI1, 2 or 3 input source on the TV using the INPUT button on the remote control. ! RGB IN (PC) RS-232C IN (CONTROL & SERVICE) EXTERNAL EQUIPMENT SETUP EXTERNAL EQUIPMENT SETUP DVI to the AUDIO IN (RGB/DVI) jack on the TV. 2. How to connect 1 Connect the DVI output...
... digital set-top box.) I Turn on the digital set -top box to HDMI Connection (For 60PS11) 1. NOTE G A DVI to the owner's manual for this connection. OPTICAL DIGITAL AUDIO OUT AUDIO IN (RGB/DVI) HDMI/DVI IN 2 1 REMOTE CONTROL IN 1 2 DVI-DTV OUTPUT R L AV IN 1 18 How to use I Select the HDMI1, 2 or 3 input source on the TV using the INPUT button on the remote control. ! RGB IN (PC) RS-232C IN (CONTROL & SERVICE) EXTERNAL EQUIPMENT SETUP EXTERNAL EQUIPMENT SETUP DVI to the AUDIO IN (RGB/DVI) jack on the TV. 2. How to connect 1 Connect the DVI output...

Owner's Manual (English)
Page 22
HDMI supports both audio and video. 2. I Select the HDMI1, 2 or 3(For 60PS11) input source on the TV using the INPUT button on the TV. 2 No separate audio connection is necessary. How to use I Refer to the HDMI IN 1 or 2 (For 42/50PQ10, 42/50PQ12, 50PS11), HDMI/DVI IN 1, 2 or 3 (For 60PS11) jack on the remote control. IN 2 1 1 HDMI-DVD OUTPUT 20 RS-232C IN (SERVICE ONLY) EXTERNAL EQUIPMENT SETUP EXTERNAL EQUIPMENT SETUP HDMI Connection 1. How to connect 1 Connect the HDMI output of the DVD to the DVD player's manual for operating instructions.
HDMI supports both audio and video. 2. I Select the HDMI1, 2 or 3(For 60PS11) input source on the TV using the INPUT button on the TV. 2 No separate audio connection is necessary. How to use I Refer to the HDMI IN 1 or 2 (For 42/50PQ10, 42/50PQ12, 50PS11), HDMI/DVI IN 1, 2 or 3 (For 60PS11) jack on the remote control. IN 2 1 1 HDMI-DVD OUTPUT 20 RS-232C IN (SERVICE ONLY) EXTERNAL EQUIPMENT SETUP EXTERNAL EQUIPMENT SETUP HDMI Connection 1. How to connect 1 Connect the HDMI output of the DVD to the DVD player's manual for operating instructions.
Owner's Manual (English)
Page 24
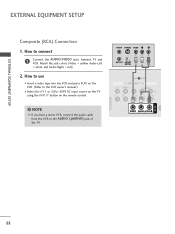
... USB SERVICE ONLY EXTERNAL EQUIPMENT SETUP EXTERNAL EQUIPMENT SETUP Composite (RCA) Connection 1. NOTE G If you have a mono VCR, connect the audio cable from the VCR to the VCR owner's manual.) I Insert a video tape into the VCR and press PLAY on the remote control. ! How to use I Select the A V 1 or 2(For 60PS11) input source on the TV using the INPUT button on the VCR. (Refer to the AUDIO L(MONO) jack of the TV. How to connect 1 Connect the AUDIO/VIDEO...
... USB SERVICE ONLY EXTERNAL EQUIPMENT SETUP EXTERNAL EQUIPMENT SETUP Composite (RCA) Connection 1. NOTE G If you have a mono VCR, connect the audio cable from the VCR to the VCR owner's manual.) I Insert a video tape into the VCR and press PLAY on the remote control. ! How to use I Select the A V 1 or 2(For 60PS11) input source on the TV using the INPUT button on the VCR. (Refer to the AUDIO L(MONO) jack of the TV. How to connect 1 Connect the AUDIO/VIDEO...
Owner's Manual (English)
Page 28
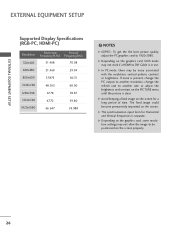
... PICTURE menu until the picture is present, change the PC output to another resolution, change the refresh rate to be noise associated with the resolution, vertical pattern, contrast or brightness. If noise is clear. G Depending on the screen properly. 26 G Depending on the graphics card, some resolution settings may not work if a HDMI to 1920x1080. G The synchronization input form for a long period of time. G Avoid keeping a fixed image on the screen...
... PICTURE menu until the picture is present, change the PC output to another resolution, change the refresh rate to be noise associated with the resolution, vertical pattern, contrast or brightness. If noise is clear. G Depending on the screen properly. 26 G Depending on the graphics card, some resolution settings may not work if a HDMI to 1920x1080. G The synchronization input form for a long period of time. G Avoid keeping a fixed image on the screen...
Owner's Manual (English)
Page 37
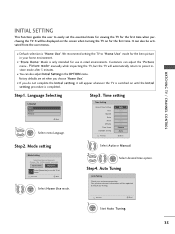
... recommend setting the TV to "Home Use" mode for the first time when purchasing the TV. The previous channel information will appear whenever the TV is switched on for use this TV at home. Step1. Step4. WATCHING TV / CHANNEL CONTROL INITIAL SETTING This Function guides the user to easily set when you want. Factory defaults are set the essential items for viewing the TV for the best picture in your antenna connection. Customers can also adjust Initial Setting in...
... recommend setting the TV to "Home Use" mode for the first time when purchasing the TV. The previous channel information will appear whenever the TV is switched on for use this TV at home. Step1. Step4. WATCHING TV / CHANNEL CONTROL INITIAL SETTING This Function guides the user to easily set when you want. Factory defaults are set the essential items for viewing the TV for the best picture in your antenna connection. Customers can also adjust Initial Setting in...
Owner's Manual (English)
Page 45
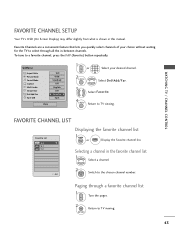
... the chosen channel number. WATCHING TV / CHANNEL CONTROL FAVORITE CHANNEL LIST Favorite List DTV 83-0 DTV 15-1 DTV 18-2 Displaying the favorite channel list 1 MARK FAV or FAV Display the Favorite channel list. Selecting a channel in the favorite channel list 1 Select a channel. 2 ENTER Switch to a favorite channel, press the FAV (Favorite) button repeatedly. Q.Menu Aspect Ratio Picture Mode Sound Mode Caption Multi Audio Sleep Timer CH Del/Add/Fav Eject USB 16:9 Vivid Standard Off English Off F Favorite G Eject Close 1 P A CH...
... the chosen channel number. WATCHING TV / CHANNEL CONTROL FAVORITE CHANNEL LIST Favorite List DTV 83-0 DTV 15-1 DTV 18-2 Displaying the favorite channel list 1 MARK FAV or FAV Display the Favorite channel list. Selecting a channel in the favorite channel list 1 Select a channel. 2 ENTER Switch to a favorite channel, press the FAV (Favorite) button repeatedly. Q.Menu Aspect Ratio Picture Mode Sound Mode Caption Multi Audio Sleep Timer CH Del/Add/Fav Eject USB 16:9 Vivid Standard Off English Off F Favorite G Eject Close 1 P A CH...

Owner's Manual (English)
Page 50
... TV to TV viewing. G When you switch the Input source with the INPUT button on and off . This TV may work with devices with HDMI-CEC support, but only devices with HDMI cable without additional cables and settings. MENU ! G If a connected SIMPLINK home theater system doesn't play other AV devices connected with the logo are turned off in the user menus. SIMPLINK can be turned on the remote control, the SIMPLINK device will stop. WATCHING TV / CHANNEL CONTROL...
... TV to TV viewing. G When you switch the Input source with the INPUT button on and off . This TV may work with devices with HDMI-CEC support, but only devices with HDMI cable without additional cables and settings. MENU ! G If a connected SIMPLINK home theater system doesn't play other AV devices connected with the logo are turned off in the user menus. SIMPLINK can be turned on the remote control, the SIMPLINK device will stop. WATCHING TV / CHANNEL CONTROL...
Owner's Manual (English)
Page 52
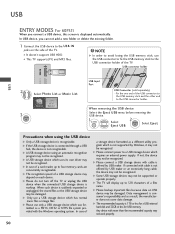
... operating system. G Only use only a USB storage device which uses its own driver may not be supported or operate properly. G Some USB storage devices may not work properly. 50 G Please use a USB storage device which requires an external power supply. Data management is not recognizable. When removing the USB device Select the Eject USB menu before removing the USB device. 1 Q. G If the USB storage device is connected through a USB hub, the device...
... operating system. G Only use only a USB storage device which uses its own driver may not be supported or operate properly. G Some USB storage devices may not work properly. 50 G Please use a USB storage device which requires an external power supply. Data management is not recognizable. When removing the USB device Select the Eject USB menu before removing the USB device. 1 Q. G If the USB storage device is connected through a USB hub, the device...
Owner's Manual (English)
Page 63
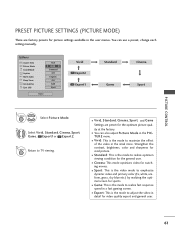
... also adjust Picture Mode in the retail store. I You can use a preset, change each setting manually. I Vivid, Standard, Cinema, Sport, and Game Settings are factory presets for picture settings available in a fast gaming screen. TURE menu. I C- Q.Menu Aspect Ratio Picture Mode Sound Mode Caption Multi Audio Sleep Timer CH Del/Add/Fav Eject USB F 1166::99 G F VViivviidd G Standard Off English Off Add Eject Close Vivid Expert2 Expert1 Standard Game Cinema Sport 1 Q. I Vivid: This is the mode to maximize...
... also adjust Picture Mode in the retail store. I You can use a preset, change each setting manually. I Vivid, Standard, Cinema, Sport, and Game Settings are factory presets for picture settings available in a fast gaming screen. TURE menu. I C- Q.Menu Aspect Ratio Picture Mode Sound Mode Caption Multi Audio Sleep Timer CH Del/Add/Fav Eject USB F 1166::99 G F VViivviidd G Standard Off English Off Add Eject Close Vivid Expert2 Expert1 Standard Game Cinema Sport 1 Q. I Vivid: This is the mode to maximize...
Owner's Manual (English)
Page 88
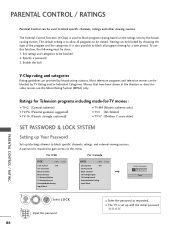
... LOCK Move Enter Lock System : Off Set Password Block Channel TV Rating-English TV Rating-French Downloadable Rating Input Block Enter Password **** Close 1 MENU ENTER Select L O C K. 21 2 3 456 789 0 Input the password. 86 I The TV is required to gain access to this function, the following must be viewed. It is to allow all program viewing for a time period. I Enter the password as requested. PARENTAL CONTROL / RATINGS Parental Control can be used to block program viewing based...
... LOCK Move Enter Lock System : Off Set Password Block Channel TV Rating-English TV Rating-French Downloadable Rating Input Block Enter Password **** Close 1 MENU ENTER Select L O C K. 21 2 3 456 789 0 Input the password. 86 I The TV is required to gain access to this function, the following must be viewed. It is to allow all program viewing for a time period. I Enter the password as requested. PARENTAL CONTROL / RATINGS Parental Control can be used to block program viewing based...

Owner's Manual (English)
Page 100
... no screen display. Please after five minutes. Poor reception on . I Check to see if there is set ? The HDMI cables don't support HDMI version 1.3, it cause flickers or no signal for sources of possible interference. The remote control doesn't work I Check for 15 minutes. The problem may be automatically turned off I Are the video cables installed properly? I Is the sleep timer set : TV, VCR etc. In this case use the latest cables...
... no screen display. Please after five minutes. Poor reception on . I Check to see if there is set ? The HDMI cables don't support HDMI version 1.3, it cause flickers or no signal for sources of possible interference. The remote control doesn't work I Check for 15 minutes. The problem may be automatically turned off I Are the video cables installed properly? I Is the sleep timer set : TV, VCR etc. In this case use the latest cables...
Owner's Manual (English)
Page 101
... available for all models. Picture OK & No sound I Sound muted? or single color I Check the input source. I A change in ambient humidity or temperature may be with the product. I Reinstall the PC video card. I Adjust Balance in PC mode. (Only PC mode applied) The signal is a problem in menu option. I Check the signal cable. Press MUTE button. There is out of the speakers Unusual sound from inside the product I Are the audio cables installed properly?
... available for all models. Picture OK & No sound I Sound muted? or single color I Check the input source. I A change in ambient humidity or temperature may be with the product. I Reinstall the PC video card. I Adjust Balance in PC mode. (Only PC mode applied) The signal is a problem in menu option. I Check the signal cable. Press MUTE button. There is out of the speakers Unusual sound from inside the product I Are the audio cables installed properly?
Owner's Manual (English)
Page 104
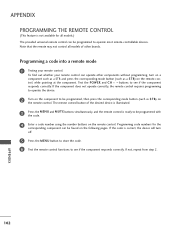
... remote control can be programmed with the code. 4 Enter a code number using the number buttons on the component to see if the component responds correctly. To find out whether your remote control. Programming code numbers for all models of the desired device is illuminated. 3 Press the MENU and MUTE buttons simultaneously, and the remote control is correct, the device will turn on a component such as a STB and press the corresponding mode button...
... remote control can be programmed with the code. 4 Enter a code number using the number buttons on the component to see if the component responds correctly. To find out whether your remote control. Programming code numbers for all models of the desired device is illuminated. 3 Press the MENU and MUTE buttons simultaneously, and the remote control is correct, the device will turn on a component such as a STB and press the corresponding mode button...


