

Owners Manual
Page 1
Retain it for future reference. PLASMA MONITOR MODELS: 42PM4M 50PM4M 60PM4M OWNER'S MANUAL Please read this information to your set . Record model number and serial number of the set . See the label attached on the back cover and quote this manual carefully before operating your dealer when you require service.
Retain it for future reference. PLASMA MONITOR MODELS: 42PM4M 50PM4M 60PM4M OWNER'S MANUAL Please read this information to your set . Record model number and serial number of the set . See the label attached on the back cover and quote this manual carefully before operating your dealer when you require service.
Owners Manual
Page 2
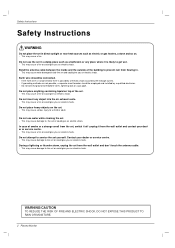
... installed by the leakage current. - WARNING/CAUTION TO REDUCE THE RISK OF FIRE AND ELECTRIC SHOCK, DO NOT EXPOSE THIS PRODUCT TO RAIN OR MOISTURE. 2 Plasma Monitor Safety Instructions Safety Instructions WARNING Do not place the set in a damp place such as electric or gas heaters, a stove and so on. - This may...
... installed by the leakage current. - WARNING/CAUTION TO REDUCE THE RISK OF FIRE AND ELECTRIC SHOCK, DO NOT EXPOSE THIS PRODUCT TO RAIN OR MOISTURE. 2 Plasma Monitor Safety Instructions Safety Instructions WARNING Do not place the set in a damp place such as electric or gas heaters, a stove and so on. - This may...
Owners Manual
Page 4
Pay particular attention to avoid wire damage. Do not over bend the power cord and do not place anything on the apparatus. 4 Plasma Monitor that appliance and has no objects filled with an exact replacement part by yourself (customer). Any of the appliance, and have the cord replaced with...use if the power cord or plug is damaged, or socket is , a single outlet circuit which powers only that is loose. Do not install the monitor near any sharp edge to plugs, wall outlets, and the point where the cord exits the appliance. - Apparatus shall not be exposed to a dedicated ...
Pay particular attention to avoid wire damage. Do not over bend the power cord and do not place anything on the apparatus. 4 Plasma Monitor that appliance and has no objects filled with an exact replacement part by yourself (customer). Any of the appliance, and have the cord replaced with...use if the power cord or plug is damaged, or socket is , a single outlet circuit which powers only that is loose. Do not install the monitor near any sharp edge to plugs, wall outlets, and the point where the cord exits the appliance. - Apparatus shall not be exposed to a dedicated ...
Owners Manual
Page 6
... or 60" so wide that a certain level of this Plasma Monitor is applied to viewers anywhere in the Plasma Monitor manufacturing process. If voltage is defective. This means that a fan is used in other Plasma Monitor manufacturers' products and the tiny dots appearing does not mean that... instant, light is not sufficient cause for the Plasma Monitor to cool the Monitor and improve its reliability. Several minute colored dots visible on the Plasma Monitor's efficiency or reliability. The noise from the cooling fans is acceptable and is emitted...
... or 60" so wide that a certain level of this Plasma Monitor is applied to viewers anywhere in the Plasma Monitor manufacturing process. If voltage is defective. This means that a fan is used in other Plasma Monitor manufacturers' products and the tiny dots appearing does not mean that... instant, light is not sufficient cause for the Plasma Monitor to cool the Monitor and improve its reliability. Several minute colored dots visible on the Plasma Monitor's efficiency or reliability. The noise from the cooling fans is acceptable and is emitted...

Owners Manual
Page 8
... 2. Front Panel Controls 3 4 5 6 12 7 1. INPUT SELECT Button 3. Here shown may be somewhat different from standby or off to standby. 60PM4M VOLUME (F,G) Buttons INPUT SELECT Button 8 Plasma Monitor INPUT SELECT VOLUME INPUT SELECT VOLUME Remote Control Sensor Power Standby Indicator Illuminates red in standby mode, Illuminates green when the Set is turned on...
... 2. Front Panel Controls 3 4 5 6 12 7 1. INPUT SELECT Button 3. Here shown may be somewhat different from standby or off to standby. 60PM4M VOLUME (F,G) Buttons INPUT SELECT Button 8 Plasma Monitor INPUT SELECT VOLUME INPUT SELECT VOLUME Remote Control Sensor Power Standby Indicator Illuminates red in standby mode, Illuminates green when the Set is turned on...
Owners Manual
Page 10
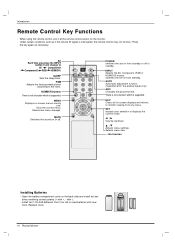
... F /G Volume Up/Down D /E Adjusts menu settings. AV Each time you press the INPUT button it at the remote control sensor on the monitor. - MUTE Switches the sound on screen menus one by one. There is not a function which is supported. Press the key again as if ...menu item. * : No function Installing Batteries • Open the battery compartment cover on -screen displays and returns to standby. Replace cover. 10 Plasma Monitor Introduction Remote Control Key Functions - When using the remote control, aim it will change to the room. Memorizes menu changes. Don't mix old or...
... F /G Volume Up/Down D /E Adjusts menu settings. AV Each time you press the INPUT button it at the remote control sensor on the monitor. - MUTE Switches the sound on screen menus one by one. There is not a function which is supported. Press the key again as if ...menu item. * : No function Installing Batteries • Open the battery compartment cover on -screen displays and returns to standby. Replace cover. 10 Plasma Monitor Introduction Remote Control Key Functions - When using the remote control, aim it will change to the room. Memorizes menu changes. Don't mix old or...
Owners Manual
Page 12
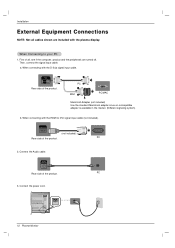
... Rear side of the product. AUDIO (RGB/DVI) Rear side of the product. AC IN 12 Plasma Monitor Installation External Equipment Connections NOTE: Not all , see if the computer, product and the peripherals are included with the plasma display. Connect the power cord. When connecting with the HDMI to your PC 1. HDMI/DVI...
... Rear side of the product. AUDIO (RGB/DVI) Rear side of the product. AC IN 12 Plasma Monitor Installation External Equipment Connections NOTE: Not all , see if the computer, product and the peripherals are included with the plasma display. Connect the power cord. When connecting with the HDMI to your PC 1. HDMI/DVI...
Owners Manual
Page 14
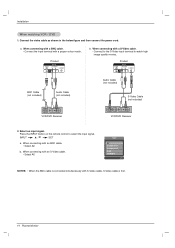
... connected simultaneously with an S-Video cable. • Select AV. Input AV Component1 Component2 RGB HDMI/DVI NOTES: • When the BNC cable is first. 14 Plasma Monitor Connect the video cable as shown in the below figure and then connect the power cord. Product AV IN VIDEO L-AUDIO-R S-VIDEO AV OUT Audio...
... connected simultaneously with an S-Video cable. • Select AV. Input AV Component1 Component2 RGB HDMI/DVI NOTES: • When the BNC cable is first. 14 Plasma Monitor Connect the video cable as shown in the below figure and then connect the power cord. Product AV IN VIDEO L-AUDIO-R S-VIDEO AV OUT Audio...
Owners Manual
Page 16
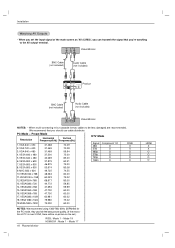
... AV Outputs • When you set .) RGB : Mode 1 ~ Mode 19 HDMI/DVI : Mode 1 ~ Mode 17 16 Plasma Monitor HDMI X X O O O O PC Mode - VGA 720 x 400 3. MAC 832 x 624 49.725 74.55 10.VESA1024...VESA 1600 x 1200 75.000 60.00 NOTES: We recommend using 1360*768, 60Hz (50PM4M) for the PC mode, they provide the best picture quality. (If the resolution of the...x 480 5. We recommend that you should use cable distributor. VESA1366 x 768 47.700 60.00 17. Video/Monitor BNC Cable (not included) Audio Cable (not included) AV IN VIDEO L-AUDIO-R S-VIDEO AV OUT Product BNC Cable...
... AV Outputs • When you set .) RGB : Mode 1 ~ Mode 19 HDMI/DVI : Mode 1 ~ Mode 17 16 Plasma Monitor HDMI X X O O O O PC Mode - VGA 720 x 400 3. MAC 832 x 624 49.725 74.55 10.VESA1024...VESA 1600 x 1200 75.000 60.00 NOTES: We recommend using 1360*768, 60Hz (50PM4M) for the PC mode, they provide the best picture quality. (If the resolution of the...x 480 5. We recommend that you should use cable distributor. VESA1366 x 768 47.700 60.00 17. Video/Monitor BNC Cable (not included) Audio Cable (not included) AV IN VIDEO L-AUDIO-R S-VIDEO AV OUT Product BNC Cable...

Owners Manual
Page 18
...) - Dynamic Standard Mild User1 User2 • You can adjust picture contrast, brightness, colour, sharpness, and tint to make appropriate adjustments. 6. Cool Normal Warm User 18 Plasma Monitor Press the PSM button • Each press of D / E button changes the screen display as shown below . Press the G button and then use D / E button to select...
...) - Dynamic Standard Mild User1 User2 • You can adjust picture contrast, brightness, colour, sharpness, and tint to make appropriate adjustments. 6. Cool Normal Warm User 18 Plasma Monitor Press the PSM button • Each press of D / E button changes the screen display as shown below . Press the G button and then use D / E button to select...
Owners Manual
Page 20
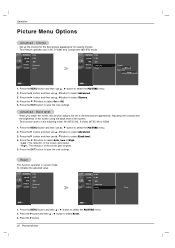
Set up the monitor for the best picture appearance for viewing movies. - Press the G button and then use D / E button to select the PICTURE menu. 2. To initialize the adjusted value ... Black level Auto Menu Prev. Menu Prev. 1. Press the EXIT button to select Advanced. 3. Operation Picture Menu Options Advanced - Menu Prev. 1. Press the G button. 20 Plasma Monitor Cinema - This feature operates only in current mode. Black level - Press the F / G button to select Auto, Low or High. • Low : The reflection of the...
Set up the monitor for the best picture appearance for viewing movies. - Press the G button and then use D / E button to select the PICTURE menu. 2. To initialize the adjusted value ... Black level Auto Menu Prev. Menu Prev. 1. Press the EXIT button to select Advanced. 3. Operation Picture Menu Options Advanced - Menu Prev. 1. Press the G button. 20 Plasma Monitor Cinema - This feature operates only in current mode. Black level - Press the F / G button to select Auto, Low or High. • Low : The reflection of the...
Owners Manual
Page 22
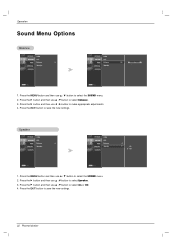
... Off. 4. Press the EXIT button to select the SOUND menu. 2. Menu Prev. 1. Press the G button and then use D / E button to save the new settings. 22 Plasma Monitor Menu Prev. 1.
... Off. 4. Press the EXIT button to select the SOUND menu. 2. Menu Prev. 1. Press the G button and then use D / E button to save the new settings. 22 Plasma Monitor Menu Prev. 1.
Owners Manual
Page 24
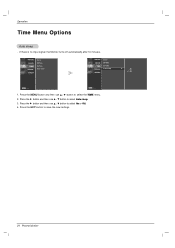
... Off. 4. Press the G button and then use D / E button to save the new settings. 24 Plasma Monitor Menu Prev. 1. Press the MENU button and then use D / E button to select Auto sleep. 3. If there is no input signal, the Monitor turns off automatically after 10 minutes. Press the EXIT button to select the TIME menu...
... Off. 4. Press the G button and then use D / E button to save the new settings. 24 Plasma Monitor Menu Prev. 1. Press the MENU button and then use D / E button to select Auto sleep. 3. If there is no input signal, the Monitor turns off automatically after 10 minutes. Press the EXIT button to select the TIME menu...
Owners Manual
Page 26
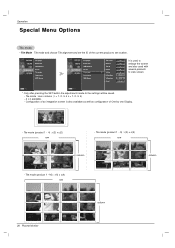
... 1 0 0 FG FG To set location. Configuration of One by one Display. - Menu Prev. Tile mode : row x column ( r = 1, 2, 3, 4 c = 1, 2, 3, 4) - 4 x 4 available. - Tile mode (product 1 ~16) : r(4) x c(4) row column 26 Plasma Monitor Tile mode (product 1 ~ 4) : r(2) x c(2) row - Operation Special Menu Options Tile mode • Tile Mode Tile mode and choose Tile alignment and set the ID of the...
... 1 0 0 FG FG To set location. Configuration of One by one Display. - Menu Prev. Tile mode : row x column ( r = 1, 2, 3, 4 c = 1, 2, 3, 4) - 4 x 4 available. - Tile mode (product 1 ~16) : r(4) x c(4) row column 26 Plasma Monitor Tile mode (product 1 ~ 4) : r(2) x c(2) row - Operation Special Menu Options Tile mode • Tile Mode Tile mode and choose Tile alignment and set the ID of the...
Owners Manual
Page 28
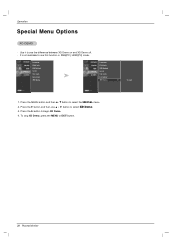
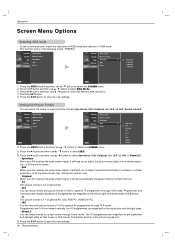
... then D / E button to see the difference between XD Demo on and XD Demo off. - To stop XD Demo, press the MENU or EXIT button. 28 Plasma Monitor It's not available to use D / E button to begin XD Demo. 4. PICTURE0 SOUND0 TIME0 SPECIAL G SCREEN0 Language Child lock ISM Method Set ID Tile mode Low...
... then D / E button to see the difference between XD Demo on and XD Demo off. - To stop XD Demo, press the MENU or EXIT button. 28 Plasma Monitor It's not available to use D / E button to begin XD Demo. 4. PICTURE0 SOUND0 TIME0 SPECIAL G SCREEN0 Language Child lock ISM Method Set ID Tile mode Low...
Owners Manual
Page 30
... 14:9 mode. This function works in various picture formats; SOUND0 Manual config. Press the G button and then use D / E button to save the new settings. 30 Plasma Monitor You can enjoy movies (the picture format of general AV. • 16:9 You can watch the screen in the following mode : RGB[PC] PICTURE0 SOUND0...
... 14:9 mode. This function works in various picture formats; SOUND0 Manual config. Press the G button and then use D / E button to save the new settings. 30 Plasma Monitor You can enjoy movies (the picture format of general AV. • 16:9 You can watch the screen in the following mode : RGB[PC] PICTURE0 SOUND0...
Owners Manual
Page 32
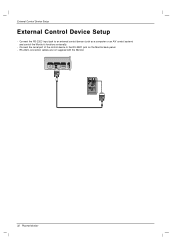
...) OUT IN HDMI/DVI IN RGB OUT IN AUDIO (RGB/DVI) COMPONENT IN VIDEO L-AUDIO-R 1 2 VIDEO AV IN L-AUDIO-R AV OUT S-VIDEO EXTERNAL SPEAKER R L 32 Plasma Monitor External Control Device Setup External Control Device Setup - Connect the serial port of the control device to an external control device (such as a computer or...
...) OUT IN HDMI/DVI IN RGB OUT IN AUDIO (RGB/DVI) COMPONENT IN VIDEO L-AUDIO-R 1 2 VIDEO AV IN L-AUDIO-R AV OUT S-VIDEO EXTERNAL SPEAKER R L 32 Plasma Monitor External Control Device Setup External Control Device Setup - Connect the serial port of the control device to an external control device (such as a computer or...
Owners Manual
Page 33
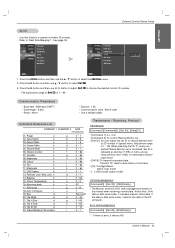
...FF p 0 ~ 8 u 1 c Key Code d 0 ~ 44 g 0 ~ 64 h 0 ~ 64 i 0 ~ 10 j 0 ~ 1 Transmission / Receiving Protocol Transmission [Command1][Command2][ ][Set ID][ ][Data][Cr] * [Command 1]: k, j, m,d * [Command 2]: To control Plasma Monitor set. * [Set ID]: You can adjust the set is 1 ~ 99. Set ID is data write mode, it indicates present status data. Input Select k 03. Screen...ID number in Special menu. Adjustment range is controlled. When selecting Set ID '0', every connected Plasma Monitor set ID to 'Real Data Mapping 1'. Transmit 'FF' data to select the SPECIAL menu...
...FF p 0 ~ 8 u 1 c Key Code d 0 ~ 44 g 0 ~ 64 h 0 ~ 64 i 0 ~ 10 j 0 ~ 1 Transmission / Receiving Protocol Transmission [Command1][Command2][ ][Set ID][ ][Data][Cr] * [Command 1]: k, j, m,d * [Command 2]: To control Plasma Monitor set. * [Set ID]: You can adjust the set is 1 ~ 99. Set ID is data write mode, it indicates present status data. Input Select k 03. Screen...ID number in Special menu. Adjustment range is controlled. When selecting Set ID '0', every connected Plasma Monitor set ID to 'Real Data Mapping 1'. Transmit 'FF' data to select the SPECIAL menu...
Owners Manual
Page 34
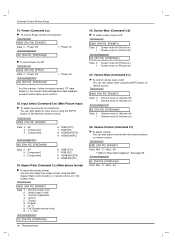
...Volume on (Picture off . Volume Control (Command 2:f) G To adjust volume. Power (Command 2:a) G To control Power On/Off of the Monitor. Transmission [k][d][ ][Set ID][ ][Data][Cr] Data 0 : Screen mute off (Picture on) 1 : Screen mute on (Picture off) ... 4 : Zoom1 5 : Zoom2 6 : Original 7 : 14 : 9 8 : Full (Europe version only) 9 : 1 : 1 (PC) Acknowledgement [c][ ][Set ID][ ][OK][Data][x] 34 Plasma Monitor 04. Transmission [k][a][ ][Set ID][ ][FF][Cr] Data 0 : Power Off Acknowledgement [a][ ][Set ID][ ][OK][Data][x] 1 : Power On * In a like manner, if other functions transmit 'FF...
...Volume on (Picture off . Volume Control (Command 2:f) G To adjust volume. Power (Command 2:a) G To control Power On/Off of the Monitor. Transmission [k][d][ ][Set ID][ ][Data][Cr] Data 0 : Screen mute off (Picture on) 1 : Screen mute on (Picture off) ... 4 : Zoom1 5 : Zoom2 6 : Original 7 : 14 : 9 8 : Full (Europe version only) 9 : 1 : 1 (PC) Acknowledgement [c][ ][Set ID][ ][OK][Data][x] 34 Plasma Monitor 04. Transmission [k][a][ ][Set ID][ ][FF][Cr] Data 0 : Power Off Acknowledgement [a][ ][Set ID][ ][OK][Data][x] 1 : Power On * In a like manner, if other functions transmit 'FF...
Owners Manual
Page 36
... to select the afterimage preventing function. Transmission [j][p][ ][Set ID][ ][Data][Cr] Data 1 : Inversion 2 : Orbiter 3 : Orb.+Inv. 4 : White Wash 8 : Normal Acknowledgement [p][ ][Set ID][ ][OK][Data][x] 36 Plasma Monitor 18. Auto Configure (Command: j u) G To adjust picture position and minimize image shaking automatically. You can not be set Acknowledgement [u][ ][Set ID][ ][OK][Data][x] 19. Tile...
... to select the afterimage preventing function. Transmission [j][p][ ][Set ID][ ][Data][Cr] Data 1 : Inversion 2 : Orbiter 3 : Orb.+Inv. 4 : White Wash 8 : Normal Acknowledgement [p][ ][Set ID][ ][OK][Data][x] 36 Plasma Monitor 18. Auto Configure (Command: j u) G To adjust picture position and minimize image shaking automatically. You can not be set Acknowledgement [u][ ][Set ID][ ][OK][Data][x] 19. Tile...


