

Owner's Manual
Page 1
OWNER'S MANUAL PLASMA TV Please read this manual carefully before operating your set and retain it for future reference. 42PJ250 50PJ250 50PK250 60PK250 60PK280 60PK290 42PJ340 50PJ340 42PJ350 50PJ350 50PK350 50PK340 50PK540 60PK540 P/NO : SAC34173302 (1007-REV03) 42PJ550 50PJ550 50PK550 60PK550 42PJ350C 50PJ350C 50PK550C 60PK550C www.lg.com
OWNER'S MANUAL PLASMA TV Please read this manual carefully before operating your set and retain it for future reference. 42PJ250 50PJ250 50PK250 60PK250 60PK280 60PK290 42PJ340 50PJ340 42PJ350 50PJ350 50PK350 50PK340 50PK540 60PK540 P/NO : SAC34173302 (1007-REV03) 42PJ550 50PJ550 50PK550 60PK550 42PJ350C 50PJ350C 50PK550C 60PK550C www.lg.com
Owner's Manual
Page 6
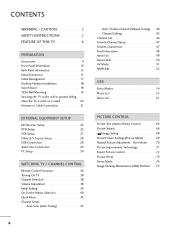
... Out Connection 29 PC Setup 30 WATCHING TV / CHANNEL CONTROL Remote Control Functions 36 Turning On TV 38 Channel Selection 38 Volume Adjustment 38 Initial Setting 39 On-Screen Menus Selection 40 Quick Menu 42 Channel Setup - Auto Scan (Auto Tuning 43 - Channel Editing 45 Channel List 46 Favorite Channel Setup... Entry Modes 54 Photo List 55 Music List 61 PICTURE CONTROL Picture Size (Aspect Ratio) Control 64 Picture Wizard 66 Energy Saving 68 Preset Picture Settings(Picture Mode 69 Manual Picture Adjustment -
... Out Connection 29 PC Setup 30 WATCHING TV / CHANNEL CONTROL Remote Control Functions 36 Turning On TV 38 Channel Selection 38 Volume Adjustment 38 Initial Setting 39 On-Screen Menus Selection 40 Quick Menu 42 Channel Setup - Auto Scan (Auto Tuning 43 - Channel Editing 45 Channel List 46 Favorite Channel Setup... Entry Modes 54 Photo List 55 Music List 61 PICTURE CONTROL Picture Size (Aspect Ratio) Control 64 Picture Wizard 66 Energy Saving 68 Preset Picture Settings(Picture Mode 69 Manual Picture Adjustment -
Owner's Manual
Page 7
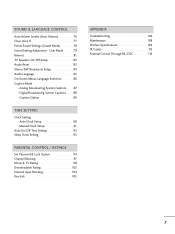
...System Captions 87 - Digital Broadcasting System Captions 88 - Caption Option 89 TIME SETTING Clock Setting - Auto Clock Setup 90 Manual Clock Setup 91 Auto On/Off Time Setting 92 Sleep Timer Setting 93 PARENTAL CONTROL / RATINGS Set Password & Lock System 94 Channel Blocking 97 Movie & TV Rating 98 ...Through RS-232C 114 7 SOUND & LANGUAGE CONTROL Auto Volume Leveler (Auto Volume 76 Clear Voice II 77 Preset Sound Settings (Sound Mode 78 Sound Setting Adjustment - User Mode 79 Balance 81 TV Speakers On/Off Setup 82 Audio Reset 83 Stereo/SAP Broadcasts Setup 84...
...System Captions 87 - Digital Broadcasting System Captions 88 - Caption Option 89 TIME SETTING Clock Setting - Auto Clock Setup 90 Manual Clock Setup 91 Auto On/Off Time Setting 92 Sleep Timer Setting 93 PARENTAL CONTROL / RATINGS Set Password & Lock System 94 Channel Blocking 97 Movie & TV Rating 98 ...Through RS-232C 114 7 SOUND & LANGUAGE CONTROL Auto Volume Leveler (Auto Volume 76 Clear Voice II 77 Preset Sound Settings (Sound Mode 78 Sound Setting Adjustment - User Mode 79 Balance 81 TV Speakers On/Off Setup 82 Audio Reset 83 Stereo/SAP Broadcasts Setup 84...
Owner's Manual
Page 8
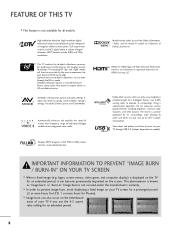
... 2.0 ('videos' dependent on the TV for a more pleasing to watch and which can also occur on the letterboxed areas of ambient light, LG's "Intelligent Sensor" uses 4,096 sensing steps to evaluate its surroundings. It allows the viewer to inquire about an ISF certified technician. Using a...BURN / BURN-IN" ON YOUR TV SCREEN I Image burn can only sense brightness of your TV if you use the 4:3 aspect ratio setting for it can become permanently imprinted on your TV through the ISFccc mode. Detailed calibration requires a licensed technician. The result is a picture optimized...
... 2.0 ('videos' dependent on the TV for a more pleasing to watch and which can also occur on the letterboxed areas of ambient light, LG's "Intelligent Sensor" uses 4,096 sensing steps to evaluate its surroundings. It allows the viewer to inquire about an ISF certified technician. Using a...BURN / BURN-IN" ON YOUR TV SCREEN I Image burn can only sense brightness of your TV if you use the 4:3 aspect ratio setting for it can become permanently imprinted on your TV through the ISFccc mode. Detailed calibration requires a licensed technician. The result is a picture optimized...
Owner's Manual
Page 20
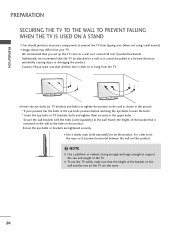
... are the same. 20 We recommend that children don't climb on the TV are tightened securely. G To use the TV safely, make sure that you set up the TV close to the wall.
... are the same. 20 We recommend that children don't climb on the TV are tightened securely. G To use the TV safely, make sure that you set up the TV close to the wall.
Owner's Manual
Page 22
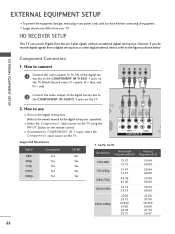
... to COMPONENT IN 2 input, select the Component2 input source on the digital set-top box. (Refer to the owner's manual for the digital set-top box. How to connect 1 Connect the video outputs (Y, PB, PR) of the digital set -top box. operation) I Select the Component1 input source on the TV ...using the INPUT button on the TV. I Image shown may differ from a digital set-top box or other digital external device, refer to the figure as shown below. EXTERNAL EQUIPMENT SETUP Component Connection 1. Y PB PR L R 2 Connect the...
... to COMPONENT IN 2 input, select the Component2 input source on the digital set-top box. (Refer to the owner's manual for the digital set-top box. How to connect 1 Connect the video outputs (Y, PB, PR) of the digital set -top box. operation) I Select the Component1 input source on the TV ...using the INPUT button on the TV. I Image shown may differ from a digital set-top box or other digital external device, refer to the figure as shown below. EXTERNAL EQUIPMENT SETUP Component Connection 1. Y PB PR L R 2 Connect the...
Owner's Manual
Page 23
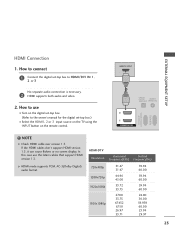
How to connect 1 Connect the digital set -top box.) I Turn on the remote control. HDMI-DTV OUTPUT 1 OPTICAL DIGITAL AUDIO OUT AUDIO (RGB/DVI) 2 1 HDMI/DVI IN RS-232C IN (CONTROL & SERVICE) ... 1. In this case use I Select the HDMI1, 2 or 3 input source on the TV using the INPUT button on the digital set-top box. (Refer to the owner's manual for the digital set -top box to use the latest cables that support HDMI version 1.3. If the HDMI cables don't support HDMI version 1.3, it...
How to connect 1 Connect the digital set -top box.) I Turn on the remote control. HDMI-DTV OUTPUT 1 OPTICAL DIGITAL AUDIO OUT AUDIO (RGB/DVI) 2 1 HDMI/DVI IN RS-232C IN (CONTROL & SERVICE) ... 1. In this case use I Select the HDMI1, 2 or 3 input source on the TV using the INPUT button on the digital set-top box. (Refer to the owner's manual for the digital set -top box to use the latest cables that support HDMI version 1.3. If the HDMI cables don't support HDMI version 1.3, it...
Owner's Manual
Page 24
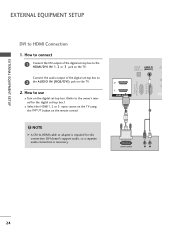
... box. (Refer to 2 the AUDIO IN (RGB/DVI) jack on the TV. 2. How to connect 1 Connect the DVI output of the digital set-top box to the owner's manual for this connection. NOTE G A DVI to HDMI cable or adapter is necessary. OPTICAL DIGITAL AUDIO OUT AUDIO IN (RGB/... R L 24 EXTERNAL EQUIPMENT SETUP EXTERNAL EQUIPMENT SETUP DVI to the HDMI/DVI IN 1, 2 or 3 jack on the TV. How to use I Turn on the digital set -top box.) I Select the HDMI1, 2 or 3 input source on the TV using the INPUT button on the remote control. ! Connect the audio output of the...
... box. (Refer to 2 the AUDIO IN (RGB/DVI) jack on the TV. 2. How to connect 1 Connect the DVI output of the digital set-top box to the owner's manual for this connection. NOTE G A DVI to HDMI cable or adapter is necessary. OPTICAL DIGITAL AUDIO OUT AUDIO IN (RGB/... R L 24 EXTERNAL EQUIPMENT SETUP EXTERNAL EQUIPMENT SETUP DVI to the HDMI/DVI IN 1, 2 or 3 jack on the TV. How to use I Turn on the digital set -top box.) I Select the HDMI1, 2 or 3 input source on the TV using the INPUT button on the remote control. ! Connect the audio output of the...

Owner's Manual
Page 27
... IN AV IN 1 VIDEO /MONO AUDIO 2 L R 1 27 I If connected to AV IN 2, select AV2 input source on the VCR. (Refer to the VCR owner's manual.) I Set VCR output switch to 3 or 4 and then tune TV to the AUDIO L/MONO jack of the VCR. 2. How to the VCR owner's manual.) ANT OUT...
... IN AV IN 1 VIDEO /MONO AUDIO 2 L R 1 27 I If connected to AV IN 2, select AV2 input source on the VCR. (Refer to the VCR owner's manual.) I Set VCR output switch to 3 or 4 and then tune TV to the AUDIO L/MONO jack of the VCR. 2. How to the VCR owner's manual.) ANT OUT...

Owner's Manual
Page 28
... SETUP 1. How to connect i.e) 1 1 Connect the USB device to connect 1 Connect the AUDIO/VIDEO jacks between TV and external equipment. USB IN Camcorder Video Game Set VIDEO L R 1 EXTERNAL EQUIPMENT SETUP VIDEO L/MONO AUDIO R HDMI IN 3 AV IN 2 VIDEO L/MONO AUDIO R HDMI IN 3 USB IN USB CONNECTION - For 42/50PJ350, 50PK350, 42...
... SETUP 1. How to connect i.e) 1 1 Connect the USB device to connect 1 Connect the AUDIO/VIDEO jacks between TV and external equipment. USB IN Camcorder Video Game Set VIDEO L R 1 EXTERNAL EQUIPMENT SETUP VIDEO L/MONO AUDIO R HDMI IN 3 AV IN 2 VIDEO L/MONO AUDIO R HDMI IN 3 USB IN USB CONNECTION - For 42/50PJ350, 50PK350, 42...
Owner's Manual
Page 29
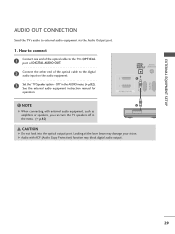
... the AUDIO menu. (G p.82). EXTERNAL EQUIPMENT SETUP (CONTROL & SERVICE) AUDIO OUT CONNECTION Send the TV's audio to the digital audio input on the audio equipment. 3 Set the "TV Speaker option -
... the AUDIO menu. (G p.82). EXTERNAL EQUIPMENT SETUP (CONTROL & SERVICE) AUDIO OUT CONNECTION Send the TV's audio to the digital audio input on the audio equipment. 3 Set the "TV Speaker option -
Owner's Manual
Page 30
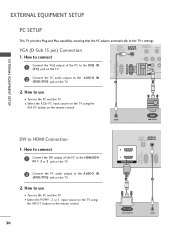
.../DVI IN RS-232C IN (CONTROL & SERVICE) RGB IN (PC) 1 2 DVI-PC OUTPUT AUDIO I Turn on the PC and the TV. How to the TV's settings. AUDIO RGB OUTPUT DVI to the AUDIO IN (RGB/DVI) jack on the TV. 2 1 VIDEO COMPONEN 1 2 Connect the PC audio output to HDMI Connection 1. VGA...
.../DVI IN RS-232C IN (CONTROL & SERVICE) RGB IN (PC) 1 2 DVI-PC OUTPUT AUDIO I Turn on the PC and the TV. How to the TV's settings. AUDIO RGB OUTPUT DVI to the AUDIO IN (RGB/DVI) jack on the TV. 2 1 VIDEO COMPONEN 1 2 Connect the PC audio output to HDMI Connection 1. VGA...
Owner's Manual
Page 31
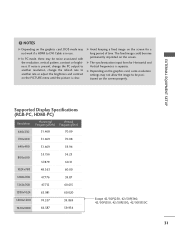
... image could become permanently imprinted on the PICTURE menu until the picture is in use. EXTERNAL EQUIPMENT SETUP ! G Depending on the graphics card, some resolution settings may not allow the image to DVI Cable is clear. Supported Display Specifications (RGB-PC, HDMI-PC) Resolution Horizontal Vertical Frequency(KHz) Frequency(Hz) 640x350...
... image could become permanently imprinted on the PICTURE menu until the picture is in use. EXTERNAL EQUIPMENT SETUP ! G Depending on the graphics card, some resolution settings may not allow the image to DVI Cable is clear. Supported Display Specifications (RGB-PC, HDMI-PC) Resolution Horizontal Vertical Frequency(KHz) Frequency(Hz) 640x350...
Owner's Manual
Page 33
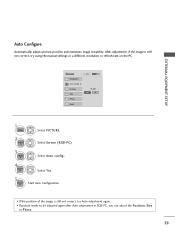
After adjustment, if the image is still not correct, try using the manual settings or a different resolution or refresh rate on the PC. Screen Resolution Auto config. To Set Yes No 1 MENU 2 ENTER Select PICTURE. EXTERNAL EQUIPMENT SETUP Auto Configure Automatically adjusts picture position and minimizes image instability. Select Screen (RGB-PC). 3 ENTER...
After adjustment, if the image is still not correct, try using the manual settings or a different resolution or refresh rate on the PC. Screen Resolution Auto config. To Set Yes No 1 MENU 2 ENTER Select PICTURE. EXTERNAL EQUIPMENT SETUP Auto Configure Automatically adjusts picture position and minimizes image instability. Select Screen (RGB-PC). 3 ENTER...
Owner's Manual
Page 35
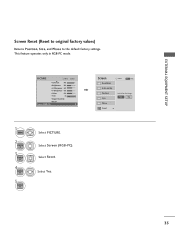
... operates only in RGB-PC mode. Select Reset. Select Screen (RGB-PC). Yes No Phase Reset G 35 Screen Resolution Move MENU Prev. Position Size Initialize Settings. Auto config. Select Y e s. PICTURE Move E • Contrast 90 • Brightness 50 • H Sharpness 60 • V Sharpness 60 • Color 60 • Tint 0R • Expert...
... operates only in RGB-PC mode. Select Reset. Select Screen (RGB-PC). Yes No Phase Reset G 35 Screen Resolution Move MENU Prev. Position Size Initialize Settings. Auto config. Select Y e s. PICTURE Move E • Contrast 90 • Brightness 50 • H Sharpness 60 • V Sharpness 60 • Color 60 • Tint 0R • Expert...
Owner's Manual
Page 37
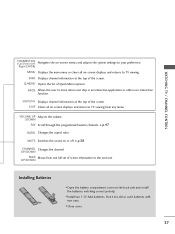
WATCHING TV / CHANNEL CONTROL THUMBSTICK (Up/Down/Left Navigates the on-screen menus and adjusts the system settings to move return one step in an interactive application or other user interaction function. BACK Allows the user to your preference. INFO Displays channel ...Quick Menu options. UP/DOWN PAGE Moves from any menu. SIMPLINK Displays channel information at the top of screen information to the next one full set of the screen. MUTE Switches the sound on the back side and install the batteries matching correct polarity. Right/ENTER) MENU Displays the main menu...
WATCHING TV / CHANNEL CONTROL THUMBSTICK (Up/Down/Left Navigates the on-screen menus and adjusts the system settings to move return one step in an interactive application or other user interaction function. BACK Allows the user to your preference. INFO Displays channel ...Quick Menu options. UP/DOWN PAGE Moves from any menu. SIMPLINK Displays channel information at the top of screen information to the next one full set of the screen. MUTE Switches the sound on the back side and install the batteries matching correct polarity. Right/ENTER) MENU Displays the main menu...
Owner's Manual
Page 39
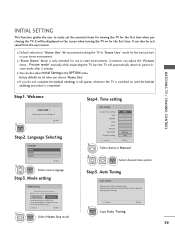
... the first time when purchasing the TV. Previous Next 1 ENTER Start Auto Tuning. 39 We recommend setting the TV to preset instore mode after 5 minutes. I Default selection is only intended for choosing LG Next Step2. I "Store Demo" Mode is "Home Use". WATCHING TV / CHANNEL CONTROL Step1....Auto Tuning. By Changing Picture Mode, you can also be displayed on the screen when turning the TV on until the Initial setting procedure is switched on for the best picture in your antenna connection. The previous channel information will automatically return to "Home Use...
... the first time when purchasing the TV. Previous Next 1 ENTER Start Auto Tuning. 39 We recommend setting the TV to preset instore mode after 5 minutes. I Default selection is only intended for choosing LG Next Step2. I "Store Demo" Mode is "Home Use". WATCHING TV / CHANNEL CONTROL Step1....Auto Tuning. By Changing Picture Mode, you can also be displayed on the screen when turning the TV on until the Initial setting procedure is switched on for the best picture in your antenna connection. The previous channel information will automatically return to "Home Use...
Owner's Manual
Page 40
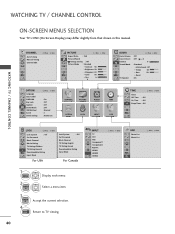
... Sound: Off • Treble 50 • Bass 50 • Reset : On Enter R OPTION Language Input Label SIMPLINK Key Lock Caption Demo Mode ISM Method Set ID Initial Setting Move Enter : On : Off : Off : Off : Normal : 1 : Home Use CHANNEL PICTURE AUDIO TIME OPTION LOCK INPUT USB TIME Clock Off Time : Off ...On Time : Off Sleep Timer : Off Move Enter 40 LOCK Move Enter Lock System : Off Set Password Block Channel Movie Rating TV Rating-Children TV Rating-General Downloadable Rating Input Block For USA Lock System : Off...
... Sound: Off • Treble 50 • Bass 50 • Reset : On Enter R OPTION Language Input Label SIMPLINK Key Lock Caption Demo Mode ISM Method Set ID Initial Setting Move Enter : On : Off : Off : Off : Normal : 1 : Home Use CHANNEL PICTURE AUDIO TIME OPTION LOCK INPUT USB TIME Clock Off Time : Off ...On Time : Off Sleep Timer : Off Move Enter 40 LOCK Move Enter Lock System : Off Set Password Block Channel Movie Rating TV Rating-Children TV Rating-General Downloadable Rating Input Block For USA Lock System : Off...
Owner's Manual
Page 41
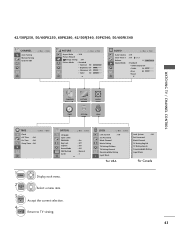
... Block Channel Movie Rating TV Rating-Children TV Rating-General Downloadable Rating Input Block For USA Lock System : Off Set Password Block Channel TV Rating-English TV Rating-French Downloadable Rating Input Block For Canada 41 42/50PJ250, 50/60PK250, 60PK280, 42/50PJ340,... Off Time : Off On Time : Off Sleep Timer : Off Move Enter OPTION Move Enter Language Input Label SIMPLINK Key Lock Caption Demo Mode ISM Method Set ID E : On : Off : Off : Off : Normal : 1 1 MENU Display each menu. 2 ENTER Select a menu item. 3 ENTER Accept the current selection. 4 EXIT Return...
... Block Channel Movie Rating TV Rating-Children TV Rating-General Downloadable Rating Input Block For USA Lock System : Off Set Password Block Channel TV Rating-English TV Rating-French Downloadable Rating Input Block For Canada 41 42/50PJ250, 50/60PK250, 60PK280, 42/50PJ340,... Off Time : Off On Time : Off Sleep Timer : Off Move Enter OPTION Move Enter Language Input Label SIMPLINK Key Lock Caption Demo Mode ISM Method Set ID E : On : Off : Off : Off : Normal : 1 1 MENU Display each menu. 2 ENTER Select a menu item. 3 ENTER Accept the current selection. 4 EXIT Return...
Owner's Manual
Page 43
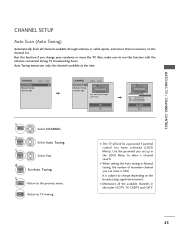
... signal environment. Run this function with the antenna connected during TV broadcasting hours. Use the password you set up in the LOCK Menu to begin auto tuning. EXIT Return to the previous menu. I When setting the Auto tuning or Manual tuning, the number of DTV, TV, CADTV and CATV. 43 Select Y e s. 4 ENTER...
... signal environment. Run this function with the antenna connected during TV broadcasting hours. Use the password you set up in the LOCK Menu to begin auto tuning. EXIT Return to the previous menu. I When setting the Auto tuning or Manual tuning, the number of DTV, TV, CADTV and CATV. 43 Select Y e s. 4 ENTER...


