
Owners Manual
Page 6
... Panel Information 9 Stand Instruction 10 Cable Management 11 Desktop Pedestal Installation 12 Swivel Stand 12 VESA Wall Mounting 13 Securing the TV to the wall to prevent falling . . . . 14 Antenna or Cable Connection 15 EXTERNAL EQUIPMENT SETUP HD Receiver Setup...Mode 41 SIMPLINK 42 PICTURE CONTROL Picture Size (Aspect Ratio) Control 44 Preset Picture Settings - Expert Control 49 Picture Improvement Technology 50 Advanced Control - Picture Mode - Auto Scan (Auto Tuning 36 - Preset 47 Manual Picture Adjustment - User Mode 48 - Film Mode 52 Picture Reset 53 Image ...
... Panel Information 9 Stand Instruction 10 Cable Management 11 Desktop Pedestal Installation 12 Swivel Stand 12 VESA Wall Mounting 13 Securing the TV to the wall to prevent falling . . . . 14 Antenna or Cable Connection 15 EXTERNAL EQUIPMENT SETUP HD Receiver Setup...Mode 41 SIMPLINK 42 PICTURE CONTROL Picture Size (Aspect Ratio) Control 44 Preset Picture Settings - Expert Control 49 Picture Improvement Technology 50 Advanced Control - Picture Mode - Auto Scan (Auto Tuning 36 - Preset 47 Manual Picture Adjustment - User Mode 48 - Film Mode 52 Picture Reset 53 Image ...

Owners Manual
Page 16
... to the wall. I Use a sturdy rope (not provided as parts of the stand. It is mounted on the wall to the holes in the picture. * If your TV. I Image shown may differ from your product has the bolts in the eye-bolts position before inserting the eye-bolts, loosen the bolts. * Insert... the eye-bolts or TV brackets/bolts and tighten them securely in a forward direction, potentially causing injury or damaging the product. Ensure the eye-bolts or brackets are the ...
... to the wall. I Use a sturdy rope (not provided as parts of the stand. It is mounted on the wall to the holes in the picture. * If your TV. I Image shown may differ from your product has the bolts in the eye-bolts position before inserting the eye-bolts, loosen the bolts. * Insert... the eye-bolts or TV brackets/bolts and tighten them securely in a forward direction, potentially causing injury or damaging the product. Ensure the eye-bolts or brackets are the ...

Owners Manual
Page 17
... Jack RF Coaxial Wire (75 ohm) ANTENNA/ CABLE IN I If the antenna needs to be split for two TV's, install a 2-Way Signal Splitter. For optimum picture quality, adjust antenna direction if needed. I To improve the picture quality in a poor signal area, plea(se) purchase a signal amplifier and install properly. I To prevent damage do...
... Jack RF Coaxial Wire (75 ohm) ANTENNA/ CABLE IN I If the antenna needs to be split for two TV's, install a 2-Way Signal Splitter. For optimum picture quality, adjust antenna direction if needed. I To improve the picture quality in a poor signal area, plea(se) purchase a signal amplifier and install properly. I To prevent damage do...
Owners Manual
Page 21
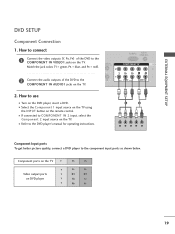
...Pr 19 I Select the Component 1 input source on the TV using the INPUT button on the TV. I Refer to the DVD player's manual for operating instructions. 1 2 Y PB PR L R Component Input ports To get better picture quality, connect a DVD player to the COMPONENT IN VIDEO1 ...jacks on the TV. EXTERNAL EQUIPMENT SETUP DVD SETUP Component Connection 1. Match the...
...Pr 19 I Select the Component 1 input source on the TV using the INPUT button on the TV. I Refer to the DVD player's manual for operating instructions. 1 2 Y PB PR L R Component Input ports To get better picture quality, connect a DVD player to the COMPONENT IN VIDEO1 ...jacks on the TV. EXTERNAL EQUIPMENT SETUP DVD SETUP Component Connection 1. Match the...

Owners Manual
Page 23
...Option menu to avoid having a fixed image remain on the TV. 2 Connect the antenna cable to the RF antenna in socket of the VCR. 2. the fixed images on the sides of time. Antenna Connection 1. How to use I To avoid picture noise (interference), leave an adequate distance between the VCR ...and TV. This pheno( m)enon is common to all TVs and is used; How to connect 1 Connect the RF antenna out socket of the VCR to ...
...Option menu to avoid having a fixed image remain on the TV. 2 Connect the antenna cable to the RF antenna in socket of the VCR. 2. the fixed images on the sides of time. Antenna Connection 1. How to use I To avoid picture noise (interference), leave an adequate distance between the VCR ...and TV. This pheno( m)enon is common to all TVs and is used; How to connect 1 Connect the RF antenna out socket of the VCR to ...

Owners Manual
Page 27
NOTES G To get the the best picture quality, adjust the PC graphics card to be noise associated with the resolution, vertical pattern, contrast or brightness. The ...the screen for Horizontal and Vertical frequencies is in use. G Depending on the graphics card, some resolution settings may be positioned on the PICTURE menu until the picture is clear. G Avoid keeping a fixed image on the screen. G The synchronization input form for a long period of time. G ....981 79.976 60.02 75.025 1360x768 47.712 60.015 1600x1200 75.00 60.00 1920x1080 67.50 60.00 * Only RGB-PC mode !
NOTES G To get the the best picture quality, adjust the PC graphics card to be noise associated with the resolution, vertical pattern, contrast or brightness. The ...the screen for Horizontal and Vertical frequencies is in use. G Depending on the graphics card, some resolution settings may be positioned on the PICTURE menu until the picture is clear. G Avoid keeping a fixed image on the screen. G The synchronization input form for a long period of time. G ....981 79.976 60.02 75.025 1360x768 47.712 60.015 1600x1200 75.00 60.00 1920x1080 67.50 60.00 * Only RGB-PC mode !

Owners Manual
Page 28
... mode. Position Size Phase Reset Move MENU Prev. 1024 x 768 1280 x 768 1360 x 768 1 MENU 2 ENTER 3 ENTER 4 ENTER 5 ENTER Select PICTURE. PICTURE Move Enter E • Contrast 50 • Brightness 50 • Sharpness 50 • Color 50 • Tint 0R G • Advanced Control • Reset Screen (RGB-PC) Screen Resolution G Auto config. EXTERNAL EQUIPMENT SETUP EXTERNAL EQUIPMENT...
... mode. Position Size Phase Reset Move MENU Prev. 1024 x 768 1280 x 768 1360 x 768 1 MENU 2 ENTER 3 ENTER 4 ENTER 5 ENTER Select PICTURE. PICTURE Move Enter E • Contrast 50 • Brightness 50 • Sharpness 50 • Color 50 • Tint 0R G • Advanced Control • Reset Screen (RGB-PC) Screen Resolution G Auto config. EXTERNAL EQUIPMENT SETUP EXTERNAL EQUIPMENT...

Owners Manual
Page 29
... RGB-PC, you can adjust the Position, S i z e or P h a s e. 27 G Position Size Phase Reset Move MENU Prev. Select Screen (RGB-PC). PICTURE Move Enter E • Contrast 50 • Brightness 50 • Sharpness 50 • Color 50 • Tint 0R G • Advanced Control • Reset Screen (RGB-PC) Screen Resolution Auto config. After adjustment, if the image...
... RGB-PC, you can adjust the Position, S i z e or P h a s e. 27 G Position Size Phase Reset Move MENU Prev. Select Screen (RGB-PC). PICTURE Move Enter E • Contrast 50 • Brightness 50 • Sharpness 50 • Color 50 • Tint 0R G • Advanced Control • Reset Screen (RGB-PC) Screen Resolution Auto config. After adjustment, if the image...

Owners Manual
Page 30
... is -30 ~ 30. I P h a s e: This function allows you prefer. Select Position, S i z e, or Phase. And the horizontal screen size will also change. PICTURE Move Enter E • Contrast 50 • Brightness 50 • Sharpness 50 • Color 50 • Tint 0R G • Advanced Control • Reset Screen (RGB-PC) Screen Resolution Auto config. Select Screen (RGB-PC). EXTERNAL...
... is -30 ~ 30. I P h a s e: This function allows you prefer. Select Position, S i z e, or Phase. And the horizontal screen size will also change. PICTURE Move Enter E • Contrast 50 • Brightness 50 • Sharpness 50 • Color 50 • Tint 0R G • Advanced Control • Reset Screen (RGB-PC) Screen Resolution Auto config. Select Screen (RGB-PC). EXTERNAL...

Owners Manual
Page 31
... Phase to the default factory settings. Yes No Phase Reset G 29 Position Size Initialize Settings. This feature operates only in RGB-PC mode. PICTURE Move Enter E • Contrast 50 • Brightness 50 • Sharpness 50 • Color 50 • Tint 0R G • Advanced Control • Reset Screen (RGB-PC) 1 MENU 2 ENTER 3 ENTER 4 ENTER 5 ENTER Select...
... Phase to the default factory settings. Yes No Phase Reset G 29 Position Size Initialize Settings. This feature operates only in RGB-PC mode. PICTURE Move Enter E • Contrast 50 • Brightness 50 • Sharpness 50 • Color 50 • Tint 0R G • Advanced Control • Reset Screen (RGB-PC) 1 MENU 2 ENTER 3 ENTER 4 ENTER 5 ENTER Select...

Owners Manual
Page 32
...p.34 MENU Displays the main menu. FLASHBK Tune to TV viewing from any menu. Control the SIMPLINK compatible devices. Clear all on or off automatically.G p.72 PICTURE Selects the factory preset picture depend on the TV. RATIO POWER SLEEP SOUND PICTURE Q. G p.39 NUMBER button - (DASH) Used to... enter a program number for type of time before your TV on -screen displays and return to the ...
...p.34 MENU Displays the main menu. FLASHBK Tune to TV viewing from any menu. Control the SIMPLINK compatible devices. Clear all on or off automatically.G p.72 PICTURE Selects the factory preset picture depend on the TV. RATIO POWER SLEEP SOUND PICTURE Q. G p.39 NUMBER button - (DASH) Used to... enter a program number for type of time before your TV on -screen displays and return to the ...

Owners Manual
Page 35
...Audio Language Setting. 2 Select your home environment. NOTE I You can also be displayed on the screen when turning the TV on for the best picture in your desired language. 3 ENTER Step4. Option Setting Step3. Do you want to start Auto Tuning? We recommend setting ...33 Time Setting Step2. Auto Tuning Auto Tuning can adjust the "Picture menu - I Default selection is only intended for the first time when purchasing the TV. Mode Setting ! Picture mode" manually while inspecting the TV, but the TV will be activated from the user menus. Selecting the environment. OSD ...
...Audio Language Setting. 2 Select your home environment. NOTE I You can also be displayed on the screen when turning the TV on for the best picture in your desired language. 3 ENTER Step4. Option Setting Step3. Do you want to start Auto Tuning? We recommend setting ...33 Time Setting Step2. Auto Tuning Auto Tuning can adjust the "Picture menu - I Default selection is only intended for the first time when purchasing the TV. Mode Setting ! Picture mode" manually while inspecting the TV, but the TV will be activated from the user menus. Selecting the environment. OSD ...

Owners Manual
Page 36
...Favorite List. I P o w e r S a v i n g: Adjusts screen brightness to TV viewing. 34 MENU 2 Display each menu. WATCHING TV / CHANNEL CONTROL WATCHING TV / CHANNEL CONTROL QUICK MENU Your TV's OSD (On Screen Display) may differ slightly from others, it helps make human voices sound better....Ratio: Selects your TV turns off . Make appropriate adjustments. 3 Q. I Sound Mode: Selects the factory preset sound for type of time before your desired picture format. I Sleep Timer: Select the amount of program. I Picture Mode: Selects the factory preset picture depend on or ...
...Favorite List. I P o w e r S a v i n g: Adjusts screen brightness to TV viewing. 34 MENU 2 Display each menu. WATCHING TV / CHANNEL CONTROL WATCHING TV / CHANNEL CONTROL QUICK MENU Your TV's OSD (On Screen Display) may differ slightly from others, it helps make human voices sound better....Ratio: Selects your TV turns off . Make appropriate adjustments. 3 Q. I Sound Mode: Selects the factory preset sound for type of time before your desired picture format. I Sleep Timer: Select the amount of program. I Picture Mode: Selects the factory preset picture depend on or ...

Owners Manual
Page 37
...WATCHING TV / CHANNEL CONTROL ON-SCREEN MENUS SELECTION Your TV's OSD (On Screen Display) may differ slightly from that shown in this manual. CHANNEL Auto Tuning Manual Tuning Channel Edit Move Enter PICTURE Move Aspect Ratio : 16:9 Picture Mode : Standard • Contrast 90 • Brightness 50 &#...• SRS TruSurround XT: Off • Treble 50 • Bass 50 • Reset E TIME Move Enter Clock : Feb/21/2008/ 2:10 AM Off Time : Off On Time : Off Sleep Timer : Off Auto Sleep : Off CHANNEL PICTURE AUDIO TIME OPTION LOCK OPTION Move Enter Language : English...
...WATCHING TV / CHANNEL CONTROL ON-SCREEN MENUS SELECTION Your TV's OSD (On Screen Display) may differ slightly from that shown in this manual. CHANNEL Auto Tuning Manual Tuning Channel Edit Move Enter PICTURE Move Aspect Ratio : 16:9 Picture Mode : Standard • Contrast 90 • Brightness 50 &#...• SRS TruSurround XT: Off • Treble 50 • Bass 50 • Reset E TIME Move Enter Clock : Feb/21/2008/ 2:10 AM Off Time : Off On Time : Off Sleep Timer : Off Auto Sleep : Off CHANNEL PICTURE AUDIO TIME OPTION LOCK OPTION Move Enter Language : English...

Owners Manual
Page 43
Sound Mode" respectively. I If you select "Cinema" in AV mode, the "Picture Mode" and "Sound Mode" return to TV viewing. I If you select "O f f" in AV mode, Cinema will be selected both for "PICTURE menu - WATCHING TV / CHANNEL CONTROL AV MODE You can select the optimal images and sounds. Picture Mode" and "AUDIO menu - Off Game Cinema Sport 1AV MODE Press the AV MODE button repeatedly to select the desired source. 2 RETURN Return to previous selected value. 41
Sound Mode" respectively. I If you select "Cinema" in AV mode, the "Picture Mode" and "Sound Mode" return to TV viewing. I If you select "O f f" in AV mode, Cinema will be selected both for "PICTURE menu - WATCHING TV / CHANNEL CONTROL AV MODE You can select the optimal images and sounds. Picture Mode" and "AUDIO menu - Off Game Cinema Sport 1AV MODE Press the AV MODE button repeatedly to select the desired source. 2 RETURN Return to previous selected value. 41

Owners Manual
Page 46
...a few minutes. NOTE G If a fixed image is displayed on the screen for a long time, the image could become imprinted on your TV. Q.Menu Aspect Ratio Power Saving Clear Voice Picture Mode Sound Mode Caption Multi Audio Sleep Timer CH Del/Add/Fav F 16:9 G 3 Off Vivid Standard Off English Off Add Close Set... By Program Just Scan 4:3 Zoom2 16:9 Zoom1 1 RATIO Select the desired picture format. 2 RETURN Return to all manufacturers and is not covered by warranty. I RGB-PC input source use 4:3 or 16:9 aspect ratio...
...a few minutes. NOTE G If a fixed image is displayed on the screen for a long time, the image could become imprinted on your TV. Q.Menu Aspect Ratio Power Saving Clear Voice Picture Mode Sound Mode Caption Multi Audio Sleep Timer CH Del/Add/Fav F 16:9 G 3 Off Vivid Standard Off English Off Add Close Set... By Program Just Scan 4:3 Zoom2 16:9 Zoom1 1 RATIO Select the desired picture format. 2 RETURN Return to all manufacturers and is not covered by warranty. I RGB-PC input source use 4:3 or 16:9 aspect ratio...

Owners Manual
Page 47
...the complete video. Just Scan turns off between alteration and screen coverage. 4:3 Choose 4:3 when you want to view a picture with an original 4:3 aspect ratio. 16:9 Adjust the picture horizontally, in DTV/CADTV/Component/HDMI-DTV/DVI-DTV (720p/1080i/1080p) input source. 45 Just Scan Normally the edges... of the picture will be cropped. (16:9 16:9) Zoom 2 Choose Zoom 2 when you want to view the picture without any alteration. Just Scan operates only in a linear proportion to be altered, both vertically ...
...the complete video. Just Scan turns off between alteration and screen coverage. 4:3 Choose 4:3 when you want to view a picture with an original 4:3 aspect ratio. 16:9 Adjust the picture horizontally, in DTV/CADTV/Component/HDMI-DTV/DVI-DTV (720p/1080i/1080p) input source. 45 Just Scan Normally the edges... of the picture will be cropped. (16:9 16:9) Zoom 2 Choose Zoom 2 when you want to view the picture without any alteration. Just Scan operates only in a linear proportion to be altered, both vertically ...

Owners Manual
Page 48
... Caption Multi Audio Sleep Timer CH Del/Add/Fav 16:9 3 Off F Vivid G Standard Off English Off Add Close Vivid Expert2 Expert1 Standard Game Cinema Sport 1 PICTURE Select Vivid, Standard, Cinema, Sport, Game, Expert1, or Expert2. 2 RETURN Return to TV viewing. You can use a preset, change each setting manually. PICTURE CONTROL PRESET PICTURE SETTINGS Picture Mode -
... Caption Multi Audio Sleep Timer CH Del/Add/Fav 16:9 3 Off F Vivid G Standard Off English Off Add Close Vivid Expert2 Expert1 Standard Game Cinema Sport 1 PICTURE Select Vivid, Standard, Cinema, Sport, Game, Expert1, or Expert2. 2 RETURN Return to TV viewing. You can use a preset, change each setting manually. PICTURE CONTROL PRESET PICTURE SETTINGS Picture Mode -

Owners Manual
Page 49
... C o o l, Medium, or W a r m. 5 RETURN Return to TV viewing. PICTURE CONTROL PICTURE Move Enter E • Contrast 50 • Brightness 50 • Sharpness 50 • Color 50 • Tint 0R G • Advanced Control • Reset Screen (RGB-PC) 1 MENU 2 ENTER Select PICTURE. PICTURE Move Enter E • Contrast 50 • Brightness • Sharpness • Color • Tint 50 Color Temperature 50 5F0resh Contrast F0reshR Color G •...
... C o o l, Medium, or W a r m. 5 RETURN Return to TV viewing. PICTURE CONTROL PICTURE Move Enter E • Contrast 50 • Brightness 50 • Sharpness 50 • Color 50 • Tint 0R G • Advanced Control • Reset Screen (RGB-PC) 1 MENU 2 ENTER Select PICTURE. PICTURE Move Enter E • Contrast 50 • Brightness • Sharpness • Color • Tint 50 Color Temperature 50 5F0resh Contrast F0reshR Color G •...

Owners Manual
Page 50
Make appropriate adjustments. 6 RETURN Return to TV viewing. 48 MENU Return to the previous menu. E E PICTURE CONTROL PICTURE CONTROL MANUAL PICTURE ADJUSTMENT Picture Mode - Select Contrast, Brightness, Sharpness, Color, or Tint. PICTURE Move Enter Aspect Ratio : 16:9 Picture Mode : Standard • Contrast 90 • Brightness 50 • Sharpness 60 • Color 60 • Tint 0R G • Advanced Control E E •...
Make appropriate adjustments. 6 RETURN Return to TV viewing. 48 MENU Return to the previous menu. E E PICTURE CONTROL PICTURE CONTROL MANUAL PICTURE ADJUSTMENT Picture Mode - Select Contrast, Brightness, Sharpness, Color, or Tint. PICTURE Move Enter Aspect Ratio : 16:9 Picture Mode : Standard • Contrast 90 • Brightness 50 • Sharpness 60 • Color 60 • Tint 0R G • Advanced Control E E •...


