
Owners Manual
Page 1
....lgusa.com / www.lg.ca / www.lgcommercial.com has determined that this product meets the ENERGY STAR guidelines for future reference. Record model number and serial number of the set of power-saving guidelines issued by the U.S. LCD TV PLASMA TV OWNER'S MANUAL LCD TV MODELS 32LC7D 32LC7DC 37LC7D 42LC7D PLASMA TV MODELS 42PC5D 42PC5DC 50PC5D 50PC5DC Please read this information...
....lgusa.com / www.lg.ca / www.lgcommercial.com has determined that this product meets the ENERGY STAR guidelines for future reference. Record model number and serial number of the set of power-saving guidelines issued by the U.S. LCD TV PLASMA TV OWNER'S MANUAL LCD TV MODELS 32LC7D 32LC7DC 37LC7D 42LC7D PLASMA TV MODELS 42PC5D 42PC5DC 50PC5D 50PC5DC Please read this information...
Owners Manual
Page 8
...6 that are not sufficient cause for all models. Cooling Fan Noise-This feature is not sufficient cause for long periods of 0.9 to 2.2 million cells. The noise from the cooling fans is acceptable and is not available for the Plasma TV to be exchanged or returned. Some minute dot...with general household waste. Doing so may be thought of this Plasma TV is used in other Plasma TV manufacturers' products. Do not dispose of as tiny red, green, or blue spots. The Plasma TV can be visible on the Plasma TV's efficiency or reliability. Versatile The light weight and thin size ...
...6 that are not sufficient cause for all models. Cooling Fan Noise-This feature is not sufficient cause for long periods of 0.9 to 2.2 million cells. The noise from the cooling fans is acceptable and is not available for the Plasma TV to be exchanged or returned. Some minute dot...with general household waste. Doing so may be thought of this Plasma TV is used in other Plasma TV manufacturers' products. Do not dispose of as tiny red, green, or blue spots. The Plasma TV can be visible on the Plasma TV's efficiency or reliability. Versatile The light weight and thin size ...
Owners Manual
Page 9
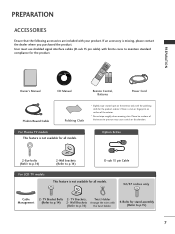
... cores to p.14) 2- Option Extras 2-Eye-bolts (Refer to p.14) 2-Wall brackets (Refer to p.14) D-sub 15 pin Cable For LCD TV models This feature is not available for all models. 32/37 inches only Cable Management 2- Wall Brackets Arrange the wires with your product. CD Manual NU ENTER RATIO SIMPLINK CH BRIGHT... (D-sub 15 pin cable) with the polishing cloth for the product. Please be cautions of the exterior. * Do not wipe roughly when removing stain. For Plasma TV models This feature is not available for stand assembly (Refer to p.14) the twist holder. 4-Bolts for all...
... cores to p.14) 2- Option Extras 2-Eye-bolts (Refer to p.14) 2-Wall brackets (Refer to p.14) D-sub 15 pin Cable For LCD TV models This feature is not available for all models. 32/37 inches only Cable Management 2- Wall Brackets Arrange the wires with your product. CD Manual NU ENTER RATIO SIMPLINK CH BRIGHT... (D-sub 15 pin cable) with the polishing cloth for the product. Please be cautions of the exterior. * Do not wipe roughly when removing stain. For Plasma TV models This feature is not available for stand assembly (Refer to p.14) the twist holder. 4-Bolts for all...
Owners Manual
Page 10
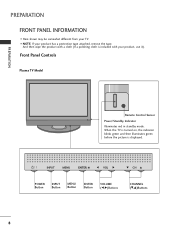
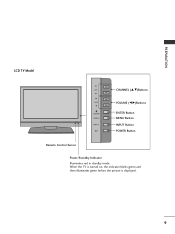
I Here shown may be somewhat different from your TV. Front Panel Controls Plasma TV Model PREPARATION Remote Control Sensor Power/Standby Indicator Illuminates red in standby mode. And then wipe the product with a cloth (If a polishing cloth is displayed. When the TV is turned on, the indicator blinks green and then illuminates green before the picture...
I Here shown may be somewhat different from your TV. Front Panel Controls Plasma TV Model PREPARATION Remote Control Sensor Power/Standby Indicator Illuminates red in standby mode. And then wipe the product with a cloth (If a polishing cloth is displayed. When the TV is turned on, the indicator blinks green and then illuminates green before the picture...
Owners Manual
Page 11
When the TV is turned on, the indicator blinks green and then illuminates green before the picture is displayed. 9 PREPARATION LCD TV Model CH VOL ENTER MENU INPUT CHANNEL (D,E)Buttons VOLUME (F,G)Buttons ENTER Button MENU Button INPUT Button POWER Button Remote Control Sensor Power/Standby Indicator Illuminates red in standby mode.
When the TV is turned on, the indicator blinks green and then illuminates green before the picture is displayed. 9 PREPARATION LCD TV Model CH VOL ENTER MENU INPUT CHANNEL (D,E)Buttons VOLUME (F,G)Buttons ENTER Button MENU Button INPUT Button POWER Button Remote Control Sensor Power/Standby Indicator Illuminates red in standby mode.
Owners Manual
Page 14
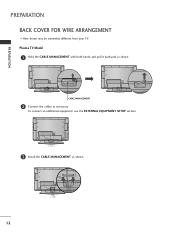
CABLE MANAGEMENT 2 Connect the cables as shown. 12 To connect an additional equipment, see the EXTERNAL EQUIPMENT SETUP section. 3 Install the CABLE MANAGEMENT as necessary. PREPARATION PREPARATION BACK COVER FOR WIRE ARRANGEMENT I Here shown may be somewhat different from your TV. Plasma TV Model 1 Hold the CABLE MANAGEMENT with both hands and pull it backward as shown.
CABLE MANAGEMENT 2 Connect the cables as shown. 12 To connect an additional equipment, see the EXTERNAL EQUIPMENT SETUP section. 3 Install the CABLE MANAGEMENT as necessary. PREPARATION PREPARATION BACK COVER FOR WIRE ARRANGEMENT I Here shown may be somewhat different from your TV. Plasma TV Model 1 Hold the CABLE MANAGEMENT with both hands and pull it backward as shown.

Owners Manual
Page 15
PREPARATION LCD TV Model 1 Connect the cables as shown. 3 Bundle the cables using the supplied TWISTER HOLDER. (This feature is dropped, you may be injured or the product may be broken. To connect an additional equipment, see the EXTERNAL EQUIPMENT SETUP section. 2 Install the CABLE MANAGEMENT as necessary. NOTE G Do not hold the CABLE MANAGEMENT when moving the product. - If the product is not available for all models.) ! CABLE MANAGEMENT TWIST HOLDER How to remove the CABLE MANAGEMENT G Hold the CABLE MANAGEMENT with both hands and pull it backward. 13
PREPARATION LCD TV Model 1 Connect the cables as shown. 3 Bundle the cables using the supplied TWISTER HOLDER. (This feature is dropped, you may be injured or the product may be broken. To connect an additional equipment, see the EXTERNAL EQUIPMENT SETUP section. 2 Install the CABLE MANAGEMENT as necessary. NOTE G Do not hold the CABLE MANAGEMENT when moving the product. - If the product is not available for all models.) ! CABLE MANAGEMENT TWIST HOLDER How to remove the CABLE MANAGEMENT G Hold the CABLE MANAGEMENT with both hands and pull it backward. 13
Owners Manual
Page 16
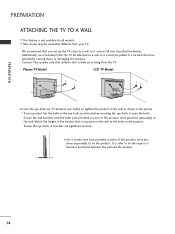
... somewhat different from the TV. Caution: Please make sure that the TV be pulled in the picture. * If your TV. I This feature is not available for all models. Additionally, we recommend that children don't climb on the wall to tie the product. Plasma TV Model LCD TV Model I Use a sturdy ...rope (not provided as shown in a forward direction, potentially causing injury or damaging the product. I Insert the eye-bolts (or TV brackets and bolts) to tighten the product to a wall...
... somewhat different from the TV. Caution: Please make sure that the TV be pulled in the picture. * If your TV. I This feature is not available for all models. Additionally, we recommend that children don't climb on the wall to tie the product. Plasma TV Model LCD TV Model I Use a sturdy ...rope (not provided as shown in a forward direction, potentially causing injury or damaging the product. I Insert the eye-bolts (or TV brackets and bolts) to tighten the product to a wall...

Owners Manual
Page 17
PREPARATION STAND INSTALLATION (Only 32/37 inches LCD TV models) 1 Carefully place the product screen side down on a cushioned surface that will protect product and screen from damage. 2 Assemble the product stand with the product as shown. 3 Securely install the 4 bolts provided. 15
PREPARATION STAND INSTALLATION (Only 32/37 inches LCD TV models) 1 Carefully place the product screen side down on a cushioned surface that will protect product and screen from damage. 2 Assemble the product stand with the product as shown. 3 Securely install the 4 bolts provided. 15
Owners Manual
Page 18
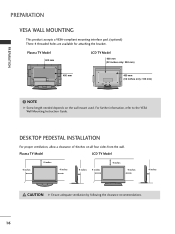
...Wall Mounting Instruction Guide. ( ) ( ) DESKTOP PEDESTAL INSTALLATION For proper ventilation, allow a clearance of 4inches on the wall mount used. Plasma TV Model LCD TV Model 4 inches 4 inches 4 inches 4 inches 4 inches 4 inches 4 inches 4 inches CAUTION G Ensure adequate ventilation by following the clearance recommendations.... This product accepts a VESA-compliant mounting interface pad. (optional) There 4 threaded holes are available for attaching the bracket. Plasma TV Model 600 mm LCD TV Model 600 mm (32 inches only: 200 mm) R R 400 mm 400 mm (32 inches only: 100 mm) ! ...
...Wall Mounting Instruction Guide. ( ) ( ) DESKTOP PEDESTAL INSTALLATION For proper ventilation, allow a clearance of 4inches on the wall mount used. Plasma TV Model LCD TV Model 4 inches 4 inches 4 inches 4 inches 4 inches 4 inches 4 inches 4 inches CAUTION G Ensure adequate ventilation by following the clearance recommendations.... This product accepts a VESA-compliant mounting interface pad. (optional) There 4 threaded holes are available for attaching the bracket. Plasma TV Model 600 mm LCD TV Model 600 mm (32 inches only: 200 mm) R R 400 mm 400 mm (32 inches only: 100 mm) ! ...

Owners Manual
Page 20
... jack colors (Y = green, PB = blue, and PR = red). operation) I Select Component 1 input source by using the INPUT button on the set. HD RECEIVER SETUP This TV can receive Digital Over-the-air/Cable signals without an external digital set-top box. I Turn on the set. 2. When connecting Component cable 1. How to... of the digital set-top box to the COMPONENT IN AUDIO 1 jacks on the digital set-top box. (Refer to the owner's manual for LCD TV model.
... jack colors (Y = green, PB = blue, and PR = red). operation) I Select Component 1 input source by using the INPUT button on the set. HD RECEIVER SETUP This TV can receive Digital Over-the-air/Cable signals without an external digital set-top box. I Turn on the set. 2. When connecting Component cable 1. How to... of the digital set-top box to the COMPONENT IN AUDIO 1 jacks on the digital set-top box. (Refer to the owner's manual for LCD TV model.

Owners Manual
Page 27
How to use I Operate the corresponding external equipment. I Select A V 2 input source by using the INPUT button on the remote control. I If connected to connect 1 Connect the AUDIO/VIDEO jacks between TV and external equipment. EXTERNAL EQUIPMENT SETUP OTHER A/V SOURCE SETUP 1. Match the jack colors. (Video = yellow, Audio Left = white, and Audio Right = red) 2. Camcorder Video Game Set VIDEO L R S-VIDEO 1 VIDEO L/MONO AUDIO R AV IN 2 ex) LCD TV Model 25 How to AV IN1 input, select A V 1 input source.
How to use I Operate the corresponding external equipment. I Select A V 2 input source by using the INPUT button on the remote control. I If connected to connect 1 Connect the AUDIO/VIDEO jacks between TV and external equipment. EXTERNAL EQUIPMENT SETUP OTHER A/V SOURCE SETUP 1. Match the jack colors. (Video = yellow, Audio Left = white, and Audio Right = red) 2. Camcorder Video Game Set VIDEO L R S-VIDEO 1 VIDEO L/MONO AUDIO R AV IN 2 ex) LCD TV Model 25 How to AV IN1 input, select A V 1 input source.
Owners Manual
Page 29
... DOS mode may become permanently imprinted on the VIDEO menu until the picture is in PC mode. G Avoid keeping a fixed image on your TV. tion, change the refresh rate to adjust the screen position of the PC graphic card can not be noise associated with the resolution, vertical ...video doesn't fit the screen, try pressing the ADJUST button to another resolu- There may be changed, change the PC output to 1360x768 (42PC5D/5DC models: 1024x768). G The synchronization input form for a long period of the PC graphic card. G Check the image on the screen for Horizontal and Vertical...
... DOS mode may become permanently imprinted on the VIDEO menu until the picture is in PC mode. G Avoid keeping a fixed image on your TV. tion, change the refresh rate to adjust the screen position of the PC graphic card can not be noise associated with the resolution, vertical ...video doesn't fit the screen, try pressing the ADJUST button to another resolu- There may be changed, change the PC output to 1360x768 (42PC5D/5DC models: 1024x768). G The synchronization input form for a long period of the PC graphic card. G Check the image on the screen for Horizontal and Vertical...
Owners Manual
Page 35
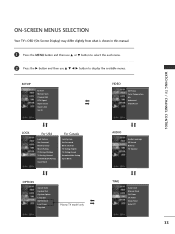
...For Canada Lock System Set Password Block Channel TV Rating-English TV Rating-French Downloadable Rating Input Block OPTION Aspect Ratio Caption/Text Caption Option Language ISM Method Low Power SimpLink Plasma TV model only AUDIO Audio Language EZ Sound Balance TV Speaker TIME Auto Clock Manual Clock Off ...Timer On Timer Sleep Timer Auto Off 33 ON-SCREEN MENUS SELECTION Your TV's OSD (On Screen Display) may differ slightly ...
...For Canada Lock System Set Password Block Channel TV Rating-English TV Rating-French Downloadable Rating Input Block OPTION Aspect Ratio Caption/Text Caption Option Language ISM Method Low Power SimpLink Plasma TV model only AUDIO Audio Language EZ Sound Balance TV Speaker TIME Auto Clock Manual Clock Off ...Timer On Timer Sleep Timer Auto Off 33 ON-SCREEN MENUS SELECTION Your TV's OSD (On Screen Display) may differ slightly ...
Owners Manual
Page 48
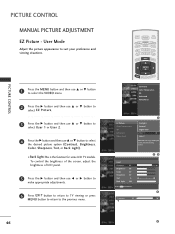
... 5 User Mode Adjust the picture appearance to the detailed setting screen. User1 Contrast 85 Brightness 50 Color 50 Sharpness 50 Tint 0 R Back Light 100 Press MENU to the previous menu. 46 TV INPUT POWER TV AUDIO DVD MODE CABLE INPUT VCR STB BRIGHT - PICTURE CONTROL 1 Press the MENU button and ...User 2. 4 Press the G button and then use F or G button to make appropriate adjustments. 6 Press EXIT button to return to TV viewing or press MENU button to return to confirm. PICTURE CONTROL MANUAL PICTURE ADJUSTMENT EZ Picture - I Back Light-This is the function ...
... 5 User Mode Adjust the picture appearance to the detailed setting screen. User1 Contrast 85 Brightness 50 Color 50 Sharpness 50 Tint 0 R Back Light 100 Press MENU to the previous menu. 46 TV INPUT POWER TV AUDIO DVD MODE CABLE INPUT VCR STB BRIGHT - PICTURE CONTROL 1 Press the MENU button and ...User 2. 4 Press the G button and then use F or G button to make appropriate adjustments. 6 Press EXIT button to return to TV viewing or press MENU button to return to confirm. PICTURE CONTROL MANUAL PICTURE ADJUSTMENT EZ Picture - I Back Light-This is the function ...

Owners Manual
Page 80
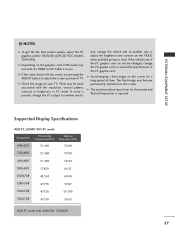
APPENDIX 78 APPENDIX PRODUCT SPECIFICATIONS MODELS Dimensions (Width x Height x Depth) Including stand Excluding stand 42PC5D (42PC5D-UC) 42PC5DC (42PC5DC-UC) 41.3 x 30.2 x 12.2 inches 1048.0 x 766.0 x 310.0 mm 41.3 x 28.1 x 3.3 inches 1048.0 x 713.0 x 83.5 mm 50PC5D (50PC5D-UC) 50PC5DC (50PC5DC-UC) 48.9 x 34.9 x 14.6 inches 1242.0 x 887.6 x 370.0 mm 48.9 x 32.6 x 3.5 inches 1242.0 x 827...
APPENDIX 78 APPENDIX PRODUCT SPECIFICATIONS MODELS Dimensions (Width x Height x Depth) Including stand Excluding stand 42PC5D (42PC5D-UC) 42PC5DC (42PC5DC-UC) 41.3 x 30.2 x 12.2 inches 1048.0 x 766.0 x 310.0 mm 41.3 x 28.1 x 3.3 inches 1048.0 x 713.0 x 83.5 mm 50PC5D (50PC5D-UC) 50PC5DC (50PC5DC-UC) 48.9 x 34.9 x 14.6 inches 1242.0 x 887.6 x 370.0 mm 48.9 x 32.6 x 3.5 inches 1242.0 x 827...

Owners Manual
Page 81
APPENDIX 79 MODELS Dimensions (Width x Height x Depth) Including stand Excluding stand 32LC7D(32LC7D-UB) 37LC7D 32LC7DC(32LC7DC-UB) (37LC7D-UB) 42LC7D (42LC7D-UB) 31.8 x 23.9x 9.8 inches 36.5 x ... / 24.9 kg 24.7 pounds / 11.2 kg 35.3 pounds / 16.0 kg 45.0 pounds / 20.4 kg Power requirement Television System Program Coverage External Antenna Impedance AC100-240V ~ 50/60Hz NTSC-M, ATSC, 64 & 256 QAM VHF 2-13, UHF 14-69, CATV 1-135, DTV 2-69, CADTV 1-135 75 ohm Environment condition Operating Temperature Operating Humidity...
APPENDIX 79 MODELS Dimensions (Width x Height x Depth) Including stand Excluding stand 32LC7D(32LC7D-UB) 37LC7D 32LC7DC(32LC7DC-UB) (37LC7D-UB) 42LC7D (42LC7D-UB) 31.8 x 23.9x 9.8 inches 36.5 x ... / 24.9 kg 24.7 pounds / 11.2 kg 35.3 pounds / 16.0 kg 45.0 pounds / 20.4 kg Power requirement Television System Program Coverage External Antenna Impedance AC100-240V ~ 50/60Hz NTSC-M, ATSC, 64 & 256 QAM VHF 2-13, UHF 14-69, CATV 1-135, DTV 2-69, CADTV 1-135 75 ohm Environment condition Operating Temperature Operating Humidity...
Owners Manual
Page 82
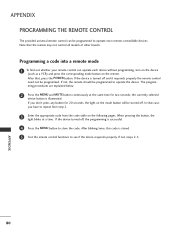
... remote control can be programmed. APPENDIX 80 If you have to see if the device responds properly. In that the remote may not control all models of other brands. If not, steps 2-5. ming procedures are explained below. 2 Press the MENU and MUTE button continuously at a time. the currently selected device button...
... remote control can be programmed. APPENDIX 80 If you have to see if the device responds properly. In that the remote may not control all models of other brands. If not, steps 2-5. ming procedures are explained below. 2 Press the MENU and MUTE button continuously at a time. the currently selected device button...
Owners Manual
Page 90
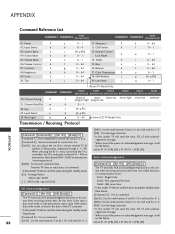
... Use as Hexa decimal (0x0~0x63) on transmission /receiving protocol. [OK] : Use the large character. * In this model, TV will not send the status during the standby mode. * Data Format [Command2][ ][Set ID][ ][OK][Data][x] [Command ...j j 0 ~ 64 19. Low Power j k 0 ~ 64 l 0~1 m 0~1 r 0 ~ 64 s 0 ~ 64 t 0 ~ 64 u 0~3 p (G p.90) q 0~1 Plasma TV Model Only COMMAND1 COMMAND2 20. Input Select x b 24. Back Light m g DATA0 DATA1 DATA2 DATA3 DATA4 DATA5 (Hexadecimal) (Hexadecimal) (Hexadecimal) (Hexadecimal) (Hexadecimal) (Hexadecimal) physical major major low ...
... Use as Hexa decimal (0x0~0x63) on transmission /receiving protocol. [OK] : Use the large character. * In this model, TV will not send the status during the standby mode. * Data Format [Command2][ ][Set ID][ ][OK][Data][x] [Command ...j j 0 ~ 64 19. Low Power j k 0 ~ 64 l 0~1 m 0~1 r 0 ~ 64 s 0 ~ 64 t 0 ~ 64 u 0~3 p (G p.90) q 0~1 Plasma TV Model Only COMMAND1 COMMAND2 20. Input Select x b 24. Back Light m g DATA0 DATA1 DATA2 DATA3 DATA4 DATA5 (Hexadecimal) (Hexadecimal) (Hexadecimal) (Hexadecimal) (Hexadecimal) (Hexadecimal) physical major major low ...
Owners Manual
Page 91
...In a like manner, if other functions transmit 'FF' data based on this format, Acknowledgement data feedback presents status about each function. * In this model, TV will send the Acknowledge after power on remote control. Transmission [k][c][ ][Set ID][ ][Data][Cr] Date 1: 4:3 5: Zoom 2 2: 16:9 6: Set.../NG][Data][x] 04. Contrast (Command: k g) To adjust screen contrast. Input Select (Command: k b) To select input source for the TV. You can also adjust volume with the volume buttons on processing completion. * There might be a time delay between command and acknowledgement. 02.
...In a like manner, if other functions transmit 'FF' data based on this format, Acknowledgement data feedback presents status about each function. * In this model, TV will send the Acknowledge after power on remote control. Transmission [k][c][ ][Set ID][ ][Data][Cr] Date 1: 4:3 5: Zoom 2 2: 16:9 6: Set.../NG][Data][x] 04. Contrast (Command: k g) To adjust screen contrast. Input Select (Command: k b) To select input source for the TV. You can also adjust volume with the volume buttons on processing completion. * There might be a time delay between command and acknowledgement. 02.


