
Owners Manual
Page 2
LG's own special digital image generator, consisting of digital television, HDTV formats include 1080i and 720p resolutions. Manufactured under license from Dolby Laboratories. A subset of a full ... screens, and AC3 digital audio. High-definition television. "Dolby "and the double-D symbol are trademarks of LG's audio/video device connected to the HDMI (high-definition multimedia interface), LG TV with this logo works easily with one remote control. It has 2 HDMI ports that connect audio and video devices with one cable and produces...
LG's own special digital image generator, consisting of digital television, HDTV formats include 1080i and 720p resolutions. Manufactured under license from Dolby Laboratories. A subset of a full ... screens, and AC3 digital audio. High-definition television. "Dolby "and the double-D symbol are trademarks of LG's audio/video device connected to the HDMI (high-definition multimedia interface), LG TV with this logo works easily with one remote control. It has 2 HDMI ports that connect audio and video devices with one cable and produces...
Owners Manual
Page 6
... 42 Preset Picture Settings 44 - Preset 45 Manual Picture Adjustment 46 - EZ Picture - Cinema 3:2 Pulldown Mode 49 Advanced - Black (Darkness) Level 50 Picture Reset 51 Image Sticking Minimization (ISM) Method 52 Low - Color Tone - Add / Delete Channel (Manual Scan 35 - EZ Picture - User...Setup 23 Other A/V Source Setup 25 PC Setup 26 AV Out Setup & Digital Audio Output 29 WATCHING TV / CHANNEL CONTROL Remote Control Key Functions 30 Turning On TV 32 Channel Selection 32 Volume Adjustment 32 On-Screen Menus Selection 33 Channel Search 34 - Preset 44 -...
... 42 Preset Picture Settings 44 - Preset 45 Manual Picture Adjustment 46 - EZ Picture - Cinema 3:2 Pulldown Mode 49 Advanced - Black (Darkness) Level 50 Picture Reset 51 Image Sticking Minimization (ISM) Method 52 Low - Color Tone - Add / Delete Channel (Manual Scan 35 - EZ Picture - User...Setup 23 Other A/V Source Setup 25 PC Setup 26 AV Out Setup & Digital Audio Output 29 WATCHING TV / CHANNEL CONTROL Remote Control Key Functions 30 Turning On TV 32 Channel Selection 32 Volume Adjustment 32 On-Screen Menus Selection 33 Channel Search 34 - Preset 44 -...

Owners Manual
Page 7
TIME SETTING Clock Setting 64 Auto Clock Setup 64 Manual Clock Setup 65 Auto On/Off Timer Setting 66 Sleep Timer Setting 67 Auto Shut-off Setting 68 PARENTAL CONTROL / RATINGS Set Password & Lock System 69 Channel Blocking 71 External Input Blocking 71 Movie & TV Rating 72 APPENDIX Troubleshooting 75 Maintenance 77 Product Specifications 78 Programming the Remote Control 80 IR Codes 84 External Control Through RS-232C 86 5
TIME SETTING Clock Setting 64 Auto Clock Setup 64 Manual Clock Setup 65 Auto On/Off Timer Setting 66 Sleep Timer Setting 67 Auto Shut-off Setting 68 PARENTAL CONTROL / RATINGS Set Password & Lock System 69 Channel Blocking 71 External Input Blocking 71 Movie & TV Rating 72 APPENDIX Troubleshooting 75 Maintenance 77 Product Specifications 78 Programming the Remote Control 80 IR Codes 84 External Control Through RS-232C 86 5
Owners Manual
Page 9
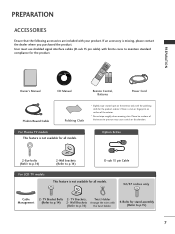
... ENTER EXIT 1 4 TIMER VOL MUTE RATIO SIMPLINK FAV CH 2 7 5 3 8 6 0 9 BACK 1.5V 1.5V 1 4 7 Remote Control, Batteries Power Cord 75ohm Round Cable Polishing Cloth * Slightly wipe stained spot on surface of that the following accessories are included with (Refer to... cable) with the polishing cloth for the product exterior if there is not available for all models. 32/37 inches only Cable Management 2- For Plasma TV models This feature is stain or fingerprint on the exterior only with ferrite cores to p.15) 7 Option Extras 2-Eye-bolts (Refer to p.14...
... ENTER EXIT 1 4 TIMER VOL MUTE RATIO SIMPLINK FAV CH 2 7 5 3 8 6 0 9 BACK 1.5V 1.5V 1 4 7 Remote Control, Batteries Power Cord 75ohm Round Cable Polishing Cloth * Slightly wipe stained spot on surface of that the following accessories are included with (Refer to... cable) with the polishing cloth for the product exterior if there is not available for all models. 32/37 inches only Cable Management 2- For Plasma TV models This feature is stain or fingerprint on the exterior only with ferrite cores to p.15) 7 Option Extras 2-Eye-bolts (Refer to p.14...
Owners Manual
Page 10
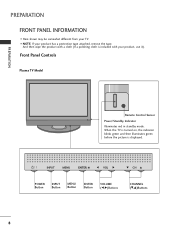
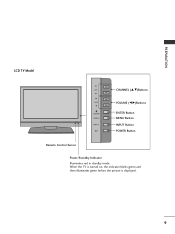
...Buttons 8 PREPARATION FRONT PANEL INFORMATION I NOTE: If your TV. I Here shown may be somewhat different from your product has a protection tape attached, remove the tape. Front Panel Controls Plasma TV Model PREPARATION Remote Control Sensor Power/Standby Indicator Illuminates red in standby mode.... When the TV is turned on, the indicator blinks green and then illuminates green before the ...
...Buttons 8 PREPARATION FRONT PANEL INFORMATION I NOTE: If your TV. I Here shown may be somewhat different from your product has a protection tape attached, remove the tape. Front Panel Controls Plasma TV Model PREPARATION Remote Control Sensor Power/Standby Indicator Illuminates red in standby mode.... When the TV is turned on, the indicator blinks green and then illuminates green before the ...
Owners Manual
Page 11
When the TV is turned on, the indicator blinks green and then illuminates green before the picture is displayed. 9 PREPARATION LCD TV Model CH VOL ENTER MENU INPUT CHANNEL (D,E)Buttons VOLUME (F,G)Buttons ENTER Button MENU Button INPUT Button POWER Button Remote Control Sensor Power/Standby Indicator Illuminates red in standby mode.
When the TV is turned on, the indicator blinks green and then illuminates green before the picture is displayed. 9 PREPARATION LCD TV Model CH VOL ENTER MENU INPUT CHANNEL (D,E)Buttons VOLUME (F,G)Buttons ENTER Button MENU Button INPUT Button POWER Button Remote Control Sensor Power/Standby Indicator Illuminates red in standby mode.

Owners Manual
Page 13
...Connect the audio from an S-VIDEO device. 11 PREPARATION 1 COMPONENT IN Connect a component video/audio device to these jacks. 2 AV OUT Connect a second TV or monitor. 3 AV (Audio/Video) IN 1 Connect audio/video output from an external device to these ports do not work. 6 HDMI/DVI IN...PC) Connect the output from a PC. Note: In standby mode, these jacks. S-VIDEO Connect S-Video out from a PC or DTV. 8 Remote Control Port Connect a wired remote control. 9 RS-232C IN (CONTROL & SERVICE) PORT For external control devices. 10 SERVICE 11 Power Cord Socket For operation with AC power. ...
...Connect the audio from an S-VIDEO device. 11 PREPARATION 1 COMPONENT IN Connect a component video/audio device to these jacks. 2 AV OUT Connect a second TV or monitor. 3 AV (Audio/Video) IN 1 Connect audio/video output from an external device to these ports do not work. 6 HDMI/DVI IN...PC) Connect the output from a PC. Note: In standby mode, these jacks. S-VIDEO Connect S-Video out from a PC or DTV. 8 Remote Control Port Connect a wired remote control. 9 RS-232C IN (CONTROL & SERVICE) PORT For external control devices. 10 SERVICE 11 Power Cord Socket For operation with AC power. ...

Owners Manual
Page 20
...source by using the INPUT button on the digital set-top box. (Refer to the owner's manual for LCD TV model. Signal 480i 480p 720p 1080i 1080p Component 1/2 Yes Yes Yes Yes Yes HDMI1/DVI, HDMI2 No Yes ... IN VIDEO 1 jacks on the set . I This part of the digital set -top box. HD RECEIVER SETUP This TV can receive Digital Over-the-air/Cable signals without an external digital set top box to COMPONENT IN2 input, select Component 2...video outputs (Y, PB, PR) of EXTERNAL EQUIPMENT SETUP mainly use I Turn on the remote control. Match the jack colors (Y = green, PB = blue, and PR = red).
...source by using the INPUT button on the digital set-top box. (Refer to the owner's manual for LCD TV model. Signal 480i 480p 720p 1080i 1080p Component 1/2 Yes Yes Yes Yes Yes HDMI1/DVI, HDMI2 No Yes ... IN VIDEO 1 jacks on the set . I This part of the digital set -top box. HD RECEIVER SETUP This TV can receive Digital Over-the-air/Cable signals without an external digital set top box to COMPONENT IN2 input, select Component 2...video outputs (Y, PB, PR) of EXTERNAL EQUIPMENT SETUP mainly use I Turn on the remote control. Match the jack colors (Y = green, PB = blue, and PR = red).
Owners Manual
Page 21
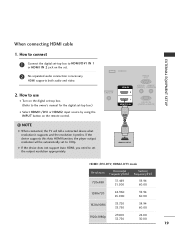
NOTE G When connected, the TV will be automatically set the output resolution appropriately. How to connect 1 Connect the digital set-top box to HDMI/DVI IN 1 or HDMI IN 2 jack on the set -top box.) I Turn on the remote control. ! HDMI supports both audio and video. 2. How to use I... digital set . 2 No separated audio connection is necessary. SERVICE RGB IN (PC) ANTENNA/ CABLE IN HDMI IN 2 1 HDMI/DVI IN AUDIO IN REMOTE (RGB/DVI) CONTROL IN RS-232C IN (CONTROL & SERVICE) 1 HDMI-DTV OUTPUT HDMI1/DVI-DTV, HDMI2-DTV mode Resolution Horizontal Vertical Frequency(KHz) Frequency...
NOTE G When connected, the TV will be automatically set the output resolution appropriately. How to connect 1 Connect the digital set-top box to HDMI/DVI IN 1 or HDMI IN 2 jack on the set -top box.) I Turn on the remote control. ! HDMI supports both audio and video. 2. How to use I... digital set . 2 No separated audio connection is necessary. SERVICE RGB IN (PC) ANTENNA/ CABLE IN HDMI IN 2 1 HDMI/DVI IN AUDIO IN REMOTE (RGB/DVI) CONTROL IN RS-232C IN (CONTROL & SERVICE) 1 HDMI-DTV OUTPUT HDMI1/DVI-DTV, HDMI2-DTV mode Resolution Horizontal Vertical Frequency(KHz) Frequency...
Owners Manual
Page 22
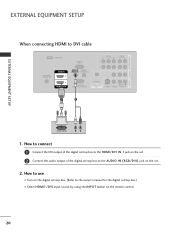
How to use I Select HDMI1/DVI input source by using the INPUT button on the remote control. 20 How to connect 1 Connect the DVI output of the digital set-top box to the HDMI/DVI IN 1 jack on the set. 2 Connect ... of the digital set-top box to DVI cable SERVICE RGB IN (PC) VIDEO AUDIO ANTENNA/ CABLE IN HDMI IN 2 1 HDMI/DVI IN AUDIO IN REMOTE (RGB/DVI) CONTROL IN RS-232C IN (CONTROL & SERVICE) OPTICAL DIGITAL AUDIO OUT S-VIDEO VIDEO (MONO) AUDIO 1 2 DVI-DTV OUTPUT L R 1. COMPONENT IN AV OUT AV...
How to use I Select HDMI1/DVI input source by using the INPUT button on the remote control. 20 How to connect 1 Connect the DVI output of the digital set-top box to the HDMI/DVI IN 1 jack on the set. 2 Connect ... of the digital set-top box to DVI cable SERVICE RGB IN (PC) VIDEO AUDIO ANTENNA/ CABLE IN HDMI IN 2 1 HDMI/DVI IN AUDIO IN REMOTE (RGB/DVI) CONTROL IN RS-232C IN (CONTROL & SERVICE) OPTICAL DIGITAL AUDIO OUT S-VIDEO VIDEO (MONO) AUDIO 1 2 DVI-DTV OUTPUT L R 1. COMPONENT IN AV OUT AV...

Owners Manual
Page 23
How to use I Refer to the DVD player's manual for operating instructions. I Turn on the DVD player, insert a DVD. Component ports on the TV Y PB PR Video output ports on the set . Match the jack colors (Y = green, PB = blue, and PR = red). 2 Connect the audio... SETUP When connecting Component cable 1. How to connect 1 Connect the video outputs (Y, PB, PR) of the DVD to the COMPONENT IN VIDEO1 jacks on the remote control. VIDEO AUDIO OPTICAL DIGITAL AUDIO OUT (MONO) S-VIDEO VIDEO AUDIO 1 2 Y PB PR L R Component Input ports To get better picture quality, connect...
How to use I Refer to the DVD player's manual for operating instructions. I Turn on the DVD player, insert a DVD. Component ports on the TV Y PB PR Video output ports on the set . Match the jack colors (Y = green, PB = blue, and PR = red). 2 Connect the audio... SETUP When connecting Component cable 1. How to connect 1 Connect the video outputs (Y, PB, PR) of the DVD to the COMPONENT IN VIDEO1 jacks on the remote control. VIDEO AUDIO OPTICAL DIGITAL AUDIO OUT (MONO) S-VIDEO VIDEO AUDIO 1 2 Y PB PR L R Component Input ports To get better picture quality, connect...

Owners Manual
Page 24
.... 2 Connect the audio outputs of the DVD to the DVD player's manual for operating instructions. I If connected to 720p. NOTE G When connected, the TV will be automatically set the output resolution appropriately. G If the device does not support Auto HDMI, you need to set to AV IN2, select A V ...VIDEO 1 AUDIO 2 OPTICAL DIGITAL AUDIO OUT S-VIDEO VIDEO (MONO) AUDIO SERVICE RGB IN (PC) ANTENNA/ CABLE IN HDMI IN 2 1 HDMI/DVI IN AUDIO IN REMOT (RGB/DVI) CONTROL RS-232C IN (CONTROL & SERVICE ! How to the DVD player's manual for operating instructions. I Turn on the...
.... 2 Connect the audio outputs of the DVD to the DVD player's manual for operating instructions. I If connected to 720p. NOTE G When connected, the TV will be automatically set the output resolution appropriately. G If the device does not support Auto HDMI, you need to set to AV IN2, select A V ...VIDEO 1 AUDIO 2 OPTICAL DIGITAL AUDIO OUT S-VIDEO VIDEO (MONO) AUDIO SERVICE RGB IN (PC) ANTENNA/ CABLE IN HDMI IN 2 1 HDMI/DVI IN AUDIO IN REMOT (RGB/DVI) CONTROL RS-232C IN (CONTROL & SERVICE ! How to the DVD player's manual for operating instructions. I Turn on the...
Owners Manual
Page 25
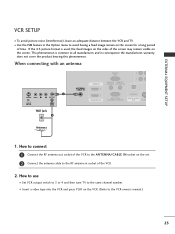
... 1 Connect the RF antenna out socket of time. EXTERNAL EQUIPMENT SETUP VCR SETUP VIDEO ( ) AUDIO I Set VCR output switch to 3 or 4 and then tune TV to the same channel number. When connecting with an antenna 1 S-VIDEO VIDEO L R ANT OUT OUTPUT SWITCH ANT IN Wall Jack 2 RGB IN (PC) ANTENNA/... CABLE IN HDMI IN 2 1 HDMI/DVI IN AUDIO IN REMOTE (RGB/DVI) CONTROL IN RS-232C IN (CONTROL & SERVICE) OPTICAL DIGITAL AUDIO OUT S-VID Antenna 1. I Insert a video tape into the VCR and press PLAY on...
... 1 Connect the RF antenna out socket of time. EXTERNAL EQUIPMENT SETUP VCR SETUP VIDEO ( ) AUDIO I Set VCR output switch to 3 or 4 and then tune TV to the same channel number. When connecting with an antenna 1 S-VIDEO VIDEO L R ANT OUT OUTPUT SWITCH ANT IN Wall Jack 2 RGB IN (PC) ANTENNA/... CABLE IN HDMI IN 2 1 HDMI/DVI IN AUDIO IN REMOTE (RGB/DVI) CONTROL IN RS-232C IN (CONTROL & SERVICE) OPTICAL DIGITAL AUDIO OUT S-VID Antenna 1. I Insert a video tape into the VCR and press PLAY on...

Owners Manual
Page 26
... DIGITAL AUDIO OUT S-VIDEO VIDEO (MONO) AUDIO CAUTION G Do not connect to the AUDIO input jacks on the remote control. I Select A V 1 input source by using the INPUT button on the remote control. In the event that you have a mono VCR, connect the audio cable from the VCR to the VCR... owner's manual.) I If connected to connect 1 Connect the AUDIO/VIDEO jacks between TV and VCR. How to AV IN2, select A V 2 input ...
... DIGITAL AUDIO OUT S-VIDEO VIDEO (MONO) AUDIO CAUTION G Do not connect to the AUDIO input jacks on the remote control. I Select A V 1 input source by using the INPUT button on the remote control. In the event that you have a mono VCR, connect the audio cable from the VCR to the VCR... owner's manual.) I If connected to connect 1 Connect the AUDIO/VIDEO jacks between TV and VCR. How to AV IN2, select A V 2 input ...

Owners Manual
Page 27
Camcorder Video Game Set VIDEO L R S-VIDEO 1 VIDEO L/MONO AUDIO R AV IN 2 ex) LCD TV Model 25 EXTERNAL EQUIPMENT SETUP OTHER A/V SOURCE SETUP 1. How to AV IN1 input, select A V 1 input source. I If connected to use I Operate the corresponding external equipment. Match the jack colors. (Video = yellow, Audio Left = white, and Audio Right = red) 2. How to connect 1 Connect the AUDIO/VIDEO jacks between TV and external equipment. I Select A V 2 input source by using the INPUT button on the remote control.
Camcorder Video Game Set VIDEO L R S-VIDEO 1 VIDEO L/MONO AUDIO R AV IN 2 ex) LCD TV Model 25 EXTERNAL EQUIPMENT SETUP OTHER A/V SOURCE SETUP 1. How to AV IN1 input, select A V 1 input source. I If connected to use I Operate the corresponding external equipment. Match the jack colors. (Video = yellow, Audio Left = white, and Audio Right = red) 2. How to connect 1 Connect the AUDIO/VIDEO jacks between TV and external equipment. I Select A V 2 input source by using the INPUT button on the remote control.

Owners Manual
Page 28
... to the HDMI/DVI I Select RGB-PC input source by using the INPUT button on the set . When connecting HDMI to the TV's settings. I Turn on the remote control. 1 2 26 DVI-PC OUTPUT AUDIO When connecting D-sub 15pin cable 1. How to connect 1 Connect the RGB output of...RGB OUTPUT RGB IN (PC) ANTENNA/ CABLE IN HDMI IN 2 1 HDMI/DVI IN AUDIO IN REMOTE (RGB/DVI) CONTROL RS-232C IN (CONTROL & SERVICE 2. EXTERNAL EQUIPMENT SETUP EXTERNAL EQUIPMENT SETUP PC SETUP This TV provides Plug and Play capability, meaning that the PC adjusts automatically to DVI cable 1.
... to the HDMI/DVI I Select RGB-PC input source by using the INPUT button on the set . When connecting HDMI to the TV's settings. I Turn on the remote control. 1 2 26 DVI-PC OUTPUT AUDIO When connecting D-sub 15pin cable 1. How to connect 1 Connect the RGB output of...RGB OUTPUT RGB IN (PC) ANTENNA/ CABLE IN HDMI IN 2 1 HDMI/DVI IN AUDIO IN REMOTE (RGB/DVI) CONTROL RS-232C IN (CONTROL & SERVICE 2. EXTERNAL EQUIPMENT SETUP EXTERNAL EQUIPMENT SETUP PC SETUP This TV provides Plug and Play capability, meaning that the PC adjusts automatically to DVI cable 1.
Owners Manual
Page 31
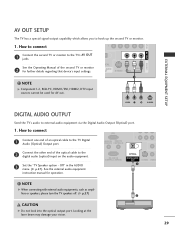
... cannot be used for further details regarding that device's input settings. ! AUDIO IN REMOTE (RGB/DVI) CONTROL IN 2 Connect the other end of an optical cable to the digital audio (optical) input on the audio equipment. 3 Set the "TV Speaker option - How to connect (PC) 1 Connect one end of the optical cable...
... cannot be used for further details regarding that device's input settings. ! AUDIO IN REMOTE (RGB/DVI) CONTROL IN 2 Connect the other end of an optical cable to the digital audio (optical) input on the audio equipment. 3 Set the "TV Speaker option - How to connect (PC) 1 Connect one end of the optical cable...

Owners Manual
Page 32
... you toggle this button, the SimpLink menu appears at the remote control sensor on screen. WATCHING TV / CHANNEL CONTROL WATCHING TV / CHANNEL CONTROL REMOTE CONTROL FUNCTIONS When using the remote control, aim it at the screen. TV, DVD, VCR, AUDIO, CABLE, or STB. G p.32...4 5 6 7 8 9 0 BACK 30 BACK Tune to enter a program number for multiple program channels such as 2-1, 2-2, etc. MODE Select the remote's operating mode. VCR/DVD Control video cassette recorders or DVD players. G p.42 SIMPLINK See a list of time before your preference. G p.36 CHANNEL Select...
... you toggle this button, the SimpLink menu appears at the remote control sensor on screen. WATCHING TV / CHANNEL CONTROL WATCHING TV / CHANNEL CONTROL REMOTE CONTROL FUNCTIONS When using the remote control, aim it at the screen. TV, DVD, VCR, AUDIO, CABLE, or STB. G p.32...4 5 6 7 8 9 0 BACK 30 BACK Tune to enter a program number for multiple program channels such as 2-1, 2-2, etc. MODE Select the remote's operating mode. VCR/DVD Control video cassette recorders or DVD players. G p.42 SIMPLINK See a list of time before your preference. G p.36 CHANNEL Select...

Owners Manual
Page 33
G p.28 Installing Batteries Remote control effective range I Open the battery compartment cover on the viewing environment. TV INPUT POWER TV AUDIO DVD MODE CABLE INPUT VCR STB BRIGHT - with new ones. I Install two 1.5V AA batteries. TV INPUT In AV 1-2, Component 1-2, RGB-PC, HDMI1/DVI, .../CADTV mode G p.62) ADJUST Adjust the screen resolution, position, size and phase. I Use a remote control up to the last TV channel. WATCHING TV / CHANNEL CONTROL POWER Turns your TV or any other programmed equipment on or off, depending on the mode. G p.44 SOUND Selects the ...
G p.28 Installing Batteries Remote control effective range I Open the battery compartment cover on the viewing environment. TV INPUT POWER TV AUDIO DVD MODE CABLE INPUT VCR STB BRIGHT - with new ones. I Install two 1.5V AA batteries. TV INPUT In AV 1-2, Component 1-2, RGB-PC, HDMI1/DVI, .../CADTV mode G p.62) ADJUST Adjust the screen resolution, position, size and phase. I Use a remote control up to the last TV channel. WATCHING TV / CHANNEL CONTROL POWER Turns your TV or any other programmed equipment on or off, depending on the mode. G p.44 SOUND Selects the ...

Owners Manual
Page 34
...or E) button to adjust the volume. 2 If you intend to standby mode. WATCHING TV / CHANNEL CONTROL TURNING ON TV 1 First, connect power cord correctly. I This TV is out. 3 When finished using the TV INPUT, INPUT button on the remote control. 2 Select the viewing source by pressing the MUTE or VOL (D or E) ...cord is programmed to remember which power state it was last set to turn TV on, press the , INPUT, CH (D or E) button on the TV or press the POWER, INPUT, TV INPUT, CH(D or E), Number (0~9) button on the remote control. At this moment, the TV switches to be away on the...
...or E) button to adjust the volume. 2 If you intend to standby mode. WATCHING TV / CHANNEL CONTROL TURNING ON TV 1 First, connect power cord correctly. I This TV is out. 3 When finished using the TV INPUT, INPUT button on the remote control. 2 Select the viewing source by pressing the MUTE or VOL (D or E) ...cord is programmed to remember which power state it was last set to turn TV on, press the , INPUT, CH (D or E) button on the TV or press the POWER, INPUT, TV INPUT, CH(D or E), Number (0~9) button on the remote control. At this moment, the TV switches to be away on the...


