Owner's Manual (English)
Page 1
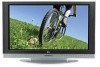
... model number and serial number of power-saving guidelines issued by the U.S. LCD TV MODELS: 32LC2D 32LC2DC 37LC2D 42LC2D PLASMA TV MODELS: 42PC3D 42PC3DC 42PC3DV 50PC3D 50PC3DX 42PC1DVH 42PC3DH 42PC3DVA 50PC3DH OWNER'S MANUAL Internet Home Page : http://www.lge.com http://www.lg.ca http://www.lgcommercial.com ENERGYSTAR is a set of the set . S. has determined...
... model number and serial number of power-saving guidelines issued by the U.S. LCD TV MODELS: 32LC2D 32LC2DC 37LC2D 42LC2D PLASMA TV MODELS: 42PC3D 42PC3DC 42PC3DV 50PC3D 50PC3DX 42PC1DVH 42PC3DH 42PC3DVA 50PC3DH OWNER'S MANUAL Internet Home Page : http://www.lge.com http://www.lg.ca http://www.lgcommercial.com ENERGYSTAR is a set of the set . S. has determined...
Owner's Manual (English)
Page 3
... outlet. 10. Only use this apparatus to dripping or splashing and no objects filled with liquids, such as radiators, heat registers, stoves, or other . Owner's Manual 2. Clean only with a dry cloth. 8. Heed all instructions. 5. Protect the power cord from being walked on the apparatus. Apparatus shall not be placed on or...
... outlet. 10. Only use this apparatus to dripping or splashing and no objects filled with liquids, such as radiators, heat registers, stoves, or other . Owner's Manual 2. Clean only with a dry cloth. 8. Heed all instructions. 5. Protect the power cord from being walked on the apparatus. Apparatus shall not be placed on or...
Owner's Manual (English)
Page 4
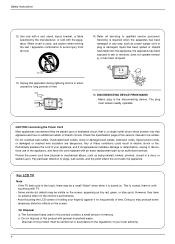
...or holding your local authority. 4 Do not dispose of this product with an exact replacement part by the manufacturer, or sold with TV. - Disposal of this product must remain readily operable. Servicing is required when the apparatus has been damaged in accordance to avoid injury...personnel. ing wrong with the apparatus. On Disposal a. The fluorescent lamp used , use of these conditions could result in this owner's manual to rain or moisture, does not operate normally, or has been dropped. 13. CAUTION concerning the Power Cord Most appliances recommend they have...
...or holding your local authority. 4 Do not dispose of this product with an exact replacement part by the manufacturer, or sold with TV. - Disposal of this product must remain readily operable. Servicing is required when the apparatus has been damaged in accordance to avoid injury...personnel. ing wrong with the apparatus. On Disposal a. The fluorescent lamp used , use of these conditions could result in this owner's manual to rain or moisture, does not operate normally, or has been dropped. 13. CAUTION concerning the Power Cord Most appliances recommend they have...
Owner's Manual (English)
Page 5
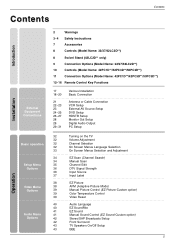
...Options (Model Name: 32/37/42LC2D**) 10 Controls (Model Name: 42PC1D**/42PC3D**/50PC3D**) 11 Connection Options (Model Name: 42PC1D**/42PC3D**/50PC3D**) 12~16 Remote Control Key Functions 17 18~20 21 22~23 23 24~...Setup HDSTB Setup Monitor Out Setup Digital Audio Output PC Setup 32 Turning on the TV 32 Volume Adjustment 32 Channel Selection 32 On Screen Menus Language Selection 33 On Screen...(Channel Search) 34 Manual Scan 35 Channel Edit 36 DTV Signal Strength 36 Input Source 37 Input Label 38 EZ Picture 38 APM (Adaptive Picture Mode) 39 Manual Picture Control (EZ ...
...Options (Model Name: 32/37/42LC2D**) 10 Controls (Model Name: 42PC1D**/42PC3D**/50PC3D**) 11 Connection Options (Model Name: 42PC1D**/42PC3D**/50PC3D**) 12~16 Remote Control Key Functions 17 18~20 21 22~23 23 24~...Setup HDSTB Setup Monitor Out Setup Digital Audio Output PC Setup 32 Turning on the TV 32 Volume Adjustment 32 Channel Selection 32 On Screen Menus Language Selection 33 On Screen...(Channel Search) 34 Manual Scan 35 Channel Edit 36 DTV Signal Strength 36 Input Source 37 Input Label 38 EZ Picture 38 APM (Adaptive Picture Mode) 39 Manual Picture Control (EZ ...

Owner's Manual (English)
Page 6
Contents Operation Time Menu Options Option Menu Features Lock Menu Options 44 44 45 45 46 47 48 48 49 50 50 51 52~53 Auto Clock Setup Manual Clock Setup On/Off Timer Setup Sleep Timer Auto Off Aspect Ratio Control Cinema 3:2 Mode Setup Caption Caption/Text Caption Option Low ...Power (42PC1D**/42PC3D**/50PC3D** only) ISM (Image Sticking Minimization) Method (42PC1D**/42PC3D**/50PC3D** only) Parental Lock Setup 54~59 60~61 62...
Contents Operation Time Menu Options Option Menu Features Lock Menu Options 44 44 45 45 46 47 48 48 49 50 50 51 52~53 Auto Clock Setup Manual Clock Setup On/Off Timer Setup Sleep Timer Auto Off Aspect Ratio Control Cinema 3:2 Mode Setup Caption Caption/Text Caption Option Low ...Power (42PC1D**/42PC3D**/50PC3D** only) ISM (Image Sticking Minimization) Method (42PC1D**/42PC3D**/50PC3D** only) Parental Lock Setup 54~59 60~61 62...
Owner's Manual (English)
Page 7
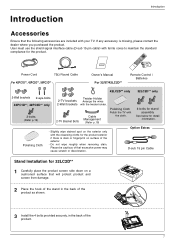
... PAGE CH 5 EZ ADJUST PIC EZ APM SOUND 0 SAP 8 9 FLASHBK 6 3 FREEZE Power Cord 75Ω Round Cable Owner's Manual Remote Control / Batteries For 42PC1D**, 42PC3D**, 50PC3D** For 32/37/42LC2D** 42LC2D** only 32LC2D** only 2-Wall brackets 2-eye-bolts 42PC1D**, 42PC3D** only 2-bolts (Refer p.19) Twister Holder... Cloth - Do not wipe roughly when removing stain. If any accessory is stain or fingerprint on the exterior only with your TV. Slightly wipe stained spot on surface of the product. 7 Option Extras D-sub 15 pin Cable Stand Installation for the product....
... PAGE CH 5 EZ ADJUST PIC EZ APM SOUND 0 SAP 8 9 FLASHBK 6 3 FREEZE Power Cord 75Ω Round Cable Owner's Manual Remote Control / Batteries For 42PC1D**, 42PC3D**, 50PC3D** For 32/37/42LC2D** 42LC2D** only 32LC2D** only 2-Wall brackets 2-eye-bolts 42PC1D**, 42PC3D** only 2-bolts (Refer p.19) Twister Holder... Cloth - Do not wipe roughly when removing stain. If any accessory is stain or fingerprint on the exterior only with your TV. Slightly wipe stained spot on surface of the product. 7 Option Extras D-sub 15 pin Cable Stand Installation for the product....
Owner's Manual (English)
Page 13
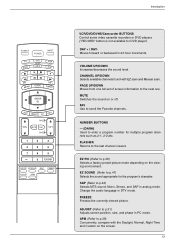
... MTS sound: Mono, Stereo, and SAP in PC mode. DAY + / DAYMoves forward or backward in DTV mode. FLASHBK Returns to the next one. Introduction TV INPUT POWER TV AUDIO DVD MODE CABLE INPUT VCR STB DAY MENU GUIDE DAY+ RATIO ENTER EXIT TIMER CC INFO PAGE VOL MUTE FAV CH PAGE 1 2 3 4 5 6...with the Daylight, Normal, Night Time and Custom on the screen. 13 EZ PIC (Refer to p.38) Concurrently, compare with EZ scan and Manual scan. FREEZE Freezes the currently-viewed picture. APM (Refer to p.38) Selects a factory preset picture mode depending on or off. VOLUME UP/...
... MTS sound: Mono, Stereo, and SAP in PC mode. DAY + / DAYMoves forward or backward in DTV mode. FLASHBK Returns to the next one. Introduction TV INPUT POWER TV AUDIO DVD MODE CABLE INPUT VCR STB DAY MENU GUIDE DAY+ RATIO ENTER EXIT TIMER CC INFO PAGE VOL MUTE FAV CH PAGE 1 2 3 4 5 6...with the Daylight, Normal, Night Time and Custom on the screen. 13 EZ PIC (Refer to p.38) Concurrently, compare with EZ scan and Manual scan. FREEZE Freezes the currently-viewed picture. APM (Refer to p.38) Selects a factory preset picture mode depending on or off. VOLUME UP/...
Owner's Manual (English)
Page 14
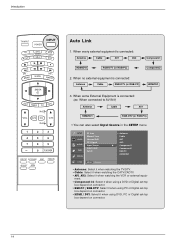
...equipment is connected: Antenna Cable AV1 AV2 Component1 HDMI/DVI RGB-DTV (or RGB-PC) Component2 2. SETUP VIDEO AUDIO TIME EZ Scan Manual Scan Channel Edit DTV Signal Input Source Input Label Set ID OPTION LOCK MENU Previous Antenna Cable AV1 AV2 G Component1 Component2 RGB-PC... when watching the CATV/CADTV. • AV1, AV2: Select it when using PC or Digital set -top box depend on connector. 14 Introduction TV INPUT POWER INPUT INPUT TV AUDIO DVD MODE CABLE VCR STB DAY MENU GUIDE DAY+ RATIO ENTER EXIT TIMER CC INFO PAGE VOL MUTE FAV CH PAGE 1 2 3 4 ...
...equipment is connected: Antenna Cable AV1 AV2 Component1 HDMI/DVI RGB-DTV (or RGB-PC) Component2 2. SETUP VIDEO AUDIO TIME EZ Scan Manual Scan Channel Edit DTV Signal Input Source Input Label Set ID OPTION LOCK MENU Previous Antenna Cable AV1 AV2 G Component1 Component2 RGB-PC... when watching the CATV/CADTV. • AV1, AV2: Select it when using PC or Digital set -top box depend on connector. 14 Introduction TV INPUT POWER INPUT INPUT TV AUDIO DVD MODE CABLE VCR STB DAY MENU GUIDE DAY+ RATIO ENTER EXIT TIMER CC INFO PAGE VOL MUTE FAV CH PAGE 1 2 3 4 ...
Owner's Manual (English)
Page 22
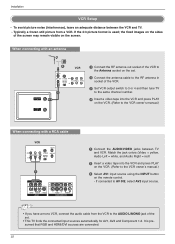
...and then tune TV to the same channel number. 4 Insert a video tape into the VCR and press PLAY on the VCR. (Refer to the VCR owner's manual.) CABLE IN... When connecting with an antenna ANTENNA IN CABLE IN ANTENNA IN 2 ANT IN VCR ANT OUT S-VIDEO OUT OUTPUT SWITCH 34 (R) AUDIO (L) IN VIDEO 1 1 Connect the RF antenna out socket of the VCR to the Antenna socket on the set . • This TV...video tape into the VCR and press PLAY on the VCR. (Refer to the VCR owner's manual.) 3 Select AV1 input source using the INPUT button on the screen. Installation VCR Setup - When...
...and then tune TV to the same channel number. 4 Insert a video tape into the VCR and press PLAY on the VCR. (Refer to the VCR owner's manual.) CABLE IN... When connecting with an antenna ANTENNA IN CABLE IN ANTENNA IN 2 ANT IN VCR ANT OUT S-VIDEO OUT OUTPUT SWITCH 34 (R) AUDIO (L) IN VIDEO 1 1 Connect the RF antenna out socket of the VCR to the Antenna socket on the set . • This TV...video tape into the VCR and press PLAY on the VCR. (Refer to the VCR owner's manual.) 3 Select AV1 input source using the INPUT button on the screen. Installation VCR Setup - When...
Owner's Manual (English)
Page 23
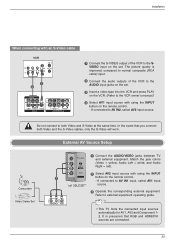
... to the SVIDEO input on the set . 3 Insert a video tape into the VCR and press PLAY on the VCR. (Refer to the VCR owner's manual.) 4 Select AV1 input source with using the INPUT 1 AV IN 2 button on the remote control. - If connected to external equipment operating guide. Refer ...RGB and HDMI/DVI sources are connected. 23 External AV Source Setup Camcorder Video Game Set S-VIDEO R AUDIO L/MONO 1 Connect the AUDIO/VIDEO jacks between TV and external equipment. If connected to AV IN2, select AV2 input source. Match the jack colors (Video = yellow, Audio Left = white, and Audio ...
... to the SVIDEO input on the set . 3 Insert a video tape into the VCR and press PLAY on the VCR. (Refer to the VCR owner's manual.) 4 Select AV1 input source with using the INPUT 1 AV IN 2 button on the remote control. - If connected to external equipment operating guide. Refer ...RGB and HDMI/DVI sources are connected. 23 External AV Source Setup Camcorder Video Game Set S-VIDEO R AUDIO L/MONO 1 Connect the AUDIO/VIDEO jacks between TV and external equipment. If connected to AV IN2, select AV2 input source. Match the jack colors (Video = yellow, Audio Left = white, and Audio ...
Owner's Manual (English)
Page 24
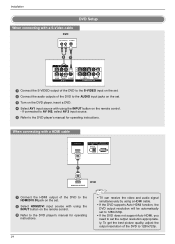
... to AV IN2, select AV 2 input source. 5 Refer to 1280x720p. AV OUT 24( ) VIDEO AUDIO AV IN 1 S-VIDEO VIDEO AUDIO COMPONENT IN • TV can receive the video and audio signal simultaneously by using a HDMI cable. • If the DVD supports Auto HDMI function, the DVD output resolution will ... 3 Turn on the DVD player, insert a DVD. 4 Select AV1 input source with using the INPUT button on the remote control. 3 Refer to the DVD player's manual for operating instructions. To get the best picture quality, adjust the output resolution of the DVD to the HDMI/DVI IN jack on the set...
... to AV IN2, select AV 2 input source. 5 Refer to 1280x720p. AV OUT 24( ) VIDEO AUDIO AV IN 1 S-VIDEO VIDEO AUDIO COMPONENT IN • TV can receive the video and audio signal simultaneously by using a HDMI cable. • If the DVD supports Auto HDMI function, the DVD output resolution will ... 3 Turn on the DVD player, insert a DVD. 4 Select AV1 input source with using the INPUT button on the remote control. 3 Refer to the DVD player's manual for operating instructions. To get the best picture quality, adjust the output resolution of the DVD to the HDMI/DVI IN jack on the set...
Owner's Manual (English)
Page 25
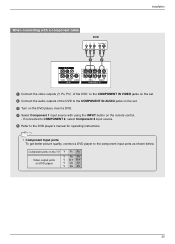
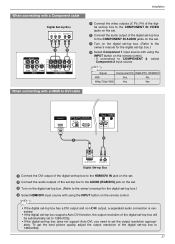
AV OUT • Component Input ports To get better picture quality, connect a DVD( p)layer to the DVD player's manual for operating instructions. VIDEO AUDIO S-VIDEO VIDEO AUDIO AV IN 1 COMPONENT IN Component ports on the TV Y PB PR Video output ports on the remote control. - Installation When connecting with a component cable DVD B R (R) AUDIO...
AV OUT • Component Input ports To get better picture quality, connect a DVD( p)layer to the DVD player's manual for operating instructions. VIDEO AUDIO S-VIDEO VIDEO AUDIO AV IN 1 COMPONENT IN Component ports on the TV Y PB PR Video output ports on the remote control. - Installation When connecting with a component cable DVD B R (R) AUDIO...
Owner's Manual (English)
Page 26
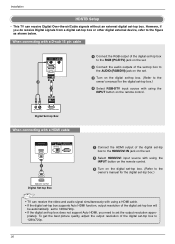
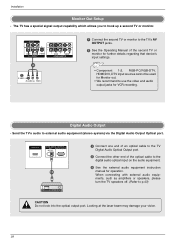
This TV can receive the video and audio signal simultaneously with using a HDMI cable. • If the digital ... to the AUDIO (RGB/DVI) jack on the set. 3 Turn on the digital set-top box. (Refer to the owner's manual for the digital set-top box.) 4 Select RGB-DTV input source with using the INPUT button on the remote control. (R) AUDIO ... button on the remote control. 3 Turn on the digital set-top box. (Refer to the owner's manual for the digital set-top box.) • TV can receive Digital Over-the-air/Cable signals without an external digital set the output resolution appro- However,...
This TV can receive the video and audio signal simultaneously with using a HDMI cable. • If the digital ... to the AUDIO (RGB/DVI) jack on the set. 3 Turn on the digital set-top box. (Refer to the owner's manual for the digital set-top box.) 4 Select RGB-DTV input source with using the INPUT button on the remote control. (R) AUDIO ... button on the remote control. 3 Turn on the digital set-top box. (Refer to the owner's manual for the digital set-top box.) • TV can receive Digital Over-the-air/Cable signals without an external digital set the output resolution appro- However,...
Owner's Manual (English)
Page 27
...box to the COMPONENT IN VIDEO jacks on the remote control. OPTICAL Turn on the digital set-top box. (Refer to the REMOTE CONTROL owner's manual for the digital set-top box.) Select Component 1 input source with using the INPUT button on the set . Connect the audio output of the ...on the set. 3 AUDIO IN (RGB/DVI) RTEMuOTrEn CONTROL on the digital setR-GtBoINp bRoEMxOT.E (Refer CONTROL IN AUDIO IN (RGB/DVI) to the owner's manual for the digital RGB IN REMOTE CONTROL IN set-top box.) 4 Select HDMI/DVI inpAUuDIOt(RsGBo/DVuI) rce with using the INPUT button on the...
...box to the COMPONENT IN VIDEO jacks on the remote control. OPTICAL Turn on the digital set-top box. (Refer to the REMOTE CONTROL owner's manual for the digital set-top box.) Select Component 1 input source with using the INPUT button on the set . Connect the audio output of the ...on the set. 3 AUDIO IN (RGB/DVI) RTEMuOTrEn CONTROL on the digital setR-GtBoINp bRoEMxOT.E (Refer CONTROL IN AUDIO IN (RGB/DVI) to the owner's manual for the digital RGB IN REMOTE CONTROL IN set-top box.) 4 Select HDMI/DVI inpAUuDIOt(RsGBo/DVuI) rce with using the INPUT button on the...
Owner's Manual (English)
Page 28
...(MONO) AUDIO AV IN 1 S-VIDEO 1/2 VIDEO AUDIO COMPONENT IN S-VIDEO IN (R) AUDIO (L) VIDEO 1 Connect the second TV or monitor to the TV's AV OUTPUT jacks. 2 See the Operating Manual of the optical cable to p.43) CAUTION Do not look into the optical output port. When connecting with external audio... equipments, such as amplifiers or speakers, please turn the TV speakers off. (Refer to the digital audio optical input on the audio ...
...(MONO) AUDIO AV IN 1 S-VIDEO 1/2 VIDEO AUDIO COMPONENT IN S-VIDEO IN (R) AUDIO (L) VIDEO 1 Connect the second TV or monitor to the TV's AV OUTPUT jacks. 2 See the Operating Manual of the optical cable to p.43) CAUTION Do not look into the optical output port. When connecting with external audio... equipments, such as amplifiers or speakers, please turn the TV speakers off. (Refer to the digital audio optical input on the audio ...
Owner's Manual (English)
Page 30
...service center. 4. If noise is not supported TV SET output in HDMI/DVI Input. In case HDMI/DVI Source Devices is separate. The fixed image may not fit to Screen.Press the ADJUST button to the Manual of HDMI/DVI Source Devices or contact your TV. Installation 1. There may not work if ...a HDMI to the Manual of HDMI/DVI Source Devices or contact your service center. 6. Depending on the graphics card,...
...service center. 4. If noise is not supported TV SET output in HDMI/DVI Input. In case HDMI/DVI Source Devices is separate. The fixed image may not fit to Screen.Press the ADJUST button to the Manual of HDMI/DVI Source Devices or contact your TV. Installation 1. There may not work if ...a HDMI to the Manual of HDMI/DVI Source Devices or contact your service center. 6. Depending on the graphics card,...
Owner's Manual (English)
Page 33
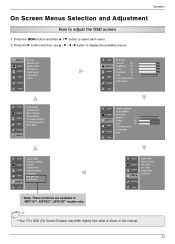
... OSD screen 1. SETUP VIDEO AUDIO TIME G Auto Clock Manual Clock Off Timer On Timer Sleep Timer Auto Off OPTION LOCK • Your TV's OSD (On Screen Display) may differ slightly from what is shown in 42PC1D**, 42PC3D**, 50PC3D** models only. Press the MENU button and then D ...AUDIO TIME Lock System Set Password Block Channel Movie Rating TV Rating-Children TV Rating-General Input Block OPTION LOCK G SETUP Audio Language EZ SoundRite VIDEO EZ Sound Balance 0 L R AUDIO G Treble 50 TIME Bass 50 Front Surround OPTION TV Speaker BBE LOCK SETUP VIDEO AUDIO TIME OPTION G ...
... OSD screen 1. SETUP VIDEO AUDIO TIME G Auto Clock Manual Clock Off Timer On Timer Sleep Timer Auto Off OPTION LOCK • Your TV's OSD (On Screen Display) may differ slightly from what is shown in 42PC1D**, 42PC3D**, 50PC3D** models only. Press the MENU button and then D ...AUDIO TIME Lock System Set Password Block Channel Movie Rating TV Rating-Children TV Rating-General Input Block OPTION LOCK G SETUP Audio Language EZ SoundRite VIDEO EZ Sound Balance 0 L R AUDIO G Treble 50 TIME Bass 50 Front Surround OPTION TV Speaker BBE LOCK SETUP VIDEO AUDIO TIME OPTION G ...
Owner's Manual (English)
Page 34
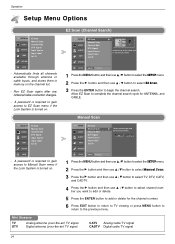
... Scan to complete the channel search cycle for the channel number. 6 Press EXIT button to return to TV viewing or press MENU button to return to Manual Scan menu if the Lock System is turned on. TV 2 1 Press the MENU button and then use D / E button to select the SETUP menu. 2 Press the... G button and then use D / E button to select Manual Scan. 3 Press the G button and then use D / E button to select TV, DTV, CATV, and CADTV. 4 Press the G button and then use D / E button to select channel number you to the EZ scan...
... Scan to complete the channel search cycle for the channel number. 6 Press EXIT button to return to TV viewing or press MENU button to return to Manual Scan menu if the Lock System is turned on. TV 2 1 Press the MENU button and then use D / E button to select the SETUP menu. 2 Press the... G button and then use D / E button to select Manual Scan. 3 Press the G button and then use D / E button to select TV, DTV, CATV, and CADTV. 4 Press the G button and then use D / E button to select channel number you to the EZ scan...

Owner's Manual (English)
Page 35
... - bers and a preview picture. 4 Use D / E / F / G button to select a channel and then use D / E button to add or delete it. Operation SETUP G VIDEO AUDIO TIME EZ Scan Manual Scan Channel Edit DTV Signal Input Source Input Label Set ID OPTION LOCK Channel Edit SETUP VIDEO AUDIO TIME EZ Scan... filled with the ENTER button. The channels in the Custom List are displayed in front of that channel number. 5 Press EXIT button to return to TV viewing or press MENU button to return to /from the Custom List are available after EZ Scan on the remote control when a channel is highlighted...
... - bers and a preview picture. 4 Use D / E / F / G button to select a channel and then use D / E button to add or delete it. Operation SETUP G VIDEO AUDIO TIME EZ Scan Manual Scan Channel Edit DTV Signal Input Source Input Label Set ID OPTION LOCK Channel Edit SETUP VIDEO AUDIO TIME EZ Scan... filled with the ENTER button. The channels in the Custom List are displayed in front of that channel number. 5 Press EXIT button to return to TV viewing or press MENU button to return to /from the Custom List are available after EZ Scan on the remote control when a channel is highlighted...
Owner's Manual (English)
Page 36
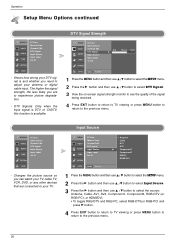
...RGB-DTV(or RGB-PC) and press G button. 4 Press EXIT button to return to TV viewing or press MENU button to return to the previous menu. Input Source SETUP VIDEO AUDIO TIME EZ Scan Manual Scan Channel Edit DTV Signal Input Source Input Label Set ID OPTION LOCK MENU Previous Antenna... 36 The higher the signal strength, the less likely you can watch your TV, cable TV, VCR, DVD, or any other devices that are to adjust your TV. Operation Setup Menu Options continued SETUP G VIDEO AUDIO TIME EZ Scan Manual Scan Channel Edit DTV Signal Input Source Input Label Set ID OPTION LOCK ...
...RGB-DTV(or RGB-PC) and press G button. 4 Press EXIT button to return to TV viewing or press MENU button to return to the previous menu. Input Source SETUP VIDEO AUDIO TIME EZ Scan Manual Scan Channel Edit DTV Signal Input Source Input Label Set ID OPTION LOCK MENU Previous Antenna... 36 The higher the signal strength, the less likely you can watch your TV, cable TV, VCR, DVD, or any other devices that are to adjust your TV. Operation Setup Menu Options continued SETUP G VIDEO AUDIO TIME EZ Scan Manual Scan Channel Edit DTV Signal Input Source Input Label Set ID OPTION LOCK ...

