Owner's Manual
Page 3
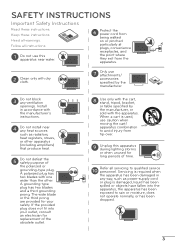
... the provided plug does not fit into the apparatus, the apparatus has been exposed to avoid injury from the apparatus. 2 Clean only with the cart, stand, tripod, bracket, or table specified by the manufacturer. 3 Do not block any ventilation openings. Keep these instructions.
... the provided plug does not fit into the apparatus, the apparatus has been exposed to avoid injury from the apparatus. 2 Clean only with the cart, stand, tripod, bracket, or table specified by the manufacturer. 3 Do not block any ventilation openings. Keep these instructions.
Owner's Manual
Page 6
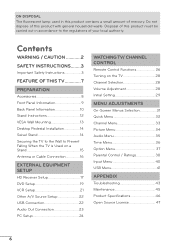
... Safety Instructions 3 FEATURE OF THIS TV 7 PREPARATION Accessories 8 Front Panel Information 9 Back Panel Information 10 Stand Instructions 12 VESA Wall Mounting 13 Desktop Pedestal Installation 14 Swivel Stand 14 Securing the TV to the Wall to the regulations of your local authority. Do not dispose of this... waste. Disposal of mercury. ON DISPOSAL The fluorescent lamp used in accordance to Prevent Falling When the TV is Used on a Stand 15 Antenna or Cable Connection 16 EXTERNAL EQUIPMENT SETUP HD Receiver Setup 17 DVD Setup 19 VCR Setup 21 Other A/V Source Setup...
... Safety Instructions 3 FEATURE OF THIS TV 7 PREPARATION Accessories 8 Front Panel Information 9 Back Panel Information 10 Stand Instructions 12 VESA Wall Mounting 13 Desktop Pedestal Installation 14 Swivel Stand 14 Securing the TV to the Wall to the regulations of your local authority. Do not dispose of this... waste. Disposal of mercury. ON DISPOSAL The fluorescent lamp used in accordance to Prevent Falling When the TV is Used on a Stand 15 Antenna or Cable Connection 16 EXTERNAL EQUIPMENT SETUP HD Receiver Setup 17 DVD Setup 19 VCR Setup 21 Other A/V Source Setup...
Owner's Manual
Page 8
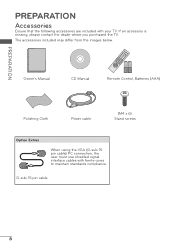
The accessories included may differ from the images below. D-sub 15 pin cable 8 PREPARATION PREPARATION Accessories Ensure that the following accessories are included with ferrite cores to maintain standards compliance. If an accessory is missing, please contact the dealer where you purchased the TV. Owner's Manual CD Manual 1.5V 1.5V Remote Control, Batteries (AAA) Polishing Cloth Power cable (M4 x 6) Stand screws Option Extras When using the VGA (D-sub 15 pin cable) PC connection, the user must use shielded signal interface cables with your TV.
The accessories included may differ from the images below. D-sub 15 pin cable 8 PREPARATION PREPARATION Accessories Ensure that the following accessories are included with ferrite cores to maintain standards compliance. If an accessory is missing, please contact the dealer where you purchased the TV. Owner's Manual CD Manual 1.5V 1.5V Remote Control, Batteries (AAA) Polishing Cloth Power cable (M4 x 6) Stand screws Option Extras When using the VGA (D-sub 15 pin cable) PC connection, the user must use shielded signal interface cables with your TV.
Owner's Manual
Page 9
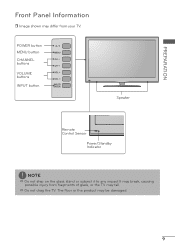
The floor or the product may be damaged. 9 POWER button MENU button CHANNEL buttons VOLUME buttons INPUT button Speaker Remote Control Sensor Power/Standby Indicator NOTE a Do not step on the glass stand or subject it to any impact.It may break, causing possible injury from your TV. a Do not drag the TV. PREPARATION Front Panel Information r Image shown may differ from fragments of glass, or the TV may fall.
The floor or the product may be damaged. 9 POWER button MENU button CHANNEL buttons VOLUME buttons INPUT button Speaker Remote Control Sensor Power/Standby Indicator NOTE a Do not step on the glass stand or subject it to any impact.It may break, causing possible injury from your TV. a Do not drag the TV. PREPARATION Front Panel Information r Image shown may differ from fragments of glass, or the TV may fall.
Owner's Manual
Page 12
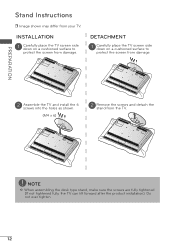
NOTE a When assembling the desk type stand, make sure the screws are fully tightened (If not tightened fully, the TV can tilt forward after the product installation). DETACHMENT 1 Carefully place the TV ... to protect the screen from damage. 2 Assemble the TV and install the 6 screws into the holes as shown. (M4 x 6) 2 Remove the screws and detach the stand from damage. PREPARATION Stand Instructions r Image shown may differ from your TV.
NOTE a When assembling the desk type stand, make sure the screws are fully tightened (If not tightened fully, the TV can tilt forward after the product installation). DETACHMENT 1 Carefully place the TV ... to protect the screen from damage. 2 Assemble the TV and install the 6 screws into the holes as shown. (M4 x 6) 2 Remove the screws and detach the stand from damage. PREPARATION Stand Instructions r Image shown may differ from your TV.

Owner's Manual
Page 14
PREPARATION Desktop Pedestal Installation r Image shown may differ from the wall. 10.1 cm (4 inches) 10.1 cm (4 inches) 10.1 cm (4 inches) 10.1 cm (4 inches) CAUTION a Ensure adequate ventilation by 30º to the left or right direction by following the clearance recommendations. Swivel Stand After installing the TV, you can adjust the TV set manually to suit your TV. For proper ventilation, allow a clearance of heat source. a Do not mount near or above any type of 10.1 cm (4 inches) on all four sides from your viewing position. 14
PREPARATION Desktop Pedestal Installation r Image shown may differ from the wall. 10.1 cm (4 inches) 10.1 cm (4 inches) 10.1 cm (4 inches) 10.1 cm (4 inches) CAUTION a Ensure adequate ventilation by 30º to the left or right direction by following the clearance recommendations. Swivel Stand After installing the TV, you can adjust the TV set manually to suit your TV. For proper ventilation, allow a clearance of heat source. a Do not mount near or above any type of 10.1 cm (4 inches) on all four sides from your viewing position. 14
Owner's Manual
Page 15
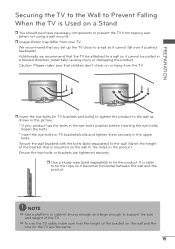
.... 15 a To use the TV safely make sure that the TV be pulled in the upper holes. Additionally, we recommend that children don't climb on a Stand r You should purchase necessary components to prevent the TV from your product has the bolts in the eye-bolts position before inserting the eye-bolts...
.... 15 a To use the TV safely make sure that the TV be pulled in the upper holes. Additionally, we recommend that children don't climb on a Stand r You should purchase necessary components to prevent the TV from your product has the bolts in the eye-bolts position before inserting the eye-bolts...

Owner's Manual
Page 46
... x Height x Depth) With stand Without stand Weight With stand Without stand 32LD400 (32LD400-UA) 791 x 563 x 210mm (31.1" x 22.2" x 8.3") 791 x 506 x 83mm (31.1" x 19.9" x 3.3") 9.5 kg (20.9 lb) 8 kg (17.6 lb) 42LD400 (42LD400-UA) 1018.5 x 693 x 246mm (40.1" x 27.3" x 9.7") 1018.5 x 632 x 92mm (40.1" x 24.9" x 3.6") 15.6 kg (34.4 lb) 13.5 kg (29.7 lb) 47LD500 (47LD500-UA) 1136.6 x 760...
... x Height x Depth) With stand Without stand Weight With stand Without stand 32LD400 (32LD400-UA) 791 x 563 x 210mm (31.1" x 22.2" x 8.3") 791 x 506 x 83mm (31.1" x 19.9" x 3.3") 9.5 kg (20.9 lb) 8 kg (17.6 lb) 42LD400 (42LD400-UA) 1018.5 x 693 x 246mm (40.1" x 27.3" x 9.7") 1018.5 x 632 x 92mm (40.1" x 24.9" x 3.6") 15.6 kg (34.4 lb) 13.5 kg (29.7 lb) 47LD500 (47LD500-UA) 1136.6 x 760...
Specification
Page 2
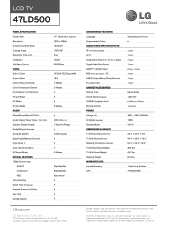
LCD TV 47LD500 PANEL SPECIFICATION Screen Size 47" Class (...(rear) USB 2.0 Input (Music/Photo/Service) 1 (side) PC Audio Input 1 (rear) Cabinet/Accessories Cabinet Color Glossy Black Swivel Stand (Degrees) +30º/-30º VESA® Compliant (WxH) • (400mm x 200mm) Remote Control 1 (Unified) Power ...View (Flashback) • Parental Control w/V-Chip • Key Lock • Closed Caption • LGusa.com LG Electronics U.S.A., Inc. 1000 Sylvan Avenue Englewood Cliffs, NJ 07632 Customer Service and Technical Support: (800) 243-0000...
LCD TV 47LD500 PANEL SPECIFICATION Screen Size 47" Class (...(rear) USB 2.0 Input (Music/Photo/Service) 1 (side) PC Audio Input 1 (rear) Cabinet/Accessories Cabinet Color Glossy Black Swivel Stand (Degrees) +30º/-30º VESA® Compliant (WxH) • (400mm x 200mm) Remote Control 1 (Unified) Power ...View (Flashback) • Parental Control w/V-Chip • Key Lock • Closed Caption • LGusa.com LG Electronics U.S.A., Inc. 1000 Sylvan Avenue Englewood Cliffs, NJ 07632 Customer Service and Technical Support: (800) 243-0000...


