

Owners Manual
Page 1
PLASMA TV OWNER'S MANUAL MODELS: 42PX4D/42PX5D 42PX4D-UB/42PX5D-UB R TruSurround XT TM Please read this manual for future reference. Model Number : Serial Number : LG Electronics U.S.A., Inc. Retain this manual carefully and completely before operating your dealer if you require service. Record model number and serial number of the TV in the spaces provided below. See the label attached on the back cover and relate this information to your TV.
PLASMA TV OWNER'S MANUAL MODELS: 42PX4D/42PX5D 42PX4D-UB/42PX5D-UB R TruSurround XT TM Please read this manual for future reference. Model Number : Serial Number : LG Electronics U.S.A., Inc. Retain this manual carefully and completely before operating your dealer if you require service. Record model number and serial number of the TV in the spaces provided below. See the label attached on the back cover and relate this information to your TV.

Owners Manual
Page 2
... turning the equipment off and on a circuit different from that interference will not occur in any way without written authorization from LG Electronics. COMPLIANCE: The responsible party for compliance could void the user's authority to provide reasonable protection against harmful interference in the... the receiver is : LG Electronics U.S.A., Inc 1000 Sylvan Avenue, Englewood Cliffs, NJ 07632 1-800-243-0000 http://www.lgusa.com WARNING/CAUTION TO REDUCE THE RISK OF FIRE AND ELECTRIC SHOCK, DO NOT EXPOSE THIS PRODUCT TO RAIN OR MOISTURE. 2 Plasma TV The exclamation point within ...
... turning the equipment off and on a circuit different from that interference will not occur in any way without written authorization from LG Electronics. COMPLIANCE: The responsible party for compliance could void the user's authority to provide reasonable protection against harmful interference in the... the receiver is : LG Electronics U.S.A., Inc 1000 Sylvan Avenue, Englewood Cliffs, NJ 07632 1-800-243-0000 http://www.lgusa.com WARNING/CAUTION TO REDUCE THE RISK OF FIRE AND ELECTRIC SHOCK, DO NOT EXPOSE THIS PRODUCT TO RAIN OR MOISTURE. 2 Plasma TV The exclamation point within ...
Owners Manual
Page 4
... apparatus. Protect the power cord from being walked on or pinched particularly at plugs, convenience receptacles, and the point where they exit from tip-over. 4 Plasma TV PORTABLE CART WARNING Safety Instructions Safety Instructions IMPORTANT SAFETY INSTRUCTIONS Important safety instructions shall be provided with the apparatus. Keep these instructions. 2. Follow all warnings...
... apparatus. Protect the power cord from being walked on or pinched particularly at plugs, convenience receptacles, and the point where they exit from tip-over. 4 Plasma TV PORTABLE CART WARNING Safety Instructions Safety Instructions IMPORTANT SAFETY INSTRUCTIONS Important safety instructions shall be provided with the apparatus. Keep these instructions. 2. Follow all warnings...

Owners Manual
Page 6
...See page 11. 4. See page 60. 7. Fine-tune source image and sound to protect the set up See Contents above. 6 Plasma TV After reading this manual, keep it handy for TV. Turn TV on . 2. Turn video source equipment on . See pages 65~ 68. 8. Select viewing source for future reference. Additional features set... Reset 65 Audio Menu Options Audio Language 66 EZ SoundRite / EZ Sound 66 Manual Sound Control (Custom Option 66 Front Surround 67 TV Speakers On/Off Setup 67 BBE 68 Stereo/SAP Broadcasts Setup 68 Time Menu Options Auto Clock Setup 69 Manual Clock Setup 69 On...
...See page 11. 4. See page 60. 7. Fine-tune source image and sound to protect the set up See Contents above. 6 Plasma TV After reading this manual, keep it handy for TV. Turn TV on . 2. Turn video source equipment on . See pages 65~ 68. 8. Select viewing source for future reference. Additional features set... Reset 65 Audio Menu Options Audio Language 66 EZ SoundRite / EZ Sound 66 Manual Sound Control (Custom Option 66 Front Surround 67 TV Speakers On/Off Setup 67 BBE 68 Stereo/SAP Broadcasts Setup 68 Time Menu Options Auto Clock Setup 69 Manual Clock Setup 69 On...
Owners Manual
Page 8
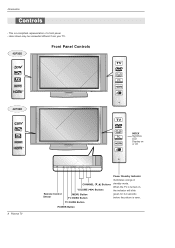
This is seen. When the TV is turned on TV GUIDE or off. 8 Plasma TV TV GUIDE Remote Control Sensor CHANNEL (E, D) Buttons VOLUME (F,G) Buttons MENU Button TV/VIDEO Button Power Standby Indicator Illuminates orange in standby mode. TV GUIDE Button POWER Button Introduction Controls - Here shown may be somewhat different from your TV. 42PX5D Front Panel Controls TV GUIDE 42PX4D INDEX Switches LED Display on , the indicator will blink green for 3-4 seconds before the picture is a simplified representation of a front panel. -
This is seen. When the TV is turned on TV GUIDE or off. 8 Plasma TV TV GUIDE Remote Control Sensor CHANNEL (E, D) Buttons VOLUME (F,G) Buttons MENU Button TV/VIDEO Button Power Standby Indicator Illuminates orange in standby mode. TV GUIDE Button POWER Button Introduction Controls - Here shown may be somewhat different from your TV. 42PX5D Front Panel Controls TV GUIDE 42PX4D INDEX Switches LED Display on , the indicator will blink green for 3-4 seconds before the picture is a simplified representation of a front panel. -

Owners Manual
Page 10
...preset picture mode depending on -screen displays and returns to explain the main features of selected mode. 10 Plasma TV AUTO DEMO Starts the demonstration to TV viewing from any other than TV, for the sub picture in regular sequence. FAV Scrolls the Favorite channels. PIP Switches to the screen....-PC), HDMI1/DVI and HDMI2 input sources. (Video, Front Video, Component 1-2 input sources are linked automatically, only if these are connected ) TV GUIDE Brings up the main menu to PIP, POP (Picture-out-ofPicture) and Twin picture modes in PIP/Twin picture mode. LIGHT Illuminates the ...
...preset picture mode depending on -screen displays and returns to explain the main features of selected mode. 10 Plasma TV AUTO DEMO Starts the demonstration to TV viewing from any other than TV, for the sub picture in regular sequence. FAV Scrolls the Favorite channels. PIP Switches to the screen....-PC), HDMI1/DVI and HDMI2 input sources. (Video, Front Video, Component 1-2 input sources are linked automatically, only if these are connected ) TV GUIDE Brings up the main menu to PIP, POP (Picture-out-ofPicture) and Twin picture modes in PIP/Twin picture mode. LIGHT Illuminates the ...
Owners Manual
Page 12
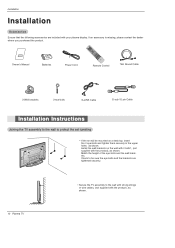
Check to be mounted on the wall with 2 bolts*, (not supplied with your plasma display. Match the height of the eye-bolts and the wall brackets. Owner's Manual 1.5V 1.5V Batteries Power Cord FLASHBK APM M/C EJECT AUTO DEMO CC ... the wall with strong strings or wire cables, (not supplied with the product), as shown. TV INPUT TV/VIDEO ODE M DAY + DAY - Installation Installation Accessories Ensure that the following accessories are tightened securely. 12 Plasma TV • Secure the TV assembly to protect the set tumbling • If the set will be sure the eye...
Check to be mounted on the wall with 2 bolts*, (not supplied with your plasma display. Match the height of the eye-bolts and the wall brackets. Owner's Manual 1.5V 1.5V Batteries Power Cord FLASHBK APM M/C EJECT AUTO DEMO CC ... the wall with strong strings or wire cables, (not supplied with the product), as shown. TV INPUT TV/VIDEO ODE M DAY + DAY - Installation Installation Accessories Ensure that the following accessories are tightened securely. 12 Plasma TV • Secure the TV assembly to protect the set tumbling • If the set will be sure the eye...
Owners Manual
Page 14
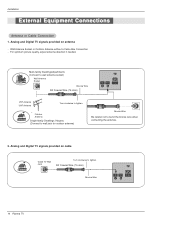
...Outdoor Antenna without a Cable Box Connection - For optimum picture quality, adjust antenna direction if needed. Analog and Digital TV signals provided on cable Cable TV Wall Jack Turn clockwise to bend the bronze wire when connecting the antenna. 2. Outdoor Antenna Single-family Dwellings /Houses... outdoor antenna) Bronze Wire Be careful not to tighten. Analog and Digital TV signals provided on antenna - RF Coaxial Wire (75 ohm) Bronze Wire CABLE ANTENNA AC INPUT 14 Plasma TV Multi-family Dwellings/Apartments (Connect to wall antenna socket) Wall Antenna Socket ...
...Outdoor Antenna without a Cable Box Connection - For optimum picture quality, adjust antenna direction if needed. Analog and Digital TV signals provided on cable Cable TV Wall Jack Turn clockwise to bend the bronze wire when connecting the antenna. 2. Outdoor Antenna Single-family Dwellings /Houses... outdoor antenna) Bronze Wire Be careful not to tighten. Analog and Digital TV signals provided on antenna - RF Coaxial Wire (75 ohm) Bronze Wire CABLE ANTENNA AC INPUT 14 Plasma TV Multi-family Dwellings/Apartments (Connect to wall antenna socket) Wall Antenna Socket ...
Owners Manual
Page 16
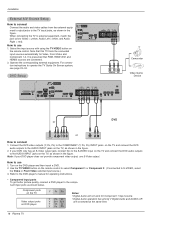
... shown in the figure. Note that RGB, HDMI1/DVI and HDMI2 sources are connected at the same time. 16 Plasma TV DVD Setup RS-232C INPUT (CONTROL/SERVICE) OUTPUT COMPONENT2 INPUT DVI INPUT DIGITAL AUDIO (OPTICAL) RGB INPUT AUDIO INPUT DVD /DTV INPUT VIDEO AUDIO VIDEO ... = white, and Audio Right = red). If your DVD player does not provide component video output, use S-Video output. Select the input source with using the TV/VIDEO button on the remote control to select Component 1 or Component 2. (If connected to S-VIDEO, select the Video or Front Video external input source.) 3. Use...
... shown in the figure. Note that RGB, HDMI1/DVI and HDMI2 sources are connected at the same time. 16 Plasma TV DVD Setup RS-232C INPUT (CONTROL/SERVICE) OUTPUT COMPONENT2 INPUT DVI INPUT DIGITAL AUDIO (OPTICAL) RGB INPUT AUDIO INPUT DVD /DTV INPUT VIDEO AUDIO VIDEO ... = white, and Audio Right = red). If your DVD player does not provide component video output, use S-Video output. Select the input source with using the TV/VIDEO button on the remote control to select Component 1 or Component 2. (If connected to S-VIDEO, select the Video or Front Video external input source.) 3. Use...
Owners Manual
Page 17
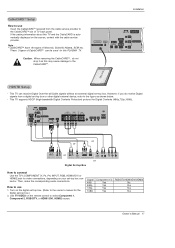
...an external digital set-top box. Turn on the digital set -top box or other digital external device, refer to the figure as this PLASMA TV. Caution: When removing the CableCARDTTMM, do receive Digital signals from the cable service provider to use 1. Cable IEEE-1394 HDMI 2 HDMI1 /... HDMI1/DVI or HDMI2 jack for video connections, depending on the screen, contact with the cable service provider. How to the CableCARDTTMM slot of TV back panel. CableCARDTTMM Setup How to use Insert the CableCARDTTMM received from a digital set -top box. (Refer to the CableCARDTTMM. These 3 types...
...an external digital set-top box. Turn on the digital set -top box or other digital external device, refer to the figure as this PLASMA TV. Caution: When removing the CableCARDTTMM, do receive Digital signals from the cable service provider to use 1. Cable IEEE-1394 HDMI 2 HDMI1 /... HDMI1/DVI or HDMI2 jack for video connections, depending on the screen, contact with the cable service provider. How to the CableCARDTTMM slot of TV back panel. CableCARDTTMM Setup How to use Insert the CableCARDTTMM received from a digital set -top box. (Refer to the CableCARDTTMM. These 3 types...

Owners Manual
Page 18
... DIGI- Connect the PC to connect audio, HDMI2 port is also available for DVI INPUT. 3. This TV provides Plug and Play capability, meaning that the PC adjusts automatically to AUDIO INPUT port located on the ....06 48.363 60.00 56.476 70.06 60.023 75.02 18 Plasma TV How to AUDIO INPUT port located on your TV. Check the image on the right side of the PC) has an analog ... for the graphic card accordingly. Select RGB-PC input source in PC mode. Installation PC Setup - The TV perceives 640x480, 60Hz as DTV 480p based on the PC graphic card, change the refresh rate to P.64...
... DIGI- Connect the PC to connect audio, HDMI2 port is also available for DVI INPUT. 3. This TV provides Plug and Play capability, meaning that the PC adjusts automatically to AUDIO INPUT port located on the ....06 48.363 60.00 56.476 70.06 60.023 75.02 18 Plasma TV How to AUDIO INPUT port located on your TV. Check the image on the right side of the PC) has an analog ... for the graphic card accordingly. Select RGB-PC input source in PC mode. Installation PC Setup - The TV perceives 640x480, 60Hz as DTV 480p based on the PC graphic card, change the refresh rate to P.64...
Owners Manual
Page 20
...1280x720p. - If the source device does not support Auto DVI, you need to set to DIGITAL AUDIO(OPTICAL) port for DVI INPUT. 4. This TV supports HDCP(High-bandwidth Digital Contents Protection) Protocol for this product). 2. How To Connect 1. No separated audio connection is a trademark or registered ... High-Definition Multimedia Interface is necessary. tion. - To get the best picture quality, adjust the output resolution of this purpose. 20 Plasma TV Connect the source device to HDMI1/DVI or HDMI2 port of the source device to 1024x768, 60Hz. - How To Connect 1.
...1280x720p. - If the source device does not support Auto DVI, you need to set to DIGITAL AUDIO(OPTICAL) port for DVI INPUT. 4. This TV supports HDCP(High-bandwidth Digital Contents Protection) Protocol for this product). 2. How To Connect 1. No separated audio connection is a trademark or registered ... High-Definition Multimedia Interface is necessary. tion. - To get the best picture quality, adjust the output resolution of this purpose. 20 Plasma TV Connect the source device to HDMI1/DVI or HDMI2 port of the source device to 1024x768, 60Hz. - How To Connect 1.

Owners Manual
Page 22
... below, press the ADJUST button to adjust the screen Position of time. POSITION G SIZE PHASE RESET Adjust Close D F G E PC mode In This Mode, the Supported TV SET Resolution Specification - 1920 x 1080 I @ 59.94Hz / 60Hz, 16:9 - 1280 x 720 P @ 59.94Hz / 60Hz, 16:9(preferred format) - 720 x 480 ...600 @ 60Hz - 800 x 600 @ 72Hz - 800 x 600 @ 75Hz - 1024 x 768 @ 60Hz(preferred format) - 1024 x 768 @ 70Hz - 1024 x 768 @ 75Hz 22 Plasma TV Installation How to use . - There may become permanently imprinted on the menu until the picture is in HDMI1/DVI Source Devices. In case that Video...
... below, press the ADJUST button to adjust the screen Position of time. POSITION G SIZE PHASE RESET Adjust Close D F G E PC mode In This Mode, the Supported TV SET Resolution Specification - 1920 x 1080 I @ 59.94Hz / 60Hz, 16:9 - 1280 x 720 P @ 59.94Hz / 60Hz, 16:9(preferred format) - 720 x 480 ...600 @ 60Hz - 800 x 600 @ 72Hz - 800 x 600 @ 75Hz - 1024 x 768 @ 60Hz(preferred format) - 1024 x 768 @ 70Hz - 1024 x 768 @ 75Hz 22 Plasma TV Installation How to use . - There may become permanently imprinted on the menu until the picture is in HDMI1/DVI Source Devices. In case that Video...
Owners Manual
Page 24
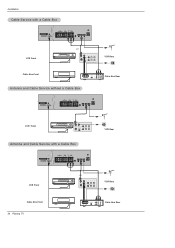
... Front or ANT OUT ANT IN OUT S-VIDEO OUTPUT (R) AUDIO (L) SWITCH 3 4 IN VIDEO VCR Rear Cable Box Front RF Cable OUTPUT SWITCH 34 (R) AUDIO (L) VIDEO TV VCR Cable Box Rear Antenna and Cable Service without a Cable Box Cable DVD /DTV INPUT VIDEO AUDIO L R COMPONENT INPUT 2 VIDEO AUDIO L R MONITOR OUTPUT COMPONENT INPUT... CABLE ANTENNA S-VIDEO AC INPUT VCR Front or ANT OUT ANT IN OUT S-VIDEO OUTPUT (R) AUDIO (L) SWITCH 3 4 IN VIDEO VCR Rear Cable Box Front 24 Plasma TV RF Cable OUTPUT SWITCH 34 (R) AUDIO (L) VIDEO...
... Front or ANT OUT ANT IN OUT S-VIDEO OUTPUT (R) AUDIO (L) SWITCH 3 4 IN VIDEO VCR Rear Cable Box Front RF Cable OUTPUT SWITCH 34 (R) AUDIO (L) VIDEO TV VCR Cable Box Rear Antenna and Cable Service without a Cable Box Cable DVD /DTV INPUT VIDEO AUDIO L R COMPONENT INPUT 2 VIDEO AUDIO L R MONITOR OUTPUT COMPONENT INPUT... CABLE ANTENNA S-VIDEO AC INPUT VCR Front or ANT OUT ANT IN OUT S-VIDEO OUTPUT (R) AUDIO (L) SWITCH 3 4 IN VIDEO VCR Rear Cable Box Front 24 Plasma TV RF Cable OUTPUT SWITCH 34 (R) AUDIO (L) VIDEO...
Owners Manual
Page 26
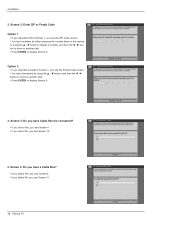
Screen 3: Do you have a Cable Box? • If you select Yes, you see Screen 5. • If you select No, you see Screen 12. 26 Plasma TV Option 2 • If you selected Canada in Screen 1, you see the ZIP Code screen. • You input numbers by using the D / E button to display a number, ...
Screen 3: Do you have a Cable Box? • If you select Yes, you see Screen 5. • If you select No, you see Screen 12. 26 Plasma TV Option 2 • If you selected Canada in Screen 1, you see the ZIP Code screen. • You input numbers by using the D / E button to display a number, ...

Owners Manual
Page 28
Note: • Many Cable Boxes require testing more than one code. • If you select No, a different code is tested in Screen 10. 28 Plasma TV Screen 8: Cable Box Brand Name • Use the D / E button to select a cable box brand. • Press ENTER to display Screen 10. 10. Screen 10: Cable ...
Note: • Many Cable Boxes require testing more than one code. • If you select No, a different code is tested in Screen 10. 28 Plasma TV Screen 8: Cable Box Brand Name • Use the D / E button to select a cable box brand. • Press ENTER to display Screen 10. 10. Screen 10: Cable ...
Owners Manual
Page 30
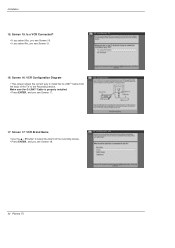
Make sure the G-LINKTM Cable is properly installed. • Press ENTER, and you see Screen 18. 30 Plasma TV Screen 17: VCR Brand Name • Use the D / E button to the Recording device. Screen 15: Is a VCR Connected? • If you select Yes, you see Screen 16. • If you select No, you see Screen 17. 17. Installation 15. Screen 16: VCR Configuration Diagram • This screen shows the correct way to install the G-LINKTM Cable from the back of the TV to select the brand of the recording device. • Press ENTER, and you see Screen 21. 16.
Make sure the G-LINKTM Cable is properly installed. • Press ENTER, and you see Screen 18. 30 Plasma TV Screen 17: VCR Brand Name • Use the D / E button to the Recording device. Screen 15: Is a VCR Connected? • If you select Yes, you see Screen 16. • If you select No, you see Screen 17. 17. Installation 15. Screen 16: VCR Configuration Diagram • This screen shows the correct way to install the G-LINKTM Cable from the back of the TV to select the brand of the recording device. • Press ENTER, and you see Screen 21. 16.
Owners Manual
Page 32
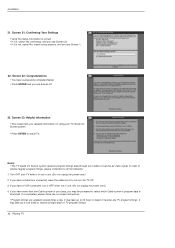
...screen instructions. • Program listings are updated several times a day. In order to receive regular program listings, please remember to watch TV. Turn OFF your TV Guide On Screen system . • Press ENTER to do the following: 1. If you may be prompted to select which Cable ...; If it is not, select No, repeat setup process, and you have more than one week to receive all eight days of TV program listings. 32 Plasma TV Installation 21. Screen 22: Congratulations • You have successfully completed Setup! • Press ENTER and you have a Cable box connected...
...screen instructions. • Program listings are updated several times a day. In order to receive regular program listings, please remember to watch TV. Turn OFF your TV Guide On Screen system . • Press ENTER to do the following: 1. If you may be prompted to select which Cable ...; If it is not, select No, repeat setup process, and you have more than one week to receive all eight days of TV program listings. 32 Plasma TV Installation 21. Screen 22: Congratulations • You have successfully completed Setup! • Press ENTER and you have a Cable box connected...
Owners Manual
Page 34
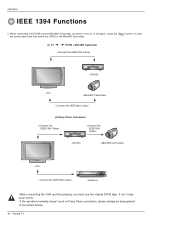
If not, it may occur errors. -If the operation normally doesn't work on Daisy Chain connection, please change an arrangement of connected device. 34 Plasma TV Operation IEEE 1394 Functions 2. When connecting the DVHS and the MicroMV Camcorder, as shown in the (c) or (d) figure, press the 1394 button to show the control panel and then select the DVHS or the MicroMV Camcorder. (c) TV DVHS + MicroMV Camcorder (d) Daisy Chain Connection -When connecting the 1394 and then playing, you must use the original DVHS tape.
If not, it may occur errors. -If the operation normally doesn't work on Daisy Chain connection, please change an arrangement of connected device. 34 Plasma TV Operation IEEE 1394 Functions 2. When connecting the DVHS and the MicroMV Camcorder, as shown in the (c) or (d) figure, press the 1394 button to show the control panel and then select the DVHS or the MicroMV Camcorder. (c) TV DVHS + MicroMV Camcorder (d) Daisy Chain Connection -When connecting the 1394 and then playing, you must use the original DVHS tape.
Owners Manual
Page 36
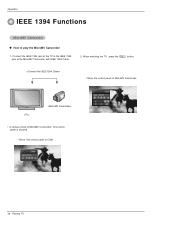
Connect the IEEE 1394 jack at the MicroMV Camcorder with IEEE 1394 Cable. 2. Operation IEEE 1394 Functions MicroMV Camcorder WV How to the IEEE 1394 jack at the TV to play the MicroMV Camcorder 1. When watching the TV, press the 1394 button. • Show the control panel of MicroMV Camcorder. • In camera mode of MicroMV Camcorder, this control panel is showed. • Show the control panel of CAM. 36 Plasma TV
Connect the IEEE 1394 jack at the MicroMV Camcorder with IEEE 1394 Cable. 2. Operation IEEE 1394 Functions MicroMV Camcorder WV How to the IEEE 1394 jack at the TV to play the MicroMV Camcorder 1. When watching the TV, press the 1394 button. • Show the control panel of MicroMV Camcorder. • In camera mode of MicroMV Camcorder, this control panel is showed. • Show the control panel of CAM. 36 Plasma TV


