
Owners Manual
Page 6
Channel Editing 41 Channel List 42 Favorite Channel Setup 43 Favorite Channel List 43 Brief Information 44 Input List 45 Input Label 46 AV Mode 47 SIMPLINK 48 USB Entry Modes 50 Photo List 51 Music List 55 PICTURE CONTROL Picture Size (Aspect Ratio) Control 58 Energy Saving 60...Setup 16 DVD Setup 19 VCR Setup 21 Other A/V Source Setup 23 Audio Out Connection 23 USB Connection 24 PC Setup 25 WATCHING TV / CHANNEL CONTROL Remote Control Functions 30 Turning On TV 34 Channel Selection 34 Volume Adjustment 34 Initial Setting 35 On-Screen Menus Selection 36 Quick ...
Channel Editing 41 Channel List 42 Favorite Channel Setup 43 Favorite Channel List 43 Brief Information 44 Input List 45 Input Label 46 AV Mode 47 SIMPLINK 48 USB Entry Modes 50 Photo List 51 Music List 55 PICTURE CONTROL Picture Size (Aspect Ratio) Control 58 Energy Saving 60...Setup 16 DVD Setup 19 VCR Setup 21 Other A/V Source Setup 23 Audio Out Connection 23 USB Connection 24 PC Setup 25 WATCHING TV / CHANNEL CONTROL Remote Control Functions 30 Turning On TV 34 Channel Selection 34 Volume Adjustment 34 Initial Setting 35 On-Screen Menus Selection 36 Quick ...

Owners Manual
Page 12
S-VIDEO (For 60PS11) Better quality than standard composition. Connect cable signals to operate the TV on DC power. Used for analog PC audio input. 4 RS-232C IN (CONTROL & SERVICE) PORT (For 60PS11) Analog Connection. Caution: ... to this jack. Doesn't support 480i. Supports standard definition video only (480i). PREPARATION R R BACK PANEL INFORMATION 11 PREPARATION 42/50PQ10, 42/50PQ12, 50PS11 1 2 OPTICAL DIGITAL AUDIO OUT IN 2 COMPONENT IN 6 VIDEO AUDIO 2 L R 1 USB SERVICE ONLY RS-232C IN (SERVICE ONLY) AV IN 1 ANTENNA/ CABLE IN VIDEO (MONO) AUDIO 60PS11...
S-VIDEO (For 60PS11) Better quality than standard composition. Connect cable signals to operate the TV on DC power. Used for analog PC audio input. 4 RS-232C IN (CONTROL & SERVICE) PORT (For 60PS11) Analog Connection. Caution: ... to this jack. Doesn't support 480i. Supports standard definition video only (480i). PREPARATION R R BACK PANEL INFORMATION 11 PREPARATION 42/50PQ10, 42/50PQ12, 50PS11 1 2 OPTICAL DIGITAL AUDIO OUT IN 2 COMPONENT IN 6 VIDEO AUDIO 2 L R 1 USB SERVICE ONLY RS-232C IN (SERVICE ONLY) AV IN 1 ANTENNA/ CABLE IN VIDEO (MONO) AUDIO 60PS11...

Owners Manual
Page 18
...box. (Refer to the owner's manual for the digital set -top box to the COMPONENT IN VIDEO 1 or 2 jacks on the TV. AV IN USB SERVICE ONLY EXTERNAL EQUIPMENT SETUP EXTERNAL EQUIPMENT SETUP I To prevent the equipment damage, never plug in any power cords until you do receive ...digital signals from your TV. Component Connection 1. Match the jack colors (Y = green, PB = blue, and PR = red). 2 Connect the audio output of the...
...box. (Refer to the owner's manual for the digital set -top box to the COMPONENT IN VIDEO 1 or 2 jacks on the TV. AV IN USB SERVICE ONLY EXTERNAL EQUIPMENT SETUP EXTERNAL EQUIPMENT SETUP I To prevent the equipment damage, never plug in any power cords until you do receive ...digital signals from your TV. Component Connection 1. Match the jack colors (Y = green, PB = blue, and PR = red). 2 Connect the audio output of the...

Owners Manual
Page 21
... the COMPONENT IN AUDIO 1 or 2 jacks on DVD player Y Y PB PR PB PR B-Y R-Y Cb Cr Pb Pr 19 Component ports on the TV Y Y Video output ports Y on the TV. 2. Match the jack colors (Y = green, PB = blue, and PR = red). 2 Connect the audio outputs of the DVD to the COMPONENT... IN VIDEO 1 or 2 jacks on the DVD player, insert a DVD. EXTERNAL EQUIPMENT SETUP AV IN USB SERVICE ONLY DVD SETUP Component Connection 1. I Refer to...
... the COMPONENT IN AUDIO 1 or 2 jacks on DVD player Y Y PB PR PB PR B-Y R-Y Cb Cr Pb Pr 19 Component ports on the TV Y Y Video output ports Y on the TV. 2. Match the jack colors (Y = green, PB = blue, and PR = red). 2 Connect the audio outputs of the DVD to the COMPONENT... IN VIDEO 1 or 2 jacks on the DVD player, insert a DVD. EXTERNAL EQUIPMENT SETUP AV IN USB SERVICE ONLY DVD SETUP Component Connection 1. I Refer to...

Owners Manual
Page 24
How to the AUDIO L(MONO) jack of the TV. Match the jack colors (Video = yellow, Audio Left = white, and Audio Right = red) 2. AV IN USB SERVICE ONLY EXTERNAL EQUIPMENT SETUP EXTERNAL EQUIPMENT SETUP Composite (RCA) Connection 1. NOTE G If you have a mono VCR, connect the audio... cable from the VCR to connect 1 Connect the AUDIO/VIDEO jacks between TV and VCR. ANT IN S-VIDEO VIDEO L R ANT ...
How to the AUDIO L(MONO) jack of the TV. Match the jack colors (Video = yellow, Audio Left = white, and Audio Right = red) 2. AV IN USB SERVICE ONLY EXTERNAL EQUIPMENT SETUP EXTERNAL EQUIPMENT SETUP Composite (RCA) Connection 1. NOTE G If you have a mono VCR, connect the audio... cable from the VCR to connect 1 Connect the AUDIO/VIDEO jacks between TV and VCR. ANT IN S-VIDEO VIDEO L R ANT ...

Owners Manual
Page 25
... beam may block digital audio output. 23 How to the digital audio input on the remote control. USB SERVICE ONLY RS-232C IN (SERVICE ONLY) 2 ! IN 1 3 Set the "TV Speaker option - OPTICAL DIGITAL AUDIO OUT 2 Connect the other end of DIGITAL AUDIO OUT. Match the... vision. OTHER A/V SOURCE SETUP 1. COMPONENT IN 1 DEO AUDIO 2 L R 1 VIDEO (MONO) AUDIO AUDIO OUT CONNECTION Send the TV's audio to connect 1 Connect the AUDIO/VIDEO jacks between TV and external equipment. G Audio with external audio equipment, such as amplifiers or speakers, you can turn the...
... beam may block digital audio output. 23 How to the digital audio input on the remote control. USB SERVICE ONLY RS-232C IN (SERVICE ONLY) 2 ! IN 1 3 Set the "TV Speaker option - OPTICAL DIGITAL AUDIO OUT 2 Connect the other end of DIGITAL AUDIO OUT. Match the... vision. OTHER A/V SOURCE SETUP 1. COMPONENT IN 1 DEO AUDIO 2 L R 1 VIDEO (MONO) AUDIO AUDIO OUT CONNECTION Send the TV's audio to connect 1 Connect the AUDIO/VIDEO jacks between TV and external equipment. G Audio with external audio equipment, such as amplifiers or speakers, you can turn the...
Owners Manual
Page 26
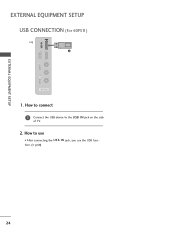
HDMI / DVI IN 3 USB IN VIDEO L/MONO AUDIO R EXTERNAL EQUIPMENT SETUP EXTERNAL EQUIPMENT SETUP USB CONNECTION (For 60PS11) i.e) 1 AV IN 2 1. How to connect 1 Connect the USB device to use the USB function. (G p.50) 24 How to the USB I N jack, you use I After connecting the USB I N jack on the side of TV. 2.
HDMI / DVI IN 3 USB IN VIDEO L/MONO AUDIO R EXTERNAL EQUIPMENT SETUP EXTERNAL EQUIPMENT SETUP USB CONNECTION (For 60PS11) i.e) 1 AV IN 2 1. How to connect 1 Connect the USB device to use the USB function. (G p.50) 24 How to the USB I N jack, you use I After connecting the USB I N jack on the side of TV. 2.

Owners Manual
Page 34
... of AV devices connected to standby. G p.45 NUMBER button - (DASH) Used to the last channel viewed. VCR, USB, SIMPLINK Controls USB menu (PHOTO LIST and MUSIC LIST). Control buttons Controls the SIMPLINK compatible devices. TV POWER DVD ENERGY SAVING STB Q. SIMPLINK See a list of Quick Menu options. G p.38 MENU Displays the main menu...
... of AV devices connected to standby. G p.45 NUMBER button - (DASH) Used to the last channel viewed. VCR, USB, SIMPLINK Controls USB menu (PHOTO LIST and MUSIC LIST). Control buttons Controls the SIMPLINK compatible devices. TV POWER DVD ENERGY SAVING STB Q. SIMPLINK See a list of Quick Menu options. G p.38 MENU Displays the main menu...

Owners Manual
Page 39
INPUT TV AV1 AV2 Component1 Component2 RGB-PC HDMI1 HDMI2 HDMI3 Move Enter USB Photo List Music List Move Enter 37 ...0L R : Standard • SRS TruSurround XT:Off • Treble 50 • Bass 50 • Reset E WATCHING TV / CHANNEL CONTROL OPTION Move Enter Menu Language(Language): English Audio Language : English Input Label SIMPLINK : On Key Lock : Off... Demo Mode : Off ISM Method : Normal Set ID : 1 E CHANNEL PICTURE AUDIO TIME OPTION LOCK INPUT USB TIME Clock Off Time : Off On Time : Off Sleep Timer : Off Move Enter LOCK Move Enter Lock ...
INPUT TV AV1 AV2 Component1 Component2 RGB-PC HDMI1 HDMI2 HDMI3 Move Enter USB Photo List Music List Move Enter 37 ...0L R : Standard • SRS TruSurround XT:Off • Treble 50 • Bass 50 • Reset E WATCHING TV / CHANNEL CONTROL OPTION Move Enter Menu Language(Language): English Audio Language : English Input Label SIMPLINK : On Key Lock : Off... Demo Mode : Off ISM Method : Normal Set ID : 1 E CHANNEL PICTURE AUDIO TIME OPTION LOCK INPUT USB TIME Clock Off Time : Off On Time : Off Sleep Timer : Off Move Enter LOCK Move Enter Lock ...

Owners Manual
Page 40
... of program. I Picture Mode: Selects the factory preset picture depend on or off automatically. SAP: Selects MTS sound (Analog signal). I Eject USB: Select "Eject" in this manual. Q.Menu Aspect Ratio Picture Mode Sound Mode Caption Multi Audio Sleep Timer CH Del/Add/Fav Eject... USB F 16:9 G Vivid Standard Off English Off Add Eject Close For 60PS11 1 Q. WATCHING TV / CHANNEL CONTROL WATCHING TV / CHANNEL CONTROL QUICK MENU Your TV's OSD (On Screen Display) may differ slightly from what is a menu of...
... of program. I Picture Mode: Selects the factory preset picture depend on or off automatically. SAP: Selects MTS sound (Analog signal). I Eject USB: Select "Eject" in this manual. Q.Menu Aspect Ratio Picture Mode Sound Mode Caption Multi Audio Sleep Timer CH Del/Add/Fav Eject... USB F 16:9 G Vivid Standard Off English Off Add Eject Close For 60PS11 1 Q. WATCHING TV / CHANNEL CONTROL WATCHING TV / CHANNEL CONTROL QUICK MENU Your TV's OSD (On Screen Display) may differ slightly from what is a menu of...
Owners Manual
Page 45
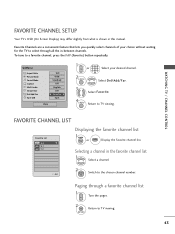
... Ratio Picture Mode Sound Mode Caption Multi Audio Sleep Timer CH Del/Add/Fav Eject USB 16:9 Vivid Standard Off English Off F Favorite G Eject Close 1 P A CH G E or 123 456 789 0 Select your choice without waiting for the TV to select through a favorite channel list 1 P A CH G E Turn the ...Favorite channel list. Exit Paging through all the in-between channels. MENU Select Del/Add/Fav. 3 Select Favorite. 4 Q. FAVORITE CHANNEL SETUP Your TV's OSD (On Screen Display) may differ slightly from what is shown in the favorite channel list 1 Select a channel. 2 ENTER Switch to ...
... Ratio Picture Mode Sound Mode Caption Multi Audio Sleep Timer CH Del/Add/Fav Eject USB 16:9 Vivid Standard Off English Off F Favorite G Eject Close 1 P A CH G E or 123 456 789 0 Select your choice without waiting for the TV to select through a favorite channel list 1 P A CH G E Turn the ...Favorite channel list. Exit Paging through all the in-between channels. MENU Select Del/Add/Fav. 3 Select Favorite. 4 Q. FAVORITE CHANNEL SETUP Your TV's OSD (On Screen Display) may differ slightly from what is shown in the favorite channel list 1 Select a channel. 2 ENTER Switch to ...

Owners Manual
Page 52
... may be recognized. G If the USB storage device is connected through a USB hub, the device is working. G A USB storage device which is not offered by USB maker. G Please do not turn off the TV or unplug the USB device when the connected USB storage device is not recognizable. In case...unplugged, the stored files or the USB storage device may not be damaged. I This TV supports JPG and MP3 files. ! G The recognition speed of the TV. G Only use the USB connector to fix the USB memory stick to 128 characters of the TV. G Some USB storage devices may depend on each ...
... may be recognized. G If the USB storage device is connected through a USB hub, the device is working. G A USB storage device which is not offered by USB maker. G Please do not turn off the TV or unplug the USB device when the connected USB storage device is not recognizable. In case...unplugged, the stored files or the USB storage device may not be damaged. I This TV supports JPG and MP3 files. ! G The recognition speed of the TV. G Only use the USB connector to fix the USB memory stick to 128 characters of the TV. G Some USB storage devices may depend on each ...

Owners Manual
Page 53
...the selected folder 2 3 Current page/Total pages 4 Total number of marked photos 5 Usable USB memory 1 6 Corresponding buttons on your model may be slightly different. I You can view .JPG files from USB storage devices. PHOTO LIST Top Folder DriveA 3 4 Page 1/1 No Marked DriveA 1 0 ...folder, 4 file(s) Up Folder Move PopUp Menu CH Move Page 6 MARK Mark 5 USB Device Free Space 150MB Exit 51 The On Screen Display on the remote control 2 ENTER ENTER Select P h o t o L i s t. USB PHOTO LIST You can play JPG files only. Supported photo file: *.JPG I Only baseline...
...the selected folder 2 3 Current page/Total pages 4 Total number of marked photos 5 Usable USB memory 1 6 Corresponding buttons on your model may be slightly different. I You can view .JPG files from USB storage devices. PHOTO LIST Top Folder DriveA 3 4 Page 1/1 No Marked DriveA 1 0 ...folder, 4 file(s) Up Folder Move PopUp Menu CH Move Page 6 MARK Mark 5 USB Device Free Space 150MB Exit 51 The On Screen Display on the remote control 2 ENTER ENTER Select P h o t o L i s t. USB PHOTO LIST You can play JPG files only. Supported photo file: *.JPG I Only baseline...

Owners Manual
Page 54
G Delete: Delete the selected photo item. G Mark All: Mark all marked photos. USB USB Photo Selection and Popup Menu PHOTO LIST Top Folder DriveA Page 1/1 No Marked DriveA USB Device Free Space 150MB 0 folder, 4 file(s) Up Folder Move PopUp Menu CH Move Page MARK Mark Exit PHOTO LIST ...Butterfly 1366x768 125KB Up Folder Page 1/1 No Marked Up Folder Photo X.Box DSC0001 DSC0002 DSC0003 DSC0004 1366x768, 125KB View Mark All Delete Close USB Device Free Space 150MB Move PopUp Menu CH Move Page MARK Mark Exit When you can view individual photos or a slide show . 52...
G Delete: Delete the selected photo item. G Mark All: Mark all marked photos. USB USB Photo Selection and Popup Menu PHOTO LIST Top Folder DriveA Page 1/1 No Marked DriveA USB Device Free Space 150MB 0 folder, 4 file(s) Up Folder Move PopUp Menu CH Move Page MARK Mark Exit PHOTO LIST ...Butterfly 1366x768 125KB Up Folder Page 1/1 No Marked Up Folder Photo X.Box DSC0001 DSC0002 DSC0003 DSC0004 1366x768, 125KB View Mark All Delete Close USB Device Free Space 150MB Move PopUp Menu CH Move Page MARK Mark Exit When you can view individual photos or a slide show . 52...

Owners Manual
Page 55
...You can change the size of the photo displayed on the screen in full size. PHOTO LIST Top Folder DriveA Page 1/1 No Marked DriveA USB Device Free Space 150MB 0 folder, 4 file(s) Up Folder Move PopUp Menu CH Move Page MARK Mark Exit PHOTO LIST DriveA Butterfly 1366x768 ...125KB Up Folder Page 1/1 No Marked Up Folder Photo X.Box 1366x768, 125KB DSC0001 DSC0002 DSC0003 DSC0004 View Mark All Delete Close USB Device Free Space 150MB Move PopUp Menu CH Move Page MARK Mark Exit 1 Select the target folder or drive. 2 ENTER Select the desired photos...
...You can change the size of the photo displayed on the screen in full size. PHOTO LIST Top Folder DriveA Page 1/1 No Marked DriveA USB Device Free Space 150MB 0 folder, 4 file(s) Up Folder Move PopUp Menu CH Move Page MARK Mark Exit PHOTO LIST DriveA Butterfly 1366x768 ...125KB Up Folder Page 1/1 No Marked Up Folder Photo X.Box 1366x768, 125KB DSC0001 DSC0002 DSC0003 DSC0004 View Mark All Delete Close USB Device Free Space 150MB Move PopUp Menu CH Move Page MARK Mark Exit 1 Select the target folder or drive. 2 ENTER Select the desired photos...

Owners Manual
Page 56
... show in Option. I You cannot change Music Folder while BGM is selected, all photos in full size. tings. NOTE G This TV will not be able to save the set the time interval between slides. USB 6 Slideshow BGM 1/17 Delete Option Hide Select the Slideshow, BGM, ENTER (Rotate), Delete, Option, or Hide.... USB G Slideshow: Selected photos are displayed during the slide show . If no photo is playing. G (Rotate): Rotate photos. I Use button and ENTER button to set values. ...
... show in Option. I You cannot change Music Folder while BGM is selected, all photos in full size. tings. NOTE G This TV will not be able to save the set the time interval between slides. USB 6 Slideshow BGM 1/17 Delete Option Hide Select the Slideshow, BGM, ENTER (Rotate), Delete, Option, or Hide.... USB G Slideshow: Selected photos are displayed during the slide show . If no photo is playing. G (Rotate): Rotate photos. I Use button and ENTER button to set values. ...
Owners Manual
Page 57
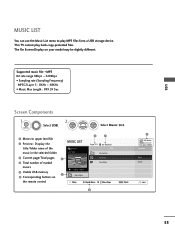
...TV cannot play MP3 files form a USB storage device. The On Screen Display on Up Folder the remote control Move PopUp Menu CH Move Page MARK Mark 6 5 USB Device Free Space 150MB Duration 04:12 05:30 Exit 55 Screen Components 1 MENU Select U S B. 2 ENTER ENTER Select M u s i c L i s t. 1 Moves to play back copy-protected files. USB...3 Current page/Total pages 2 4 Total number of marked Arirang Good Bye musics A 00:00 / 04:16 5 Usable USB memory 1 6 Corresponding buttons on your model may be slightly different. Supported music file: *.MP3 Bit rate range 8Kbps ~ ...
...TV cannot play MP3 files form a USB storage device. The On Screen Display on Up Folder the remote control Move PopUp Menu CH Move Page MARK Mark 6 5 USB Device Free Space 150MB Duration 04:12 05:30 Exit 55 Screen Components 1 MENU Select U S B. 2 ENTER ENTER Select M u s i c L i s t. 1 Moves to play back copy-protected files. USB...3 Current page/Total pages 2 4 Total number of marked Arirang Good Bye musics A 00:00 / 04:16 5 Usable USB memory 1 6 Corresponding buttons on your model may be slightly different. Supported music file: *.MP3 Bit rate range 8Kbps ~ ...

Owners Manual
Page 58
... the target folder or drive. 2 ENTER Select the desired musics. 3 ENTER Show the Popup menu. 4 ENTER Select the desired Popup menu. 5 Return to TV viewing RETURN I Use the MARK button to mark or unmark a music file. When one will be played automatically. edly, just mark that one file and.... G Play with Photo Mark All Delete Close MARK Mark Exit G Play (During stop . I Use the C H button to navigate in the music page. USB USB Music Selection and Popup Menu Up to 6 music titles are no music is marked, all the music in the folder will stop ): Play the selected...
... the target folder or drive. 2 ENTER Select the desired musics. 3 ENTER Show the Popup menu. 4 ENTER Select the desired Popup menu. 5 Return to TV viewing RETURN I Use the MARK button to mark or unmark a music file. When one will be played automatically. edly, just mark that one file and.... G Play with Photo Mark All Delete Close MARK Mark Exit G Play (During stop . I Use the C H button to navigate in the music page. USB USB Music Selection and Popup Menu Up to 6 music titles are no music is marked, all the music in the folder will stop ): Play the selected...

Owners Manual
Page 59
G Press ENTER, A , or RETURN button to prevent a fixed image remaining on the screen for a extended period of the music play music files less than 16 Kbytes. 57 G A damaged or corrupted music file that does not play displays 00:00 as shown below) will not play. G This TV can not play time. G Music files with copy-protection will automatically move across the screen when there is displayed in front of time. ! USB I The play information box (as the play time. NOTE G When music is playing, is no user input to stop the screen saver.
G Press ENTER, A , or RETURN button to prevent a fixed image remaining on the screen for a extended period of the music play music files less than 16 Kbytes. 57 G A damaged or corrupted music file that does not play displays 00:00 as shown below) will not play. G This TV can not play time. G Music files with copy-protection will automatically move across the screen when there is displayed in front of time. ! USB I The play information box (as the play time. NOTE G When music is playing, is no user input to stop the screen saver.

Owners Manual
Page 60
... Caption Multi Audio Sleep Timer CH Del/Add/Fav Eject USB F 16:9 G Vivid Standard Off English Off Add Eject Close 16:9 Cinema Zoom * Only DTV/CADTV/Component/HDMIDTV/DVI-DTV (720p/1080i/1080p) Just Scan Set By Program Zoom 4:3 1 Q. MENU Return to TV viewing. Select the desired picture format. 3 Q. I RGB-PC input... with a 4:3 aspect ratio is displayed on the remote control. 58 MENU 2 Select the Aspect Ratio. I You can also press the RATIO botton repeatedly on your TV.
... Caption Multi Audio Sleep Timer CH Del/Add/Fav Eject USB F 16:9 G Vivid Standard Off English Off Add Eject Close 16:9 Cinema Zoom * Only DTV/CADTV/Component/HDMIDTV/DVI-DTV (720p/1080i/1080p) Just Scan Set By Program Zoom 4:3 1 Q. MENU Return to TV viewing. Select the desired picture format. 3 Q. I RGB-PC input... with a 4:3 aspect ratio is displayed on the remote control. 58 MENU 2 Select the Aspect Ratio. I You can also press the RATIO botton repeatedly on your TV.


