
Owners Manual
Page 1
PLASMA MONITOR MODELS: 42PM4M 50PM4M 60PM4M OWNER'S MANUAL Please read this information to your set . See the label attached on the back cover and quote this manual carefully before operating your dealer when you require service. P/NO: 38289U0558J (0711-REV00) Printed in Korea Record model number and serial number of the set . Retain it for future reference.
PLASMA MONITOR MODELS: 42PM4M 50PM4M 60PM4M OWNER'S MANUAL Please read this information to your set . See the label attached on the back cover and quote this manual carefully before operating your dealer when you require service. P/NO: 38289U0558J (0711-REV00) Printed in Korea Record model number and serial number of the set . Retain it for future reference.
Owners Manual
Page 2
... no guarantee that may cause harmful interference to the presence of the FCC Rules. However, there is : LG Electronics U.S.A., Inc 1000 Sylvan Avenue, Englewood Cliffs, NJ 07632 1-800-243-0000 http://www.lgusa.com 2 Plasma Monitor Reorient or relocate the receiving antenna. - Consult the dealer or an experienced radio/TV technician for help...
... no guarantee that may cause harmful interference to the presence of the FCC Rules. However, there is : LG Electronics U.S.A., Inc 1000 Sylvan Avenue, Englewood Cliffs, NJ 07632 1-800-243-0000 http://www.lgusa.com 2 Plasma Monitor Reorient or relocate the receiving antenna. - Consult the dealer or an experienced radio/TV technician for help...
Owners Manual
Page 4
... Shock, Do Not Expose This Appliance To Rain Or Moisture. 17. Use only with the apparatus. Most appliances recommend they be placed on the apparatus. 4 Plasma Monitor such as vases, shall be placed upon . Check the specification page of this apparatus during lightning storms or when unused for long periods of your...
... Shock, Do Not Expose This Appliance To Rain Or Moisture. 17. Use only with the apparatus. Most appliances recommend they be placed on the apparatus. 4 Plasma Monitor such as vases, shall be placed upon . Check the specification page of this apparatus during lightning storms or when unused for long periods of your...
Owners Manual
Page 6
...rays are not sufficient cause for the Plasma Monitor to cool the Monitor and improve its reliability. Cooling Fan Noise In the same way that this Plasma Monitor is not sufficient cause for the Plasma Monitor to be present on the Plasma Monitor screen The Plasma Display Panel which is the display device...and is defective. WARNING TO REDUCE THE RISK OF FIRE AND ELECTRIC SHOCK, DO NOT EXPOSE THIS PRODUCT TO RAIN OR MOISTURE. 6 Plasma Monitor This also occurs in a movie theater. Introduction Introduction What is the a next generation flat Display using this phenomenon. 160° ...
...rays are not sufficient cause for the Plasma Monitor to cool the Monitor and improve its reliability. Cooling Fan Noise In the same way that this Plasma Monitor is not sufficient cause for the Plasma Monitor to be present on the Plasma Monitor screen The Plasma Display Panel which is the display device...and is defective. WARNING TO REDUCE THE RISK OF FIRE AND ELECTRIC SHOCK, DO NOT EXPOSE THIS PRODUCT TO RAIN OR MOISTURE. 6 Plasma Monitor This also occurs in a movie theater. Introduction Introduction What is the a next generation flat Display using this phenomenon. 160° ...
Owners Manual
Page 8
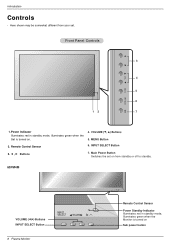
... Control Sensor 6. Introduction Controls - Here shown may be somewhat different from standby or off to standby. 60PM4M VOLUME (F,G) Buttons INPUT SELECT Button INPUT SELECT VOLUME 8 Plasma Monitor INPUT SELECT VOLUME Remote Control Sensor Power Standby Indicator Illuminates red in standby mode, Illuminates green when the Set is turned on . 4. Power Indicator Illuminates...
... Control Sensor 6. Introduction Controls - Here shown may be somewhat different from standby or off to standby. 60PM4M VOLUME (F,G) Buttons INPUT SELECT Button INPUT SELECT VOLUME 8 Plasma Monitor INPUT SELECT VOLUME Remote Control Sensor Power Standby Indicator Illuminates red in standby mode, Illuminates green when the Set is turned on . 4. Power Indicator Illuminates...
Owners Manual
Page 10
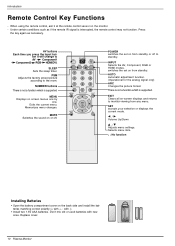
... RGB or HDMI modes. There is not a function which is supported. ton it at the remote control sensor on the monitor. - NUMBER buttons There is not a function which is supported. MENU Displays on the back side and install the batteries ...Switches the sound on from standby or off . Introduction Remote Control Key Functions - switches the set on or off to monitor viewing from standby. PSM Adjusts the factory preset picture according to AV Component1 Component2 RGB HDMI/DVI. F /G Volume ...for the analog signal only) ARC Changes the picture format. Replace cover. 10 Plasma Monitor
... RGB or HDMI modes. There is not a function which is supported. ton it at the remote control sensor on the monitor. - NUMBER buttons There is not a function which is supported. MENU Displays on the back side and install the batteries ...Switches the sound on from standby or off . Introduction Remote Control Key Functions - switches the set on or off to monitor viewing from standby. PSM Adjusts the factory preset picture according to AV Component1 Component2 RGB HDMI/DVI. F /G Volume ...for the analog signal only) ARC Changes the picture format. Replace cover. 10 Plasma Monitor

Owners Manual
Page 12
.... RGB IN OUT Rear side of all cables shown are turned off. Connect the power cord. First of the product. AC IN 12 Plasma Monitor PC 2. When connecting with the D-Sub signal input cable. a. PC 3. Installation External Equipment Connections NOTE: Not all , see if the... computer, product and the peripherals are included with the plasma display. Connect the Audio cable. PC MAC PC/MAC Macintosh Adapter (not included) Use the standard Macintosh adapter since an incompatible adapter is...
.... RGB IN OUT Rear side of all cables shown are turned off. Connect the power cord. First of the product. AC IN 12 Plasma Monitor PC 2. When connecting with the D-Sub signal input cable. a. PC 3. Installation External Equipment Connections NOTE: Not all , see if the... computer, product and the peripherals are included with the plasma display. Connect the Audio cable. PC MAC PC/MAC Macintosh Adapter (not included) Use the standard Macintosh adapter since an incompatible adapter is...
Owners Manual
Page 14
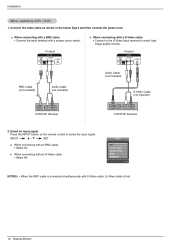
... AV IN VIDEO L-AUDIO-R S-VIDEO AV OUT b. INPUT D /E SET a. Input AV Component1 Component2 RGB HDMI/DVI NOTES: • When the BNC cable is first. 14 Plasma Monitor a. Select an input signal. Connect the video cable as shown in the below figure and then connect the power cord. Product AV IN VIDEO L-AUDIO...
... AV IN VIDEO L-AUDIO-R S-VIDEO AV OUT b. INPUT D /E SET a. Input AV Component1 Component2 RGB HDMI/DVI NOTES: • When the BNC cable is first. 14 Plasma Monitor a. Select an input signal. Connect the video cable as shown in the below figure and then connect the power cord. Product AV IN VIDEO L-AUDIO...
Owners Manual
Page 16
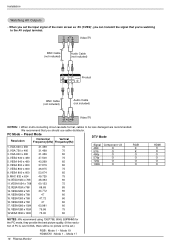
...(Hz) 1. VESA 800 x 600 53.674 85 9. Installation Watching AV Outputs • When you set .) RGB : Mode 1 ~ Mode 19 HDMI/DVI : Mode 1 ~ Mode 17 16 Plasma Monitor HDMI X X O O O O Video/TV BNC Cable (not included) Audio Cable (not included) AV IN VIDEO L-AUDIO-R S-VIDEO AV OUT Product BNC Cable (not included) Audio Cable...
...(Hz) 1. VESA 800 x 600 53.674 85 9. Installation Watching AV Outputs • When you set .) RGB : Mode 1 ~ Mode 19 HDMI/DVI : Mode 1 ~ Mode 17 16 Plasma Monitor HDMI X X O O O O Video/TV BNC Cable (not included) Audio Cable (not included) AV IN VIDEO L-AUDIO-R S-VIDEO AV OUT Product BNC Cable (not included) Audio Cable...

Owners Manual
Page 18
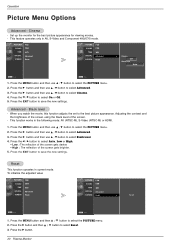
.... 6. Press the G button and then use D / E button to select PSM. 3. Press the G button and then use D / E button to select CSM. 3. Cool Normal Warm User 18 Plasma Monitor Operation Picture Menu Options - When adjusting picture options (contrast, brightness, colour, sharpness and tint (NTSC input only)) manually, PSM is automatically changed . You can also...
.... 6. Press the G button and then use D / E button to select PSM. 3. Press the G button and then use D / E button to select CSM. 3. Cool Normal Warm User 18 Plasma Monitor Operation Picture Menu Options - When adjusting picture options (contrast, brightness, colour, sharpness and tint (NTSC input only)) manually, PSM is automatically changed . You can also...
Owners Manual
Page 20
...AV (NTSC-M), S-Video (NTSC-M) or HDMI. 1. Advanced - Press the F / G button to select On or Off. 5. Press the G button. 20 Plasma Monitor Menu Prev. 1. Black level - Press the EXIT button to select the PICTURE menu. 2. Press the MENU button and then D / E button to save the... Advanced Reset PICTURE0 PSM SOUND0 CSM TIME0 SPECIAL0 SCREEN0 Advanced Reset G To set to select Advanced. 3. Cinema - Set up the monitor for the best picture appearance for viewing movies. - Press the EXIT button to select Reset. 3. This function works in current mode...
...AV (NTSC-M), S-Video (NTSC-M) or HDMI. 1. Advanced - Press the F / G button to select On or Off. 5. Press the G button. 20 Plasma Monitor Menu Prev. 1. Black level - Press the EXIT button to select the PICTURE menu. 2. Press the MENU button and then D / E button to save the... Advanced Reset PICTURE0 PSM SOUND0 CSM TIME0 SPECIAL0 SCREEN0 Advanced Reset G To set to select Advanced. 3. Cinema - Set up the monitor for the best picture appearance for viewing movies. - Press the EXIT button to select Reset. 3. This function works in current mode...
Owners Manual
Page 22
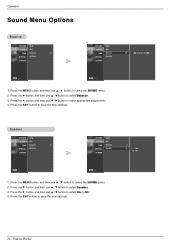
.... 4. Press the MENU button and then use D / E button to select the SOUND menu. 2. Menu Prev. 1. Press the EXIT button to save the new settings. 22 Plasma Monitor Press the EXIT button to save the new settings. Operation Sound Menu Options Balance PICTURE0 SSM SOUND G AVL TIME0 Balance 0 SPECIAL0 Speaker SCREEN0 PICTURE0 SSM...
.... 4. Press the MENU button and then use D / E button to select the SOUND menu. 2. Menu Prev. 1. Press the EXIT button to save the new settings. 22 Plasma Monitor Press the EXIT button to save the new settings. Operation Sound Menu Options Balance PICTURE0 SSM SOUND G AVL TIME0 Balance 0 SPECIAL0 Speaker SCREEN0 PICTURE0 SSM...

Owners Manual
Page 24
... the EXIT button to select the TIME menu. 2. If there is no input signal, the Monitor turns off automatically after 10 minutes. Press the MENU button and then use D / E button to save the new settings. 24 Plasma Monitor PICTURE0 Clock SOUND0 TIME G SPECIAL0 Off time On time Auto sleep SCREEN0 PICTURE0 SOUND0 TIME0...
... the EXIT button to select the TIME menu. 2. If there is no input signal, the Monitor turns off automatically after 10 minutes. Press the MENU button and then use D / E button to save the new settings. 24 Plasma Monitor PICTURE0 Clock SOUND0 TIME G SPECIAL0 Off time On time Auto sleep SCREEN0 PICTURE0 SOUND0 TIME0...
Owners Manual
Page 26
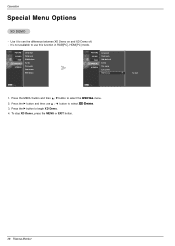
... • Tile Mode Tile mode and choose Tile alignment and set the ID of One by one Display. - Tile mode (product 1 ~16) : r(4) x c(4) row column 26 Plasma Monitor Menu Prev. Configuration of an integration screen is also available as well as configuration of the current product to set It is used to enlarge...
... • Tile Mode Tile mode and choose Tile alignment and set the ID of One by one Display. - Tile mode (product 1 ~16) : r(4) x c(4) row column 26 Plasma Monitor Menu Prev. Configuration of an integration screen is also available as well as configuration of the current product to set It is used to enlarge...
Owners Manual
Page 28
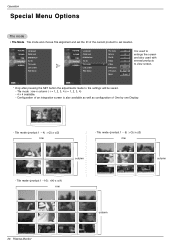
... G To start Menu Prev. Press the G button to select the SPECIAL menu. 2. Menu Prev. 1. To stop XD Demo, press the MENU or EXIT button. 28 Plasma Monitor Use it to see the difference between XD Demo on and XD Demo off. - Operation Special Menu Options XD DEMO -
... G To start Menu Prev. Press the G button to select the SPECIAL menu. 2. Menu Prev. 1. To stop XD Demo, press the MENU or EXIT button. 28 Plasma Monitor Use it to see the difference between XD Demo on and XD Demo off. - Operation Special Menu Options XD DEMO -
Owners Manual
Page 30
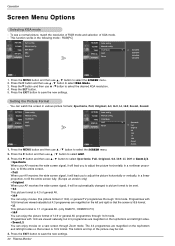
... select the SCREEN menu. 2. G Spectacle Full Original 4:3 16:9 1:1 14:9 Zoom1 Zoom2 1. Press the MENU button and then use D / E button to save the new settings. 30 Plasma Monitor XGA Mode ARC Reset PICTURE0 Auto config. Press the SET button. 5. PICTURE0 SOUND0 TIME0 SPECIAL0 SCREEN G Auto config. PICTURE0 SOUND0 TIME0 SPECIAL0 SCREEN0 Auto config...
... select the SCREEN menu. 2. G Spectacle Full Original 4:3 16:9 1:1 14:9 Zoom1 Zoom2 1. Press the MENU button and then use D / E button to save the new settings. 30 Plasma Monitor XGA Mode ARC Reset PICTURE0 Auto config. Press the SET button. 5. PICTURE0 SOUND0 TIME0 SPECIAL0 SCREEN G Auto config. PICTURE0 SOUND0 TIME0 SPECIAL0 SCREEN0 Auto config...
Owners Manual
Page 32
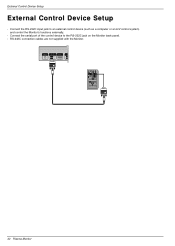
...RGB/DVI) COMPONENT IN VIDEO L-AUDIO-R 1 2 VIDEO AV IN L-AUDIO-R AV OUT S-VIDEO EXTERNAL SPEAKER R L 32 Plasma Monitor RS-232C connection cables are not supplied with the Monitor. Connect the serial port of the control device to an external control device (such as a computer or an A/V control system...) and control the Monitor's functions externally. - Connect the RS-232C input jack to the RS-232C jack on the Monitor back panel. -...
...RGB/DVI) COMPONENT IN VIDEO L-AUDIO-R 1 2 VIDEO AV IN L-AUDIO-R AV OUT S-VIDEO EXTERNAL SPEAKER R L 32 Plasma Monitor RS-232C connection cables are not supplied with the Monitor. Connect the serial port of the control device to an external control device (such as a computer or an A/V control system...) and control the Monitor's functions externally. - Connect the RS-232C input jack to the RS-232C jack on the Monitor back panel. -...

Owners Manual
Page 33
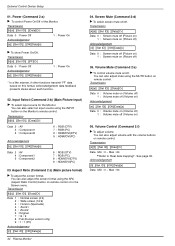
... adjustment range of the PC computer. Colour Temperature k 16. Tile ID Set d 24. When selecting Set ID '0', every connected Plasma Monitor set ID to 'Real Data Mapping 1'. OSD Select k 13. Balance k 15. Tile H Size d 22. Use this function...m 0 ~ 1 t 0 ~ 64 u 0 ~ 3 z FF p 0 ~ 8 u 1 c Key Code d 0 ~ 44 g 0 ~ 64 h 0 ~ 64 i 0 ~ 10 j 0 ~ 1 Transmission / Receiving Protocol Transmission [Command1][Command2][ ][Set ID][ ][Data][Cr] * [Command 1]: k, j, m,d * [Command 2]: To control Plasma Monitor set. * [Set ID]: You can adjust the set is 1 ~ 99.
... adjustment range of the PC computer. Colour Temperature k 16. Tile ID Set d 24. When selecting Set ID '0', every connected Plasma Monitor set ID to 'Real Data Mapping 1'. OSD Select k 13. Balance k 15. Tile H Size d 22. Use this function...m 0 ~ 1 t 0 ~ 64 u 0 ~ 3 z FF p 0 ~ 8 u 1 c Key Code d 0 ~ 44 g 0 ~ 64 h 0 ~ 64 i 0 ~ 10 j 0 ~ 1 Transmission / Receiving Protocol Transmission [Command1][Command2][ ][Set ID][ ][Data][Cr] * [Command 1]: k, j, m,d * [Command 2]: To control Plasma Monitor set. * [Set ID]: You can adjust the set is 1 ~ 99.
Owners Manual
Page 34
... [f][ ][Set ID][ ][OK][Data][x] Data Min : 0 ~ Max : 64 Power (Command 2:a) G To control Power On/Off of the Monitor. Volume Control (Command 2:f) G To adjust volume. Transmission [k][a][ ][Set ID][ ][Data][Cr] Data 0 : Power Off 1 : Power On ... : Zoom1 5 : Zoom2 6 : Original 7 : 14 : 9 8 : Full (Europe version only) 9 : 1 : 1 (PC) Acknowledgement [c][ ][Set ID][ ][OK][Data][x] 34 Plasma Monitor 04. Aspect Ratio (Command 2:c) (Main picture format) G To adjust the screen format. Transmission [k][a][ ][Set ID][ ][FF][Cr] Data 0 : Power Off Acknowledgement [a][ ][Set ID][ ][OK][Data...
... [f][ ][Set ID][ ][OK][Data][x] Data Min : 0 ~ Max : 64 Power (Command 2:a) G To control Power On/Off of the Monitor. Volume Control (Command 2:f) G To adjust volume. Transmission [k][a][ ][Set ID][ ][Data][Cr] Data 0 : Power Off 1 : Power On ... : Zoom1 5 : Zoom2 6 : Original 7 : 14 : 9 8 : Full (Europe version only) 9 : 1 : 1 (PC) Acknowledgement [c][ ][Set ID][ ][OK][Data][x] 34 Plasma Monitor 04. Aspect Ratio (Command 2:c) (Main picture format) G To adjust the screen format. Transmission [k][a][ ][Set ID][ ][FF][Cr] Data 0 : Power Off Acknowledgement [a][ ][Set ID][ ][OK][Data...

Owners Manual
Page 36
... off status when Stand-by mode. Transmission [j][p][ ][Set ID][ ][Data][Cr] Data 1 : Inversion 2 : Orbiter 3 : Orb.+Inv. 4 : White Wash 8 : Normal Acknowledgement [p][ ][Set ID][ ][OK][Data][x] 36 Plasma Monitor 18. Transmission [k][u][ ][Set ID][ ][Data][Cr] Data 0: Normal 1: Cool 2: Warm 3: User Acknowledgement [u][ ][Set ID][ ][OK][Data][x] Data 0: Normal 1: Cool 2: Warm 3: User 16. Abnormal state (Command2...
... off status when Stand-by mode. Transmission [j][p][ ][Set ID][ ][Data][Cr] Data 1 : Inversion 2 : Orbiter 3 : Orb.+Inv. 4 : White Wash 8 : Normal Acknowledgement [p][ ][Set ID][ ][OK][Data][x] 36 Plasma Monitor 18. Transmission [k][u][ ][Set ID][ ][Data][Cr] Data 0: Normal 1: Cool 2: Warm 3: User Acknowledgement [u][ ][Set ID][ ][OK][Data][x] Data 0: Normal 1: Cool 2: Warm 3: User 16. Abnormal state (Command2...


