Owner's Manual
Page 4
... to install the TV by SWITCH" 4 Do not install this product near flammable objects such as this unit by the hanging power and signal cables on the back of your appliance, and if its appearance indicates damage or deterioration, unplug it, discontinue use a damaged or loose power cord. SAFETY INSTRUCTIONS 11 Never touch this unit is connected to the AC wall outlet...
... to install the TV by SWITCH" 4 Do not install this product near flammable objects such as this unit by the hanging power and signal cables on the back of your appliance, and if its appearance indicates damage or deterioration, unplug it, discontinue use a damaged or loose power cord. SAFETY INSTRUCTIONS 11 Never touch this unit is connected to the AC wall outlet...
Owner's Manual
Page 6
... Panel Information 13 Stand Instruction 15 Cable Management 17 Desktop Pedestal Installation 18 Swivel Stand 18 VESA Wall Mounting 19 Securing the TV to the wall to prevent falling when the TV is used on a stand 20 Antenna or Cable Connection 21 EXTERNAL EQUIPMENT SETUP HD Receiver Setup 22 DVD Setup 25 VCR Setup 27 Other A/V Source Setup 28 USB Connection 28 Audio Out Connection 29 PC Setup 30 WATCHING TV / CHANNEL CONTROL Remote Control Functions 36 Turning On TV 38 Channel Selection 38 Volume Adjustment 38 Initial Setting...
... Panel Information 13 Stand Instruction 15 Cable Management 17 Desktop Pedestal Installation 18 Swivel Stand 18 VESA Wall Mounting 19 Securing the TV to the wall to prevent falling when the TV is used on a stand 20 Antenna or Cable Connection 21 EXTERNAL EQUIPMENT SETUP HD Receiver Setup 22 DVD Setup 25 VCR Setup 27 Other A/V Source Setup 28 USB Connection 28 Audio Out Connection 29 PC Setup 30 WATCHING TV / CHANNEL CONTROL Remote Control Functions 36 Turning On TV 38 Channel Selection 38 Volume Adjustment 38 Initial Setting...
Owner's Manual
Page 13
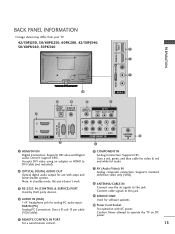
...a wired remote control. 6 COMPONENT IN Analog Connection. Uses a red, green, and blue cable for video & red and white for software updates. 10 Power Cord Socket For operation with amps and home theater systems. Note: In standby mode, this jack. Supports standard definition video only (480i). 8 ANTENNA/CABLE IN Connect over-the air signals to DVI cable (not included) 2 OPTICAL DIGITAL AUDIO OUT Optical digital audio output for analog PC audio input. Doesn't support 480i. Accepts DVI video using an adapter or HDMI to this port doesn't work. 3 RS-232C IN (CONTROL & SERVICE) PORT Used by...
...a wired remote control. 6 COMPONENT IN Analog Connection. Uses a red, green, and blue cable for video & red and white for software updates. 10 Power Cord Socket For operation with amps and home theater systems. Note: In standby mode, this jack. Supports standard definition video only (480i). 8 ANTENNA/CABLE IN Connect over-the air signals to DVI cable (not included) 2 OPTICAL DIGITAL AUDIO OUT Optical digital audio output for analog PC audio input. Doesn't support 480i. Accepts DVI video using an adapter or HDMI to this port doesn't work. 3 RS-232C IN (CONTROL & SERVICE) PORT Used by...

Owner's Manual
Page 14
...Accepts DVI video using an adapter or HDMI to this jack. REMOTE CONTROL IN PORT 5 For a wired remote control. 6 COMPONENT IN Analog Connection. Supports HD. Caution: Never attempt to MP3. 10 Power Cord Socket For operation with amps and home theater systems. Note: In standby mode, this port doesn't work. 3 RS-232C IN (CONTROL & SERVICE) PORT Used by third party devices. Connect cable signals to DVI cable (not included) 2 OPTICAL DIGITAL AUDIO OUT Optical digital audio output for analog PC audio input. Uses a red, green, and blue cable for video & red and white for viewing...
...Accepts DVI video using an adapter or HDMI to this jack. REMOTE CONTROL IN PORT 5 For a wired remote control. 6 COMPONENT IN Analog Connection. Supports HD. Caution: Never attempt to MP3. 10 Power Cord Socket For operation with amps and home theater systems. Note: In standby mode, this port doesn't work. 3 RS-232C IN (CONTROL & SERVICE) PORT Used by third party devices. Connect cable signals to DVI cable (not included) 2 OPTICAL DIGITAL AUDIO OUT Optical digital audio output for analog PC audio input. Uses a red, green, and blue cable for video & red and white for viewing...
Owner's Manual
Page 19
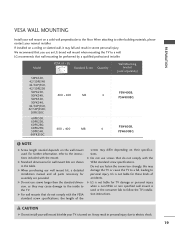
... the TV to follow the TV installation instructions. PREPARATION VESA WALL MOUNTING Install your wall mount on . For further information, refer to the instructions included with the VESA standard screw specifications, the length of accidents. G Do not use screws longer then the standard dimension, as they may fall , leading to electric shock. 19 When attaching to the floor. Model VESA (A * B) A Standard Screw Quantity B Wall Mounting bracket (sold separately) 50PK550, 42/50PJ340...
... the TV to follow the TV installation instructions. PREPARATION VESA WALL MOUNTING Install your wall mount on . For further information, refer to the instructions included with the VESA standard screw specifications, the length of accidents. G Do not use screws longer then the standard dimension, as they may fall , leading to electric shock. 19 When attaching to the floor. Model VESA (A * B) A Standard Screw Quantity B Wall Mounting bracket (sold separately) 50PK550, 42/50PJ340...
Owner's Manual
Page 22
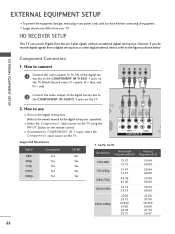
... IN AUDIO 1 jacks on the remote control. I Select the Component1 input source on the TV using the INPUT button on the TV. 2. HD RECEIVER SETUP This TV can receive Digital Over-the-air/Cable signals without an external digital set-top box. Match the jack colors (Y = green, PB = blue, and PR = red). I Turn on the digital set-top box. (Refer to the owner's manual for the digital set -top box to COMPONENT IN 2 input, select the Component2 input source on the TV. EXTERNAL EQUIPMENT SETUP Component Connection 1.
... IN AUDIO 1 jacks on the remote control. I Select the Component1 input source on the TV using the INPUT button on the TV. 2. HD RECEIVER SETUP This TV can receive Digital Over-the-air/Cable signals without an external digital set-top box. Match the jack colors (Y = green, PB = blue, and PR = red). I Turn on the digital set-top box. (Refer to the owner's manual for the digital set -top box to COMPONENT IN 2 input, select the Component2 input source on the TV. EXTERNAL EQUIPMENT SETUP Component Connection 1.
Owner's Manual
Page 23
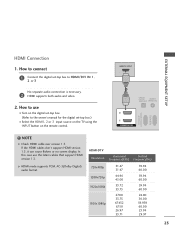
... version 1.3. If the HDMI cables don't support HDMI version 1.3, it can cause flickers or no screen display. How to HDMI/DVI IN 1, 2 or 3 No separate audio connection is necessary. 2 HDMI supports both audio and video. 2. In this case use I Turn on the digital set-top box. (Refer to the owner's manual for the digital set -top box to connect 1 Connect the digital set -top box.) I Select the HDMI1, 2 or 3 input source on the TV using the INPUT button on the remote control. EXTERNAL EQUIPMENT SETUP HDMI Connection 1. G HDMI mode supports PCM, AC-3(Dolby Digital) audio format.
... version 1.3. If the HDMI cables don't support HDMI version 1.3, it can cause flickers or no screen display. How to HDMI/DVI IN 1, 2 or 3 No separate audio connection is necessary. 2 HDMI supports both audio and video. 2. In this case use I Turn on the digital set-top box. (Refer to the owner's manual for the digital set -top box to connect 1 Connect the digital set -top box.) I Select the HDMI1, 2 or 3 input source on the TV using the INPUT button on the remote control. EXTERNAL EQUIPMENT SETUP HDMI Connection 1. G HDMI mode supports PCM, AC-3(Dolby Digital) audio format.
Owner's Manual
Page 24
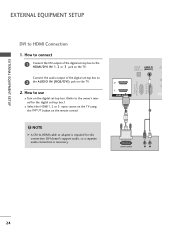
.... 2. Connect the audio output of the digital set -top box to the HDMI/DVI IN 1, 2 or 3 jack on the remote control. ! DVI doesn't support audio, so a separate audio connection is required for the digital set -top box. (Refer to use I Turn on the digital set -top box.) I Select the HDMI1, 2 or 3 input source on the TV using the INPUT button on the TV. How to the owner's manual for this connection. OPTICAL DIGITAL AUDIO OUT AUDIO IN (RGB/DVI) R CO RS-232C IN (CONTROL & SERVICE) RGB IN (PC) 2 2 1 1 HDMI/DVI...
.... 2. Connect the audio output of the digital set -top box to the HDMI/DVI IN 1, 2 or 3 jack on the remote control. ! DVI doesn't support audio, so a separate audio connection is required for the digital set -top box. (Refer to use I Turn on the digital set -top box.) I Select the HDMI1, 2 or 3 input source on the TV using the INPUT button on the TV. How to the owner's manual for this connection. OPTICAL DIGITAL AUDIO OUT AUDIO IN (RGB/DVI) R CO RS-232C IN (CONTROL & SERVICE) RGB IN (PC) 2 2 1 1 HDMI/DVI...

Owner's Manual
Page 26
HDMI supports both audio and video. 2. How to use I Refer to the HDMI/DVI IN 1, 2 or 3 jack on the remote control. How to connect 1 Connect the HDMI output of the DVD to the DVD player's manual for operating instructions. I Select the HDMI1, 2 or 3 input source on the TV using the INPUT button on the TV. 2 No separate audio connection is necessary. HDMI-DVD OUTPUT 1 OPTICAL DIGITAL AUDIO OUT AUD (RGB/D 2 1 HDMI/DVI IN RS-232C IN (CONTROL & SERVICE) RGB IN (PC) 26 EXTERNAL EQUIPMENT SETUP EXTERNAL EQUIPMENT SETUP HDMI Connection 1.
HDMI supports both audio and video. 2. How to use I Refer to the HDMI/DVI IN 1, 2 or 3 jack on the remote control. How to connect 1 Connect the HDMI output of the DVD to the DVD player's manual for operating instructions. I Select the HDMI1, 2 or 3 input source on the TV using the INPUT button on the TV. 2 No separate audio connection is necessary. HDMI-DVD OUTPUT 1 OPTICAL DIGITAL AUDIO OUT AUD (RGB/D 2 1 HDMI/DVI IN RS-232C IN (CONTROL & SERVICE) RGB IN (PC) 26 EXTERNAL EQUIPMENT SETUP EXTERNAL EQUIPMENT SETUP HDMI Connection 1.

Owner's Manual
Page 27
... of the VCR. 2. ANTENNA/ CABLE IN 1 2 Connect the antenna cable to the VCR owner's manual.) ANT OUT S-VIDEO VIDEO L R ANT IN 2 OUTPUT SWITCH Wall Jack Antenna Composite (RCA) Connection 1. EXTERNAL EQUIPMENT SETUP VCR SETUP Antenna Connection 1. I Insert a video tape into the VCR and press PLAY on the VCR. (Refer to the ANTENNA/CABLE IN socket on the remote control. Match the jack colors (Video = yellow, Audio Left = white, and Audio Right = red) 2. I If connected to AV IN 2, select AV2 input source on the VCR...
... of the VCR. 2. ANTENNA/ CABLE IN 1 2 Connect the antenna cable to the VCR owner's manual.) ANT OUT S-VIDEO VIDEO L R ANT IN 2 OUTPUT SWITCH Wall Jack Antenna Composite (RCA) Connection 1. EXTERNAL EQUIPMENT SETUP VCR SETUP Antenna Connection 1. I Insert a video tape into the VCR and press PLAY on the VCR. (Refer to the ANTENNA/CABLE IN socket on the remote control. Match the jack colors (Video = yellow, Audio Left = white, and Audio Right = red) 2. I If connected to AV IN 2, select AV2 input source on the VCR...

Owner's Manual
Page 28
..., 42/50PJ350C, 50/60PK550C models 1. Match the jack colors. (Video = yellow, Audio Left = white, and Audio Right = red) 2. USB IN Camcorder Video Game Set VIDEO L R 1 EXTERNAL EQUIPMENT SETUP VIDEO L/MONO AUDIO R HDMI IN 3 AV IN 2 VIDEO L/MONO AUDIO R HDMI IN 3 USB IN USB CONNECTION - EXTERNAL EQUIPMENT SETUP OTHER A/V SOURCE SETUP 1. How to use the USB function. (G p.54) AV IN 2 28 I Select the A V 2 input source on the TV using the INPUT button on the remote control. How to the USB I If connected to connect 1 Connect the AUDIO/VIDEO jacks between TV and...
..., 42/50PJ350C, 50/60PK550C models 1. Match the jack colors. (Video = yellow, Audio Left = white, and Audio Right = red) 2. USB IN Camcorder Video Game Set VIDEO L R 1 EXTERNAL EQUIPMENT SETUP VIDEO L/MONO AUDIO R HDMI IN 3 AV IN 2 VIDEO L/MONO AUDIO R HDMI IN 3 USB IN USB CONNECTION - EXTERNAL EQUIPMENT SETUP OTHER A/V SOURCE SETUP 1. How to use the USB function. (G p.54) AV IN 2 28 I Select the A V 2 input source on the TV using the INPUT button on the remote control. How to the USB I If connected to connect 1 Connect the AUDIO/VIDEO jacks between TV and...
Owner's Manual
Page 39
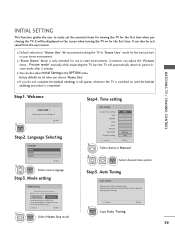
... H o m e U s e mode. INITIAL SETTING This Function guides the user to use in your antenna connection. We recommend setting the TV to preset instore mode after 5 minutes. I Default selection is completed. Language Selecting Language English Español Français Next 1 ENTER Select menu Language. Choose the setting mode you want . By Changing Picture Mode, you can adjust the "Picture menu - Time setting Time Setting Current Time Setting Year Month Date Hour Minute Time Zone Daylight Saving F Auto...
... H o m e U s e mode. INITIAL SETTING This Function guides the user to use in your antenna connection. We recommend setting the TV to preset instore mode after 5 minutes. I Default selection is completed. Language Selecting Language English Español Français Next 1 ENTER Select menu Language. Choose the setting mode you want . By Changing Picture Mode, you can adjust the "Picture menu - Time setting Time Setting Current Time Setting Year Month Date Hour Minute Time Zone Daylight Saving F Auto...
Owner's Manual
Page 47
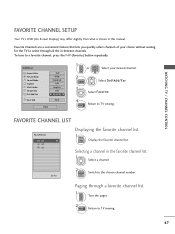
... Screen Display) may differ slightly from what is shown in -between channels. Q.Menu Aspect Ratio Picture Mode Sound Mode Caption Multi Audio Sleep Timer CH Del/Add/Fav Eject USB 16:9 Vivid Standard Off English Off F Favorite G Eject Close 1 or P CH A G E 2 Q.MENU 123 456 Select your choice without waiting for the TV to select through a favorite channel list 1 P CH A G E Turn the pages. 2 EXIT Return to the chosen channel number...
... Screen Display) may differ slightly from what is shown in -between channels. Q.Menu Aspect Ratio Picture Mode Sound Mode Caption Multi Audio Sleep Timer CH Del/Add/Fav Eject USB 16:9 Vivid Standard Off English Off F Favorite G Eject Close 1 or P CH A G E 2 Q.MENU 123 456 Select your choice without waiting for the TV to select through a favorite channel list 1 P CH A G E Turn the pages. 2 EXIT Return to the chosen channel number...
Owner's Manual
Page 52
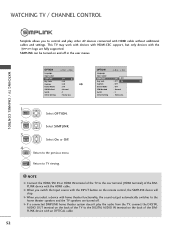
... menu. G When you switch the Input source with an OPTICAL cable. 52 G If a connected SIMPLINK home theater system doesn't play other AV devices connected with home theater functionality, the sound output automatically switches to the home theater speakers and the TV speakers are fully supported. G When you select a device with HDMI cable without additional cables and settings. WATCHING TV / CHANNEL CONTROL Simplink allows you to control and play the audio from the TV, connect the DIGITAL AUDIO...
... menu. G When you switch the Input source with an OPTICAL cable. 52 G If a connected SIMPLINK home theater system doesn't play other AV devices connected with home theater functionality, the sound output automatically switches to the home theater speakers and the TV speakers are fully supported. G When you select a device with HDMI cable without additional cables and settings. WATCHING TV / CHANNEL CONTROL Simplink allows you to control and play the audio from the TV, connect the DIGITAL AUDIO...
Owner's Manual
Page 54
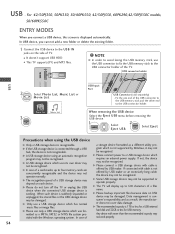
... List Music List USB Input Port USB Connector (sold separately) - Data management is not recognizable. G Please use a USB storage device which requires an external power supply. In case of a USB storage device may be recognized. When removing the USB device Select the Eject USB menu before removing the USB device. 1 Q.MENU 2 Select ENTER Select E j e c t. Precautions when using an automatic recognition program may not work properly. 54 G The recognition speed of a storage device formatted...
... List Music List USB Input Port USB Connector (sold separately) - Data management is not recognizable. G Please use a USB storage device which requires an external power supply. In case of a USB storage device may be recognized. When removing the USB device Select the Eject USB menu before removing the USB device. 1 Q.MENU 2 Select ENTER Select E j e c t. Precautions when using an automatic recognition program may not work properly. 54 G The recognition speed of a storage device formatted...
Owner's Manual
Page 69
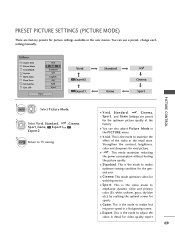
... store. I Standard: This is the mode to realize fast response speed in detail for video quality expert 69 I Vivid: This is the mode to adjust the video in a fast gaming screen. I V i v i d, S t a n d a r d, , C i n e m a, AutoPowerSave Sport, and Game Settings are factory presets for picture settings available in the PICTURE menu. Q.Menu Aspect Ratio Picture Mode Sound Mode Caption Multi Audio Sleep Timer CH Del/Add/Fav Eject USB F 1166::99 G F VViivviidd G Standard Off English Off Add Eject Close...
... store. I Standard: This is the mode to realize fast response speed in detail for video quality expert 69 I Vivid: This is the mode to adjust the video in a fast gaming screen. I V i v i d, S t a n d a r d, , C i n e m a, AutoPowerSave Sport, and Game Settings are factory presets for picture settings available in the PICTURE menu. Q.Menu Aspect Ratio Picture Mode Sound Mode Caption Multi Audio Sleep Timer CH Del/Add/Fav Eject USB F 1166::99 G F VViivviidd G Standard Off English Off Add Eject Close...
Owner's Manual
Page 94
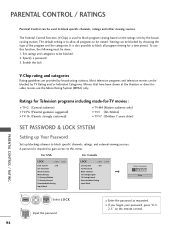
... all programs to block program viewing based on the remote control. It is used to be blocked. 2. For USA For Canada LOCK Move Enter Lock System : Off Set Password Block Channel Movie Rating TV Rating-Children TV Rating-General Downloadable Rating Input Block LOCK Move Enter Lock System : Off Set Password Block Channel TV Rating-English TV Rating-French Downloadable Rating Input Block Enter Password **** Close 1 MENU ENTER Select L O C K. 2 123 456 789 0 Input the password. 94...
... all programs to block program viewing based on the remote control. It is used to be blocked. 2. For USA For Canada LOCK Move Enter Lock System : Off Set Password Block Channel Movie Rating TV Rating-Children TV Rating-General Downloadable Rating Input Block LOCK Move Enter Lock System : Off Set Password Block Channel TV Rating-English TV Rating-French Downloadable Rating Input Block Enter Password **** Close 1 MENU ENTER Select L O C K. 2 123 456 789 0 Input the password. 94...
Owner's Manual
Page 106
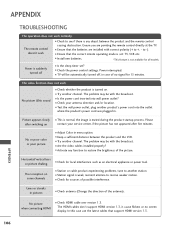
... startup process. to +, - No or poor color or poor picture I Check antenna (Change the direction of the antenna). Lines or streaks in pictures I Adjust Color in menu option. The HDMI cables don't support HDMI version 1.3, it cause flickers or no signal for sources of no screen display. Power is turned on contact your antenna direction and/or location. I Is the sleep timer set : TV, VCR etc. The problem may be with the broadcast. I Check whether...
... startup process. to +, - No or poor color or poor picture I Check antenna (Change the direction of the antenna). Lines or streaks in pictures I Adjust Color in menu option. The HDMI cables don't support HDMI version 1.3, it cause flickers or no signal for sources of no screen display. Power is turned on contact your antenna direction and/or location. I Is the sleep timer set : TV, VCR etc. The problem may be with the broadcast. I Check whether...

Owner's Manual
Page 107
... a fault with the broadcast. Press MUTE button. No output from one of range I Adjust resolution, horizontal frequency, or vertical frequency. Picture OK & No sound I Sound muted? I Reinstall the PC video card. or single color I Try another channel. APPENDIX 107 No sound when connecting HDMI/USB I Check the signal cable. There is not available for all models. I Check the input source. The audio function does not work. The problem may result in ambient humidity or...
... a fault with the broadcast. Press MUTE button. No output from one of range I Adjust resolution, horizontal frequency, or vertical frequency. Picture OK & No sound I Sound muted? I Reinstall the PC video card. or single color I Try another channel. APPENDIX 107 No sound when connecting HDMI/USB I Check the signal cable. There is not available for all models. I Check the input source. The audio function does not work. The problem may result in ambient humidity or...

Brochure
Page 4
...) A/V Input Navigation / EZ Input Toggle Yes Input Labeling Yes Quick View (Flashback) Yes Quick Setup Guide Yes Parental Control w/V-Chip Yes Key Lock Yes SimpLink™ (HDMI CEC) Yes CONVENIENCE FEATURES Language 3 (English, Spanish, French) 3D User Interface Yes Auto Tuning / Programming Yes Program (Channel) Edit (Add / Delete) Yes Favorite Channel Programming Yes Auto/Manual Clock Yes On/Off Timer Yes Sleep Timer Yes Auto Off (when no video is a trademark of Video...
...) A/V Input Navigation / EZ Input Toggle Yes Input Labeling Yes Quick View (Flashback) Yes Quick Setup Guide Yes Parental Control w/V-Chip Yes Key Lock Yes SimpLink™ (HDMI CEC) Yes CONVENIENCE FEATURES Language 3 (English, Spanish, French) 3D User Interface Yes Auto Tuning / Programming Yes Program (Channel) Edit (Add / Delete) Yes Favorite Channel Programming Yes Auto/Manual Clock Yes On/Off Timer Yes Sleep Timer Yes Auto Off (when no video is a trademark of Video...


