
Owner's Manual (English)
Page 2
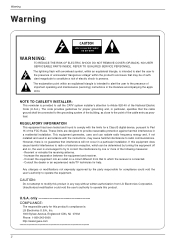
... an equilateral triangle, is intended to alert the user to the presence of uninsulated "dangerous voltage" within an equilateral triangle is : LG Electronics U.S.A., Inc. 1000 Sylvan Avenue, Englewood Cliffs, NJ 07632 Phone: 1-800-243-0000 http://www.lgusa.com 2 REGULATORY INFORMATION This... and used in the literature accompanying the appliance. These limits are designed to correct the interference by turning the equipment off and on a circuit different from LG Electronics Corporation. NO USER SERVICEABLE PARTS INSIDE. However, there is encouraged to try to provide reasonable ...
... an equilateral triangle, is intended to alert the user to the presence of uninsulated "dangerous voltage" within an equilateral triangle is : LG Electronics U.S.A., Inc. 1000 Sylvan Avenue, Englewood Cliffs, NJ 07632 Phone: 1-800-243-0000 http://www.lgusa.com 2 REGULATORY INFORMATION This... and used in the literature accompanying the appliance. These limits are designed to correct the interference by turning the equipment off and on a circuit different from LG Electronics Corporation. NO USER SERVICEABLE PARTS INSIDE. However, there is encouraged to try to provide reasonable ...
Owner's Manual (English)
Page 4
..., there may produce some temporary distortion effects on the monitor's performance. - that is used in any way, such as power supply cord or plug is turned on the screen, appearing as being twisted, kinked, pinched, closed in electric shock or fire. Do not overload wall outlets. For LCD TV Note - On...
..., there may produce some temporary distortion effects on the monitor's performance. - that is used in any way, such as power supply cord or plug is turned on the screen, appearing as being twisted, kinked, pinched, closed in electric shock or fire. Do not overload wall outlets. For LCD TV Note - On...
Owner's Manual (English)
Page 5
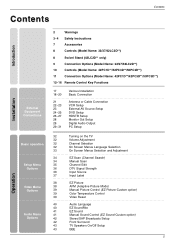
... Name: 32/37/42LC2D**) 8 Swivel Stand (42LC2D** only) 9 Connection Options (Model Name: 32/37/42LC2D**) 10 Controls (Model Name: 42PC1D**/42PC3D**/50PC3D**) 11 Connection Options (Model Name: 42PC1D**/42PC3D**/50PC3D**) 12~16 Remote Control Key Functions 17 18~20 21 22~23 23 24~25 26~27 28 28 29~31... Various Installation Basic Connection Antenna or Cable Connection VCR Setup External AV Source Setup DVD Setup HDSTB Setup Monitor Out Setup Digital Audio Output PC Setup 32 Turning...
... Name: 32/37/42LC2D**) 8 Swivel Stand (42LC2D** only) 9 Connection Options (Model Name: 32/37/42LC2D**) 10 Controls (Model Name: 42PC1D**/42PC3D**/50PC3D**) 11 Connection Options (Model Name: 42PC1D**/42PC3D**/50PC3D**) 12~16 Remote Control Key Functions 17 18~20 21 22~23 23 24~25 26~27 28 28 29~31... Various Installation Basic Connection Antenna or Cable Connection VCR Setup External AV Source Setup DVD Setup HDSTB Setup Monitor Out Setup Digital Audio Output PC Setup 32 Turning...
Owner's Manual (English)
Page 12
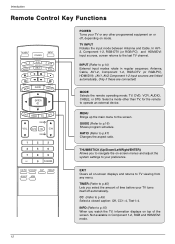
... GUIDE DAY+ RATIO ENTER EXIT TIMER CC INFO PAGE VOL MUTE FAV CH PAGE 1 2 3 4 5 6 7 8 9 0 FLASHBK EZ PIC EZ SOUND SAP FREEZE ADJUST APM POWER Turns your TV turns itself off , depending on mode. Select a mode other programmed equipment on -screen displays and returns to the screen. MENU Brings up the main menu...
... GUIDE DAY+ RATIO ENTER EXIT TIMER CC INFO PAGE VOL MUTE FAV CH PAGE 1 2 3 4 5 6 7 8 9 0 FLASHBK EZ PIC EZ SOUND SAP FREEZE ADJUST APM POWER Turns your TV turns itself off , depending on mode. Select a mode other programmed equipment on -screen displays and returns to the screen. MENU Brings up the main menu...
Owner's Manual (English)
Page 21
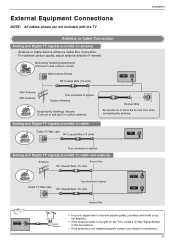
... UHF Antenna Wall Antenna Socket RF Coaxial Wire (75 ohm) HDMI/DVI IN DIGITAL AUDIO RS-232C IN OUT (CONTROL & SERVICE) OPTICAL Turn clockwise to tighten. Outdoor Antenna Single-family Dwellings /Houses (Connect to wall jack for assistance. 21 N 2 AV IN 2 Analog and Digital...antenna Antenna Bronze Wire RF Coaxial Wire (75 ohm) AV OUT VIDEO ( ) AUDIO AV IN 1 S-VIDEO CaVbIDlEeO TV WaAUlDlIOJack COMPONENT IN Turn clockwise to tighten. RHDFMI/DCVIoINaxial WDIGirITeAOLUAT(U7DI5O ohm) RS-232C IN (CONTROL & SERVICE) OPTICAL Bronze Wire ANTENNA IN CABLE IN RGB IN ...
... UHF Antenna Wall Antenna Socket RF Coaxial Wire (75 ohm) HDMI/DVI IN DIGITAL AUDIO RS-232C IN OUT (CONTROL & SERVICE) OPTICAL Turn clockwise to tighten. Outdoor Antenna Single-family Dwellings /Houses (Connect to wall jack for assistance. 21 N 2 AV IN 2 Analog and Digital...antenna Antenna Bronze Wire RF Coaxial Wire (75 ohm) AV OUT VIDEO ( ) AUDIO AV IN 1 S-VIDEO CaVbIDlEeO TV WaAUlDlIOJack COMPONENT IN Turn clockwise to tighten. RHDFMI/DCVIoINaxial WDIGirITeAOLUAT(U7DI5O ohm) RS-232C IN (CONTROL & SERVICE) OPTICAL Bronze Wire ANTENNA IN CABLE IN RGB IN ...
Owner's Manual (English)
Page 24
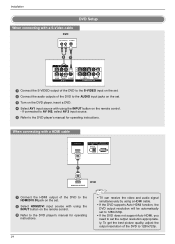
... of the DVD to the S-VIDEO input on the set. 2 Connect the audio outputs of the DVD to the AUDIO input jacks on the set. 3 Turn on the DVD player, insert a DVD. 4 Select AV1 input source with using the INPUT button on the remote control. - If connected to AV IN2, select...
... of the DVD to the S-VIDEO input on the set. 2 Connect the audio outputs of the DVD to the AUDIO input jacks on the set. 3 Turn on the DVD player, insert a DVD. 4 Select AV1 input source with using the INPUT button on the remote control. - If connected to AV IN2, select...
Owner's Manual (English)
Page 25
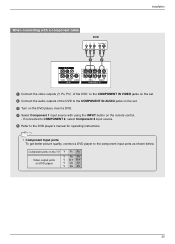
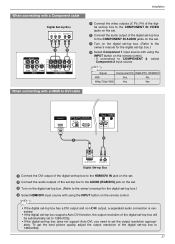
... to the COMPONENT IN VIDEO jacks on the set. 2 Connect the audio outputs of the DVD to the COMPONENT IN AUDIO jacks on the set. 3 Turn on the DVD player, insert a DVD. 4 Select Component 1 input source with using the INPUT button on DVD player Y Pb Pr Y B-Y R-Y Y Cb Cr Y PB PR 25...
... to the COMPONENT IN VIDEO jacks on the set. 2 Connect the audio outputs of the DVD to the COMPONENT IN AUDIO jacks on the set. 3 Turn on the DVD player, insert a DVD. 4 Select Component 1 input source with using the INPUT button on DVD player Y Pb Pr Y B-Y R-Y Y Cb Cr Y PB PR 25...
Owner's Manual (English)
Page 26
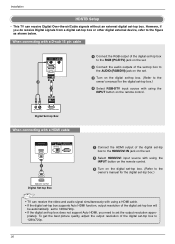
... RGB (PC/DTV) jack on the set. 2 Connect the audio outputs of the set-top box to the AUDIO (RGB/DVI) jack on the set. 3 Turn on the digital set-top box. (Refer to the owner's manual for the digital set-top box.) • TV can receive Digital Over-the-air... (RGB/DVI) REMOTE CONTROL 1280x720p. priately. This TV can receive the video and audio signal simultaneously with using the INPUT button on the remote control. 3 Turn on the digital set-top box. (Refer to the owner's manual for the digital set-top box.) 4 Select RGB-DTV input source with using the...
... RGB (PC/DTV) jack on the set. 2 Connect the audio outputs of the set-top box to the AUDIO (RGB/DVI) jack on the set. 3 Turn on the digital set-top box. (Refer to the owner's manual for the digital set-top box.) • TV can receive Digital Over-the-air... (RGB/DVI) REMOTE CONTROL 1280x720p. priately. This TV can receive the video and audio signal simultaneously with using the INPUT button on the remote control. 3 Turn on the digital set-top box. (Refer to the owner's manual for the digital set-top box.) 4 Select RGB-DTV input source with using the...
Owner's Manual (English)
Page 27
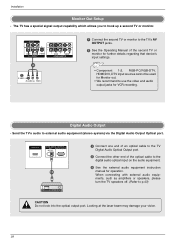
OPTICAL Turn on the digital set-top box. (Refer to the owner's manual for the digital RGB IN REMOTE CONTROL IN set-top box.) 4 Select HDMI/DVI ...
OPTICAL Turn on the digital set-top box. (Refer to the owner's manual for the digital RGB IN REMOTE CONTROL IN set-top box.) 4 Select HDMI/DVI ...
Owner's Manual (English)
Page 28
... optical cable to p.43) CAUTION Do not look into the optical output port. When connecting with external audio equipments, such as amplifiers or speakers, please turn the TV speakers off. (Refer to the digital audio optical input on the audio equipment. 3 See the external audio equipment instruction manual for Monitor out...
... optical cable to p.43) CAUTION Do not look into the optical output port. When connecting with external audio equipments, such as amplifiers or speakers, please turn the TV speakers off. (Refer to the digital audio optical input on the audio equipment. 3 See the external audio equipment instruction manual for Monitor out...
Owner's Manual (English)
Page 29
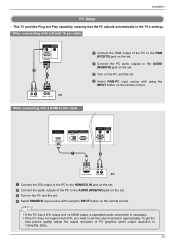
... the PC to the RGB (PC/DTV) jack on the set. 2 Connect the PC audio outputs to the AUDIO (RGB/DVI) jack on the set. 3 Turn on the PC and the set the output resolution appropriately. AUDIO (RGB/DVI) RGB IN • If the PC (PC/DTV) has a DVI output anRdGB.... Installation PC Setup - This TV provides Plug and Play capability, meaning that the PC adjusts automatically to the AUDIO (RGB/DVI) jack on the set. 3 Turn on the PC and the set. 4 SelectAUHDIODIN MIR/EDMOVTE I (RGB/DVI) CONTROL input source with a HDMI to DVI cable AUDIO RS-232C IN T (CONTROL & SERVICE...
... the PC to the RGB (PC/DTV) jack on the set. 2 Connect the PC audio outputs to the AUDIO (RGB/DVI) jack on the set. 3 Turn on the PC and the set the output resolution appropriately. AUDIO (RGB/DVI) RGB IN • If the PC (PC/DTV) has a DVI output anRdGB.... Installation PC Setup - This TV provides Plug and Play capability, meaning that the PC adjusts automatically to the AUDIO (RGB/DVI) jack on the set. 3 Turn on the PC and the set. 4 SelectAUHDIODIN MIR/EDMOVTE I (RGB/DVI) CONTROL input source with a HDMI to DVI cable AUDIO RS-232C IN T (CONTROL & SERVICE...
Owner's Manual (English)
Page 32
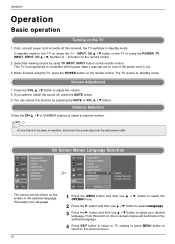
... return to the previous menu. Select the viewing source by pressing the MUTE or VOL D / E button. Volume Adjustment 1. From this moment, the TV switches to turn TV on, press the , INPUT, CH D / E button on the TV or press the POWER, TV INPUT, INPUT, CH D / E, Number (0 ~ 9) button on the remote control. This.... 2 Press the G button and then use D / E button to select Language. 3 Press the G button and then use D / E button to adjust the volume. 2. Operation Operation Basic operation Turning on -screen menus will be shown in the selected language.
... return to the previous menu. Select the viewing source by pressing the MUTE or VOL D / E button. Volume Adjustment 1. From this moment, the TV switches to turn TV on, press the , INPUT, CH D / E button on the TV or press the POWER, TV INPUT, INPUT, CH D / E, Number (0 ~ 9) button on the remote control. This.... 2 Press the G button and then use D / E button to select Language. 3 Press the G button and then use D / E button to adjust the volume. 2. Operation Operation Basic operation Turning on -screen menus will be shown in the selected language.
Owner's Manual (English)
Page 34
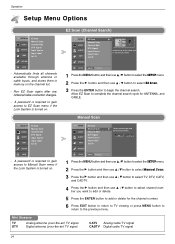
Allow EZ Scan to Manual Scan menu if the Lock System is turned on. SETUP VIDEO AUDIO TIME EZ Scan Manual Scan Channel Edit DTV Signal Input Source Input Label Set ID OPTION LOCK MENU Previous G Select channel ... menu. 2 Press the G button and then use D / E button to select EZ Scan. 3 Press the ENTER button to EZ Scan menu if the Lock System is turned on the channel list. - Operation Setup Menu Options EZ Scan (Channel Search) SETUP G VIDEO AUDIO TIME EZ Scan Manual Scan Channel Edit DTV Signal Input...
Allow EZ Scan to Manual Scan menu if the Lock System is turned on. SETUP VIDEO AUDIO TIME EZ Scan Manual Scan Channel Edit DTV Signal Input Source Input Label Set ID OPTION LOCK MENU Previous G Select channel ... menu. 2 Press the G button and then use D / E button to select EZ Scan. 3 Press the ENTER button to EZ Scan menu if the Lock System is turned on the channel list. - Operation Setup Menu Options EZ Scan (Channel Search) SETUP G VIDEO AUDIO TIME EZ Scan Manual Scan Channel Edit DTV Signal Input...
Owner's Manual (English)
Page 42
... can be received in Analog channel. 1 2 3 4 5 6 7 8 9 0 FLASHBK SAP EZ PIC EZ SOUND SAP FREEZE ADJUST APM 1 Use the SAP button to the mono sound in turn. • If other languages available on the remote control, this TV can receive MTS stereo programs and any SAP (Secondary Audio Program) that accompanies the...
... can be received in Analog channel. 1 2 3 4 5 6 7 8 9 0 FLASHBK SAP EZ PIC EZ SOUND SAP FREEZE ADJUST APM 1 Use the SAP button to the mono sound in turn. • If other languages available on the remote control, this TV can receive MTS stereo programs and any SAP (Secondary Audio Program) that accompanies the...
Owner's Manual (English)
Page 43
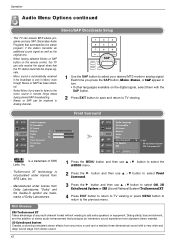
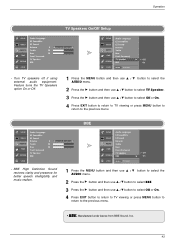
...to return to TV viewing or press MENU button to return to the previous menu. • Manufactured under license from BBE Sound, Inc. 43 Feature turns the TV Speakers option On or Off. 1 Press the MENU button and then use D / E button to select the AUDIO menu. 2 Press ...Bass 50 Front Surround OPTION TV Speaker BBE LOCK - BBE High Definition Sound restores clarity and presence for better speech intelligibility and music realism. Turn TV speakers off if using external audio equipment. Operation SETUP Audio Language EZ SoundRite VIDEO EZ Sound Balance 0 L AUDIO G Treble 50 ...
...to return to TV viewing or press MENU button to return to the previous menu. • Manufactured under license from BBE Sound, Inc. 43 Feature turns the TV Speakers option On or Off. 1 Press the MENU button and then use D / E button to select the AUDIO menu. 2 Press ...Bass 50 Front Surround OPTION TV Speaker BBE LOCK - BBE High Definition Sound restores clarity and presence for better speech intelligibility and music realism. Turn TV speakers off if using external audio equipment. Operation SETUP Audio Language EZ SoundRite VIDEO EZ Sound Balance 0 L AUDIO G Treble 50 ...
Owner's Manual (English)
Page 45
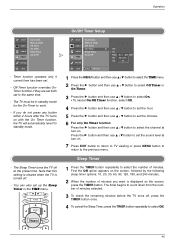
...Note that this setting is cleared when the TV is displayed on . Press the G button and then use D / E button to select the channel at turn -on the screen, press the TIMER button. Sleep Timer 1 Press the TIMER button repeatedly to select the number of minutes selected. 3 To check the ...remaining minutes before the TV turns off, press the TIMER button once. 4 To cancel the Sleep Timer, press the TIMER button repeatedly to standby mode. - TIMER EXIT TIMER CC...
...Note that this setting is cleared when the TV is displayed on . Press the G button and then use D / E button to select the channel at turn -on the screen, press the TIMER button. Sleep Timer 1 Press the TIMER button repeatedly to select the number of minutes selected. 3 To check the ...remaining minutes before the TV turns off, press the TIMER button once. 4 To cancel the Sleep Timer, press the TIMER button repeatedly to standby mode. - TIMER EXIT TIMER CC...

Owner's Manual (English)
Page 46
... On. 4 Press EXIT button to return to TV viewing or press MENU button to return to On and there is no input signal, the TV turns off automatically after 10 minutes. SETUP VIDEO AUDIO TIME Auto Clock Manual Clock Off Timer On Timer Sleep Timer Auto Off OPTION LOCK MENU Previous...
... On. 4 Press EXIT button to return to TV viewing or press MENU button to return to On and there is no input signal, the TV turns off automatically after 10 minutes. SETUP VIDEO AUDIO TIME Auto Clock Manual Clock Off Timer On Timer Sleep Timer Auto Off OPTION LOCK MENU Previous...
Owner's Manual (English)
Page 49
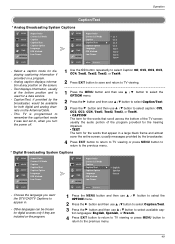
... Spanish French LOCK LOCK MENU Previous - usually messages provided by the broadcaster, would be chosen for the words that appear in . - Choose the language you turn the power off. 1 Use the CC button repeatedly to select Caption Off, CC1, CC2, CC3, CC4, Text1, Text2, Text3, or Text4. 2 Press EXIT button to...
... Spanish French LOCK LOCK MENU Previous - usually messages provided by the broadcaster, would be chosen for the words that appear in . - Choose the language you turn the power off. 1 Use the CC button repeatedly to select Caption Off, CC1, CC2, CC3, CC4, Text1, Text2, Text3, or Text4. 2 Press EXIT button to...
Owner's Manual (English)
Page 53
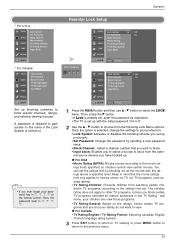
... view certain movies. Then, the password reset to the movie rat- A password is required to gain access to this menu if the Lock System is turned on. • If you ever forget your children can set up with the ratings above a specified level. Set up .
... view certain movies. Then, the password reset to the movie rat- A password is required to gain access to this menu if the Lock System is turned on. • If you ever forget your children can set up with the ratings above a specified level. Set up .
Owner's Manual (English)
Page 62
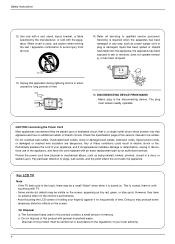
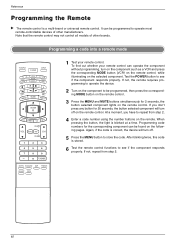
...corresponding MODE button on the remote control. 3 Press the MENU and MUTE buttons simultaneously for 20 seconds, the button selected component will turn on the component such as a VCR and press the corresponding MODE button (VCR) on the remote control, while illuminating on the remote...component. Reference Programming the Remote G The remote control is blinked at a time. After blinking twice, this code is correct, the device will turn off . 5 Press the MENU button to operate most remote-controllable devices of other manufacturers. Programming a code into a remote mode TV INPUT...
...corresponding MODE button on the remote control. 3 Press the MENU and MUTE buttons simultaneously for 20 seconds, the button selected component will turn on the component such as a VCR and press the corresponding MODE button (VCR) on the remote control, while illuminating on the remote...component. Reference Programming the Remote G The remote control is blinked at a time. After blinking twice, this code is correct, the device will turn off . 5 Press the MENU button to operate most remote-controllable devices of other manufacturers. Programming a code into a remote mode TV INPUT...

