
Owner's Manual (English)
Page 5
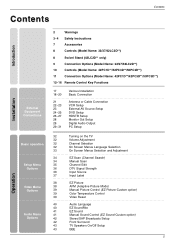
... Installation Basic Connection Antenna or Cable Connection VCR Setup External AV Source Setup DVD Setup HDSTB Setup Monitor Out Setup Digital Audio Output PC Setup 32 Turning on the TV 32 Volume Adjustment 32 Channel Selection 32 On Screen Menus Language Selection 33 On Screen Menus Selection and Adjustment 34 EZ Scan (Channel Search) 34 Manual Scan 35 Channel Edit 36 DTV Signal Strength 36 Input Source 37 Input Label 38 EZ Picture 38 APM (Adaptive Picture Mode) 39 Manual Picture Control (EZ Picture-Custom option) 39 Color Temperature Control 39 Video Reset...
... Installation Basic Connection Antenna or Cable Connection VCR Setup External AV Source Setup DVD Setup HDSTB Setup Monitor Out Setup Digital Audio Output PC Setup 32 Turning on the TV 32 Volume Adjustment 32 Channel Selection 32 On Screen Menus Language Selection 33 On Screen Menus Selection and Adjustment 34 EZ Scan (Channel Search) 34 Manual Scan 35 Channel Edit 36 DTV Signal Strength 36 Input Source 37 Input Label 38 EZ Picture 38 APM (Adaptive Picture Mode) 39 Manual Picture Control (EZ Picture-Custom option) 39 Color Temperature Control 39 Video Reset...
Owner's Manual (English)
Page 12
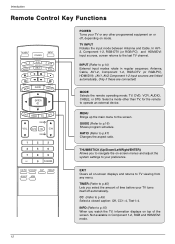
... channel. Introduction Remote Control Key Functions TV INPUT POWER TV AUDIO DVD MODE CABLE INPUT VCR STB DAY MENU GUIDE DAY+ RATIO ENTER EXIT TIMER CC INFO PAGE VOL MUTE FAV CH PAGE 1 2 3 4 5 6 7 8 9 0 FLASHBK EZ PIC EZ SOUND SAP FREEZE ADJUST APM POWER Turns your TV or any menu. TV INPUT Rotates the input mode between Antenna and Cable. In AV12, Component 1-2, RGB-DTV (or RGB-PC), and HDMI/DVI input sources, screen returns to p.16) Shows program schedule. TIMER (Refer to the screen. MENU...
... channel. Introduction Remote Control Key Functions TV INPUT POWER TV AUDIO DVD MODE CABLE INPUT VCR STB DAY MENU GUIDE DAY+ RATIO ENTER EXIT TIMER CC INFO PAGE VOL MUTE FAV CH PAGE 1 2 3 4 5 6 7 8 9 0 FLASHBK EZ PIC EZ SOUND SAP FREEZE ADJUST APM POWER Turns your TV or any menu. TV INPUT Rotates the input mode between Antenna and Cable. In AV12, Component 1-2, RGB-DTV (or RGB-PC), and HDMI/DVI input sources, screen returns to p.16) Shows program schedule. TIMER (Refer to the screen. MENU...
Owner's Manual (English)
Page 13
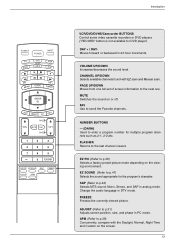
... Manual scan. APM (Refer to scroll the Favorite channels. Introduction TV INPUT POWER TV AUDIO DVD MODE CABLE INPUT VCR STB DAY MENU GUIDE DAY+ RATIO ENTER EXIT TIMER CC INFO PAGE VOL MUTE FAV CH PAGE 1 2 3 4 5 6 7 8 9 0 FLASHBK EZ PIC EZ SOUND SAP FREEZE ADJUST APM VCR/DVD/DVHS/Camcorder BUTTONS Control some video cassette recorders or DVD players ("RECORD" button is not available for the program's character. CHANNEL UP/DOWN Selects available channels found with the Daylight, Normal, Night Time...
... Manual scan. APM (Refer to scroll the Favorite channels. Introduction TV INPUT POWER TV AUDIO DVD MODE CABLE INPUT VCR STB DAY MENU GUIDE DAY+ RATIO ENTER EXIT TIMER CC INFO PAGE VOL MUTE FAV CH PAGE 1 2 3 4 5 6 7 8 9 0 FLASHBK EZ PIC EZ SOUND SAP FREEZE ADJUST APM VCR/DVD/DVHS/Camcorder BUTTONS Control some video cassette recorders or DVD players ("RECORD" button is not available for the program's character. CHANNEL UP/DOWN Selects available channels found with the Daylight, Normal, Night Time...
Owner's Manual (English)
Page 14
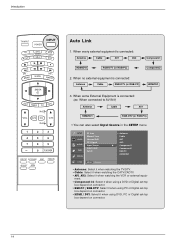
... SETUP menu. SETUP VIDEO AUDIO TIME EZ Scan Manual Scan Channel Edit DTV Signal Input Source Input Label Set ID OPTION LOCK MENU Previous Antenna Cable AV1 AV2 G Component1 Component2 RGB-PC HDMI/DVI • Antenna: Select it when watching the TV/DTV. • Cable: Select it when watching the CATV/CADTV. • AV1, AV2: Select it when using DVD, PC or Digital set-top box depend on connector. • HDMI / DVI: Select it when watching the VCR or external equip- When every external equipment is connected: Antenna Cable...
... SETUP menu. SETUP VIDEO AUDIO TIME EZ Scan Manual Scan Channel Edit DTV Signal Input Source Input Label Set ID OPTION LOCK MENU Previous Antenna Cable AV1 AV2 G Component1 Component2 RGB-PC HDMI/DVI • Antenna: Select it when watching the TV/DTV. • Cable: Select it when watching the CATV/CADTV. • AV1, AV2: Select it when using DVD, PC or Digital set-top box depend on connector. • HDMI / DVI: Select it when watching the VCR or external equip- When every external equipment is connected: Antenna Cable...
Owner's Manual (English)
Page 15
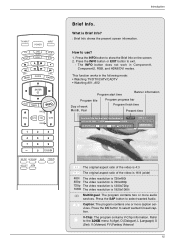
TV INPUT POWER TV AUDIO DVD MODE CABLE INPUT VCR STB DAY MENU GUIDE DAY+ RATIO ENTER EXIT TIMER CC ININFFOO PAGE VOL MUTE FAV CH PAGE 1 2 3 4 5 6 7 8 9 0 FLASHBK EZ PIC EZ SOUND SAP FREEZE ADJUST APM Introduction Brief Info. Press the INFO button or EXIT button to the LOCK menu: A (Age), D (Dialogue), L (Language), S (Sex), V (Violence), FV (Fantasy Violence) 15 CC Caption: The program contains one or more audio services. Refer to exit. - Press the...
TV INPUT POWER TV AUDIO DVD MODE CABLE INPUT VCR STB DAY MENU GUIDE DAY+ RATIO ENTER EXIT TIMER CC ININFFOO PAGE VOL MUTE FAV CH PAGE 1 2 3 4 5 6 7 8 9 0 FLASHBK EZ PIC EZ SOUND SAP FREEZE ADJUST APM Introduction Brief Info. Press the INFO button or EXIT button to the LOCK menu: A (Age), D (Dialogue), L (Language), S (Sex), V (Violence), FV (Fantasy Violence) 15 CC Caption: The program contains one or more audio services. Refer to exit. - Press the...
Owner's Manual (English)
Page 16
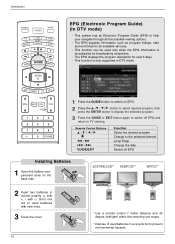
.... * Dispose of used batteries in DTV mode. EXIT TIMER CC INFO PAGE VOL MUTE FAV CH PAGE 1 2 3 4 5 6 7 8 9 0 FLASHBK 1 Press the GUIDE button to TV viewing. Introduction TV INPUT POWER TV AUDIO DVD MODE CABLE INPUT VCR STB DAY MENU DAY+ GGUUIIDDEE RATIO ENTER EPG (Electronic Program Guide) (In DTV mode) - Remote Control Buttons D /E /F /G FF / GG IFF / GGI GUIDE/EXIT Function Select the desired program Change to the selected channel Jump Page Change the date Switch off EPG Installing Batteries 1 Open the...
.... * Dispose of used batteries in DTV mode. EXIT TIMER CC INFO PAGE VOL MUTE FAV CH PAGE 1 2 3 4 5 6 7 8 9 0 FLASHBK 1 Press the GUIDE button to TV viewing. Introduction TV INPUT POWER TV AUDIO DVD MODE CABLE INPUT VCR STB DAY MENU DAY+ GGUUIIDDEE RATIO ENTER EPG (Electronic Program Guide) (In DTV mode) - Remote Control Buttons D /E /F /G FF / GG IFF / GGI GUIDE/EXIT Function Select the desired program Change to the selected channel Jump Page Change the date Switch off EPG Installing Batteries 1 Open the...
Owner's Manual (English)
Page 23
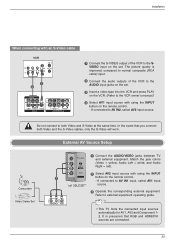
... (RCA cable) input. 2 Connect the audio outputs of the VCR to AV IN2, select AV2 input source. Refer to the VCR owner's manual.) 4 Select AV1 input source with using the INPUT 1 AV IN 2 button on the set . 3 Insert a video tape into the VCR and press PLAY on the remote control. - In the event that RGB and HDMI/DVI sources are connected. 23 External AV Source Setup Camcorder Video Game Set S-VIDEO R AUDIO L/MONO 1 Connect the AUDIO/VIDEO jacks between TV and external equipment. Match the jack colors (Video = yellow, Audio Left...
... (RCA cable) input. 2 Connect the audio outputs of the VCR to AV IN2, select AV2 input source. Refer to the VCR owner's manual.) 4 Select AV1 input source with using the INPUT 1 AV IN 2 button on the set . 3 Insert a video tape into the VCR and press PLAY on the remote control. - In the event that RGB and HDMI/DVI sources are connected. 23 External AV Source Setup Camcorder Video Game Set S-VIDEO R AUDIO L/MONO 1 Connect the AUDIO/VIDEO jacks between TV and external equipment. Match the jack colors (Video = yellow, Audio Left...
Owner's Manual (English)
Page 24
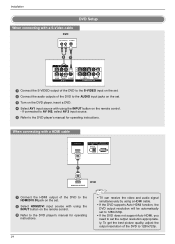
... not support Auto HDMI, you need to the AUDIO input jacks on the set . 2 Select HDMI/DVI input source with using the INPUT button on the remote control. - When connecting with a HDMI cable HDMI/DVI IN DIGITAL AUDIO RS-232C IN OUT (CONTROL&SERVICE) OPTICAL ) IO S-VIDEO 1 VIDEO AUDIO COMPONENT IN 1 HDMI-DVD OUTPUT DVD 1 Connect the HDMI output of the DVD to the HDMI/DVI IN jack on the set . 3 Turn on the DVD player, insert a DVD. 4 Select AV1 input source with using the INPUT button on the remote control. 3 Refer to the DVD player's manual for operating instructions.
... not support Auto HDMI, you need to the AUDIO input jacks on the set . 2 Select HDMI/DVI input source with using the INPUT button on the remote control. - When connecting with a HDMI cable HDMI/DVI IN DIGITAL AUDIO RS-232C IN OUT (CONTROL&SERVICE) OPTICAL ) IO S-VIDEO 1 VIDEO AUDIO COMPONENT IN 1 HDMI-DVD OUTPUT DVD 1 Connect the HDMI output of the DVD to the HDMI/DVI IN jack on the set . 3 Turn on the DVD player, insert a DVD. 4 Select AV1 input source with using the INPUT button on the remote control. 3 Refer to the DVD player's manual for operating instructions.
Owner's Manual (English)
Page 26
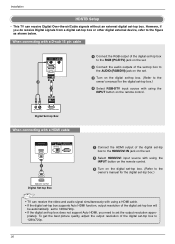
... (CONTROL&SERVICE) OPTICAL 1 HDMI-DTV OUTPUT Digital Set-top Box 1 Connect the HDMI output of the digital set-top box to the HDMI/DVI IN jack on the set. 2 Select HDMI/DVI input source with using the INPUT button on the remote control. 3 Turn on the digital set-top box. (Refer to the owner's manual for the digital set-top box.) • TV can receive Digital Over-the-air/Cable signals without an external digital set -top box or other digital external device, refer to 1280x720p. • If the digital set-top box does not support Auto HDMI, you do receive Digital signals...
... (CONTROL&SERVICE) OPTICAL 1 HDMI-DTV OUTPUT Digital Set-top Box 1 Connect the HDMI output of the digital set-top box to the HDMI/DVI IN jack on the set. 2 Select HDMI/DVI input source with using the INPUT button on the remote control. 3 Turn on the digital set-top box. (Refer to the owner's manual for the digital set-top box.) • TV can receive Digital Over-the-air/Cable signals without an external digital set -top box or other digital external device, refer to 1280x720p. • If the digital set-top box does not support Auto HDMI, you do receive Digital signals...
Owner's Manual (English)
Page 27
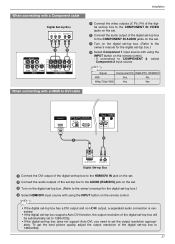
...8226; If the digital set-top box supports Auto DVI function, the output resolution of the digital set-top box will be automatically set to 1280x720p. • If the digital set-top box does not support Auto DVI, you need to COMPONENT 2, select Component 2 input source. Connect the audio output of the digital set-top box to the COMPONENT IN VIDEO jacks on the set. Installation When connecting with a Component cable AV OUT 1 Digital Set-top Box B R (R) AUDIO (L) HDMI/DVI IN 2 DIGITAL AUDIO RS-232C IN OUT (CONTROL & SERVICE) OPTICAL 3 1 2 4 Connect the video outputs (Y, PB, PR...
...8226; If the digital set-top box supports Auto DVI function, the output resolution of the digital set-top box will be automatically set to 1280x720p. • If the digital set-top box does not support Auto DVI, you need to COMPONENT 2, select Component 2 input source. Connect the audio output of the digital set-top box to the COMPONENT IN VIDEO jacks on the set. Installation When connecting with a Component cable AV OUT 1 Digital Set-top Box B R (R) AUDIO (L) HDMI/DVI IN 2 DIGITAL AUDIO RS-232C IN OUT (CONTROL & SERVICE) OPTICAL 3 1 2 4 Connect the video outputs (Y, PB, PR...
Owner's Manual (English)
Page 28
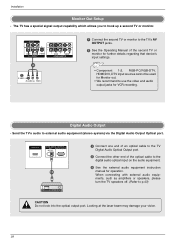
... speakers off. (Refer to the digital audio optical input on the audio equipment. 3 See the external audio equipment instruction manual for VCR recording. AV OUT VIDEO (MONO) AUDIO AV IN 1 S-VIDEO 1/2 VIDEO AUDIO COMPONENT IN S-VIDEO IN (R) AUDIO (L) VIDEO 1 Connect the second TV or monitor to the TV's AV OUTPUT jacks. 2 See the Operating Manual of the optical cable to p.43) CAUTION Do not look into the optical output port. Looking at the laser beam may damage your vision. 28 Installation Monitor Out Setup - HDMI/DVI...
... speakers off. (Refer to the digital audio optical input on the audio equipment. 3 See the external audio equipment instruction manual for VCR recording. AV OUT VIDEO (MONO) AUDIO AV IN 1 S-VIDEO 1/2 VIDEO AUDIO COMPONENT IN S-VIDEO IN (R) AUDIO (L) VIDEO 1 Connect the second TV or monitor to the TV's AV OUTPUT jacks. 2 See the Operating Manual of the optical cable to p.43) CAUTION Do not look into the optical output port. Looking at the laser beam may damage your vision. 28 Installation Monitor Out Setup - HDMI/DVI...
Owner's Manual (English)
Page 29
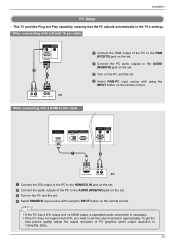
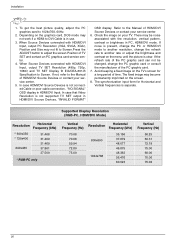
... support Auto DVI, you need to 1024x768, 60Hz. 29 To get the best picture quality, adjust the output resolution of PC graphics card's output resolution to set . 4 Select RGB-PC input source with using the INPUT button on the PC and the set the output resolution appropriately. This TV provides Plug and Play capability, meaning that the PC adjusts automatically to the AUDIO (RGB/DVI) jack on the set. 3 Turn on the remote control. When connecting with a HDMI to DVI cable AUDIO RS-232C IN T (CONTROL & SERVICE...
... support Auto DVI, you need to 1024x768, 60Hz. 29 To get the best picture quality, adjust the output resolution of PC graphics card's output resolution to set . 4 Select RGB-PC input source with using the INPUT button on the PC and the set the output resolution appropriately. This TV provides Plug and Play capability, meaning that the PC adjusts automatically to the AUDIO (RGB/DVI) jack on the set. 3 Turn on the remote control. When connecting with a HDMI to DVI cable AUDIO RS-232C IN T (CONTROL & SERVICE...
Owner's Manual (English)
Page 30
... on the menu until the picture is separate. When Source Devices connected with HDMI/DVI Input, output TV SET Resolution (480p, 720p, 1080i) and TV SET Display fit EIA/CEA-861-B Specification to another resolution, change the PC graphic card or consult the manufacturer of HDMI/DVI Source Devices or contact your service center. 5. If noise is present, change the PC or HDMI/DVI mode to Screen. The fixed image may not work if a HDMI to...
... on the menu until the picture is separate. When Source Devices connected with HDMI/DVI Input, output TV SET Resolution (480p, 720p, 1080i) and TV SET Display fit EIA/CEA-861-B Specification to another resolution, change the PC graphic card or consult the manufacturer of HDMI/DVI Source Devices or contact your service center. 5. If noise is present, change the PC or HDMI/DVI mode to Screen. The fixed image may not work if a HDMI to...
Owner's Manual (English)
Page 32
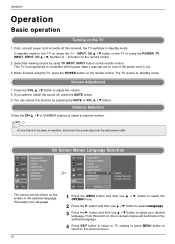
First, connect power cord correctly. At this moment, the TV switches to adjust the volume. 2. Select the viewing source by pressing the MUTE or VOL D / E button. When finished using TV INPUT, INPUT button on the remote control. Press the VOL D / E button to standby mode. Channel Selection Press the CH D / E or NUMBER buttons to select a channel number. • If you want to , even if the power cord is programmed to remember which power state it was last set to switch the sound off...
First, connect power cord correctly. At this moment, the TV switches to adjust the volume. 2. Select the viewing source by pressing the MUTE or VOL D / E button. When finished using TV INPUT, INPUT button on the remote control. Press the VOL D / E button to standby mode. Channel Selection Press the CH D / E or NUMBER buttons to select a channel number. • If you want to , even if the power cord is programmed to remember which power state it was last set to switch the sound off...
Owner's Manual (English)
Page 33
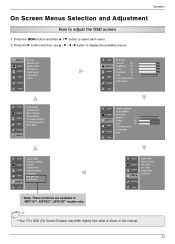
...to select each menu. 2. SETUP VIDEO AUDIO TIME G Auto Clock Manual Clock Off Timer On Timer Sleep Timer Auto Off OPTION LOCK • Your TV's OSD (On Screen Display) may differ slightly from what is shown in 42PC1D**, 42PC3D**, 50PC3D** models only. SETUP G VIDEO AUDIO TIME EZ Scan Manual Scan Channel Edit DTV Signal Input Source Input Label Set ID OPTION LOCK SETUP EZ Picture Contrast 85 VIDEO G Brightness 50 Color 50 AUDIO Sharpness 50 Tint 0 R G TIME Color Temperature OPTION Video Reset LOCK SETUP VIDEO AUDIO TIME Lock System Set Password Block Channel Movie...
...to select each menu. 2. SETUP VIDEO AUDIO TIME G Auto Clock Manual Clock Off Timer On Timer Sleep Timer Auto Off OPTION LOCK • Your TV's OSD (On Screen Display) may differ slightly from what is shown in 42PC1D**, 42PC3D**, 50PC3D** models only. SETUP G VIDEO AUDIO TIME EZ Scan Manual Scan Channel Edit DTV Signal Input Source Input Label Set ID OPTION LOCK SETUP EZ Picture Contrast 85 VIDEO G Brightness 50 Color 50 AUDIO Sharpness 50 Tint 0 R G TIME Color Temperature OPTION Video Reset LOCK SETUP VIDEO AUDIO TIME Lock System Set Password Block Channel Movie...
Owner's Manual (English)
Page 34
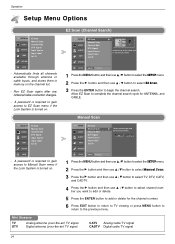
... . Run EZ Scan again after any Antenna/Cable connection changes. - Mini Glossary TV DTV Analog antenna (over-the-air) TV signal Digital antenna (over-the-air) TV signal CATV Analog cable TV signal CADTV Digital cable TV signal 34 SETUP VIDEO AUDIO TIME OPTION EZ Scan Manual Scan Channel Edit DTV Signal Input Source Input Label Set ID LOCK MENU Previous G ANTENNA CABLE Selection ( G or ) leads you to the EZ scan screen. 1 Press the MENU button and then use D / E button to select the SETUP menu. 2 Press the G button and then use D / E button to select channel number you want to...
... . Run EZ Scan again after any Antenna/Cable connection changes. - Mini Glossary TV DTV Analog antenna (over-the-air) TV signal Digital antenna (over-the-air) TV signal CATV Analog cable TV signal CADTV Digital cable TV signal 34 SETUP VIDEO AUDIO TIME OPTION EZ Scan Manual Scan Channel Edit DTV Signal Input Source Input Label Set ID LOCK MENU Previous G ANTENNA CABLE Selection ( G or ) leads you to the EZ scan screen. 1 Press the MENU button and then use D / E button to select the SETUP menu. 2 Press the G button and then use D / E button to select channel number you want to...
Owner's Manual (English)
Page 36
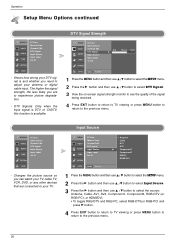
... and then use D / E button to select DTV Signal. 3 View the on-screen signal strength monitor to see the quality of the signal being received. 4 Press EXIT button to return to TV viewing or press MENU button to return to your antenna or digital cable input. SETUP G VIDEO AUDIO TIME EZ Scan Manual Scan Channel Edit DTV Signal Input Source Input Label Set ID OPTION LOCK - Operation Setup Menu Options continued SETUP G VIDEO AUDIO TIME EZ Scan Manual Scan Channel Edit DTV Signal Input Source Input Label Set ID OPTION LOCK - Changes the picture source so you are connected to...
... and then use D / E button to select DTV Signal. 3 View the on-screen signal strength monitor to see the quality of the signal being received. 4 Press EXIT button to return to TV viewing or press MENU button to return to your antenna or digital cable input. SETUP G VIDEO AUDIO TIME EZ Scan Manual Scan Channel Edit DTV Signal Input Source Input Label Set ID OPTION LOCK - Operation Setup Menu Options continued SETUP G VIDEO AUDIO TIME EZ Scan Manual Scan Channel Edit DTV Signal Input Source Input Label Set ID OPTION LOCK - Changes the picture source so you are connected to...
Owner's Manual (English)
Page 52
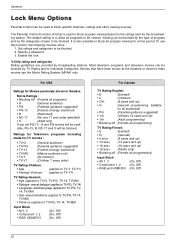
... to be used to block all programming) Input Block • AV 1, 2 • Component 1, 2 • RGB and HDMI/DVI (On, Off) (On, Off) (On, Off) 52 It is also possible to block program viewing based on the ratings sent by broadcasting stations. Set ratings and categories to block specific channels, ratings and other viewing sources. Specify a password 3. The default setting is used to be blocked. To use the Movie...
... to be used to block all programming) Input Block • AV 1, 2 • Component 1, 2 • RGB and HDMI/DVI (On, Off) (On, Off) (On, Off) 52 It is also possible to block program viewing based on the ratings sent by broadcasting stations. Set ratings and categories to block specific channels, ratings and other viewing sources. Specify a password 3. The default setting is used to be blocked. To use the Movie...
Owner's Manual (English)
Page 62
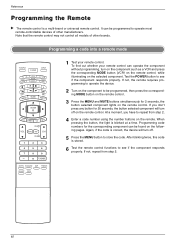
... turn on the component such as a VCR and press the corresponding MODE button (VCR) on the remote control, while illuminating on the remote control. Reference Programming the Remote G The remote control is blinked at a time. Programming a code into a remote mode TV INPUT POWER TV AUDIO DVD MODE CABLE INPUT VCR STB DAY MENU GUIDE DAY+ RATIO ENTER EXIT TIMER CC INFO PAGE VOL MUTE FAV CH PAGE 1 2 3 4 5 6 7 8 9 0 FLASHBK EZ PIC EZ SOUND SAP FREEZE ADJUST APM 1 Test your remote control can be found on the remote control. Test the POWER button...
... turn on the component such as a VCR and press the corresponding MODE button (VCR) on the remote control, while illuminating on the remote control. Reference Programming the Remote G The remote control is blinked at a time. Programming a code into a remote mode TV INPUT POWER TV AUDIO DVD MODE CABLE INPUT VCR STB DAY MENU GUIDE DAY+ RATIO ENTER EXIT TIMER CC INFO PAGE VOL MUTE FAV CH PAGE 1 2 3 4 5 6 7 8 9 0 FLASHBK EZ PIC EZ SOUND SAP FREEZE ADJUST APM 1 Test your remote control can be found on the remote control. Test the POWER button...
Owner's Manual (English)
Page 65
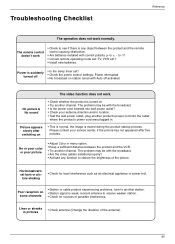
... the wall power outlet, plug another channel. to +, - in menu option. • Keep a sufficient distance between the product and the remote control causing obstruction. • Are batteries installed with the broadcast. • Are the video cables installed properly? • Activate any function to another channel. No or poor color or poor picture • Adjust Color in pictures 65 The problem may be with Auto off • Is the sleep timer set : TV, VCR...
... the wall power outlet, plug another channel. to +, - in menu option. • Keep a sufficient distance between the product and the remote control causing obstruction. • Are batteries installed with the broadcast. • Are the video cables installed properly? • Activate any function to another channel. No or poor color or poor picture • Adjust Color in pictures 65 The problem may be with Auto off • Is the sleep timer set : TV, VCR...


