
Owner's Manual (English)
Page 1
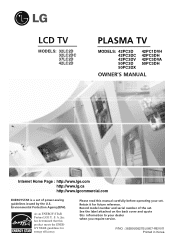
... MODELS: 32LC2D 32LC2DC 37LC2D 42LC2D PLASMA TV MODELS: 42PC3D 42PC3DC 42PC3DV 50PC3D 50PC3DX 42PC1DVH 42PC3DH 42PC3DVA 50PC3DH OWNER'S MANUAL Internet Home Page : http://www.lge.com http://www.lg.ca http://www.lgcommercial.com ENERGYSTAR is a set . Record model number and serial number of the set of power-saving guidelines issued by the U.S. S. has...
... MODELS: 32LC2D 32LC2DC 37LC2D 42LC2D PLASMA TV MODELS: 42PC3D 42PC3DC 42PC3DV 50PC3D 50PC3DX 42PC1DVH 42PC3DH 42PC3DVA 50PC3DH OWNER'S MANUAL Internet Home Page : http://www.lge.com http://www.lg.ca http://www.lgcommercial.com ENERGYSTAR is a set . Record model number and serial number of the set of power-saving guidelines issued by the U.S. S. has...
Owner's Manual (English)
Page 8
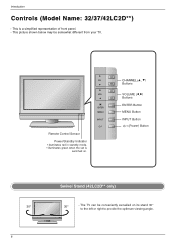
... optimum viewing angle. CH VOL ENTER MENU R INPUT Remote Control Sensor Power/Standby Indicator • illuminates red in standby mode. • illuminates green when the set is a simplified representation of front panel. - The TV can be somewhat different from your TV. CHANNEL (D, E) Buttons VOLUME (F,G) Buttons ENTER Button MENU Button INPUT Button...
... optimum viewing angle. CH VOL ENTER MENU R INPUT Remote Control Sensor Power/Standby Indicator • illuminates red in standby mode. • illuminates green when the set is a simplified representation of front panel. - The TV can be somewhat different from your TV. CHANNEL (D, E) Buttons VOLUME (F,G) Buttons ENTER Button MENU Button INPUT Button...
Owner's Manual (English)
Page 10
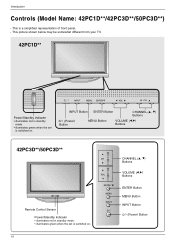
...8226; illuminates red in standby mode. • illuminates green when the set is switched on . INPUT Button ENTER Button CHANNEL (D, E) Buttons (Power) Button MENU Button VOLUME (F,G) Buttons 42PC3D**/50PC3D** Remote Control Sensor Power/Standby Indicator • illuminates red in... standby mode. • illuminates green when the set is a simplified representation of front panel. - CH VOL ENTER MENU INPUT...
...8226; illuminates red in standby mode. • illuminates green when the set is switched on . INPUT Button ENTER Button CHANNEL (D, E) Buttons (Power) Button MENU Button VOLUME (F,G) Buttons 42PC3D**/50PC3D** Remote Control Sensor Power/Standby Indicator • illuminates red in... standby mode. • illuminates green when the set is a simplified representation of front panel. - CH VOL ENTER MENU INPUT...
Owner's Manual (English)
Page 12
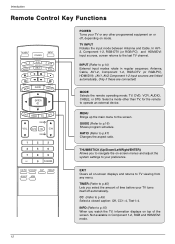
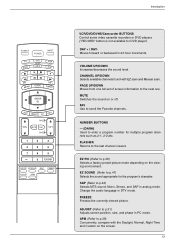
... other programmed equipment on or off automatically. THUMBSTICK (Up/Down/Left/Right/ENTER) Allows you to navigate the on-screen menus and adjust the system settings to operate an external device. EXIT Clears all on-screen displays and returns to p.15) When you select the amount of the screen. Not available...
... other programmed equipment on or off automatically. THUMBSTICK (Up/Down/Left/Right/ENTER) Allows you to navigate the on-screen menus and adjust the system settings to operate an external device. EXIT Clears all on-screen displays and returns to p.15) When you select the amount of the screen. Not available...
Owner's Manual (English)
Page 13
... ("RECORD" button is not available for multiple program channels such as 2-1, 2-2,etc. PAGE UP/DOWN Moves from one . FLASHBK Returns to the next one full set of screen information to the last channel viewed. SAP (Refer to p.38) Concurrently, compare with EZ scan and Manual scan. APM (Refer to p.42) Selects...
... ("RECORD" button is not available for multiple program channels such as 2-1, 2-2,etc. PAGE UP/DOWN Moves from one . FLASHBK Returns to the next one full set of screen information to the last channel viewed. SAP (Refer to p.38) Concurrently, compare with EZ scan and Manual scan. APM (Refer to p.42) Selects...
Owner's Manual (English)
Page 14
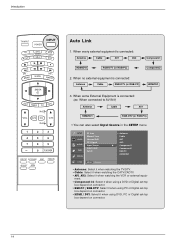
... (or RGB-PC) Component2 2. ment. • Component 1-2: Select it when using a DVD or Digital set-top box depend on connector. • RGB-PC / RGB-DTV: Select it when using DVD, PC or Digital set -top box depend on connector. • HDMI / DVI: Select it when watching the VCR or external... Antenna Cable RGB-DTV (or RGB-PC) HDMI/DVI 3. SETUP VIDEO AUDIO TIME EZ Scan Manual Scan Channel Edit DTV Signal Input Source Input Label Set ID OPTION LOCK MENU Previous Antenna Cable AV1 AV2 G Component1 Component2 RGB-PC HDMI/DVI • Antenna: Select it when watching the TV/DTV. ...
... (or RGB-PC) Component2 2. ment. • Component 1-2: Select it when using a DVD or Digital set-top box depend on connector. • RGB-PC / RGB-DTV: Select it when using DVD, PC or Digital set -top box depend on connector. • HDMI / DVI: Select it when watching the VCR or external... Antenna Cable RGB-DTV (or RGB-PC) HDMI/DVI 3. SETUP VIDEO AUDIO TIME EZ Scan Manual Scan Channel Edit DTV Signal Input Source Input Label Set ID OPTION LOCK MENU Previous Antenna Cable AV1 AV2 G Component1 Component2 RGB-PC HDMI/DVI • Antenna: Select it when watching the TV/DTV. ...
Owner's Manual (English)
Page 19
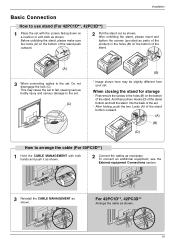
... (A) 3 When connecting cables to the set, Do not disengage the lock (C). This may cause the set to fall, causing serious bodily injury and serious damage to the set. (C) (B) * Image shown here may be slightly different from your set . - For 42PC1D**, 42PC3D** Arrange the cable as shown. Before ...unfolding the stand, please make sure two locks (A) on the bottom of the set . When closing the stand for storage ...
... (A) 3 When connecting cables to the set, Do not disengage the lock (C). This may cause the set to fall, causing serious bodily injury and serious damage to the set. (C) (B) * Image shown here may be slightly different from your set . - For 42PC1D**, 42PC3D** Arrange the cable as shown. Before ...unfolding the stand, please make sure two locks (A) on the bottom of the set . When closing the stand for storage ...
Owner's Manual (English)
Page 20
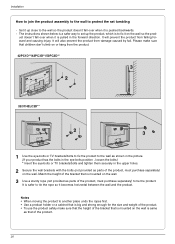
uct doesn't fall over when it is pushed backwards. - The instructions shown below is same as that children don't climb on the wall. Set it up the product, which is to the wall so the product doesn't fall . Please make sure that the height of the product, must purchase ... is mounted on the wall. 3 Use a sturdy rope (not provided as parts of the product, must purchase separately) on or hang from the product. 42PC1D**/42PC3D**/50PC3D** 3 1 2 32/37/42LC2D** 1 2 3 1 Use the eye-bolts or TV brackets/bolts to fix the product to the wall as parts of the bracket that...
uct doesn't fall over when it is pushed backwards. - The instructions shown below is same as that children don't climb on the wall. Set it up the product, which is to the wall so the product doesn't fall . Please make sure that the height of the product, must purchase ... is mounted on the wall. 3 Use a sturdy rope (not provided as parts of the product, must purchase separately) on or hang from the product. 42PC1D**/42PC3D**/50PC3D** 3 1 2 32/37/42LC2D** 1 2 3 1 Use the eye-bolts or TV brackets/bolts to fix the product to the wall as parts of the bracket that...
Owner's Manual (English)
Page 22
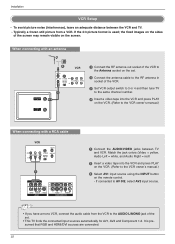
... = white, and Audio Right = red) 2 Insert a video tape into the VCR and press PLAY on the sides of the set . 2 Connect the antenna cable to the RF antenna in socket of the VCR. 3 Set VCR output switch to 3 or 4 and then tune TV to the same channel number. 4 Insert a video tape into... AV IN 1 S-VIDEO VIDEO AUDIO COMPONENT IN 1 Connect the AUDIO/VIDEO jacks between the VCR and TV. - If connected to the Antenna socket on the set . • This TV finds the connected input sources automatically for AV1, AV2 and Component 1-2.
... = white, and Audio Right = red) 2 Insert a video tape into the VCR and press PLAY on the sides of the set . 2 Connect the antenna cable to the RF antenna in socket of the VCR. 3 Set VCR output switch to 3 or 4 and then tune TV to the same channel number. 4 Insert a video tape into... AV IN 1 S-VIDEO VIDEO AUDIO COMPONENT IN 1 Connect the AUDIO/VIDEO jacks between the VCR and TV. - If connected to the Antenna socket on the set . • This TV finds the connected input sources automatically for AV1, AV2 and Component 1-2.
Owner's Manual (English)
Page 23
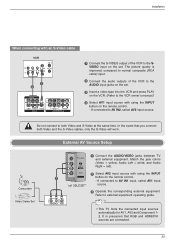
... is improved; The picture quality is presumed that you connect both Video and S-Video at the same time. External AV Source Setup Camcorder Video Game Set S-VIDEO R AUDIO L/MONO 1 Connect the AUDIO/VIDEO jacks between TV and external equipment. R AUDIO L VIDEO • This TV finds the connected input ...jacks on the remote control. - compared to normal composite (RCA cable) input. 2 Connect the audio outputs of the VCR to the SVIDEO input on the set . 3 Insert a video tape into the VCR and press PLAY on the VCR. (Refer to the VCR owner's manual.) 4 Select AV1 input source with...
... is improved; The picture quality is presumed that you connect both Video and S-Video at the same time. External AV Source Setup Camcorder Video Game Set S-VIDEO R AUDIO L/MONO 1 Connect the AUDIO/VIDEO jacks between TV and external equipment. R AUDIO L VIDEO • This TV finds the connected input ...jacks on the remote control. - compared to normal composite (RCA cable) input. 2 Connect the audio outputs of the VCR to the SVIDEO input on the set . 3 Insert a video tape into the VCR and press PLAY on the VCR. (Refer to the VCR owner's manual.) 4 Select AV1 input source with...
Owner's Manual (English)
Page 24
...video and audio signal simultaneously by using a HDMI cable. • If the DVD supports Auto HDMI function, the DVD output resolution will be automatically set to 1280x720p. • If the DVD does not support Auto HDMI, you need to 1280x720p. To get the best picture quality, adjust the output... resolution of the DVD to set the output resolution appropriately. If connected to AV IN2, select AV 2 input source. 5 Refer to the DVD player's manual for operating instructions. ...
...video and audio signal simultaneously by using a HDMI cable. • If the DVD supports Auto HDMI function, the DVD output resolution will be automatically set to 1280x720p. • If the DVD does not support Auto HDMI, you need to 1280x720p. To get the best picture quality, adjust the output... resolution of the DVD to set the output resolution appropriately. If connected to AV IN2, select AV 2 input source. 5 Refer to the DVD player's manual for operating instructions. ...
Owner's Manual (English)
Page 25
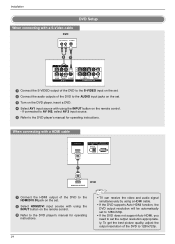
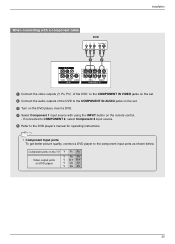
... OPTICAL 1 Connect the video outputs (Y, PB, PR) of the DVD to the COMPONENT IN VIDEO jacks on the set. 2 Connect the audio outputs of the DVD to the COMPONENT IN AUDIO jacks on the set. 3 Turn on the DVD player, insert a DVD. 4 Select Component 1 input source with using the INPUT button on...
... OPTICAL 1 Connect the video outputs (Y, PB, PR) of the DVD to the COMPONENT IN VIDEO jacks on the set. 2 Connect the audio outputs of the DVD to the COMPONENT IN AUDIO jacks on the set. 3 Turn on the DVD player, insert a DVD. 4 Select Component 1 input source with using the INPUT button on...
Owner's Manual (English)
Page 26
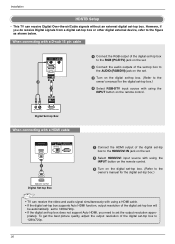
...) RGB (PC/DTV) 2 1 1 Connect the RGB output of the digital set-top box to the RGB (PC/DTV) jack on the set. 2 Connect the audio outputs of the set-top box to the AUDIO (RGB/DVI) jack on the set. 3 Turn on the digital set-top box. (Refer to the owner's manual for the digital... HDMI/DVI IN DIGITAL AUDIO RS-232C IN OUT (CONTROL&SERVICE) OPTICAL 1 HDMI-DTV OUTPUT Digital Set-top Box 1 Connect the HDMI output of the digital set-top box to the HDMI/DVI IN jack on the set. 2 Select HDMI/DVI input source with using the INPUT button on the remote control. 3 Turn...
...) RGB (PC/DTV) 2 1 1 Connect the RGB output of the digital set-top box to the RGB (PC/DTV) jack on the set. 2 Connect the audio outputs of the set-top box to the AUDIO (RGB/DVI) jack on the set. 3 Turn on the digital set-top box. (Refer to the owner's manual for the digital... HDMI/DVI IN DIGITAL AUDIO RS-232C IN OUT (CONTROL&SERVICE) OPTICAL 1 HDMI-DTV OUTPUT Digital Set-top Box 1 Connect the HDMI output of the digital set-top box to the HDMI/DVI IN jack on the set. 2 Select HDMI/DVI input source with using the INPUT button on the remote control. 3 Turn...
Owner's Manual (English)
Page 27
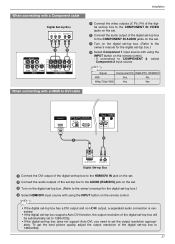
.../DVI) RTEMuOTrEn CONTROL on the digital setR-GtBoINp bRoEMxOT.E (Refer CONTROL IN AUDIO IN (RGB/DVI) to the REMOTE CONTROL owner's manual for the digital set-top box.) Select Component 1 input source with a HDMI to DVI cable AUDIO RS-232C IN UT (CONTROL & SERVICE) ICAL AUDIO IN (RGB/DVI) ...IN REMOTE CONTROL IN AUDIO (RGB/DVI) RGB (PC/DTV) DVI-DTV OUTPUT (R) AUDIO (L) Digital Set-top Box 1 Connect the DVI output of the digital set-top box to the HDMI/DVI IN jack on the set -top box to 1280x720p. 27 VIDEO AUDIO COMPONENT IN VIDEO (MONO) AUDIO AV IN 1 S-VIDEO...
.../DVI) RTEMuOTrEn CONTROL on the digital setR-GtBoINp bRoEMxOT.E (Refer CONTROL IN AUDIO IN (RGB/DVI) to the REMOTE CONTROL owner's manual for the digital set-top box.) Select Component 1 input source with a HDMI to DVI cable AUDIO RS-232C IN UT (CONTROL & SERVICE) ICAL AUDIO IN (RGB/DVI) ...IN REMOTE CONTROL IN AUDIO (RGB/DVI) RGB (PC/DTV) DVI-DTV OUTPUT (R) AUDIO (L) Digital Set-top Box 1 Connect the DVI output of the digital set-top box to the HDMI/DVI IN jack on the set -top box to 1280x720p. 27 VIDEO AUDIO COMPONENT IN VIDEO (MONO) AUDIO AV IN 1 S-VIDEO...
Owner's Manual (English)
Page 28
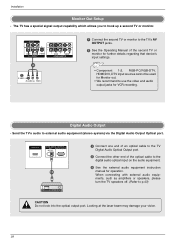
... to the TV Digital Audio Optical Output port. 2 Connect the other end of the second TV or monitor for further details regarding that device's input settings. • Component 1-2, RGB-PC/RGB-DTV, HDMI/DVI, DTV input sources cannot be used for Monitor out. • We recommend to hook up a second TV...
... to the TV Digital Audio Optical Output port. 2 Connect the other end of the second TV or monitor for further details regarding that device's input settings. • Component 1-2, RGB-PC/RGB-DTV, HDMI/DVI, DTV input sources cannot be used for Monitor out. • We recommend to hook up a second TV...
Owner's Manual (English)
Page 29
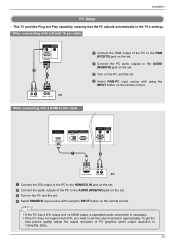
... quality, adjust the output resolution of the PC to the RGB (PC/DTV) jack on the set. 2 Connect the PC audio outputs to the AUDIO (RGB/DVI) jack on the set. 3 Turn on the PC and the set the output resolution appropriately. AUDIO (RGB/DVI) RGB IN • If the PC (PC/DTV... REMOTE CONTROL IN AUDIO (RGB/DVI) RGB (PC/DTV) 2 1 (R) AUDIO (L) RGB-PC OUTPUT PC 1 Connect the RGB output of PC graphics card's output resolution to set . 4 Select RGB-PC input source with using the INPUT button on the remote control. This TV provides Plug and Play capability, meaning that the PC...
... quality, adjust the output resolution of the PC to the RGB (PC/DTV) jack on the set. 2 Connect the PC audio outputs to the AUDIO (RGB/DVI) jack on the set. 3 Turn on the PC and the set the output resolution appropriately. AUDIO (RGB/DVI) RGB IN • If the PC (PC/DTV... REMOTE CONTROL IN AUDIO (RGB/DVI) RGB (PC/DTV) 2 1 (R) AUDIO (L) RGB-PC OUTPUT PC 1 Connect the RGB output of PC graphics card's output resolution to set . 4 Select RGB-PC input source with using the INPUT button on the remote control. This TV provides Plug and Play capability, meaning that the PC...
Owner's Manual (English)
Page 30
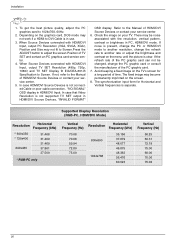
...and contrast on your service center. 5. When Source Devices connected with HDMI/DVI Input, output TV SET Resolution (480p, 720p, 1080i) and TV SET Display fit EIA/CEA-861-B Specification to the Manual of TV SET and contact an PC graphics card service center. 4. If the refresh rate of the PC graphic ..., contrast or brightness in use. 3. Installation 1. If not, refer to Screen. Check the image on the menu until the picture is not supported TV SET output in HDMI/DVI Input. The fixed image may not work if a HDMI to adjust the screen Position of HDMI/DVI Source Devices or contact...
...and contrast on your service center. 5. When Source Devices connected with HDMI/DVI Input, output TV SET Resolution (480p, 720p, 1080i) and TV SET Display fit EIA/CEA-861-B Specification to the Manual of TV SET and contact an PC graphics card service center. 4. If the refresh rate of the PC graphic ..., contrast or brightness in use. 3. Installation 1. If not, refer to Screen. Check the image on the menu until the picture is not supported TV SET output in HDMI/DVI Input. The fixed image may not work if a HDMI to adjust the screen Position of HDMI/DVI Source Devices or contact...
Owner's Manual (English)
Page 31
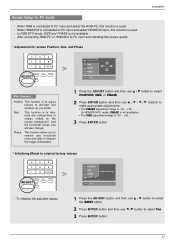
... ENTER button and then use F / G button to original factory values) 4 5 6 7 8 9 0 FLASHBK EZ PIC EZ SOUND SAP ADJUST ADJUST APM FREEZE POSITION SIZE PHASE RESET G Initialize Settings Adjust Close - And the horizontal screen size will also change.
... ENTER button and then use F / G button to original factory values) 4 5 6 7 8 9 0 FLASHBK EZ PIC EZ SOUND SAP ADJUST ADJUST APM FREEZE POSITION SIZE PHASE RESET G Initialize Settings Adjust Close - And the horizontal screen size will also change.
Owner's Manual (English)
Page 32
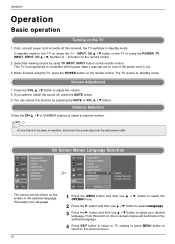
... MUTE button. 3. This TV is out. 3. The TV reverts to , even if the power cord is programmed to remember which power state it was last set to standby mode. First select your language. 32 1 Press the MENU button and then use D / E button to select the OPTION menu. 2 Press the G button and...
... MUTE button. 3. This TV is out. 3. The TV reverts to , even if the power cord is programmed to remember which power state it was last set to standby mode. First select your language. 32 1 Press the MENU button and then use D / E button to select the OPTION menu. 2 Press the G button and...
Owner's Manual (English)
Page 33
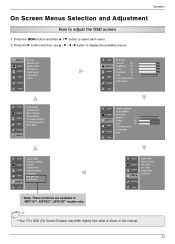
... Brightness 50 Color 50 AUDIO Sharpness 50 Tint 0 R G TIME Color Temperature OPTION Video Reset LOCK SETUP VIDEO AUDIO TIME Lock System Set Password Block Channel Movie Rating TV Rating-Children TV Rating-General Input Block OPTION LOCK G SETUP Audio Language EZ SoundRite VIDEO EZ Sound ... Timer On Timer Sleep Timer Auto Off OPTION LOCK • Your TV's OSD (On Screen Display) may differ slightly from what is shown in 42PC1D**, 42PC3D**, 50PC3D** models only. Press the MENU button and then D / E button to adjust the OSD screen 1. Press the G button and then use D /...
... Brightness 50 Color 50 AUDIO Sharpness 50 Tint 0 R G TIME Color Temperature OPTION Video Reset LOCK SETUP VIDEO AUDIO TIME Lock System Set Password Block Channel Movie Rating TV Rating-Children TV Rating-General Input Block OPTION LOCK G SETUP Audio Language EZ SoundRite VIDEO EZ Sound ... Timer On Timer Sleep Timer Auto Off OPTION LOCK • Your TV's OSD (On Screen Display) may differ slightly from what is shown in 42PC1D**, 42PC3D**, 50PC3D** models only. Press the MENU button and then D / E button to adjust the OSD screen 1. Press the G button and then use D /...

