
Owner's Manual (English)
Page 5
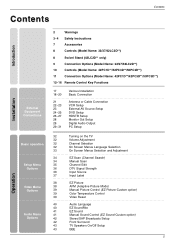
...42LC2D**) 8 Swivel Stand (42LC2D** only) 9 Connection Options (Model Name: 32/37/42LC2D**) 10 Controls (Model Name: 42PC1D**/42PC3D**/50PC3D**) 11 Connection Options (Model Name: 42PC1D**/42PC3D**/50PC3D**) 12~16 Remote Control Key Functions 17 18~20 21 22~23 23 24~25 26~27 28 28 29~31...) 34 Manual Scan 35 Channel Edit 36 DTV Signal Strength 36 Input Source 37 Input Label 38 EZ Picture 38 APM (Adaptive Picture Mode) 39 Manual Picture Control (EZ Picture-Custom option) 39 Color Temperature Control 39 Video Reset 40 Audio Language 40 EZ SoundRite 41 EZ Sound 41...
...42LC2D**) 8 Swivel Stand (42LC2D** only) 9 Connection Options (Model Name: 32/37/42LC2D**) 10 Controls (Model Name: 42PC1D**/42PC3D**/50PC3D**) 11 Connection Options (Model Name: 42PC1D**/42PC3D**/50PC3D**) 12~16 Remote Control Key Functions 17 18~20 21 22~23 23 24~25 26~27 28 28 29~31...) 34 Manual Scan 35 Channel Edit 36 DTV Signal Strength 36 Input Source 37 Input Label 38 EZ Picture 38 APM (Adaptive Picture Mode) 39 Manual Picture Control (EZ Picture-Custom option) 39 Color Temperature Control 39 Video Reset 40 Audio Language 40 EZ SoundRite 41 EZ Sound 41...
Owner's Manual (English)
Page 8
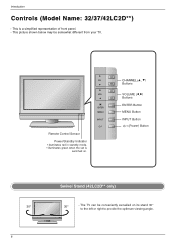
... Name: 32/37/42LC2D**) - CHANNEL (D, E) Buttons VOLUME (F,G) Buttons ENTER Button MENU Button INPUT Button (Power) Button 30° 8 Swivel Stand (42LC2D** only) 30° R - This picture shown below may be conveniently swivelled on . This is switched on its stand 30° to the left or right to provide the optimum viewing...
... Name: 32/37/42LC2D**) - CHANNEL (D, E) Buttons VOLUME (F,G) Buttons ENTER Button MENU Button INPUT Button (Power) Button 30° 8 Swivel Stand (42LC2D** only) 30° R - This picture shown below may be conveniently swivelled on . This is switched on its stand 30° to the left or right to provide the optimum viewing...
Owner's Manual (English)
Page 10
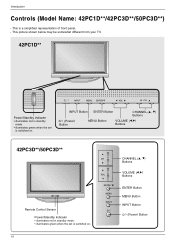
...**) - INPUT Button ENTER Button CHANNEL (D, E) Buttons (Power) Button MENU Button VOLUME (F,G) Buttons 42PC3D**/50PC3D** Remote Control Sensor Power/Standby Indicator • illuminates red in standby mode. • illuminates green when the set is a simplified ... VOL ENTER MENU INPUT CHANNEL (D, E) Buttons VOLUME (F,G) Buttons ENTER Button MENU Button INPUT Button (Power) Button 10 This is switched on . This picture shown below may be somewhat different from your TV. 42PC1D** INPUT MENU ENTER VOL CH Power/Standby Indicator • illuminates red in standby mode. &#...
...**) - INPUT Button ENTER Button CHANNEL (D, E) Buttons (Power) Button MENU Button VOLUME (F,G) Buttons 42PC3D**/50PC3D** Remote Control Sensor Power/Standby Indicator • illuminates red in standby mode. • illuminates green when the set is a simplified ... VOL ENTER MENU INPUT CHANNEL (D, E) Buttons VOLUME (F,G) Buttons ENTER Button MENU Button INPUT Button (Power) Button 10 This is switched on . This picture shown below may be somewhat different from your TV. 42PC1D** INPUT MENU ENTER VOL CH Power/Standby Indicator • illuminates red in standby mode. &#...
Owner's Manual (English)
Page 13
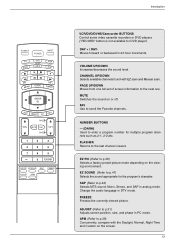
MUTE Switches the sound on the viewing environment. FREEZE Freezes the currently-viewed picture. PAGE UP/DOWN Moves from one full set of screen information to the last channel viewed. FLASHBK Returns to the next one. Change the audio ... Custom on the screen. 13 EZ PIC (Refer to p.38) Concurrently, compare with EZ scan and Manual scan. APM (Refer to p.38) Selects a factory preset picture mode depending on or off. FAV Use to p.42) Selects MTS sound: Mono, Stereo, and SAP in 24 hour increments. SAP (Refer to scroll the...
MUTE Switches the sound on the viewing environment. FREEZE Freezes the currently-viewed picture. PAGE UP/DOWN Moves from one full set of screen information to the last channel viewed. FLASHBK Returns to the next one. Change the audio ... Custom on the screen. 13 EZ PIC (Refer to p.38) Concurrently, compare with EZ scan and Manual scan. APM (Refer to p.38) Selects a factory preset picture mode depending on or off. FAV Use to p.42) Selects MTS sound: Mono, Stereo, and SAP in 24 hour increments. SAP (Refer to scroll the...
Owner's Manual (English)
Page 20
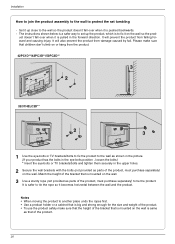
... product to another place undo the ropes first. • Use a product holder or a cabinet that children don't climb on or hang from the product. 42PC1D**/42PC3D**/50PC3D** 3 1 2 32/37/42LC2D** 1 2 3 1 Use the eye-bolts or TV brackets/bolts to fix the product to the wall as shown in the... picture. (If your product has the bolts in the eye-bolts position , loosen the bolts.) * Insert the eye-bolts or TV brackets/bolts and tighten them ...
... product to another place undo the ropes first. • Use a product holder or a cabinet that children don't climb on or hang from the product. 42PC1D**/42PC3D**/50PC3D** 3 1 2 32/37/42LC2D** 1 2 3 1 Use the eye-bolts or TV brackets/bolts to fix the product to the wall as shown in the... picture. (If your product has the bolts in the eye-bolts position , loosen the bolts.) * Insert the eye-bolts or TV brackets/bolts and tighten them ...
Owner's Manual (English)
Page 21
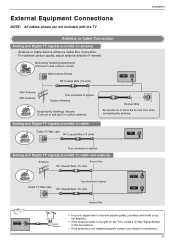
...DVI) RGB (PC/DTV) ANTENNA IN CABLE IN signal amplifier RGB IN REMOTE CONTROL IN AUDIO (RGB/DVI) • In a poor signal area to improve picture quality, purchase and install a signal amplifier. • If the antenna needs to be split for two TV's, install a "2-Way Signal Splitter" in the ... AUDIO (RGB/DVI) RGB (PC/DTV) AV IN 2 Bronze Wire S-VIDEO R AUDIO L/MONO VIDEO AV IN 2 Be careful not to tighten. For optimum picture quality, adjust antenna direction if needed. Analog and Digital TV signals provided on antenna AV IN 2 - VI VIDEO AUDIO S-VIDEO L/MONO R AV IN 2 VIDEO...
...DVI) RGB (PC/DTV) ANTENNA IN CABLE IN signal amplifier RGB IN REMOTE CONTROL IN AUDIO (RGB/DVI) • In a poor signal area to improve picture quality, purchase and install a signal amplifier. • If the antenna needs to be split for two TV's, install a "2-Way Signal Splitter" in the ... AUDIO (RGB/DVI) RGB (PC/DTV) AV IN 2 Bronze Wire S-VIDEO R AUDIO L/MONO VIDEO AV IN 2 Be careful not to tighten. For optimum picture quality, adjust antenna direction if needed. Analog and Digital TV signals provided on antenna AV IN 2 - VI VIDEO AUDIO S-VIDEO L/MONO R AV IN 2 VIDEO...
Owner's Manual (English)
Page 22
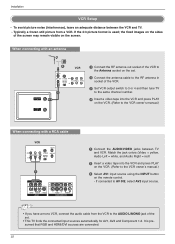
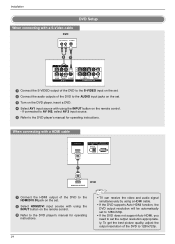
To avoid picture noise (interference), leave an adequate distance between TV and VCR. Match the jack colors (Video = yellow, Audio Left = ...sides of the screen may remain visible on the VCR. (Refer to AV IN2, select AV2 input source. Typically a frozen still picture from the VCR to the VCR owner's manual.) CABLE IN When connecting with a RCA cable VCR ANT IN OUT S-VIDEO (R)...same channel number. 4 Insert a video tape into the VCR and press PLAY on the screen. If the 4:3 picture format is presumed that RGB and HDMI/DVI sources are connected. Installation VCR Setup -
To avoid picture noise (interference), leave an adequate distance between TV and VCR. Match the jack colors (Video = yellow, Audio Left = ...sides of the screen may remain visible on the VCR. (Refer to AV IN2, select AV2 input source. Typically a frozen still picture from the VCR to the VCR owner's manual.) CABLE IN When connecting with a RCA cable VCR ANT IN OUT S-VIDEO (R)...same channel number. 4 Insert a video tape into the VCR and press PLAY on the screen. If the 4:3 picture format is presumed that RGB and HDMI/DVI sources are connected. Installation VCR Setup -
Owner's Manual (English)
Page 23
... 1 AV IN 2 button on the remote control. - R AUDIO L VIDEO • This TV finds the connected input sources automatically for AV1, AV2 and Component 12. The picture quality is presumed that you connect both Video and S-Video at the same time. In the event that RGB and HDMI/DVI sources are connected...
... 1 AV IN 2 button on the remote control. - R AUDIO L VIDEO • This TV finds the connected input sources automatically for AV1, AV2 and Component 12. The picture quality is presumed that you connect both Video and S-Video at the same time. In the event that RGB and HDMI/DVI sources are connected...
Owner's Manual (English)
Page 24
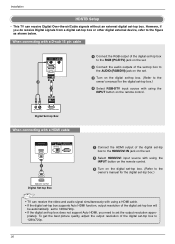
To get the best picture quality, adjust the output resolution of the DVD to the DVD player's manual for operating instructions. If connected to AV IN2, select AV 2 input source. 5 ...
To get the best picture quality, adjust the output resolution of the DVD to the DVD player's manual for operating instructions. If connected to AV IN2, select AV 2 input source. 5 ...
Owner's Manual (English)
Page 25
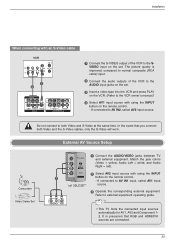
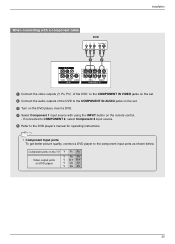
... source with using the INPUT button on DVD player Y Pb Pr Y B-Y R-Y Y Cb Cr Y PB PR 25 AV OUT • Component Input ports To get better picture quality, connect a DVD( p)layer to the DVD player's manual for operating instructions. VIDEO AUDIO S-VIDEO VIDEO AUDIO AV IN 1 COMPONENT IN Component ports on the...
... source with using the INPUT button on DVD player Y Pb Pr Y B-Y R-Y Y Cb Cr Y PB PR 25 AV OUT • Component Input ports To get better picture quality, connect a DVD( p)layer to the DVD player's manual for operating instructions. VIDEO AUDIO S-VIDEO VIDEO AUDIO AV IN 1 COMPONENT IN Component ports on the...
Owner's Manual (English)
Page 26
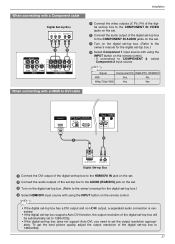
priately. To get the best picture quality, adjust the output resolution of the digital set-top box will be automatically set to 1280x720p. • If the digital set-top box does ...
priately. To get the best picture quality, adjust the output resolution of the digital set-top box will be automatically set to 1280x720p. • If the digital set-top box does ...
Owner's Manual (English)
Page 27
... the digital set-top box supports Auto DVI function, the output resolution of the digital set-top box to 1280x720p. 27 To get the best picture quality, adjust the output resolution of the digital set-top box will be automatically set to 1280x720p. • If the digital set-top box does...
... the digital set-top box supports Auto DVI function, the output resolution of the digital set-top box to 1280x720p. 27 To get the best picture quality, adjust the output resolution of the digital set-top box will be automatically set to 1280x720p. • If the digital set-top box does...
Owner's Manual (English)
Page 29
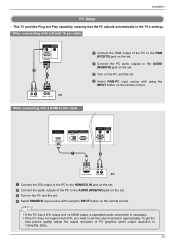
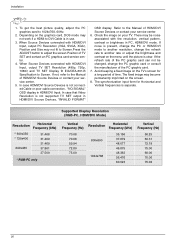
This TV provides Plug and Play capability, meaning that the PC adjusts automatically to 1024x768, 60Hz. 29 To get the best picture quality, adjust the output resolution of the PC to the RGB (PC/DTV) jack on the set. 2 Connect the PC audio outputs to the AUDIO (...
This TV provides Plug and Play capability, meaning that the PC adjusts automatically to 1024x768, 60Hz. 29 To get the best picture quality, adjust the output resolution of the PC to the RGB (PC/DTV) jack on the set. 2 Connect the PC audio outputs to the AUDIO (...
Owner's Manual (English)
Page 30
To get the best picture quality, adjust the PC graphics card to the Manual of TV SET and contact an PC graphics card service center. 4. In case HDMI/DVI Source ... in PC, HDMI/DVI mode. There may not work if a HDMI to another rate or adjust the brightness and contrast on the menu until the picture is separate. If not, refer to another resolution, change the PC graphic card or consult the manufacturer of time. Check the image on the graphics...
To get the best picture quality, adjust the PC graphics card to the Manual of TV SET and contact an PC graphics card service center. 4. In case HDMI/DVI Source ... in PC, HDMI/DVI mode. There may not work if a HDMI to another rate or adjust the brightness and contrast on the menu until the picture is separate. If not, refer to another resolution, change the PC graphic card or consult the manufacturer of time. Check the image on the graphics...
Owner's Manual (English)
Page 31
When RGB is connected to PC input and select the RGB-PC, this function is to adjust picture to left/right and up/down as you to PC input and select HDMI/DVI input, this function is used . - When HDMI/DVI is connected ...
When RGB is connected to PC input and select the RGB-PC, this function is to adjust picture to left/right and up/down as you to PC input and select HDMI/DVI input, this function is used . - When HDMI/DVI is connected ...
Owner's Manual (English)
Page 33
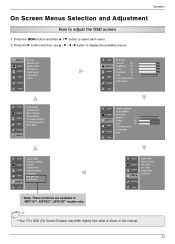
... menus. SETUP G VIDEO AUDIO TIME EZ Scan Manual Scan Channel Edit DTV Signal Input Source Input Label Set ID OPTION LOCK SETUP EZ Picture Contrast 85 VIDEO G Brightness 50 Color 50 AUDIO Sharpness 50 Tint 0 R G TIME Color Temperature OPTION Video Reset LOCK SETUP VIDEO AUDIO... Timer On Timer Sleep Timer Auto Off OPTION LOCK • Your TV's OSD (On Screen Display) may differ slightly from what is shown in 42PC1D**, 42PC3D**, 50PC3D** models only. Press the G button and then use D / E / F / G button to select each menu. 2. Operation On Screen Menus Selection...
... menus. SETUP G VIDEO AUDIO TIME EZ Scan Manual Scan Channel Edit DTV Signal Input Source Input Label Set ID OPTION LOCK SETUP EZ Picture Contrast 85 VIDEO G Brightness 50 Color 50 AUDIO Sharpness 50 Tint 0 R G TIME Color Temperature OPTION Video Reset LOCK SETUP VIDEO AUDIO... Timer On Timer Sleep Timer Auto Off OPTION LOCK • Your TV's OSD (On Screen Display) may differ slightly from what is shown in 42PC1D**, 42PC3D**, 50PC3D** models only. Press the G button and then use D / E / F / G button to select each menu. 2. Operation On Screen Menus Selection...

Owner's Manual (English)
Page 35
... that channel number. 5 Press EXIT button to return to TV viewing or press MENU button to return to the previous menu. 35 bers and a preview picture. 4 Use D / E / F / G button to select a channel and then use D / E button to add or delete scanned channels. Press FAV button to add the channel to the small...
... that channel number. 5 Press EXIT button to return to TV viewing or press MENU button to return to the previous menu. 35 bers and a preview picture. 4 Use D / E / F / G button to select a channel and then use D / E button to add or delete scanned channels. Press FAV button to add the channel to the small...
Owner's Manual (English)
Page 36
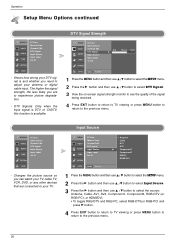
... to see the quality of the signal being received. 4 Press EXIT button to return to TV viewing or press MENU button to return to experience picture degradation. - DTV Signals: Only when the input signal is DTV or CADTV, this function is and whether you can watch your antenna or digital cable... input. SETUP G VIDEO AUDIO TIME EZ Scan Manual Scan Channel Edit DTV Signal Input Source Input Label Set ID OPTION LOCK - Changes the picture source so you need to adjust your TV, cable TV, VCR, DVD, or any other devices that are to the previous menu. Operation Setup Menu...
... to see the quality of the signal being received. 4 Press EXIT button to return to TV viewing or press MENU button to return to experience picture degradation. - DTV Signals: Only when the input signal is DTV or CADTV, this function is and whether you can watch your antenna or digital cable... input. SETUP G VIDEO AUDIO TIME EZ Scan Manual Scan Channel Edit DTV Signal Input Source Input Label Set ID OPTION LOCK - Changes the picture source so you need to adjust your TV, cable TV, VCR, DVD, or any other devices that are to the previous menu. Operation Setup Menu...

Owner's Manual (English)
Page 38
... EZ PIC EZ PIC EZ SOUND SAP FREEZE ADJUST APM 1 Press the EZ PIC button repeatedly to select the picture appearance setup option as shown below: Custom (your own settings), Daylight, Normal, Night Time, Movie, Video Game, and Sports. • You can select the desired ...mode. Daylight, Normal, Night Time, Movie, Video Game, and Sports settings are preset for the best picture appearance. Select the preset value in the VIDEO menu. 2 Press the EXIT button to save and return to navigate 4 EZ...
... EZ PIC EZ PIC EZ SOUND SAP FREEZE ADJUST APM 1 Press the EZ PIC button repeatedly to select the picture appearance setup option as shown below: Custom (your own settings), Daylight, Normal, Night Time, Movie, Video Game, and Sports. • You can select the desired ...mode. Daylight, Normal, Night Time, Movie, Video Game, and Sports settings are preset for the best picture appearance. Select the preset value in the VIDEO menu. 2 Press the EXIT button to save and return to navigate 4 EZ...
Owner's Manual (English)
Page 39
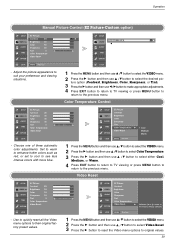
... adjustments. 4 Press EXIT button to return to TV viewing or press MENU button to return to original values. 39 SETUP EZ Picture Contrast VIDEO Brightness AUDIO Color Sharpness G Tint TIME Color Temperature OPTION Video Reset G Selection ( G or ) resets to see less...menu options to suit your preference and viewing situations. Choose one of three automatic color adjustments. Operation Manual Picture Control (EZ Picture-Custom option) SETUP EZ Picture Contrast 85 VIDEO G Brightness 50 Color 50 AUDIO Sharpness 50 Tint 0 R TIME Color Temperature OPTION ...
... adjustments. 4 Press EXIT button to return to TV viewing or press MENU button to return to original values. 39 SETUP EZ Picture Contrast VIDEO Brightness AUDIO Color Sharpness G Tint TIME Color Temperature OPTION Video Reset G Selection ( G or ) resets to see less...menu options to suit your preference and viewing situations. Choose one of three automatic color adjustments. Operation Manual Picture Control (EZ Picture-Custom option) SETUP EZ Picture Contrast 85 VIDEO G Brightness 50 Color 50 AUDIO Sharpness 50 Tint 0 R TIME Color Temperature OPTION ...


