
Owners Manual
Page 2
if an accessory is missin& please contact the >. Cable Management N rrl O r11 Owner's Manual _tteries For 42PCl RV*, 42PC3RV* Remote Control Power Cord 2_Wall brackets 2_e_e_bolts For 26LC2R*, 32LC2R* 2 :lr'v"brackets 2-Wall bracke_ 2-bolts Twis_r Holder Ar_nge the wires with your TV. t_ dealer where you purchased the product. t,,_0323B,_,,1,_,er_ 3/10/06 8:52 PH Page ], __ Ensure that the following accessories are included with the twister ho|de_.
if an accessory is missin& please contact the >. Cable Management N rrl O r11 Owner's Manual _tteries For 42PCl RV*, 42PC3RV* Remote Control Power Cord 2_Wall brackets 2_e_e_bolts For 26LC2R*, 32LC2R* 2 :lr'v"brackets 2-Wall bracke_ 2-bolts Twis_r Holder Ar_nge the wires with your TV. t_ dealer where you purchased the product. t,,_0323B,_,,1,_,er_ 3/10/06 8:52 PH Page ], __ Ensure that the following accessories are included with the twister ho|de_.

Owners Manual
Page 3
... Connection 18 VCR Setup 19-20 _ternaf Equipment Connections 2_ DVD Setup 22-23 HDSTB Setup 24-23 PC Setup 26-27 Turning the TV On 28 PIP (Picture-ln-P_'ture) Watching PIP 29 Programme Selection for Sub Picture ........ 29 Input Source Selection for Sub Picture...31 SIMPLE Text 31 TOP Text 32 FASTEXT 32 Special Teletext Functions 33 2 On Screen Menus Selection and Adiustment ..... 34 Setting up TV stations Auto programme tuning 35 Manual programme tuning 36 Fine tuning 37 Assigning a s_tion name 38 Programme edit 39 Favourite programme 40 ...
... Connection 18 VCR Setup 19-20 _ternaf Equipment Connections 2_ DVD Setup 22-23 HDSTB Setup 24-23 PC Setup 26-27 Turning the TV On 28 PIP (Picture-ln-P_'ture) Watching PIP 29 Programme Selection for Sub Picture ........ 29 Input Source Selection for Sub Picture...31 SIMPLE Text 31 TOP Text 32 FASTEXT 32 Special Teletext Functions 33 2 On Screen Menus Selection and Adiustment ..... 34 Setting up TV stations Auto programme tuning 35 Manual programme tuning 36 Fine tuning 37 Assigning a s_tion name 38 Programme edit 39 Favourite programme 40 ...
Owners Manual
Page 5
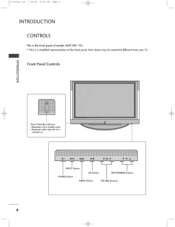
Here shown may be somewhat different from your TV. m z --4 Front Pane Controls 0 c -4 0 z Power/S_ndl_y Indicator • illuminates red in sta_dby mode. • illuminates white w_n the set is a simplified representation of models 42PCI RV* PCs, "'_This is switched on, iNPUT Bu_on POWER Button OK Button MENU Button PROGRAMME Buttons VOLUME Buttons 4 t,,_0323B,_,,1,_,er_ 3/10/06 8:52 PH Page 4 __ This is the front panel of the front panel.
Here shown may be somewhat different from your TV. m z --4 Front Pane Controls 0 c -4 0 z Power/S_ndl_y Indicator • illuminates red in sta_dby mode. • illuminates white w_n the set is a simplified representation of models 42PCI RV* PCs, "'_This is switched on, iNPUT Bu_on POWER Button OK Button MENU Button PROGRAMME Buttons VOLUME Buttons 4 t,,_0323B,_,,1,_,er_ 3/10/06 8:52 PH Page 4 __ This is the front panel of the front panel.
Owners Manual
Page 6
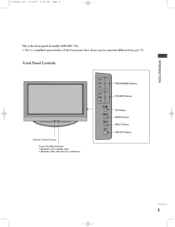
Button gutton 8utton Button 5 l,,_0323B,,l,_,er_3/10/06 8:52 PH Page 5 __ This is the front panel of models 42PC3RV* TVs. ,l_This is a simplified representation of the front pane[ Here shown may be somewhat different from your TW Front Pane[ Controls Z ..-4 0 C -4 0 z Buttons But'tons Remote Control Sensor Power/Standby Indicator , illw_inates red in standby mode. • illwninates white when the set is switc_d on.
Button gutton 8utton Button 5 l,,_0323B,,l,_,er_3/10/06 8:52 PH Page 5 __ This is the front panel of models 42PC3RV* TVs. ,l_This is a simplified representation of the front pane[ Here shown may be somewhat different from your TW Front Pane[ Controls Z ..-4 0 C -4 0 z Buttons But'tons Remote Control Sensor Power/Standby Indicator , illw_inates red in standby mode. • illwninates white when the set is switc_d on.

Owners Manual
Page 7
...: The voltage is the back panel of the control devices to the RS-232C jack. Connect over-the-air signals to operate the TV on the Specifications page. Never attempt to this iack. t,,_0323B,_,,1,_,er_ 3/10/06 8:52 PH Page 6 __ INTRODUCTION CONNECTION OPTION This... or output external device to these jacks, from an external RS-232C _nput (CONTROL&SERVICE) Port Connect the serial port of models 42PCl RV% 42PC3RV* TVs. Back Connection Panel m Z -4 O C -4 O Z AUDIO Input Connections are available for listening stereo sound from an @ Component _nput Connect a component these ...
...: The voltage is the back panel of the control devices to the RS-232C jack. Connect over-the-air signals to operate the TV on the Specifications page. Never attempt to this iack. t,,_0323B,_,,1,_,er_ 3/10/06 8:52 PH Page 6 __ INTRODUCTION CONNECTION OPTION This... or output external device to these jacks, from an external RS-232C _nput (CONTROL&SERVICE) Port Connect the serial port of models 42PCl RV% 42PC3RV* TVs. Back Connection Panel m Z -4 O C -4 O Z AUDIO Input Connections are available for listening stereo sound from an @ Component _nput Connect a component these ...

Owners Manual
Page 8
white w|_n the set is a simplified representation of models 26LC2R*, 32LC2r* TVs. Here shown may be somewhat different from your TV. n This is switched on. Z -4 Front Pane[ Controls 0 C N -i 0 Z I Remote Control Sensor o i|lwninates Power/Stand_ Indicator • illuminates red in standby mnde. VOLUME Buttons Button Button l,,_0323B,,l,_,er_3/10/06 8:52 PH Page 7 __ This is the front panel of the front panel.
white w|_n the set is a simplified representation of models 26LC2R*, 32LC2r* TVs. Here shown may be somewhat different from your TV. n This is switched on. Z -4 Front Pane[ Controls 0 C N -i 0 Z I Remote Control Sensor o i|lwninates Power/Stand_ Indicator • illuminates red in standby mnde. VOLUME Buttons Button Button l,,_0323B,,l,_,er_3/10/06 8:52 PH Page 7 __ This is the front panel of the front panel.

Owners Manual
Page 9
VIDEO input Connects the video signal from a video device, @ Power Cord Socket This TV operates on DC power. @ Euro Scarf Socket (AV]/AV2) Connect scart socket input or output external device to these jacks, from an external device to ... serial port of models 26LC2R* _s. t,,_0323B,_,,1,_,er_ 3/10/06 8:52 PH Page 8 This is indicated on the Specifications page, Never attempt to operate the TV on an AC power. O Remote Control Port video/audio device to Connect your surround sound system, Connect over-the-air signals to this jack. Audio...
VIDEO input Connects the video signal from a video device, @ Power Cord Socket This TV operates on DC power. @ Euro Scarf Socket (AV]/AV2) Connect scart socket input or output external device to these jacks, from an external device to ... serial port of models 26LC2R* _s. t,,_0323B,_,,1,_,er_ 3/10/06 8:52 PH Page 8 This is indicated on the Specifications page, Never attempt to operate the TV on an AC power. O Remote Control Port video/audio device to Connect your surround sound system, Connect over-the-air signals to this jack. Audio...

Owners Manual
Page 10
... page. Back Connection Panel Z -4 AUDIO [nput O Connections are availabie for listening C stereo sound from the video device_ @ Power Cord Socket This TV operates on DC power. @ Euro Scarf Socket (AV]/AV2) Connect scott socket input or output from an external device to these jacks. t_ -4 .... @ Component Input Connect a component O these jacks. @ RS-252C Input (CONTROL&SERVICE) Port Connect the serial port of models 32LC2R* TVs. Never attempt to operate the TV on an AC power. from a PC to the O HDM[ Input Connect a HDMI signal to HDM[ port with HDMI cable. @ SWideo...
... page. Back Connection Panel Z -4 AUDIO [nput O Connections are availabie for listening C stereo sound from the video device_ @ Power Cord Socket This TV operates on DC power. @ Euro Scarf Socket (AV]/AV2) Connect scott socket input or output from an external device to these jacks. t_ -4 .... @ Component Input Connect a component O these jacks. @ RS-252C Input (CONTROL&SERVICE) Port Connect the serial port of models 32LC2R* TVs. Never attempt to operate the TV on an AC power. from a PC to the O HDM[ Input Connect a HDMI signal to HDM[ port with HDMI cable. @ SWideo...
Owners Manual
Page 11
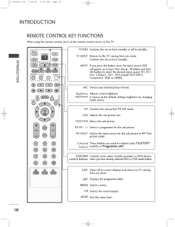
... 3/'10/06 8:52 PH Page 10 _+ INTRODUCTION REMOTE CONTROL KEY FUNCTIONS When using the remote control, aim it at the remote control sensor on the TV+ POWER Swffches the set on+ from s_ndby+ Z -.I O INPUT If you have already selected DVD or VCR mode button, J| EXIT Clears all on-... from standby or off to standby. gr+ghtn+ess adjus[ment Adjusts screen brightness+ It returns to select the desired input source (TV, AVl + --4 AV2, S+Video2 , AV3 , AV4 (except 42PC3RV+), O Component, RGB, or HDMI)+ Z ARC Selects your desired picture format. PEPINPUT Selects the input source for...
... 3/'10/06 8:52 PH Page 10 _+ INTRODUCTION REMOTE CONTROL KEY FUNCTIONS When using the remote control, aim it at the remote control sensor on the TV+ POWER Swffches the set on+ from s_ndby+ Z -.I O INPUT If you have already selected DVD or VCR mode button, J| EXIT Clears all on-... from standby or off to standby. gr+ghtn+ess adjus[ment Adjusts screen brightness+ It returns to select the desired input source (TV, AVl + --4 AV2, S+Video2 , AV3 , AV4 (except 42PC3RV+), O Component, RGB, or HDMI)+ Z ARC Selects your desired picture format. PEPINPUT Selects the input source for...
Owners Manual
Page 17
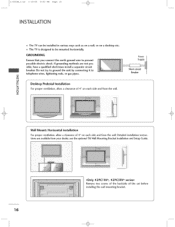
... to prevent possible electric shock. z Short I,,_0323B l,_,en 3/'10/06 8:52 PH Page 16 __ The TV can be mounted horizontally. Desktop Pedestal Installation For proper ventilation, allow a clearance of 4" on a desktop etc. The TV is designed to be installed in various ways such as on a wall, or on each side and...
... to prevent possible electric shock. z Short I,,_0323B l,_,en 3/'10/06 8:52 PH Page 16 __ The TV can be mounted horizontally. Desktop Pedestal Installation For proper ventilation, allow a clearance of 4" on a desktop etc. The TV is designed to be installed in various ways such as on a wall, or on each side and...

Owners Manual
Page 18
... the picture. (ffyour product has the bolts in the eye-bolts position before inserting the eye-bolts, loosen the bolts.) * insert the eye-bolts or TV brackets/bolts and tighten them securely in the forward direction, falling for-ward and hurting people. The instructions shown below is a safer way to set...
... the picture. (ffyour product has the bolts in the eye-bolts position before inserting the eye-bolts, loosen the bolts.) * insert the eye-bolts or TV brackets/bolts and tighten them securely in the forward direction, falling for-ward and hurting people. The instructions shown below is a safer way to set...
Owners Manual
Page 19
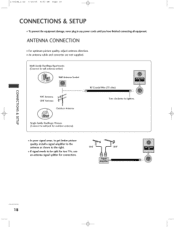
...-family Dwellings/Apartments (Connect to wall antenna socket) Wall Antenna Socket RFCoaxial Wire {75 ohm) N t : vIl _::j O Z Z m -4 VHFuAHnFtennaAntenn_a Turn clo,,:kwise to be split for bvo TVs, use an antenna signal splitter for outdoor antenna) In poor signal areas, to get better picture quality, install a signal amplifier to the antenna as shown...
...-family Dwellings/Apartments (Connect to wall antenna socket) Wall Antenna Socket RFCoaxial Wire {75 ohm) N t : vIl _::j O Z Z m -4 VHFuAHnFtennaAntenn_a Turn clo,,:kwise to be split for bvo TVs, use an antenna signal splitter for outdoor antenna) In poor signal areas, to get better picture quality, install a signal amplifier to the antenna as shown...

Owners Manual
Page 20
...screen. Typically a frozen still picture from a VCR. jacks between the VCR and TV. When connecting with a RCA cable Connect the AUDIO/VIDEO Match the jack colors (Video and Audio Right _ red...). yellow, Audio TV and VCR. Z m -4 C "0 When connecting with an antenna Connect the ANT OUT socket ... white, Insert a video tape into the VCR and press PLAY on the VCR and match the C_ appropriate programme between the TV and VCR for viewing. N 0 Z Z m Press the PLAY button on the VCR, (Refer to AV IN 4, ...
...screen. Typically a frozen still picture from a VCR. jacks between the VCR and TV. When connecting with a RCA cable Connect the AUDIO/VIDEO Match the jack colors (Video and Audio Right _ red...). yellow, Audio TV and VCR. Z m -4 C "0 When connecting with an antenna Connect the ANT OUT socket ... white, Insert a video tape into the VCR and press PLAY on the VCR and match the C_ appropriate programme between the TV and VCR for viewing. N 0 Z Z m Press the PLAY button on the VCR, (Refer to AV IN 4, ...
Owners Manual
Page 22
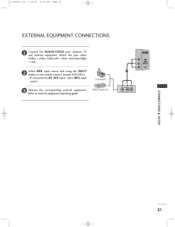
CamcordeF Operate the corresponding external equipment. Video Game Set N Refer to AV IN3 input, select AV3 input source. 1,,_0323Bl,_,en 3/'10/06 8:52 PH Page 21 __ EXTERNAL EQUIPMENT CONNECTIONS Connect the AUDIO/VIDEO jacks between TV and external equipment. Match the jack colors (Video = yellow, Audio Left = white, and Audio Right = red) Select AV4 input source with using the INPUT button on the remote control. (except 42PC3RV*) - If connected to external equipment operating guide. O Z Z m Z m -4 C 21
CamcordeF Operate the corresponding external equipment. Video Game Set N Refer to AV IN3 input, select AV3 input source. 1,,_0323Bl,_,en 3/'10/06 8:52 PH Page 21 __ EXTERNAL EQUIPMENT CONNECTIONS Connect the AUDIO/VIDEO jacks between TV and external equipment. Match the jack colors (Video = yellow, Audio Left = white, and Audio Right = red) Select AV4 input source with using the INPUT button on the remote control. (except 42PC3RV*) - If connected to external equipment operating guide. O Z Z m Z m -4 C 21

Owners Manual
Page 27
When connecting with a D-sub ]5 pin cable PC Connect the TV to the PC with using the INPUT button on the PC. O Z Z m -4 Select R(_B input source with the PC cable. Connect the PC audio putput to the TV's settings. I,,_0323B l,_,en 3/'10/06 8:52 PH Page 26 __ CONNECTIONS & SETUP PC SETUP This TV provides Plug and Play capability, meaning that the PC adjusts automatically to the TV's AUDIO IN (RGB) input N Turn on the remote control, z m -4 c 26
When connecting with a D-sub ]5 pin cable PC Connect the TV to the PC with using the INPUT button on the PC. O Z Z m -4 Select R(_B input source with the PC cable. Connect the PC audio putput to the TV's settings. I,,_0323B l,_,en 3/'10/06 8:52 PH Page 26 __ CONNECTIONS & SETUP PC SETUP This TV provides Plug and Play capability, meaning that the PC adjusts automatically to the TV's AUDIO IN (RGB) input N Turn on the remote control, z m -4 c 26
Owners Manual
Page 29
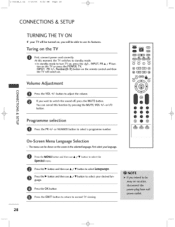
...-4 C Programme selection Press the PR +/- or NUMBER button to switch the sound off, press the MUTE button. -4 You can be able to select your TV will be turned on, you want to select a programme number. P_ss the I_ button and then use A / V bulton to standby mode. Press the OK... button Press the EXIT button to return to sele_ _guctge. or I , INPUT, PR A / _ button on the TV or press the POWEP_ TV, INPUT, PR +/o, Number(O~9) the TV will be shown on the screen in _ seleO__dlanguage. _rst _ _ur [anom_ge. Press the MENU b u_on and then use & / V ...
...-4 C Programme selection Press the PR +/- or NUMBER button to switch the sound off, press the MUTE button. -4 You can be able to select your TV will be turned on, you want to select a programme number. P_ss the I_ button and then use A / V bulton to standby mode. Press the OK... button Press the EXIT button to return to sele_ _guctge. or I , INPUT, PR A / _ button on the TV or press the POWEP_ TV, INPUT, PR +/o, Number(O~9) the TV will be shown on the screen in _ seleO__dlanguage. _rst _ _ur [anom_ge. Press the MENU b u_on and then use & / V ...
Owners Manual
Page 30
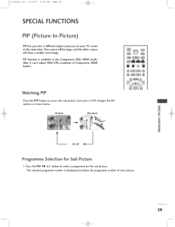
I,,_0323B l,_,en 3/'10/06 8:52 PH Page 29 _o SPECIAL FUNCTIONS PIP (Picture-In-Picture) PIP lets you view 2 different inputs (sources) on your TV screen at the same time. PIP function is displayed just below . m PIP Mode _2 Mode i C Z 0 Z PIP Off Programme Selection for the sub picture, The selected ...
I,,_0323B l,_,en 3/'10/06 8:52 PH Page 29 _o SPECIAL FUNCTIONS PIP (Picture-In-Picture) PIP lets you view 2 different inputs (sources) on your TV screen at the same time. PIP function is displayed just below . m PIP Mode _2 Mode i C Z 0 Z PIP Off Programme Selection for the sub picture, The selected ...
Owners Manual
Page 32
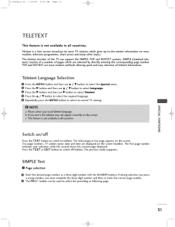
...page number. Teletext is not available in all countries. information on news, The teletext decoder of this TV can be used to select the $1_da! O Press the & / V button to normal TV viewing. Repeatedly press the MENU button to return to select the required language. menu. Two page ...numbers, TV station name, date and time are selected by most TV stations which are displayed on the screen. The first indicates your selection, while the second shows the current page displayed. ...
...page number. Teletext is not available in all countries. information on news, The teletext decoder of this TV can be used to select the $1_da! O Press the & / V button to normal TV viewing. Repeatedly press the MENU button to return to select the required language. menu. Two page ...numbers, TV station name, date and time are selected by most TV stations which are displayed on the screen. The first indicates your selection, while the second shows the current page displayed. ...

Owners Manual
Page 34
... of the screen. Press this button again to display the time at the top left hand corner of 2 or more sub pages. "D m [] UPDATE Displays the TV picture on the screen below the time. To hold or change is displayed at the top right hand corner of the page. Press this button... screen. Press again to exit this button is pressed the stop symbol is inhibited. or NUMBER buttons. m SIZE Selects double height text. O Z [] TIME When viewing a TV programme, press this button again,
... of the screen. Press this button again to display the time at the top left hand corner of 2 or more sub pages. "D m [] UPDATE Displays the TV picture on the screen below the time. To hold or change is displayed at the top right hand corner of the page. Press this button... screen. Press again to exit this button is pressed the stop symbol is inhibited. or NUMBER buttons. m SIZE Selects double height text. O Z [] TIME When viewing a TV programme, press this button again,

Owners Manual
Page 35
... to the higher level menu by pressing the OK or MENU button. t,,_0323B,_,,2-en 3/10/06 8:53 PH Page 34 TV MENU Se_ing up TV stations ON SCREENMENUS SELECTION AND ADJUSTMENT Your TV's OSD (On Screen Display) may differ slightly from what is shown in the sub or pule-down menu with _ / I_...
... to the higher level menu by pressing the OK or MENU button. t,,_0323B,_,,2-en 3/10/06 8:53 PH Page 34 TV MENU Se_ing up TV stations ON SCREENMENUS SELECTION AND ADJUSTMENT Your TV's OSD (On Screen Display) may differ slightly from what is shown in the sub or pule-down menu with _ / I_...


