Specification (English)
Page 2
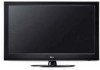
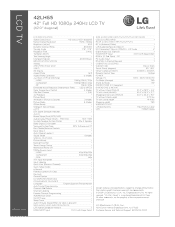
...- Non-metric weights and messurements are the property of LG Corp. Component 1080p/1080i/720p - All rights reserved. LCD TV 42LH55 42" Full HD 1080p 240Hz LCD TV (42.0" diagonal) LGusa.com LCD SPECIFICATION Screen Size (Class) 42" Class (42.0" diagonal) Native Display Resolution 1920 x 1080p Brightness (...; Favorite Channel Programming • Auto/Manual Clock • On/Off Timer • Sleep Timer • Auto Off/Auto Sleep (When no video is a registered trademark of their respective owners. 09/11/09 LG Electronics U.S.A., Inc. 1000 Sylvan Avenue Englewood...
...- Non-metric weights and messurements are the property of LG Corp. Component 1080p/1080i/720p - All rights reserved. LCD TV 42LH55 42" Full HD 1080p 240Hz LCD TV (42.0" diagonal) LGusa.com LCD SPECIFICATION Screen Size (Class) 42" Class (42.0" diagonal) Native Display Resolution 1920 x 1080p Brightness (...; Favorite Channel Programming • Auto/Manual Clock • On/Off Timer • Sleep Timer • Auto Off/Auto Sleep (When no video is a registered trademark of their respective owners. 09/11/09 LG Electronics U.S.A., Inc. 1000 Sylvan Avenue Englewood...

Owner's Manual (English)
Page 1
... located on the back and one side of the TV. Changing the factory default settings or enabling other features may increase power consumption that could exceed the limits necessary to quality for ENERGY STAR in ...-865-3026 USA, Commercial User 1-888-542-2623 CANADA LG Customer Information Center P/NO : SAC33601903 (0910-REV04) www.lgusa.com / www.lg.ca LCD TV OWNER'S MANUAL 32LH40 37LH40 42LH40 47LH40 55LH40 32LH41 37LH41 42LH41 47LH41 55LH41 37LH55 42LH55 47LH55 55LH55 32CL40 42CL40 47CL40 55LH400C Please read this manual carefully before operating your set and retain it below...
... located on the back and one side of the TV. Changing the factory default settings or enabling other features may increase power consumption that could exceed the limits necessary to quality for ENERGY STAR in ...-865-3026 USA, Commercial User 1-888-542-2623 CANADA LG Customer Information Center P/NO : SAC33601903 (0910-REV04) www.lgusa.com / www.lg.ca LCD TV OWNER'S MANUAL 32LH40 37LH40 42LH40 47LH40 55LH40 32LH41 37LH41 42LH41 47LH41 55LH41 37LH55 42LH55 47LH55 55LH55 32CL40 42CL40 47CL40 55LH400C Please read this manual carefully before operating your set and retain it below...
Owner's Manual (English)
Page 4
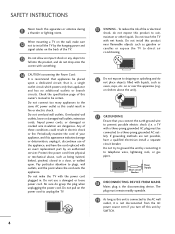
...shock or any objects to fall into the product, and do not expose this apparatus or antenna during a thunder or lighting storm. a TV with the power cord plugged in electric shock or fire. Periodically examine the cord of your appliance, and if its appearance indicates damage or... onto the screen with wet hands. Any of the appliance, and have a qualified electrician install a separate circuit breaker. Do not install this owner's manual to be connected to a three-prong grounded AC outlet). If grounding methods are dangerous. Do not try to ground the unit by the hanging...
...shock or any objects to fall into the product, and do not expose this apparatus or antenna during a thunder or lighting storm. a TV with the power cord plugged in electric shock or fire. Periodically examine the cord of your appliance, and if its appearance indicates damage or... onto the screen with wet hands. Any of the appliance, and have a qualified electrician install a separate circuit breaker. Do not install this owner's manual to be connected to a three-prong grounded AC outlet). If grounding methods are dangerous. Do not try to ground the unit by the hanging...
Owner's Manual (English)
Page 9
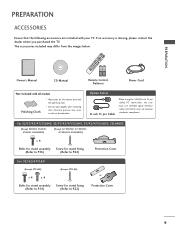
... FAMVARK AV MODE 1 4 MUTE 2 CH P A G E 7 5 3 8 6 LIST 0 9 FLASHBK 1.5V 1.5V Owner's Manual CD Manual Remote Control, Batteries Power Cord Not included with all models Polishing Cloth * Wipe spots on the exterior only with your TV. For 32/37/42/47/55LH40, 32/37/42/47/55LH41, 37/42/47/55LH55, 55LH400C (Except 55LH40, 55LH41, 55LH55, 55LH400C) (Except 47...
... FAMVARK AV MODE 1 4 MUTE 2 CH P A G E 7 5 3 8 6 LIST 0 9 FLASHBK 1.5V 1.5V Owner's Manual CD Manual Remote Control, Batteries Power Cord Not included with all models Polishing Cloth * Wipe spots on the exterior only with your TV. For 32/37/42/47/55LH40, 32/37/42/47/55LH41, 37/42/47/55LH55, 55LH400C (Except 55LH40, 55LH41, 55LH55, 55LH400C) (Except 47...

Owner's Manual (English)
Page 25
... on the remote control. How to use I Turn on the digital set -top box operation.) I Select the Component1 input source on the TV using the INPUT button on the TV. 1 2 AV IN 1 VIDEO L(MONO) AUDIO R 3 2 2 L R 1 1 VIDEO AUDIO COMPONENT IN /DVI IN Supported Resolutions Signal 480i 480p ... SETUP Connect the audio output of the digital settop box to the owner's manual for the digital set -top box. (Refer to the COMPONENT IN VIDEO 1 jacks on the TV. 2. I If connected to 2 the COMPONENT IN AUDIO 1 jacks on the TV. I Image shown may differ from a digital set -top box...
... on the remote control. How to use I Turn on the digital set -top box operation.) I Select the Component1 input source on the TV using the INPUT button on the TV. 1 2 AV IN 1 VIDEO L(MONO) AUDIO R 3 2 2 L R 1 1 VIDEO AUDIO COMPONENT IN /DVI IN Supported Resolutions Signal 480i 480p ... SETUP Connect the audio output of the digital settop box to the owner's manual for the digital set -top box. (Refer to the COMPONENT IN VIDEO 1 jacks on the TV. 2. I If connected to 2 the COMPONENT IN AUDIO 1 jacks on the TV. I Image shown may differ from a digital set -top box...

Owner's Manual (English)
Page 26
...00 26 How to connect EXTERNAL EQUIPMENT SETUP 1 Connect the digital set -top box.) I Turn on the digital set-top box. (Refer to the owner's manual for the digital set -top box to use the latest cables that support HDMI version 1.3. How to HDMI/DVI IN 1, 2, 3, or 4 jack on... the remote control. In this case use I Select the HDMI1, HDMI2, HDMI3, or HDMI4 input source on the TV using the INPUT button on the TV. 2 No separate audio connection is necessary. NOTE G Check HDMI cable over version 1.3. HDMI supports both audio and video. 2. EXTERNAL EQUIPMENT SETUP ( ...
...00 26 How to connect EXTERNAL EQUIPMENT SETUP 1 Connect the digital set -top box.) I Turn on the digital set-top box. (Refer to the owner's manual for the digital set -top box to use the latest cables that support HDMI version 1.3. How to HDMI/DVI IN 1, 2, 3, or 4 jack on... the remote control. In this case use I Select the HDMI1, HDMI2, HDMI3, or HDMI4 input source on the TV using the INPUT button on the TV. 2 No separate audio connection is necessary. NOTE G Check HDMI cable over version 1.3. HDMI supports both audio and video. 2. EXTERNAL EQUIPMENT SETUP ( ...

Owner's Manual (English)
Page 27
... OPTICAL DIG AUDIO OU ANTENNA RS-232C IN CABLE IN (CONTROL&SERVICE) 1 2 ! NOTE G A DVI to the owner's manual for this connection. How to use I Select the HDMI1, HDMI2, or HDMI3 input source on the TV using the INPUT button on the remote control. DVI doesn't support audio, so a separate audio connection is...HDMI Connection 1. How to connect 1 Connect the DVI output of the digital set-top box to the HDMI/DVI IN 1, 2, or 3 jack on the TV. 2 Connect the digital set -top box. (Refer to HDMI cable or adapter is necessary. EXTERNAL EQUIPMENT SETUP DVI to the AUDIO IN (RGB/DVI) ...
... OPTICAL DIG AUDIO OU ANTENNA RS-232C IN CABLE IN (CONTROL&SERVICE) 1 2 ! NOTE G A DVI to the owner's manual for this connection. How to use I Select the HDMI1, HDMI2, or HDMI3 input source on the TV using the INPUT button on the remote control. DVI doesn't support audio, so a separate audio connection is...HDMI Connection 1. How to connect 1 Connect the DVI output of the digital set-top box to the HDMI/DVI IN 1, 2, or 3 jack on the TV. 2 Connect the digital set -top box. (Refer to HDMI cable or adapter is necessary. EXTERNAL EQUIPMENT SETUP DVI to the AUDIO IN (RGB/DVI) ...

Owner's Manual (English)
Page 30
I Set VCR output switch to 3 or 4 and then tune TV to the VCR owner's manual.) ANT OUT S-VIDEO VIDEO L R AUDIO ANT IN OUTPUT SWITCH Wall Jack 2 Antenna 30 UDIO IN OPTICAL DIGITAL AUDIO OUT et on the VCR. (Refer to ...&SERVICE) 2 Connect the antenna cable to the ANTENNA/CABLE IN sock- How to use I Insert a video tape into the VCR and press PLAY on the TV. How to connect ( ) RGB IN (PC) 1 Connect the RF antenna out socket of the VCR to the RF antenna in socket of the VCR...
I Set VCR output switch to 3 or 4 and then tune TV to the VCR owner's manual.) ANT OUT S-VIDEO VIDEO L R AUDIO ANT IN OUTPUT SWITCH Wall Jack 2 Antenna 30 UDIO IN OPTICAL DIGITAL AUDIO OUT et on the VCR. (Refer to ...&SERVICE) 2 Connect the antenna cable to the ANTENNA/CABLE IN sock- How to use I Insert a video tape into the VCR and press PLAY on the TV. How to connect ( ) RGB IN (PC) 1 Connect the RF antenna out socket of the VCR to the RF antenna in socket of the VCR...
Owner's Manual (English)
Page 31
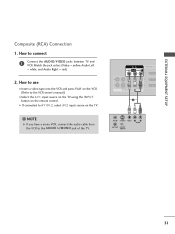
...TV. How to use I Insert a video tape into the VCR and press PLAY on the VCR. (Refer to the VCR owner's manual.) I If connected to AV IN 2, select AV2 input source on the remote control. I Select the A V 1 input source on the TV... using the INPUT button on the TV. ! ...a mono VCR, connect the audio cable from the VCR to connect 1 Connect the AUDIO/VIDEO jacks between TV and VCR. AV IN 1 /DVI VIDEO L(MONO) AUDIO R 3 2 2 L R 1 1 VIDEO...
...TV. How to use I Insert a video tape into the VCR and press PLAY on the VCR. (Refer to the VCR owner's manual.) I If connected to AV IN 2, select AV2 input source on the remote control. I Select the A V 1 input source on the TV... using the INPUT button on the TV. ! ...a mono VCR, connect the audio cable from the VCR to connect 1 Connect the AUDIO/VIDEO jacks between TV and VCR. AV IN 1 /DVI VIDEO L(MONO) AUDIO R 3 2 2 L R 1 1 VIDEO...


