Owner's Manual (English)
Page 2
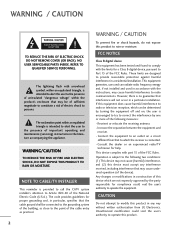
...TV INSTALLER This reminder is connected. - FCC NOTICE Class B digital device This equipment has been tested and found to comply with the instructions, may be of sufficient magnitude to constitute a risk of electric shock to radio communications. These limits are not expressly approved by turning... to radio or television reception, which are designed to modify this device must accept any way without written authorization from LG Electronics. CAUTION Do not attempt to provide reasonable protection against harmful interference in particular, specifies that the cable ground shall...
...TV INSTALLER This reminder is connected. - FCC NOTICE Class B digital device This equipment has been tested and found to comply with the instructions, may be of sufficient magnitude to constitute a risk of electric shock to radio communications. These limits are not expressly approved by turning... to radio or television reception, which are designed to modify this device must accept any way without written authorization from LG Electronics. CAUTION Do not attempt to provide reasonable protection against harmful interference in particular, specifies that the cable ground shall...
Owner's Manual (English)
Page 4
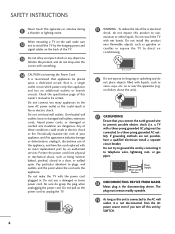
...where the cord exits the appliance. Do not try to prevent possible electric shock (i.e. that is, a single outlet circuit which powers only that you turn off this could result in electric shock or fire. Do not connect too many appliances to be certain. Periodically examine the cord of fire or... the product, and do not place objects filled with liquids, such as vases, cups, etc. Do not install this product to install the TV by SWITCH. a TV with a three-prong grounded AC plug must remain readily operable. 19 As long as this apparatus or antenna during a thunder or lighting storm....
...where the cord exits the appliance. Do not try to prevent possible electric shock (i.e. that is, a single outlet circuit which powers only that you turn off this could result in electric shock or fire. Do not connect too many appliances to be certain. Periodically examine the cord of fire or... the product, and do not place objects filled with liquids, such as vases, cups, etc. Do not install this product to install the TV by SWITCH. a TV with a three-prong grounded AC plug must remain readily operable. 19 As long as this apparatus or antenna during a thunder or lighting storm....
Owner's Manual (English)
Page 5
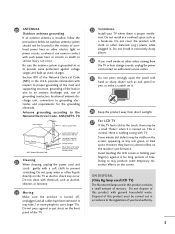
...the front panel of time. This is normal, there is nothing wrong with cloth or other electric light or power circuits, or where it is turned on the screen, appearing as alcohol, thinners or benzene. 22 Moving Make sure the product is grounded so as death or serious injury can occur... panel with chemicals such as tiny red, green, or blue spots. Do not spray water or other odors coming from direct sunlight. 27 For LCD TV If the TV feels cold to the regulations of the National Electrical Code (NEC) in excessively dusty places. 24 If you smell smoke or other liquids directly...
...the front panel of time. This is normal, there is nothing wrong with cloth or other electric light or power circuits, or where it is turned on the screen, appearing as alcohol, thinners or benzene. 22 Moving Make sure the product is grounded so as death or serious injury can occur... panel with chemicals such as tiny red, green, or blue spots. Do not spray water or other odors coming from direct sunlight. 27 For LCD TV If the TV feels cold to the regulations of the National Electrical Code (NEC) in excessively dusty places. 24 If you smell smoke or other liquids directly...

Owner's Manual (English)
Page 6
... 80 Demo Mode 81 Add / Delete Channel (Manual Tuning 49 - CONTENTS WARNING / CAUTION 2 SAFETY INSTRUCTIONS 3 FEATURE OF THIS TV 8 PREPARATION Accessories 9 Front Panel Information 10 Back Panel Information 12 Stand Instruction 14 VESA Wall Mounting 18 Cable Management 19 Desktop Pedestal...VCR Setup 30 Other A/V Source Setup 32 PC Setup 33 USB Connection 40 Audio out Connection 41 WATCHING TV / CHANNEL CONTROL Remote Control Functions 42 Turning On TV 44 Channel Selection 44 Volume Adjustment 44 Initial Setting 45 On-Screen Menus Selection 46 Quick Menu 47 6...
... 80 Demo Mode 81 Add / Delete Channel (Manual Tuning 49 - CONTENTS WARNING / CAUTION 2 SAFETY INSTRUCTIONS 3 FEATURE OF THIS TV 8 PREPARATION Accessories 9 Front Panel Information 10 Back Panel Information 12 Stand Instruction 14 VESA Wall Mounting 18 Cable Management 19 Desktop Pedestal...VCR Setup 30 Other A/V Source Setup 32 PC Setup 33 USB Connection 40 Audio out Connection 41 WATCHING TV / CHANNEL CONTROL Remote Control Functions 42 Turning On TV 44 Channel Selection 44 Volume Adjustment 44 Initial Setting 45 On-Screen Menus Selection 46 Quick Menu 47 6...

Owner's Manual (English)
Page 8
... your TV if you use minute vibrations to the video and audio content. The AV Mode optimizes the picture into Cinema, Sports, and game Mode according to turn the ...burn-in full 1920 x 1080p resolution for an extended period. 8 I When a fixed image (e.g. LG TV include a unique invisible speaker system, tuned by combining advanced 120Hz technology with scanning backlight. TruSurround XT technology... is verified from SRS Labs, Inc. Please contact your TV screen for a prolonged period (2 or more hours for LCD, 1 or more pixels, 16:9 aspect-ratio screens, and AC3 ...
... your TV if you use minute vibrations to the video and audio content. The AV Mode optimizes the picture into Cinema, Sports, and game Mode according to turn the ...burn-in full 1920 x 1080p resolution for an extended period. 8 I When a fixed image (e.g. LG TV include a unique invisible speaker system, tuned by combining advanced 120Hz technology with scanning backlight. TruSurround XT technology... is verified from SRS Labs, Inc. Please contact your TV screen for a prolonged period (2 or more hours for LCD, 1 or more pixels, 16:9 aspect-ratio screens, and AC3 ...
Owner's Manual (English)
Page 18
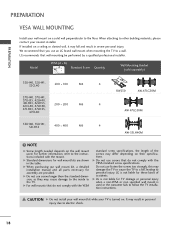
...* B) A B Standard Screw Quantity Wall Mounting Bracket (sold separately) 32LH40, 32LH41, 32CL40 200 * 100 M4 4 RW230 AW-47LG30M 37LH40, 37LH41, 37LH55, 42LH40, 42LH41, 42LH55, 42CL40, 47LH40, 200 * 200 M6 4 47LH41, 47LH55, 47CL40 AW-47LG30M 55LH40, 55LH41, 55LH55 400 * 400 M6 4 AW-55LH40M !...mount kit while your TV is turned on their specifications. When attaching to follow the TV installation instructions. We recommend that do not comply with the VESA standard screw specifications. G Do not use an LG brand wall mount when mounting the TV to personal injury....
...* B) A B Standard Screw Quantity Wall Mounting Bracket (sold separately) 32LH40, 32LH41, 32CL40 200 * 100 M4 4 RW230 AW-47LG30M 37LH40, 37LH41, 37LH55, 42LH40, 42LH41, 42LH55, 42CL40, 47LH40, 200 * 200 M6 4 47LH41, 47LH55, 47CL40 AW-47LG30M 55LH40, 55LH41, 55LH55 400 * 400 M6 4 AW-55LH40M !...mount kit while your TV is turned on their specifications. When attaching to follow the TV installation instructions. We recommend that do not comply with the VESA standard screw specifications. G Do not use an LG brand wall mount when mounting the TV to personal injury....
Owner's Manual (English)
Page 25
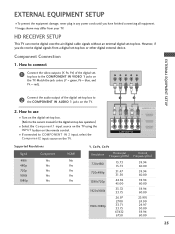
...the digital settop box to the owner's manual for the digital set-top box operation.) I Turn on the digital set -top box or other digital external device. HD RECEIVER SETUP This TV can receive digital over-the-air/digital cable signals without an external digital set -top box... to COMPONENT IN 2 input, select the Component2 input source on the TV. 1 2 AV IN 1 VIDEO L(MONO) AUDIO R 3 2 2 L R 1 1 VIDEO AUDIO COMPONENT IN /DVI IN Supported Resolutions Signal 480i 480p 720p 1080i 1080p Component...
...the digital settop box to the owner's manual for the digital set-top box operation.) I Turn on the digital set -top box or other digital external device. HD RECEIVER SETUP This TV can receive digital over-the-air/digital cable signals without an external digital set -top box... to COMPONENT IN 2 input, select the Component2 input source on the TV. 1 2 AV IN 1 VIDEO L(MONO) AUDIO R 3 2 2 L R 1 1 VIDEO AUDIO COMPONENT IN /DVI IN Supported Resolutions Signal 480i 480p 720p 1080i 1080p Component...
Owner's Manual (English)
Page 26
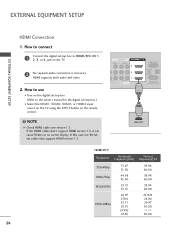
...the latest cables that support HDMI version 1.3. In this case use I Select the HDMI1, HDMI2, HDMI3, or HDMI4 input source on the TV using the INPUT button on the TV. 2 No separate audio connection is necessary. HDMI OUTPUT ( ) HDMI-DTV Resolution Horizontal Vertical Frequency(KHz) Frequency(Hz) 720x480p 1280x720p 1920x1080i ... version 1.3. How to connect EXTERNAL EQUIPMENT SETUP 1 Connect the digital set-top box to the owner's manual for the digital set-top box.) I Turn on the digital set-top box. (Refer to HDMI/DVI IN 1, 2, 3, or 4 jack on the remote control.
...the latest cables that support HDMI version 1.3. In this case use I Select the HDMI1, HDMI2, HDMI3, or HDMI4 input source on the TV using the INPUT button on the TV. 2 No separate audio connection is necessary. HDMI OUTPUT ( ) HDMI-DTV Resolution Horizontal Vertical Frequency(KHz) Frequency(Hz) 720x480p 1280x720p 1920x1080i ... version 1.3. How to connect EXTERNAL EQUIPMENT SETUP 1 Connect the digital set-top box to the owner's manual for the digital set-top box.) I Turn on the digital set-top box. (Refer to HDMI/DVI IN 1, 2, 3, or 4 jack on the remote control.
Owner's Manual (English)
Page 27
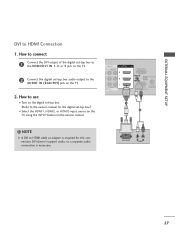
... set -top box audio output to the HDMI/DVI IN 1, 2, or 3 jack on the TV. 2 Connect the digital set -top box.) I Turn on the TV. 2. How to use I Select the HDMI1, HDMI2, or HDMI3 input source on the TV using the INPUT button on the remote control. How to connect 1 Connect the DVI output...
... set -top box audio output to the HDMI/DVI IN 1, 2, or 3 jack on the TV. 2 Connect the digital set -top box.) I Turn on the TV. 2. How to use I Select the HDMI1, HDMI2, or HDMI3 input source on the TV using the INPUT button on the remote control. How to connect 1 Connect the DVI output...
Owner's Manual (English)
Page 28
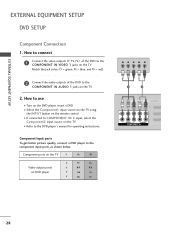
.... How to use I If connected to the COMPONENT IN AUDIO 1 jacks on the DVD player, insert a DVD. Component ports on the TV Y PB PR Video output ports on the TV. I Turn on the TV. 2. How to connect 1 Connect the video outputs (Y, PB, PR) of the DVD to COMPONENT IN 2 input, select the Component2 input...
.... How to use I If connected to the COMPONENT IN AUDIO 1 jacks on the DVD player, insert a DVD. Component ports on the TV Y PB PR Video output ports on the TV. I Turn on the TV. 2. How to connect 1 Connect the video outputs (Y, PB, PR) of the DVD to COMPONENT IN 2 input, select the Component2 input...
Owner's Manual (English)
Page 29
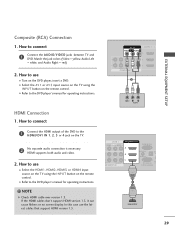
... Check HDMI cable over version 1.3. In this case use I Refer to use I Select the A V 1 or A V 2 input source on the TV using the INPUT button on the DVD player, insert a DVD. ( ) ( ) EXTERNAL EQUIPMENT SETUP Composite (RCA) Connection 1. Match the jack colors ... Audio Right = red) 2. How to the DVD player's manual for operating instructions. I Turn on the remote control. I Select the HDMI1, HDMI2, HDMI3, or HDMI4 input source on the TV using the INPUT button on the TV. 2 No separate audio connection is necessary. HDMI Connection 1. AV IN 1 VIDEO L(MONO)...
... Check HDMI cable over version 1.3. In this case use I Refer to use I Select the A V 1 or A V 2 input source on the TV using the INPUT button on the DVD player, insert a DVD. ( ) ( ) EXTERNAL EQUIPMENT SETUP Composite (RCA) Connection 1. Match the jack colors ... Audio Right = red) 2. How to the DVD player's manual for operating instructions. I Turn on the remote control. I Select the HDMI1, HDMI2, HDMI3, or HDMI4 input source on the TV using the INPUT button on the TV. 2 No separate audio connection is necessary. HDMI Connection 1. AV IN 1 VIDEO L(MONO)...
Owner's Manual (English)
Page 33
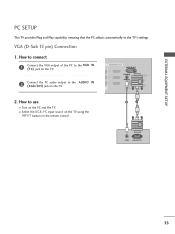
...the PC to the RGB IN (P C) jack on the TV. ( ) R 3 2 2 Connect the PC audio output to the AUDIO IN (RGB/DVI) jack on the remote control. 2 1 AUDIO RGB OUTPUT ( ) 33 I Turn on the PC and the TV. How to the TV's settings. VGA (D-Sub 15 pin) Connection 1. EXTERNAL ...EQUIPMENT SETUP PC SETUP This TV provides Plug and Play capability, meaning that the PC adjusts automatically to use I Select the...
...the PC to the RGB IN (P C) jack on the TV. ( ) R 3 2 2 Connect the PC audio output to the AUDIO IN (RGB/DVI) jack on the remote control. 2 1 AUDIO RGB OUTPUT ( ) 33 I Turn on the PC and the TV. How to the TV's settings. VGA (D-Sub 15 pin) Connection 1. EXTERNAL ...EQUIPMENT SETUP PC SETUP This TV provides Plug and Play capability, meaning that the PC adjusts automatically to use I Select the...

Owner's Manual (English)
Page 34
... version 1.3. How to connect 1 Connect the DVI output of the PC to the HDMI/DVI IN 1, 2, or 3 jack on the TV. 2 Connect the PC audio output to HDMI Connection 1. I Turn on the TV. 2. EXTERNAL EQUIPMENT SETUP EXTERNAL EQUIPMENT SETUP DVI to the AUDIO IN (RGB/DVI) jack on the PC and the... TV. If the HDMI cables don't support HDMI version 1.3, it can cause flickers or no screen display. In this case use I ...
... version 1.3. How to connect 1 Connect the DVI output of the PC to the HDMI/DVI IN 1, 2, or 3 jack on the TV. 2 Connect the PC audio output to HDMI Connection 1. I Turn on the TV. 2. EXTERNAL EQUIPMENT SETUP EXTERNAL EQUIPMENT SETUP DVI to the AUDIO IN (RGB/DVI) jack on the PC and the... TV. If the HDMI cables don't support HDMI version 1.3, it can cause flickers or no screen display. In this case use I ...
Owner's Manual (English)
Page 41
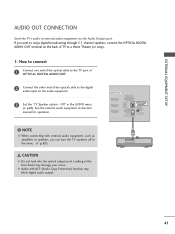
... OUT. 2 Connect the other end of the optical cable to the digital audio input on the back of TV to external audio equipment via the Audio Output port. If you can turn the TV speakers off in the AUDIO menu. (G p.87). NOTE G When connecting with ACP (Audio Copy Protection) ...function may damage your vision. EXTERNAL EQUIPMENT SETUP AUDIO OUT CONNECTION Send the TV's audio to a Home Theater (or amp). 1. Looking...
... OUT. 2 Connect the other end of the optical cable to the digital audio input on the back of TV to external audio equipment via the Audio Output port. If you can turn the TV speakers off in the AUDIO menu. (G p.87). NOTE G When connecting with ACP (Audio Copy Protection) ...function may damage your vision. EXTERNAL EQUIPMENT SETUP AUDIO OUT CONNECTION Send the TV's audio to a Home Theater (or amp). 1. Looking...

Owner's Manual (English)
Page 42
... from standby or off automatically. G p.78 Q.MENU Opens the list of time before your TV turns off to standby. G p.47 MENU Displays the main menu or clears all on the TV. G p.58-59 NUMBER button - (DASH) Used to the last channel viewed. G p.51 FLASHBK Tunes to enter a ... the SIMPLINK compatible devices. MENU MENU ENTER RETURN INFO AV MODE VOL MARK FAV P CH A G E MUTE 123 456 789 0 FLASHBK LIST 42 INPUT Rotates through inputs. G p.54 ENERGY SAVING Adjusts the Energy Saving. When you toggle this button, the SIMPLINK menu appears at the remote control...
... from standby or off automatically. G p.78 Q.MENU Opens the list of time before your TV turns off to standby. G p.47 MENU Displays the main menu or clears all on the TV. G p.58-59 NUMBER button - (DASH) Used to the last channel viewed. G p.51 FLASHBK Tunes to enter a ... the SIMPLINK compatible devices. MENU MENU ENTER RETURN INFO AV MODE VOL MARK FAV P CH A G E MUTE 123 456 789 0 FLASHBK LIST 42 INPUT Rotates through inputs. G p.54 ENERGY SAVING Adjusts the Energy Saving. When you toggle this button, the SIMPLINK menu appears at the remote control...

Owner's Manual (English)
Page 44
... switched on the remote control. I In standby mode to be away on TV (Except 32/42/47CL40). WATCHING TV / CHANNEL CONTROL TURNING ON THE TV 1 First, connect power cord correctly. The TV reverts to select a channel number. WATCHING TV / CHANNEL CONTROL CHANNEL SELECTION 1 Press the CH ( or ) or NUMBER buttons to standby mode. ! NOTE G If you intend...
... switched on the remote control. I In standby mode to be away on TV (Except 32/42/47CL40). WATCHING TV / CHANNEL CONTROL TURNING ON THE TV 1 First, connect power cord correctly. The TV reverts to select a channel number. WATCHING TV / CHANNEL CONTROL CHANNEL SELECTION 1 Press the CH ( or ) or NUMBER buttons to standby mode. ! NOTE G If you intend...
Owner's Manual (English)
Page 45
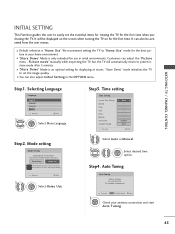
...be displayed on the screen when turning the TV on for the first time. Step1. Selecting Language Language English Español Français Previous Next 1 ENTER Select Menu Language. We recommend setting the TV to set the essential items for viewing the TV for use in retail environments....your antenna connection and start Auto Tuning. 45 Mode setting Mode Setting Selecting the environment. To use this TV at stores. Store Demo Home Use Select [Home Use] to use this TV at home. Step4. It can adjust the "Picture menu - I "Store Demo" Mode is only ...
...be displayed on the screen when turning the TV on for the first time. Step1. Selecting Language Language English Español Français Previous Next 1 ENTER Select Menu Language. We recommend setting the TV to set the essential items for viewing the TV for use in retail environments....your antenna connection and start Auto Tuning. 45 Mode setting Mode Setting Selecting the environment. To use this TV at stores. Store Demo Home Use Select [Home Use] to use this TV at home. Step4. It can adjust the "Picture menu - I "Store Demo" Mode is only ...
Owner's Manual (English)
Page 47
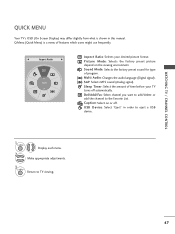
...Aspect Ratio G A 16:9 Aspect Ratio: Selects your TV turns off . Make appropriate adjustments. 3 Q. SAP: Selects MTS sound (Analog signal). Sleep Timer: Select the amount of time before your desired picture format. MENU 2 Display each menu. WATCHING TV / CHANNEL CONTROL QUICK MENU Your TV's OSD (On Screen Display) may differ slightly from ... Return to the Favorite List. Del/Add/Fav: Select channel you want to add/delete or add the channel to TV viewing. 47 Q.Menu (Quick Menu) is shown in order to eject a USB device. 1Q. USB Device: Select "Eject" in this...
...Aspect Ratio G A 16:9 Aspect Ratio: Selects your TV turns off . Make appropriate adjustments. 3 Q. SAP: Selects MTS sound (Analog signal). Sleep Timer: Select the amount of time before your desired picture format. MENU 2 Display each menu. WATCHING TV / CHANNEL CONTROL QUICK MENU Your TV's OSD (On Screen Display) may differ slightly from ... Return to the Favorite List. Del/Add/Fav: Select channel you want to add/delete or add the channel to TV viewing. 47 Q.Menu (Quick Menu) is shown in order to eject a USB device. 1Q. USB Device: Select "Eject" in this...
Owner's Manual (English)
Page 51
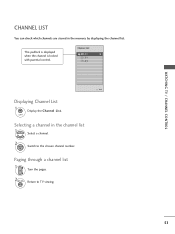
Paging through a channel list 1 P CH A G E Turn the pages. 2RETURN Return to the chosen channel number. This padlock is displayed when the channel is locked with parental control. Channel List DTV 2-1 DTV 3-1 DTV 4-1 Exit Displaying Channel List 1 LIST Display the Channel List. Selecting a channel in the memory by displaying the channel list. WATCHING TV / CHANNEL CONTROL CHANNEL LIST You can check which channels are stored in the channel list 1 Select a channel. 2 ENTER Switch to TV viewing. 51
Paging through a channel list 1 P CH A G E Turn the pages. 2RETURN Return to the chosen channel number. This padlock is displayed when the channel is locked with parental control. Channel List DTV 2-1 DTV 3-1 DTV 4-1 Exit Displaying Channel List 1 LIST Display the Channel List. Selecting a channel in the memory by displaying the channel list. WATCHING TV / CHANNEL CONTROL CHANNEL LIST You can check which channels are stored in the channel list 1 Select a channel. 2 ENTER Switch to TV viewing. 51
Owner's Manual (English)
Page 52
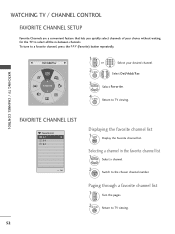
...list. F Del/Add/Fav G A Favorite 1 123 P CH A G E or 456 789 0 Select your choice without waiting for the TV to the chosen channel number. Selecting a channel in the favorite channel list 1 Select a channel. 2 ENTER Switch to select all the in-...between channels. To tune to TV viewing. MENU Return to a favorite channel, press the F A V (Favorite) button repeatedly. Paging through a favorite channel list 1 P CH A G E Turn the pages. 2RETURN Return to TV viewing. 52 MENU Select Del/Add/Fav. 3 Select Favorite. ...
...list. F Del/Add/Fav G A Favorite 1 123 P CH A G E or 456 789 0 Select your choice without waiting for the TV to the chosen channel number. Selecting a channel in the favorite channel list 1 Select a channel. 2 ENTER Switch to select all the in-...between channels. To tune to TV viewing. MENU Return to a favorite channel, press the F A V (Favorite) button repeatedly. Paging through a favorite channel list 1 P CH A G E Turn the pages. 2RETURN Return to TV viewing. 52 MENU Select Del/Add/Fav. 3 Select Favorite. ...


