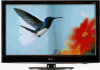
Owners Manual
Page 6
...47 Input List 48 Input Label 49 AV Mode 50 SIMPLINK 51 USB Entry Modes 54 Photo List 55 Music List 59 PICTURE CONTROL Picture Size (Aspect Ratio) Control 62 Picture Wizard 64 Preset Picture Settings (Picture Mode 66 Manual Picture Adjustment - CONTENTS WARNING / CAUTION 2 SAFETY INSTRUCTIONS 3... 23 VCR Setup 25 Other A/V Source Setup 27 USB Connection 28 Audio out Connection 29 PC Setup 30 WATCHING TV / CHANNEL CONTROL Remote Control Functions 36 Turning On TV 38 Channel Selection 38 Volume Adjustment 38 Initial Setting 39 On-Screen Menus Selection 40 Quick Menu 41 ...
...47 Input List 48 Input Label 49 AV Mode 50 SIMPLINK 51 USB Entry Modes 54 Photo List 55 Music List 59 PICTURE CONTROL Picture Size (Aspect Ratio) Control 62 Picture Wizard 64 Preset Picture Settings (Picture Mode 66 Manual Picture Adjustment - CONTENTS WARNING / CAUTION 2 SAFETY INSTRUCTIONS 3... 23 VCR Setup 25 Other A/V Source Setup 27 USB Connection 28 Audio out Connection 29 PC Setup 30 WATCHING TV / CHANNEL CONTROL Remote Control Functions 36 Turning On TV 38 Channel Selection 38 Volume Adjustment 38 Initial Setting 39 On-Screen Menus Selection 40 Quick Menu 41 ...
Owners Manual
Page 9
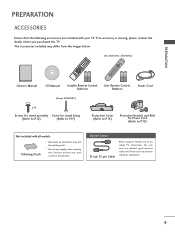
...POWER 1 4 7 5 8 TIMER 0 INPUT 9 FLASHBK RETURN VOL CH OK CH VOL 2 3 6 BED1 BED2 1.5V 1.5V Owner's Manual CD Manual Installer Remote Control, User Remote Control, Batteries Batteries Power Cord (Except 47LH300C) x 4 Screws for stand assembly Screw for stand fixing (Refer to P.12) (Refer to P.17) Protection Cover (Refer...accessory is missing, please contact the dealer where you purchased the TV. Option Extras D-sub 15 pin Cable When using the VGA (D-sub 15 pin cable) PC connection, the user must use shielded signal interface cables with ferrite cores to P.15) Not ...
...POWER 1 4 7 5 8 TIMER 0 INPUT 9 FLASHBK RETURN VOL CH OK CH VOL 2 3 6 BED1 BED2 1.5V 1.5V Owner's Manual CD Manual Installer Remote Control, User Remote Control, Batteries Batteries Power Cord (Except 47LH300C) x 4 Screws for stand assembly Screw for stand fixing (Refer to P.12) (Refer to P.17) Protection Cover (Refer...accessory is missing, please contact the dealer where you purchased the TV. Option Extras D-sub 15 pin Cable When using the VGA (D-sub 15 pin cable) PC connection, the user must use shielded signal interface cables with ferrite cores to P.15) Not ...

Owners Manual
Page 10
..., 26LH210C INPUT Button POWER Button MENU Button ENTER Button VOLUME CHANNEL (-, +) Buttons (E,D) Buttons INPUT MENU ENTER VOL CH 32LH210C, 32/37/42LH200C, 42/47LH300C SPEAKER Remote Control Sensor, Power/Standby Indicator Illuminates red in the OPTION menu. Illuminates blue when the TV is switched on. (Can be adjusted using the Power Indicator...
..., 26LH210C INPUT Button POWER Button MENU Button ENTER Button VOLUME CHANNEL (-, +) Buttons (E,D) Buttons INPUT MENU ENTER VOL CH 32LH210C, 32/37/42LH200C, 42/47LH300C SPEAKER Remote Control Sensor, Power/Standby Indicator Illuminates red in the OPTION menu. Illuminates blue when the TV is switched on. (Can be adjusted using the Power Indicator...
Owners Manual
Page 11
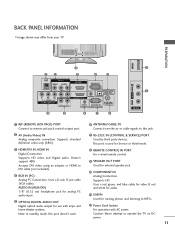
... 8 REMOTE CONTROL IN PORT For a wired remote control. 9 SPEAKER OUT PORT Used for external speaker jack. 10 COMPONENT IN Analog Connection. Supports HD. Uses a red, green, and blue cable for video & red and white for audio. 11 USB IN Used for Service or Hotel mode. 3 HDMI/DVI IN, HDMI IN Digital... 5 OPTICAL DIGITAL AUDIO OUT Digital optical audio output for use with AC power. Supports HD video and Digital audio. Uses a D-sub 15 pin cable (VGA cable). Caution: Never attempt to DVI cable (not included). 4 RGB IN (PC) Analog PC Connection. PREPARATION USB IN 12 1 2 RJP AV IN...
... 8 REMOTE CONTROL IN PORT For a wired remote control. 9 SPEAKER OUT PORT Used for external speaker jack. 10 COMPONENT IN Analog Connection. Supports HD. Uses a red, green, and blue cable for video & red and white for audio. 11 USB IN Used for Service or Hotel mode. 3 HDMI/DVI IN, HDMI IN Digital... 5 OPTICAL DIGITAL AUDIO OUT Digital optical audio output for use with AC power. Supports HD video and Digital audio. Uses a D-sub 15 pin cable (VGA cable). Caution: Never attempt to DVI cable (not included). 4 RGB IN (PC) Analog PC Connection. PREPARATION USB IN 12 1 2 RJP AV IN...
Owners Manual
Page 20
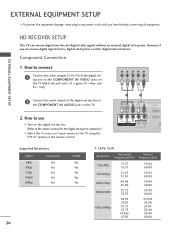
... set -top box to the COMPONENT IN VIDEO jacks on the remote control. 1 2 RJP AV IN 1 VIDEO AUDIO 2 L(MONO) R 1 VIDEO COMPONENT IN L AUDIO R L R SPEAKER OUT /DVI IN REMO CONTRO Supported Resolutions Signal Component 480i Yes 480p Yes 720p Yes 1080i Yes 1080p Yes HDMI No Yes Yes Yes Yes 20 Y, CB/PB, CR/PR...
... set -top box to the COMPONENT IN VIDEO jacks on the remote control. 1 2 RJP AV IN 1 VIDEO AUDIO 2 L(MONO) R 1 VIDEO COMPONENT IN L AUDIO R L R SPEAKER OUT /DVI IN REMO CONTRO Supported Resolutions Signal Component 480i Yes 480p Yes 720p Yes 1080i Yes 1080p Yes HDMI No Yes Yes Yes Yes 20 Y, CB/PB, CR/PR...
Owners Manual
Page 21
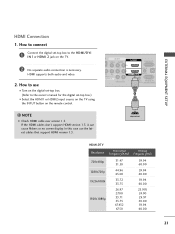
...AV IN 1 VIDEO AUDIO 2 L(MONO) R 1 DEO ONENT IN L AUDIO R L R SPEAKER OUT RGB IN (PC) AUDIO IN O /DVI IN (RGB/DVI) REMOTE RS-232C IN CONTROL IN (CONTROL&SERVICE) 1 HDMI OUTPUT HDMI-DTV Resolution Horizontal Vertical Frequency(KHz) Frequency(Hz) 720x480p 1280x720p 1920x1080i 1920x1080p 31.47 31.50 44.96 45.00 33.72 33.75...24.00 29.97 30.00 59.94 60.00 21 In this case use I Turn on the digital set -top box.) I N 1or HDMI 2 jack on the remote control. ! How to connect 1 Connect the digital set-top box to the owner's manual for the digital set -top box. (Refer to the...
...AV IN 1 VIDEO AUDIO 2 L(MONO) R 1 DEO ONENT IN L AUDIO R L R SPEAKER OUT RGB IN (PC) AUDIO IN O /DVI IN (RGB/DVI) REMOTE RS-232C IN CONTROL IN (CONTROL&SERVICE) 1 HDMI OUTPUT HDMI-DTV Resolution Horizontal Vertical Frequency(KHz) Frequency(Hz) 720x480p 1280x720p 1920x1080i 1920x1080p 31.47 31.50 44.96 45.00 33.72 33.75...24.00 29.97 30.00 59.94 60.00 21 In this case use I Turn on the digital set -top box.) I N 1or HDMI 2 jack on the remote control. ! How to connect 1 Connect the digital set-top box to the owner's manual for the digital set -top box. (Refer to the...
Owners Manual
Page 22
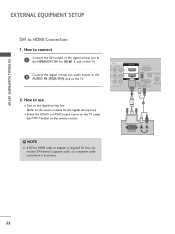
...digital set -top box.) I Turn on the TV. 2. How to HDMI cable or adapter is necessary. AV IN 1 O AUDIO 2 L(MONO) R 1 L AUDIO R L R SPEAKER OUT RGB IN (PC) AUDIO IN /DVI IN (RGB/DVI) OPTICAL DIGIT AUDIO OUT REMOTE RS-232C IN ACNATBELNENIAN CONTROL IN (CONTROL&SERVICE) 1 2 ! NOTE G A DVI to use I Select the... HDMI1 or HDMI2 input source on the TV using the INPUT button on the remote control. DVI OUTPUT L R AUDIO 22 DVI doesn't support audio, so a separate audio connection is required for the digital set -top box audio output...
...digital set -top box.) I Turn on the TV. 2. How to HDMI cable or adapter is necessary. AV IN 1 O AUDIO 2 L(MONO) R 1 L AUDIO R L R SPEAKER OUT RGB IN (PC) AUDIO IN /DVI IN (RGB/DVI) OPTICAL DIGIT AUDIO OUT REMOTE RS-232C IN ACNATBELNENIAN CONTROL IN (CONTROL&SERVICE) 1 2 ! NOTE G A DVI to use I Select the... HDMI1 or HDMI2 input source on the TV using the INPUT button on the remote control. DVI OUTPUT L R AUDIO 22 DVI doesn't support audio, so a separate audio connection is required for the digital set -top box audio output...
Owners Manual
Page 23
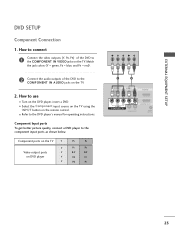
EXTERNAL EQUIPMENT SETUP DVD SETUP Component Connection 1. How to use I Turn on the remote control. I Refer to the COMPONENT IN VIDEO jacks on the TV. Match the jack colors (Y = green, PB = blue, and PR = red). 2 Connect the audio outputs of ... player Y Y PB PR PB PR B-Y R-Y Cb Cr Pb Pr Y PB PR L R 1 2 RJP AV IN 1 VIDEO AUDIO 2 L(MONO) R 1 VIDEO COMPONENT IN L AUDIO R L R SPEAKER OUT /DVI IN REMOT CONTRO 23 How to connect 1 Connect the video outputs (Y, PB, PR) of the DVD to the component input ports as shown below. I Select the Component...
EXTERNAL EQUIPMENT SETUP DVD SETUP Component Connection 1. How to use I Turn on the remote control. I Refer to the COMPONENT IN VIDEO jacks on the TV. Match the jack colors (Y = green, PB = blue, and PR = red). 2 Connect the audio outputs of ... player Y Y PB PR PB PR B-Y R-Y Cb Cr Pb Pr Y PB PR L R 1 2 RJP AV IN 1 VIDEO AUDIO 2 L(MONO) R 1 VIDEO COMPONENT IN L AUDIO R L R SPEAKER OUT /DVI IN REMOT CONTRO 23 How to connect 1 Connect the video outputs (Y, PB, PR) of the DVD to the component input ports as shown below. I Select the Component...
Owners Manual
Page 24
... player's manual for operating instructions. In this case use I Turn on the remote control. HDMI OUTPUT 24 HDMI supports both audio and video. 2. NOTE G Check HDMI cable over version 1.3. If the HDMI cables don't support HDMI version 1.3, it can cause flickers or no screen display. I Select the ..., insert a DVD. How to use I Refer to the HDMI/DVI IN 1or HDMI 2 jack on the remote control. How to connect 1 Connect the HDMI output of the DVD to the DVD player's manual for operating instructions. HDMI Connection 1. RJP AV IN 1 VIDEO AUDIO 2 L(MONO) ...
... player's manual for operating instructions. In this case use I Turn on the remote control. HDMI OUTPUT 24 HDMI supports both audio and video. 2. NOTE G Check HDMI cable over version 1.3. If the HDMI cables don't support HDMI version 1.3, it can cause flickers or no screen display. I Select the ..., insert a DVD. How to use I Refer to the HDMI/DVI IN 1or HDMI 2 jack on the remote control. How to connect 1 Connect the HDMI output of the DVD to the DVD player's manual for operating instructions. HDMI Connection 1. RJP AV IN 1 VIDEO AUDIO 2 L(MONO) ...

Owners Manual
Page 26
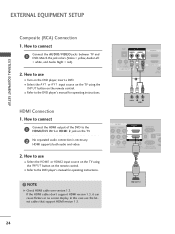
... press PLAY on the VCR. (Refer to the VCR owner's manual.) I Select the A V 1 or A V 2 input source on the TV using the INPUT button on the remote control. ! PREPARATION PREPARATION Composite (RCA) Connection 1.
... press PLAY on the VCR. (Refer to the VCR owner's manual.) I Select the A V 1 or A V 2 input source on the TV using the INPUT button on the remote control. ! PREPARATION PREPARATION Composite (RCA) Connection 1.

Owners Manual
Page 27
USB IN Camcorder Video Game Set VIDEO L R 1 VIDEO L/MONO AUDIO R AV IN 2 27 Match the jack colors. (Video = yellow, Audio Left = white, and Audio Right = red) 2. How to use I Operate the corresponding external equipment. How to connect 1 Connect the AUDIO/VIDEO jacks between TV and external equipment. PREPARATION OTHER A/V SOURCE SETUP 1. I Select the A V 1 or A V 2 input source on the TV using the INPUT button on the remote control.
USB IN Camcorder Video Game Set VIDEO L R 1 VIDEO L/MONO AUDIO R AV IN 2 27 Match the jack colors. (Video = yellow, Audio Left = white, and Audio Right = red) 2. How to use I Operate the corresponding external equipment. How to connect 1 Connect the AUDIO/VIDEO jacks between TV and external equipment. PREPARATION OTHER A/V SOURCE SETUP 1. I Select the A V 1 or A V 2 input source on the TV using the INPUT button on the remote control.
Owners Manual
Page 29
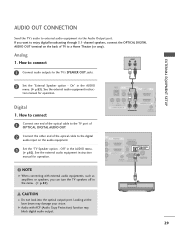
... IN 1 VIDEO AUDIO 2 L(MONO) R 1 VIDEO COMPONENT IN L AUDIO R L R SPEAKER OUT AU (RG /DVI IN REMOTE CONTROL IN (C O 2 R 1 R R OUT RGB IN (PC) AUDIO IN OPTICAL DIGITAL AUDIO OUT /DVI IN (RGB/DVI) 1 REMOTE ANTENNA/ RS-232C IN CABLE IN CONTROL IN (CONTROL&SERVICE) 2 CAUTION G Do not look into the optical output port. Off " in the AUDIO...
... IN 1 VIDEO AUDIO 2 L(MONO) R 1 VIDEO COMPONENT IN L AUDIO R L R SPEAKER OUT AU (RG /DVI IN REMOTE CONTROL IN (C O 2 R 1 R R OUT RGB IN (PC) AUDIO IN OPTICAL DIGITAL AUDIO OUT /DVI IN (RGB/DVI) 1 REMOTE ANTENNA/ RS-232C IN CABLE IN CONTROL IN (CONTROL&SERVICE) 2 CAUTION G Do not look into the optical output port. Off " in the AUDIO...
Owners Manual
Page 30
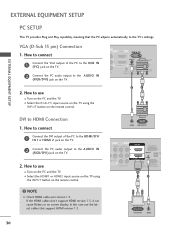
... over version 1.3. How to HDMI Connection 1. If the HDMI cables don't support HDMI version 1.3, it can cause flickers or no screen display. I Select the HDMI1 or HDMI2 input source on the TV using the INPUT button on the remote control. 2 1 DVI to use I Turn on the TV. 2. VGA (D-Sub 15 pin) Connection ...1. How to the AUDIO IN (RGB/DVI) jack on the PC and the TV. How to connect 1 Connect the VGA output of the PC to the HDMI/DVI I N 1or HDMI 2 jack on the TV....
... over version 1.3. How to HDMI Connection 1. If the HDMI cables don't support HDMI version 1.3, it can cause flickers or no screen display. I Select the HDMI1 or HDMI2 input source on the TV using the INPUT button on the remote control. 2 1 DVI to use I Turn on the TV. 2. VGA (D-Sub 15 pin) Connection ...1. How to the AUDIO IN (RGB/DVI) jack on the PC and the TV. How to connect 1 Connect the VGA output of the PC to the HDMI/DVI I N 1or HDMI 2 jack on the TV....
Owners Manual
Page 36
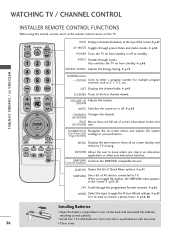
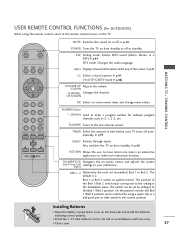
.... G p.46 MARK Select the input to enter a program number for multiple program channels such as 2-1, 2-2, etc. WATCHING TV / CHANNEL CONTROL WATCHING TV / CHANNEL CONTROL INSTALLER REMOTE CONTROL FUNCTIONS When using the remote control, aim it at the remote control sensor on -screen menus and adjusts the system (Up/Down/Left Right/ENTER) settings to your preference. UP/DOWN...
.... G p.46 MARK Select the input to enter a program number for multiple program channels such as 2-1, 2-2, etc. WATCHING TV / CHANNEL CONTROL WATCHING TV / CHANNEL CONTROL INSTALLER REMOTE CONTROL FUNCTIONS When using the remote control, aim it at the remote control sensor on -screen menus and adjusts the system (Up/Down/Left Right/ENTER) settings to your preference. UP/DOWN...
Owners Manual
Page 37
...standby. The default is 2. The position of time before your preference. Installing Batteries I Close cover. 37 I Install two 1.5V AAA batteries. USER REMOTE CONTROL FUNCTIONS (For 26/32LH210C) When using a paper clip or a ball point pen to slide switch to the correct position. G p.87 (*In DTV/...volume. /DOWN CHANNEL Changes the channel. Don't mix old or used batteries with new ones. BED1, 2 Determines the code set by using the remote control, aim it to the last channel viewed. SAP Analog mode: Selects MTS sound (Mono, Stereo, or a SAP) G p.84 DTV mode: Changes...
...standby. The default is 2. The position of time before your preference. Installing Batteries I Close cover. 37 I Install two 1.5V AAA batteries. USER REMOTE CONTROL FUNCTIONS (For 26/32LH210C) When using a paper clip or a ball point pen to slide switch to the correct position. G p.87 (*In DTV/...volume. /DOWN CHANNEL Changes the channel. Don't mix old or used batteries with new ones. BED1, 2 Determines the code set by using the remote control, aim it to the last channel viewed. SAP Analog mode: Selects MTS sound (Mono, Stereo, or a SAP) G p.84 DTV mode: Changes...
Owners Manual
Page 38
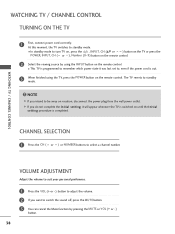
...to turn TV on, press the , INPUT, CH (DE or ) button on the TV or press the POWER, INPUT, CH ( or ), Number (0~9) button on the remote control. 2 Select the viewing source by pressing the MUTE or VOL (+ or -) button. 38 G If you want to , even if the power cord is completed. I In... standby mode to be away on the remote control. The TV reverts to select a channel number. VOLUME ADJUSTMENT Adjust the volume to suit your personal preference. 1 Press the VOL (+ or -) button to standby mode...
...to turn TV on, press the , INPUT, CH (DE or ) button on the TV or press the POWER, INPUT, CH ( or ), Number (0~9) button on the remote control. 2 Select the viewing source by pressing the MUTE or VOL (+ or -) button. 38 G If you want to , even if the power cord is completed. I In... standby mode to be away on the remote control. The TV reverts to select a channel number. VOLUME ADJUSTMENT Adjust the volume to suit your personal preference. 1 Press the VOL (+ or -) button to standby mode...
Owners Manual
Page 51
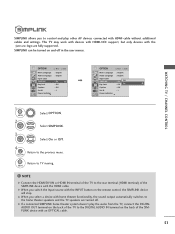
SIMPLINK allows you switch the Input source with the INPUT button on the remote control, the SIMPLINK device will stop. WATCHING TV / CHANNEL CONTROL OPTION Menu Language Audio Language Input Label SIMPLINK Key Lock Caption Set ID Power Indicator E Move Enter : English : English : On : Off : Off : 1 OPTION...SIMPLINK home theater system doesn't play other AV devices connected with the logo are turned off in the user menus. NOTE G Connect the HDMI/DVI IN or HDMI IN terminal of the TV to the DIGITAL AUDIO IN terminal on and off . RETURN Return to the previous menu. G When you to...
SIMPLINK allows you switch the Input source with the INPUT button on the remote control, the SIMPLINK device will stop. WATCHING TV / CHANNEL CONTROL OPTION Menu Language Audio Language Input Label SIMPLINK Key Lock Caption Set ID Power Indicator E Move Enter : English : English : On : Off : Off : 1 OPTION...SIMPLINK home theater system doesn't play other AV devices connected with the logo are turned off in the user menus. NOTE G Connect the HDMI/DVI IN or HDMI IN terminal of the TV to the DIGITAL AUDIO IN terminal on and off . RETURN Return to the previous menu. G When you to...
Owners Manual
Page 55
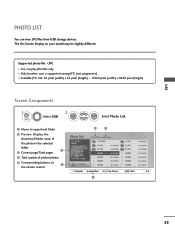
... folder 2 3 Current page/Total pages 4 Total number of marked photos 5 Corresponding buttons on your model may be slightly different. The On-Screen Display on 1 the remote control 3 4 Photo List Drive1 JMJ001 1366x768, 125KB Up Folder Page 2/3 No Marked Up Folder KY101 06/10/2008 KY102 04/03/2008 JMJ001 01/01/2000...
... folder 2 3 Current page/Total pages 4 Total number of marked photos 5 Corresponding buttons on your model may be slightly different. The On-Screen Display on 1 the remote control 3 4 Photo List Drive1 JMJ001 1366x768, 125KB Up Folder Page 2/3 No Marked Up Folder KY101 06/10/2008 KY102 04/03/2008 JMJ001 01/01/2000...
Owners Manual
Page 59
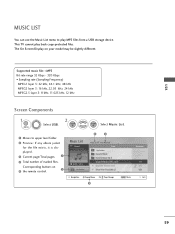
Corresponding buttons on your model may be slightly different. This TV cannot play MP3 files from a USB storage device. The On Screen Display on 5 the remote control. 1 Music List Drive1 3 4 Page 2/3 No Marked Title Up Folder A 00:00 / 04:16 Up Folder Navigation Popup Menu CH Page Change 5 Duration MARK Mark Exit ...
Corresponding buttons on your model may be slightly different. This TV cannot play MP3 files from a USB storage device. The On Screen Display on 5 the remote control. 1 Music List Drive1 3 4 Page 2/3 No Marked Title Up Folder A 00:00 / 04:16 Up Folder Navigation Popup Menu CH Page Change 5 Duration MARK Mark Exit ...

Owners Manual
Page 103
RETURN Return to prevent unauthorized viewing by locking out the front panel controls, so that it was last set to the previous menu. Key Lock' appears on the screen if any button on the remote control. I , INPUT, CH (DE or ) button on the TV or POWER, INPUT, CH ( ) or NUMBER buttons on the ...front panel is pressed while viewing the TV. PARENTAL CONTROL / RATING 103 KEY LOCK This feature can be used to TV viewing...
RETURN Return to prevent unauthorized viewing by locking out the front panel controls, so that it was last set to the previous menu. Key Lock' appears on the screen if any button on the remote control. I , INPUT, CH (DE or ) button on the TV or POWER, INPUT, CH ( ) or NUMBER buttons on the ...front panel is pressed while viewing the TV. PARENTAL CONTROL / RATING 103 KEY LOCK This feature can be used to TV viewing...

