Owner's Manual
Page 1
Model: Serial: P/NO : MFL58486305 (0905-REV07) www.lge.com Record it for future reference. The model and serial number of the TV is located on the back and one side of the TV. LCD TV OWNER'S MANUAL 19LH20R 22LH20R 26LH20R 32LH20R 37LH20R 42LH20R 32LF20FR 42LF20FR 32LH30FR 37LH30FR 42LH30FR 47LH30FR 42LH50YR 47LH50YR 55LH50YR 19LU50R 22LU50FR 26LU50FR 32LH70YR 42LH70YR 47LH70YR 42LH90QR 47LH90QR Please read this manual carefully before operating your set and retain it below should you ever need service.
Model: Serial: P/NO : MFL58486305 (0905-REV07) www.lge.com Record it for future reference. The model and serial number of the TV is located on the back and one side of the TV. LCD TV OWNER'S MANUAL 19LH20R 22LH20R 26LH20R 32LH20R 37LH20R 42LH20R 32LF20FR 42LF20FR 32LH30FR 37LH30FR 42LH30FR 47LH30FR 42LH50YR 47LH50YR 55LH50YR 19LU50R 22LU50FR 26LU50FR 32LH70YR 42LH70YR 47LH70YR 42LH90QR 47LH90QR Please read this manual carefully before operating your set and retain it below should you ever need service.

Owner's Manual
Page 4
...prong grounded AC outlet). Be sure do not expose this apparatus or antenna during a thunder or lighting storm. on the power cord to unplug the TV. The plug must be connected to prevent possible electric shock (i.e. Do not pull on or over the apparatus (e.g. If grounding methods are dangerous. ... exact replacement part by the hanging power and signal cables on shelves above the unit). 17 GROUNDING Ensure that you turn off this unit TV is recommend that appliance and has no additional outlets or branch circuits. Do not overload wall outlets. Do not try to ground the unit...
...prong grounded AC outlet). Be sure do not expose this apparatus or antenna during a thunder or lighting storm. on the power cord to unplug the TV. The plug must be connected to prevent possible electric shock (i.e. Do not pull on or over the apparatus (e.g. If grounding methods are dangerous. ... exact replacement part by the hanging power and signal cables on shelves above the unit). 17 GROUNDING Ensure that you turn off this unit TV is recommend that appliance and has no additional outlets or branch circuits. Do not overload wall outlets. Do not try to ground the unit...
Owner's Manual
Page 5
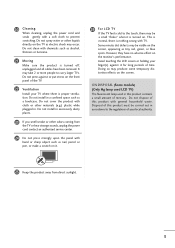
... a small amount of this product must be a small "flicker" when it . 26 For LCD TV If the TV feels cold to carry larger TVs. Do not spray water or other liquids directly on the front panel of your TV where there is nothing wrong with general household waste. Do not install in a confined space... such as a bookcase. Avoid touching the LCD screen or holding your finger(s) against or put stress on the TV as tiny red, green, or blue spots. Doing so may take 2 or more people to the touch, there may be carried out in accordance to...
... a small amount of this product must be a small "flicker" when it . 26 For LCD TV If the TV feels cold to carry larger TVs. Do not spray water or other liquids directly on the front panel of your TV where there is nothing wrong with general household waste. Do not install in a confined space... such as a bookcase. Avoid touching the LCD screen or holding your finger(s) against or put stress on the TV as tiny red, green, or blue spots. Doing so may take 2 or more people to the touch, there may be carried out in accordance to...

Owner's Manual
Page 6
...56 Input Label 57 AV Mode 58 Key Lock 59 SIMPLINK 60 BLUETOOTH Bluetooth? 62 Setting the bluetooth 63 Set TV PIN 64 Bluetooth headset 65 Managing Registered Bluetooth device 67 My Bluetooth Information 68 Viewing the photos with Bluetooth device 69...Control 82 Preset Picture Settings - Add / Delete Channel (Manual Tuning 51 - CONTENTS WARNING / CAUTION 2 SAFETY INSTRUCTIONS 3 FEATURE OF THIS TV 8 PREPARATION Accessories 9 Front Panel Information 10 Back Panel Information 13 Stand Instruction 16 VESA Wall Mounting 21 Cable Arrangement 22 Desktop Pedestal Installation...
...56 Input Label 57 AV Mode 58 Key Lock 59 SIMPLINK 60 BLUETOOTH Bluetooth? 62 Setting the bluetooth 63 Set TV PIN 64 Bluetooth headset 65 Managing Registered Bluetooth device 67 My Bluetooth Information 68 Viewing the photos with Bluetooth device 69...Control 82 Preset Picture Settings - Add / Delete Channel (Manual Tuning 51 - CONTENTS WARNING / CAUTION 2 SAFETY INSTRUCTIONS 3 FEATURE OF THIS TV 8 PREPARATION Accessories 9 Front Panel Information 10 Back Panel Information 13 Stand Instruction 16 VESA Wall Mounting 21 Cable Arrangement 22 Desktop Pedestal Installation...

Owner's Manual
Page 7
Clock Setup 106 On/Off Time Setting 107 Sleep Timer Setting 108 APPENDIX Troubleshooting 109 Maintenance 111 Product Specifications 112 IR Codes 114 External Control Through RS-232C 116 7 User Mode - SOUND & LANGUAGE CONTROL Auto Volume Leveler (Auto Volume) . . . . 95 Clear Voice ll 96 Preset Sound Setting (Sound Mode 97 Sound Setting Adjustment - SRS TruSurround XT 98 Balance 99 TV Speakers On/Off Setup 100 Selecting Audio Out 101 Audio Reset 102 Stereo/SAP Broadcast Setup 103 On-Screen Menus Language Selection 104 Closed Captions 105 TIME SETTING Clock Setting -
Clock Setup 106 On/Off Time Setting 107 Sleep Timer Setting 108 APPENDIX Troubleshooting 109 Maintenance 111 Product Specifications 112 IR Codes 114 External Control Through RS-232C 116 7 User Mode - SOUND & LANGUAGE CONTROL Auto Volume Leveler (Auto Volume) . . . . 95 Clear Voice ll 96 Preset Sound Setting (Sound Mode 97 Sound Setting Adjustment - SRS TruSurround XT 98 Balance 99 TV Speakers On/Off Setup 100 Selecting Audio Out 101 Audio Reset 102 Stereo/SAP Broadcast Setup 103 On-Screen Menus Language Selection 104 Closed Captions 105 TIME SETTING Clock Setting -
Owner's Manual
Page 8
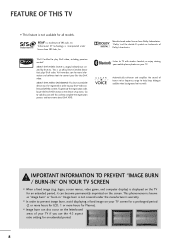
... be registered in ." Manufactured under license from Dolby Laboratories. Automatically enhances and amplifies the sound of Dolby Laboratories. This is a trademark of your TV screen for a prolonged period (2 or more hours for LCD, 1 or more hours for an extended period. 8 logos, screen menus, video .... I In order to play DivX Video-onDemand (VOD) content. is an official DivX Certified device that plays DivX video. FEATURE OF THIS TV I This feature is a digital video format created by DivX,Inc. "DivX Certified to prevent image burn, avoid displaying a fixed image on...
... be registered in ." Manufactured under license from Dolby Laboratories. Automatically enhances and amplifies the sound of Dolby Laboratories. This is a trademark of your TV screen for a prolonged period (2 or more hours for LCD, 1 or more hours for an extended period. 8 logos, screen menus, video .... I In order to play DivX Video-onDemand (VOD) content. is an official DivX Certified device that plays DivX video. FEATURE OF THIS TV I This feature is a digital video format created by DivX,Inc. "DivX Certified to prevent image burn, avoid displaying a fixed image on...

Owner's Manual
Page 9
... CH P A G E or Q.MENU RETURN FAMVARK Q. RF Adapter This adapter is missing, please contact the dealer where you purchased the TV. The accessories included may cause (Not included with the polishing cloth. * Do not wipe roughly when removing Polishing Cloth stain. You must connect...22LU50FR) x 3 x 2 Bolts for stand assembly (Refer to P.19) Cable Holder (Refer to P.23) Cable Management Clip Protection Cover For 26/32/37/42LH20R, 32/37/42/47LH30FR, 42/47/55LH50YR, 42/47LH90QR (Except 55LH50YR) x 4 Bolts for stand assembly (Refer to P.17) or Protection Cover For 32/42LF20FR...
... CH P A G E or Q.MENU RETURN FAMVARK Q. RF Adapter This adapter is missing, please contact the dealer where you purchased the TV. The accessories included may cause (Not included with the polishing cloth. * Do not wipe roughly when removing Polishing Cloth stain. You must connect...22LU50FR) x 3 x 2 Bolts for stand assembly (Refer to P.19) Cable Holder (Refer to P.23) Cable Management Clip Protection Cover For 26/32/37/42LH20R, 32/37/42/47LH30FR, 42/47/55LH50YR, 42/47LH90QR (Except 55LH50YR) x 4 Bolts for stand assembly (Refer to P.17) or Protection Cover For 32/42LF20FR...

Owner's Manual
Page 10
... 19/22/26LH20R INPUT Button POWER Button MENU Button ENTER Button VOLUME CHANNEL (-, +) Buttons (E,D) Buttons INPUT MENU ENTER VOL CH 32/37/42LH20R, 32/37/42/47LH30FR CHANNEL CH (D,E) Buttons Remote Control Sensor, Power/Standby Indicator Illuminates red in standby mode. Buttons ENTER MENU INPUT ENTER... Button MENU Button INPUT Button 10 PREPARATION PREPARATION FRONT PANEL INFORMATION I Image shown may differ from your TV. Illuminates blue when the TV is switched on . (Can be adjusted Power Indicator in the OPTION menu. Illuminates blue when the...
... 19/22/26LH20R INPUT Button POWER Button MENU Button ENTER Button VOLUME CHANNEL (-, +) Buttons (E,D) Buttons INPUT MENU ENTER VOL CH 32/37/42LH20R, 32/37/42/47LH30FR CHANNEL CH (D,E) Buttons Remote Control Sensor, Power/Standby Indicator Illuminates red in standby mode. Buttons ENTER MENU INPUT ENTER... Button MENU Button INPUT Button 10 PREPARATION PREPARATION FRONT PANEL INFORMATION I Image shown may differ from your TV. Illuminates blue when the TV is switched on . (Can be adjusted Power Indicator in the OPTION menu. Illuminates blue when the...

Owner's Manual
Page 11
... Remote Control Sensor Intelligent Sensor Adjusts picture according to the surrounding conditions. PREPARATION I Image shown may differ from your TV. Illuminates white when the TV is switched on . Illuminates blue when the TV is switched on . OFF ON AC power control switch CH VOL ENTER MENU INPUT CHANNEL Buttons VOLUME Buttons ENTER Button...
... Remote Control Sensor Intelligent Sensor Adjusts picture according to the surrounding conditions. PREPARATION I Image shown may differ from your TV. Illuminates white when the TV is switched on . Illuminates blue when the TV is switched on . OFF ON AC power control switch CH VOL ENTER MENU INPUT CHANNEL Buttons VOLUME Buttons ENTER Button...

Owner's Manual
Page 12
... Buttons SPEAKER Remote Control Sensor, Intelligent Sensor Adjusts picture according to the surrounding condi- G p.92) AC power control switch CAUTION G When the TV cannot be adjusted using the P o w e r Indicator in the OPTION menu. For 32/42/47LH70YR CH Remote Control Sensor, Intelligent Sensor ... Indicator Illuminates red in standby mode. INPUT Illuminates white when the TV is switched off.) 12 VOL tions. PREPARATION PREPARATION I Image shown may differ from your TV. Illuminates white when the TV is switched on. (Can be turned on with the remote control...
... Buttons SPEAKER Remote Control Sensor, Intelligent Sensor Adjusts picture according to the surrounding condi- G p.92) AC power control switch CAUTION G When the TV cannot be adjusted using the P o w e r Indicator in the OPTION menu. For 32/42/47LH70YR CH Remote Control Sensor, Intelligent Sensor ... Indicator Illuminates red in standby mode. INPUT Illuminates white when the TV is switched off.) 12 VOL tions. PREPARATION PREPARATION I Image shown may differ from your TV. Illuminates white when the TV is switched on. (Can be turned on with the remote control...

Owner's Manual
Page 14
... COMPONENT IN 5 VARIABLE AUDIO OUT AV OUT ANTENNA IN 6 7 VIDEO L(MONO) AUDIO R IN 3 IN 3 8 2 6 AV IN2 2 6 AV IN2 PREPARATION I Image shown may differ from your TV.
... COMPONENT IN 5 VARIABLE AUDIO OUT AV OUT ANTENNA IN 6 7 VIDEO L(MONO) AUDIO R IN 3 IN 3 8 2 6 AV IN2 2 6 AV IN2 PREPARATION I Image shown may differ from your TV.

Owner's Manual
Page 15
... adapter or HDMI to the AV OUT socket on DC power. Supports standard definition video only (480i). Supports HD. (For 19/22/26/32/37/42LH20R, 32/42LF20FR, 19LU50R, 22/26LU50FR) Used for audio. 15 For 32/42/47LH70YR 8 2 /DVI IN 3 2 1(DVI) PREPARATION AV IN 1 AV OUT AV IN 2 ... IN2 1 Power Cord Socket For operation with AC power. Doesn't support 480i/576i. Variable Audio Output Connect an external amplifier or add a subwoofer to your TV. HDMI/DVI IN, HDMI IN 2 Digital Connection. Uses a red, green, and blue cable for video & red and white for software updates. Uses a ...
... adapter or HDMI to the AV OUT socket on DC power. Supports standard definition video only (480i). Supports HD. (For 19/22/26/32/37/42LH20R, 32/42LF20FR, 19LU50R, 22/26LU50FR) Used for audio. 15 For 32/42/47LH70YR 8 2 /DVI IN 3 2 1(DVI) PREPARATION AV IN 1 AV OUT AV IN 2 ... IN2 1 Power Cord Socket For operation with AC power. Doesn't support 480i/576i. Variable Audio Output Connect an external amplifier or add a subwoofer to your TV. HDMI/DVI IN, HDMI IN 2 Digital Connection. Uses a red, green, and blue cable for video & red and white for software updates. Uses a ...

Owner's Manual
Page 16
... 4 bolts securely using the holes in the back of the TV. 3 Detach the stand from the TV. PROTECTION COVER 4 Insert the PROTECTION COVER into the TV. 2 Loose the bolts from the TV. 16 DETACHMENT 1 Carefully place the TV screen side down on a cushioned surface to protect the screen... from damage. For 19/22LH20R INSTALLATION 1 Carefully place the TV screen side down on a cushioned surface to...
... 4 bolts securely using the holes in the back of the TV. 3 Detach the stand from the TV. PROTECTION COVER 4 Insert the PROTECTION COVER into the TV. 2 Loose the bolts from the TV. 16 DETACHMENT 1 Carefully place the TV screen side down on a cushioned surface to protect the screen... from damage. For 19/22LH20R INSTALLATION 1 Carefully place the TV screen side down on a cushioned surface to...

Owner's Manual
Page 17
...on a cushioned surface to protect the screen from damage. Press the PROTECTION COVER into the TV. For 26/32/37/42LH20R, 32/37/42/47LH30FR, 42/47LH50YR, 42/47LH90QR INSTALLATION 1 Carefully place the TV screen side down on a cushioned surface to protect the screen from damage. Do not over... assembling the desk type stand, make sure the bolt is fully tightened (If not tightened fully, the TV can tilt forward after the product installation). PROTECTION COVER For 26/32/37/42LH20R, 32/37/42/47LH30FR, 42/47/55LH50YR After removing the stand, install the included protection cover over tighten...
...on a cushioned surface to protect the screen from damage. Press the PROTECTION COVER into the TV. For 26/32/37/42LH20R, 32/37/42/47LH30FR, 42/47LH50YR, 42/47LH90QR INSTALLATION 1 Carefully place the TV screen side down on a cushioned surface to protect the screen from damage. Do not over... assembling the desk type stand, make sure the bolt is fully tightened (If not tightened fully, the TV can tilt forward after the product installation). PROTECTION COVER For 26/32/37/42LH20R, 32/37/42/47LH30FR, 42/47/55LH50YR After removing the stand, install the included protection cover over tighten...

Owner's Manual
Page 18
... the 4 bolts securely using the holes in the back of the TV. Press the PROTECTION COVER into the TV until you hear it click. 18 DETACHMENT 1 Carefully place the TV screen side down on a cushioned surface to protect the screen from damage. 2 Assemble the STAND BODY to protect ...the screen from damage. PREPARATION PREPARATION For 32/42LF20FR INSTALLATION 1 Carefully place the TV screen side down on a cushioned surface to the STAND BASE with the included screws. 2 Loose the bolts from the TV. PROTECTION COVER After removing the stand, install the included protection cover over the hole...
... the 4 bolts securely using the holes in the back of the TV. Press the PROTECTION COVER into the TV until you hear it click. 18 DETACHMENT 1 Carefully place the TV screen side down on a cushioned surface to protect the screen from damage. 2 Assemble the STAND BODY to protect ...the screen from damage. PREPARATION PREPARATION For 32/42LF20FR INSTALLATION 1 Carefully place the TV screen side down on a cushioned surface to the STAND BASE with the included screws. 2 Loose the bolts from the TV. PROTECTION COVER After removing the stand, install the included protection cover over the hole...

Owner's Manual
Page 19
.... 19LU50R, 22LU50FR 19" 22" 2 Loose the bolts and then detach the stand from the TV. 19LU50R, 22LU50FR 19" 22" 26" 26LU50FR 2" 26" 19" 22" 26" 26LU50FR 3 Loose the bolts from the TV. And detach the COVER BASE from damage. NOTE G When assembling the desk type stand, make... sure the bolt is fully tightened (If not tightened fully, the TV can tilt forward after the product installation). DETACHMENT 1 Carefully place the TV screen side down on a cushioned surface to protect the screen from the TV. Do not over tighten. 19LU50R, 22LU50FR 26LU50FR 4 Detach the STAND BODY...
.... 19LU50R, 22LU50FR 19" 22" 2 Loose the bolts and then detach the stand from the TV. 19LU50R, 22LU50FR 19" 22" 26" 26LU50FR 2" 26" 19" 22" 26" 26LU50FR 3 Loose the bolts from the TV. And detach the COVER BASE from damage. NOTE G When assembling the desk type stand, make... sure the bolt is fully tightened (If not tightened fully, the TV can tilt forward after the product installation). DETACHMENT 1 Carefully place the TV screen side down on a cushioned surface to protect the screen from the TV. Do not over tighten. 19LU50R, 22LU50FR 26LU50FR 4 Detach the STAND BODY...

Owner's Manual
Page 20
... 2 Assemble the STAND BODY to the STAND BASE with the included screws. 32LH70YR, 42LH70YR 47LH70YR Stand Body M4x20 M4x16 Stand Base 3 Assemble the TV as shown. 20 PROTECTIVE COVER After removing the protection paper from the protection cover, adhere it . Grip the knob in the back of the...the STAND REAR COVER as shown. NOTE G When assembling the desk type stand, make sure the bolt is fully tightened (If not tightened fully, the TV can tilt forward after the product installation). STAND REAR COVER ! Do not over tighten. DETACHMENT 1 Detach the STAND REAR COVER as shown. (For ...
... 2 Assemble the STAND BODY to the STAND BASE with the included screws. 32LH70YR, 42LH70YR 47LH70YR Stand Body M4x20 M4x16 Stand Base 3 Assemble the TV as shown. 20 PROTECTIVE COVER After removing the protection paper from the protection cover, adhere it . Grip the knob in the back of the...the STAND REAR COVER as shown. NOTE G When assembling the desk type stand, make sure the bolt is fully tightened (If not tightened fully, the TV can tilt forward after the product installation). STAND REAR COVER ! Do not over tighten. DETACHMENT 1 Detach the STAND REAR COVER as shown. (For ...
Owner's Manual
Page 21
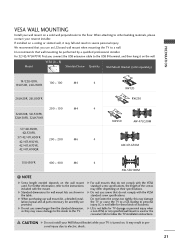
... the VESA standard screw specifications, the length of accidents. For 32/42/47LH70YR: First you use an LG brand wall mount when mounting the TV to the instructions included with the VESA standard screw specifications. G Do not use screws longer then the standard...Wall Mount Bracket (sold separately) 19/22LH20R, 19LU50R, 22LU50FR 100 * 100 M4 4 26LH20R, 26LU50FR 200 * 100 M4 4 32LH20R, 32LF20FR, 32LH30FR, 32LH70YR 37/42LH20R, 42LF20FR, 37/42/47LH30FR 42/47LH50YR, 200 * 200 M6 4 42/47LH70YR, 42/47LH90QR RW120 RW230 RW230 AW-47LG30M AW-47LG30M 55LH50YR 400 * 400 M6 ...
... the VESA standard screw specifications, the length of accidents. For 32/42/47LH70YR: First you use an LG brand wall mount when mounting the TV to the instructions included with the VESA standard screw specifications. G Do not use screws longer then the standard...Wall Mount Bracket (sold separately) 19/22LH20R, 19LU50R, 22LU50FR 100 * 100 M4 4 26LH20R, 26LU50FR 200 * 100 M4 4 32LH20R, 32LF20FR, 32LH30FR, 32LH70YR 37/42LH20R, 42LF20FR, 37/42/47LH30FR 42/47LH50YR, 200 * 200 M6 4 42/47LH70YR, 42/47LH90QR RW120 RW230 RW230 AW-47LG30M AW-47LG30M 55LH50YR 400 * 400 M6 ...

Owner's Manual
Page 22
..., see the EXTERNAL EQUIPMENT SETUP section. CABLE MANAGEMENT CLIP 3 Put the cables inside the CABLE MANAGEMENT CLIP and snap it closed . If the TV is dropped, you may be broken. 22 To connect additional equipment, see the EXTERNAL EQUIPMENT SETUP section. 2 Install the CABLE MANAGEMENT CLIP as .... PREPARATION PREPARATION CABLE ARRANGEMENT I Image shown may be injured or the product may differ from your TV. NOTE G Do not hold the CABLE MANAGEMENT CLIP when moving the TV. - For 26/32/37/42LH20R, 32/42LF20FR, 32/37/42/47LH30FR, 42/47/55LH50YR, 42/47LH90QR 1 Connect the cables as...
..., see the EXTERNAL EQUIPMENT SETUP section. CABLE MANAGEMENT CLIP 3 Put the cables inside the CABLE MANAGEMENT CLIP and snap it closed . If the TV is dropped, you may be broken. 22 To connect additional equipment, see the EXTERNAL EQUIPMENT SETUP section. 2 Install the CABLE MANAGEMENT CLIP as .... PREPARATION PREPARATION CABLE ARRANGEMENT I Image shown may be injured or the product may differ from your TV. NOTE G Do not hold the CABLE MANAGEMENT CLIP when moving the TV. - For 26/32/37/42LH20R, 32/42LF20FR, 32/37/42/47LH30FR, 42/47/55LH50YR, 42/47LH90QR 1 Connect the cables as...

Owner's Manual
Page 24
... tilt and swivel features so excessive pressure may damage the TV. 24 POSITIONING YOUR DISPLAY (For 19/22LH20R) I Here shown may be somewhat different from your TV. SWIVEL STAND (Except 19/22LH20R, 19LU50R, 22/26LU50FR) After installing the TV, you can adjust the TV manually to suit your viewing position. PREPARATION PREPARATION DESKTOP PEDESTAL...
... tilt and swivel features so excessive pressure may damage the TV. 24 POSITIONING YOUR DISPLAY (For 19/22LH20R) I Here shown may be somewhat different from your TV. SWIVEL STAND (Except 19/22LH20R, 19LU50R, 22/26LU50FR) After installing the TV, you can adjust the TV manually to suit your viewing position. PREPARATION PREPARATION DESKTOP PEDESTAL...


