
Owners Manual
Page 1
Lifds Good LCD TV OWNER'S MANUAL 26LH210C 32LH210C 26LH200C 32LH200C 37LH200C 42LH200C 42LH300C 47LH300C Please read this manual carefully before operating your set and retain it below should you ever need service. Model: This product qualifies for ENERGYSTAR. 1 -800-243-0000 1 -888-865-...
Lifds Good LCD TV OWNER'S MANUAL 26LH210C 32LH210C 26LH200C 32LH200C 37LH200C 42LH200C 42LH300C 47LH300C Please read this manual carefully before operating your set and retain it below should you ever need service. Model: This product qualifies for ENERGYSTAR. 1 -800-243-0000 1 -888-865-...

Owners Manual
Page 4
... of these conditions could result in a door, or walked upon a dedicated circuit; Do not expose to dripping or splashing and do not expose this owner's manual to be certain. a TV with liquids, such as being twisted, kinked, pinched, closed in fire or electric shock. Do not make sure not to fall...
... of these conditions could result in a door, or walked upon a dedicated circuit; Do not expose to dripping or splashing and do not expose this owner's manual to be certain. a TV with liquids, such as being twisted, kinked, pinched, closed in fire or electric shock. Do not make sure not to fall...
Owners Manual
Page 6
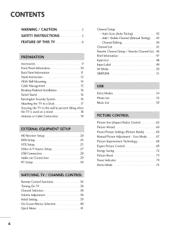
Add / Delete Channel (Manual Tuning) ...... 43 - User Mode .......... 67 Picture Improvement Technology 68 Expert Picture Control 69 Energy ...54 Photo List 55 Music List 59 Picture Size (Aspect Ratio) Control 62 Picture Wizard 64 Preset Picture Settings (Picture Mode 66 Manual Picture Adjustment - CONTENTS WARNING / CAUTION 2 SAFETY INSTRUCTIONS 3 FEATURE OF THIS TV 8 Accessories 9 Front Panel Information 10 Back Panel... 19 HD Receiver Setup 20 DVD Setup 23 VCR Setup 25 Other A/V Source Setup 27 USB Connection 28 Audio out Connection 29 PC Setup 30 Channel Setup -
Add / Delete Channel (Manual Tuning) ...... 43 - User Mode .......... 67 Picture Improvement Technology 68 Expert Picture Control 69 Energy ...54 Photo List 55 Music List 59 Picture Size (Aspect Ratio) Control 62 Picture Wizard 64 Preset Picture Settings (Picture Mode 66 Manual Picture Adjustment - CONTENTS WARNING / CAUTION 2 SAFETY INSTRUCTIONS 3 FEATURE OF THIS TV 8 Accessories 9 Front Panel Information 10 Back Panel... 19 HD Receiver Setup 20 DVD Setup 23 VCR Setup 25 Other A/V Source Setup 27 USB Connection 28 Audio out Connection 29 PC Setup 30 Channel Setup -

Owners Manual
Page 7
Digital Broadcasting System Captions ........ 88 - Manual Clock Setup 91 Auto On/Off Time Setting 92 Sleep Timer Setting 93 ' Set Password & Lock System 94 Channel Blocking 97 Movie & TV Rating 98 ...
Digital Broadcasting System Captions ........ 88 - Manual Clock Setup 91 Auto On/Off Time Setting 92 Sleep Timer Setting 93 ' Set Password & Lock System 94 Channel Blocking 97 Movie & TV Rating 98 ...
Owners Manual
Page 9
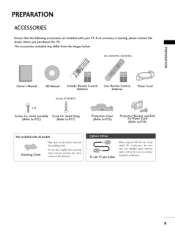
...an accessory is missing, please contact the dealer where you purchased the TV. D-sub 15 pin Cable When using the VGA (D-sub 15 pin cable) PC connection, the user must use shielded signal interface cables with your TV. PREPARATION ACCESSORIES Ensure... differ from the images below. The accessories included may cause scratch or discoloration. "O _o r_l (For 26LH210C, 32LH210C) _o © z Owner's Manual CD Manual \\ Installer Remote Control, Batteries User Remote Control, Batteries Power Cord (Except 47LH300C) x4 Screws for stand assembly Screw for stand fixing (Refer to P....
...an accessory is missing, please contact the dealer where you purchased the TV. D-sub 15 pin Cable When using the VGA (D-sub 15 pin cable) PC connection, the user must use shielded signal interface cables with your TV. PREPARATION ACCESSORIES Ensure... differ from the images below. The accessories included may cause scratch or discoloration. "O _o r_l (For 26LH210C, 32LH210C) _o © z Owner's Manual CD Manual \\ Installer Remote Control, Batteries User Remote Control, Batteries Power Cord (Except 47LH300C) x4 Screws for stand assembly Screw for stand fixing (Refer to P....

Owners Manual
Page 16
...a clearance of the Kensington company. KENSINGTONSECURITYSYSTEM ,,,IThis feature is an optional accessory. Connect the Kensington Security System cable as notebook PCs and LCD projectors. PREPARATION DESKTOP PEDESTALINSTALLATION ,,,IImage shown may differ from the wall. -0 _o l'rl 4 inches _o 4 inches 4 inches 4 inches... © z SWIVELSTAND After installing the TV, you can adjust the TV set manually to the left or right direction by 20 degrees to the user's guide provided with a Kensington Security System connector on all models....
...a clearance of the Kensington company. KENSINGTONSECURITYSYSTEM ,,,IThis feature is an optional accessory. Connect the Kensington Security System cable as notebook PCs and LCD projectors. PREPARATION DESKTOP PEDESTALINSTALLATION ,,,IImage shown may differ from the wall. -0 _o l'rl 4 inches _o 4 inches 4 inches 4 inches... © z SWIVELSTAND After installing the TV, you can adjust the TV set manually to the left or right direction by 20 degrees to the user's guide provided with a Kensington Security System connector on all models....

Owners Manual
Page 20
... any power cords until you do receive digital signals from a digital set-top box or other digital external device. XD top box to the owner's manual for the digital set-top box operation.) Select the Component input source on the TV using the INPUT button on the remote control. How to...
... any power cords until you do receive digital signals from a digital set-top box or other digital external device. XD top box to the owner's manual for the digital set-top box operation.) Select the Component input source on the TV using the INPUT button on the remote control. How to...

Owners Manual
Page 21
How to use 01T_urn on the digital set -top box.) 01S_elect the HDMI1 or HDMI2 input source on the TV using m the INPUT button on the remote control. the HDMI/DVI m X m O No separate audio connection is necessary. C HDMI-DTV 26.97 2ZOO 33.71 33.75 6Z432 6Z50 23.976 24.00 29.97 30.00 59.94 60.00 21 How to connect O INon1noerct HtDheMIdig2itajal csketo-tnoptheboTxVto. HDMI Connection 1. z HDMI supports both audio and video. m z (Refer to the owner's manual for the digital set -top box. m _D C 2.
How to use 01T_urn on the digital set -top box.) 01S_elect the HDMI1 or HDMI2 input source on the TV using m the INPUT button on the remote control. the HDMI/DVI m X m O No separate audio connection is necessary. C HDMI-DTV 26.97 2ZOO 33.71 33.75 6Z432 6Z50 23.976 24.00 29.97 30.00 59.94 60.00 21 How to connect O INon1noerct HtDheMIdig2itajal csketo-tnoptheboTxVto. HDMI Connection 1. z HDMI supports both audio and video. m z (Refer to the owner's manual for the digital set -top box. m _D C 2.

Owners Manual
Page 22
to m _o z m X:) O CAUonDnIOect tIhNe (dRigGitBa/lDVsl)et-topjacbkoxon atuhdeio TVo.utput to the owner's manual for the digital set-top box.) 01S_elect the HDMI1 or HDMI2 input source on the TV using the INPUT button on the remote control. 22 How to use c "O 01T_urn on the digital set-top box. (Refer to the c i "O m z m 2. How to HDMI Connection 1. EXTERNALEQUIPMENT SETUP DVI to connect m x CthoennHeDcMt I/tDheVl DVI IoNutp1uotr HofDMthIe d2igijtaacl ksoent-ttohpe bToVx.
to m _o z m X:) O CAUonDnIOect tIhNe (dRigGitBa/lDVsl)et-topjacbkoxon atuhdeio TVo.utput to the owner's manual for the digital set-top box.) 01S_elect the HDMI1 or HDMI2 input source on the TV using the INPUT button on the remote control. 22 How to use c "O 01T_urn on the digital set-top box. (Refer to the c i "O m z m 2. How to HDMI Connection 1. EXTERNALEQUIPMENT SETUP DVI to connect m x CthoennHeDcMt I/tDheVl DVI IoNutp1uotr HofDMthIe d2igijtaacl ksoent-ttohpe bToVx.

Owners Manual
Page 23
... (Y = green, PB = blue, and PR = red). How to use -t 01T_urn on the TV. _0 c z -t 2. z O Connect the audio outputs of the DVD to the DVD player's manual for operating instructions. c 0_Select the Component input source on the TV using the INPUT button on DVD player 23 Component Input ports To get better...
... (Y = green, PB = blue, and PR = red). How to use -t 01T_urn on the TV. _0 c z -t 2. z O Connect the audio outputs of the DVD to the DVD player's manual for operating instructions. c 0_Select the Component input source on the TV using the INPUT button on DVD player 23 Component Input ports To get better...

Owners Manual
Page 24
... TV using the INPUT button on the remote control. O No separated audio connection is necessary. How to the DVD player's manual for operating instructions. 24 How to connect O Connect the AUDIO/VIDEO jacks between TV and DVD. Match the jack colors (Video... = yellow, Audio Left m x = white, and Audio Right = red). m c -O HDMI Connection 1. m _o z 2. HDMI supports both audio and video. 2. EXTERNALEQUIPMENT SETUP Composite (RCA) Connection 1. How to connect O CHoDnMneI/cDtVI the HINDM1IorouHtpDuMt I of2thjeackDVoDn tthoe thTeV.
... TV using the INPUT button on the remote control. O No separated audio connection is necessary. How to the DVD player's manual for operating instructions. 24 How to connect O Connect the AUDIO/VIDEO jacks between TV and DVD. Match the jack colors (Video... = yellow, Audio Left m x = white, and Audio Right = red). m c -O HDMI Connection 1. m _o z 2. HDMI supports both audio and video. 2. EXTERNALEQUIPMENT SETUP Composite (RCA) Connection 1. How to connect O CHoDnMneI/cDtVI the HINDM1IorouHtpDuMt I of2thjeackDVoDn tthoe thTeV.

Owners Manual
Page 25
et on the VCR. (Refer to the ANTENNA/CABLE IN sock- How to connect O Connect the RF antenna out socket of the VCR. 2. How to use 01S_et VCR output switch to 3 or 4 and then tune TV to the same channel number. 01_Insert a video tape into the VCR and press PLAY on the TV. O Connect the antenna cable to the RF antenna in socket of the VCR to the VCR owner's manual.) m x m _o z m XD c "O m z m c Wall Jack "O Antenna 25 VCR SETUP Antenna Connection 1.
et on the VCR. (Refer to the ANTENNA/CABLE IN sock- How to connect O Connect the RF antenna out socket of the VCR. 2. How to use 01S_et VCR output switch to 3 or 4 and then tune TV to the same channel number. 01_Insert a video tape into the VCR and press PLAY on the TV. O Connect the antenna cable to the RF antenna in socket of the VCR to the VCR owner's manual.) m x m _o z m XD c "O m z m c Wall Jack "O Antenna 25 VCR SETUP Antenna Connection 1.

Owners Manual
Page 26
How to use 01I_nsert a video tape into the VCR and press PLAY on the VCR. (Refer to connect © z O Connect the AUDIO/VIDEO jacks between TV and VCR. How to the VCR owner's manual.) 01S0e1l_ect the AV 1 or AV2 input source on the TV using the INPUT button on the remote control. 26 Match the jack colors (Video = yellow, Audio Left = white, and Audio Right = red). 2. PREPARATION Composite (RCA) Connection m 1.
How to use 01I_nsert a video tape into the VCR and press PLAY on the VCR. (Refer to connect © z O Connect the AUDIO/VIDEO jacks between TV and VCR. How to the VCR owner's manual.) 01S0e1l_ect the AV 1 or AV2 input source on the TV using the INPUT button on the remote control. 26 Match the jack colors (Video = yellow, Audio Left = white, and Audio Right = red). 2. PREPARATION Composite (RCA) Connection m 1.

Owners Manual
Page 29
Analog r_l 1. On" in the AUDIO menu. (_ p.82). See the external audio equipment instruction manual for operation. r_l c O Set the "External Speaker option - O Set the "TV Speaker option - r_l z tion manual for operation. 29 r_l c Digital 1. Off" in the AUDIO menu. (_ p.83). How to connect x r_l z O Connect audio outputs to external audio equipment...
Analog r_l 1. On" in the AUDIO menu. (_ p.82). See the external audio equipment instruction manual for operation. r_l c O Set the "External Speaker option - O Set the "TV Speaker option - r_l z tion manual for operation. 29 r_l c Digital 1. Off" in the AUDIO menu. (_ p.83). How to connect x r_l z O Connect audio outputs to external audio equipment...

Owners Manual
Page 33
Select Yes. Select Screen (RGB-PC). Start Auto Configuration. 01_If the position of the image is still not correct, try Auto adjustment again. 011If_ picture needs to be adjusted again after Auto adjustment in RGB-PC, you can adjust the Position, Phase. Size or 33 After adjustment, if the image is still not correct, try using the manual settings or a different resolution or refresh rate on the PC. Select Auto Config.. r'_ x m z m c m z m c Select PICTURE. Auto Configure Automatically adjusts picture position and minimizes image instability.
Select Yes. Select Screen (RGB-PC). Start Auto Configuration. 01_If the position of the image is still not correct, try Auto adjustment again. 011If_ picture needs to be adjusted again after Auto adjustment in RGB-PC, you can adjust the Position, Phase. Size or 33 After adjustment, if the image is still not correct, try using the manual settings or a different resolution or refresh rate on the PC. Select Auto Config.. r'_ x m z m c m z m c Select PICTURE. Auto Configure Automatically adjusts picture position and minimizes image instability.

Owners Manual
Page 34
..., or Phase. Make appropriate adjustments. 01_Position: This function is not clear after auto adjustment and especially if characters are still trembling, adjust the picture phase manually. This feature operates only in RGB-PC mode.
..., or Phase. Make appropriate adjustments. 01_Position: This function is not clear after auto adjustment and especially if characters are still trembling, adjust the picture phase manually. This feature operates only in RGB-PC mode.

Owners Manual
Page 39
Picture mode" manually while inspecting the TV, but the TV will be activated from the user menus. 01_Default selection is an optimal setting for the first time when ... automatically return to "Home Use" mode for the best picture in your antenna connection and start Auto Tuning. 39 N -r" z Step1. Mode setting Select Auto or Manual. We recommend setting the TV to preset instore mode after 5 minutes. 0_"Store Demo" Mode is "Home Use". "Store Demo" mode initializes the TV to...
Picture mode" manually while inspecting the TV, but the TV will be activated from the user menus. 01_Default selection is an optimal setting for the first time when ... automatically return to "Home Use" mode for the best picture in your antenna connection and start Auto Tuning. 39 N -r" z Step1. Mode setting Select Auto or Manual. We recommend setting the TV to preset instore mode after 5 minutes. 0_"Store Demo" Mode is "Home Use". "Store Demo" mode initializes the TV to...

Owners Manual
Page 40
WATCHING TV / CHANNEL CONTROL ON-SCREENMENUSSELECTION Your TV's OSD (On Screen Display) may differ slightly from that shown in this manual. -r" z i < N -r" > Z Z fT1 N 0 Z I I _m 0 Display each menu. Accept the current selection. Select a menu item. Return to TV viewing. 40
WATCHING TV / CHANNEL CONTROL ON-SCREENMENUSSELECTION Your TV's OSD (On Screen Display) may differ slightly from that shown in this manual. -r" z i < N -r" > Z Z fT1 N 0 Z I I _m 0 Display each menu. Accept the current selection. Select a menu item. Return to TV viewing. 40

Owners Manual
Page 41
... z add the channel to TV viewing. 41 Q.Menu (Quick Menu) is shown in order to eject a USB N device. -r > z z fT1 N © Z © Return to the Favorite List. [_ Caption: Select on or off. < !_ USB Device: Select "Eject" in this manual. Aspect Ratio: Selects your desired picture format. [] Picture Mode: Selects the desired preset picture setting...
... z add the channel to TV viewing. 41 Q.Menu (Quick Menu) is shown in order to eject a USB N device. -r > z z fT1 N © Z © Return to the Favorite List. [_ Caption: Select on or off. < !_ USB Device: Select "Eject" in this manual. Aspect Ratio: Selects your desired picture format. [] Picture Mode: Selects the desired preset picture setting...

Owners Manual
Page 42
... hours. Also, make sure to run this function if you can store is subject to allow a channel search. 01W_ hen setting the Auto tuning or Manual tuning, the number of DTV, TV, CADTV and CATV. 42 Select Auto Tuning. It is 1000. Use the password you set up in the order...
... hours. Also, make sure to run this function if you can store is subject to allow a channel search. 01W_ hen setting the Auto tuning or Manual tuning, the number of DTV, TV, CADTV and CATV. 42 Select Auto Tuning. It is 1000. Use the password you set up in the order...


