
Owners Manual
Page 1
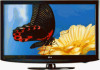
... consumption that could exceed the limits necessary to quality for ENERGY STAR in the "factory default (Home Use)" setting. Lifds Good LCD TV OWNER'S MANUAL 26LH210C 32LH210C 26LH200C 32LH200C 37LH200C 42LH200C 42LH300C 47LH300C Please read this manual carefully before operating your set and retain it below should you ever need service. u,_s_,_, usa...
... consumption that could exceed the limits necessary to quality for ENERGY STAR in the "factory default (Home Use)" setting. Lifds Good LCD TV OWNER'S MANUAL 26LH210C 32LH210C 26LH200C 32LH200C 37LH200C 42LH200C 42LH300C 47LH300C Please read this manual carefully before operating your set and retain it below should you ever need service. u,_s_,_, usa...

Owners Manual
Page 2
...to which are designed to the point of the FCC Rules. However, there is connected. -Consult the dealer or an experienced radio/TV technician for compliance could void the user's authority to operate this product to operate the equipment. This device complies with the instructions,... any way without written authorization from that the cable ground shall be determined by turning the equipment off and on a circuit different from LG Electronics. Any changes or modifications in a particular installation. Connect the equipment to an outlet on , the user is subject to the ...
...to which are designed to the point of the FCC Rules. However, there is connected. -Consult the dealer or an experienced radio/TV technician for compliance could void the user's authority to operate this product to operate the equipment. This device complies with the instructions,... any way without written authorization from that the cable ground shall be determined by turning the equipment off and on a circuit different from LG Electronics. Any changes or modifications in a particular installation. Connect the equipment to an outlet on , the user is subject to the ...

Owners Manual
Page 4
... or electrical shock, do not drop onto the screen with a three-prong grounded AC plug must remain readily operable. Do not touch the TV with an exact replacement part by connecting it is recommend that is the disconnecting device. Do not install this owner's manual to ground the ...possible, install a separate Do not try to be connected to dripping or splashing and do grasp the plug when unplugging the power cord. a TV with something. 0 CAUTION concerning the Power Cord: It is not disconnected from physical or mechanical abuse, such as gasoline or candles or expose the...
... or electrical shock, do not drop onto the screen with a three-prong grounded AC plug must remain readily operable. Do not touch the TV with an exact replacement part by connecting it is recommend that is the disconnecting device. Do not install this owner's manual to ground the ...possible, install a separate Do not try to be connected to dripping or splashing and do grasp the plug when unplugging the power cord. a TV with something. 0 CAUTION concerning the Power Cord: It is not disconnected from physical or mechanical abuse, such as gasoline or candles or expose the...

Owners Manual
Page 5
.../NFPA 70 Ground Clamp Antenna Lead in the vicinity of the lead-in . O For LCD TV If the TV feels cold to carry larger TVs. This is normal, there is proper ventilation. Avoid touching the LCD screen or holding your TV where there is nothing wrong with chemicals such as to grounding electrodes and requirements for...
.../NFPA 70 Ground Clamp Antenna Lead in the vicinity of the lead-in . O For LCD TV If the TV feels cold to carry larger TVs. This is normal, there is proper ventilation. Avoid touching the LCD screen or holding your TV where there is nothing wrong with chemicals such as to grounding electrodes and requirements for...
Owners Manual
Page 6
...Picture Reset 73 Power Indicator 74 Demo Mode 75 Remote Control Functions 36 Turning On TV 38 Channel Selection 38 Volume Adjustment 38 Initial Setting 39 On-Screen Menus Selection 40...Mode 66 Manual Picture Adjustment - CONTENTS WARNING / CAUTION 2 SAFETY INSTRUCTIONS 3 FEATURE OF THIS TV 8 Accessories 9 Front Panel Information 10 Back Panel Information 11 Stand Instruction 12 VESA Wall Mounting... 16 Kensington Security System 16 Attaching the TV to a Desk 17 Securing the TV to the wall to prevent falling when the TV is used on a stand 18 Antenna...
...Picture Reset 73 Power Indicator 74 Demo Mode 75 Remote Control Functions 36 Turning On TV 38 Channel Selection 38 Volume Adjustment 38 Initial Setting 39 On-Screen Menus Selection 40...Mode 66 Manual Picture Adjustment - CONTENTS WARNING / CAUTION 2 SAFETY INSTRUCTIONS 3 FEATURE OF THIS TV 8 Accessories 9 Front Panel Information 10 Back Panel Information 11 Stand Instruction 12 VESA Wall Mounting... 16 Kensington Security System 16 Attaching the TV to a Desk 17 Securing the TV to the wall to prevent falling when the TV is used on a stand 18 Antenna...

Owners Manual
Page 7
... Manual Clock Setup 91 Auto On/Off Time Setting 92 Sleep Timer Setting 93 ' Set Password & Lock System 94 Channel Blocking 97 Movie & TV Rating 98 Downloadable Rating 101 External Input Blocking 102 Key Lock 103 Troubleshooting 104 Maintenance 106 Product Specifications 107 IR Codes 108 External Control Through... RS-232C 110 Open Source License 116 7 User Mode 79 Balance 80 Audio Reset 81 TV Speakers On/Off Setup 82 External Speakers On/Off Setup 83 Stereo/SAP Broadcasts Setup 84 Audio Language 85 On-Screen Menus Language ...
... Manual Clock Setup 91 Auto On/Off Time Setting 92 Sleep Timer Setting 93 ' Set Password & Lock System 94 Channel Blocking 97 Movie & TV Rating 98 Downloadable Rating 101 External Input Blocking 102 Key Lock 103 Troubleshooting 104 Maintenance 106 Product Specifications 107 IR Codes 108 External Control Through... RS-232C 110 Open Source License 116 7 User Mode 79 Balance 80 Audio Reset 81 TV Speakers On/Off Setup 82 External Speakers On/Off Setup 83 Stereo/SAP Broadcasts Setup 84 Audio Language 85 On-Screen Menus Language ...

Owners Manual
Page 8
... "and the double-D symbol are trademarks or registered trademarks of Dolby Laboratories. H.-_ml HDMI, the HDMI logo and High-Definition Multimedia Interface are trademarks of HDMI Licensing LLC." It allows the viewer to inquire about an ISF certified technician. It ...TV contains the detailed calibrations necessary for a more film-like experience 8 The resulting ISF "day" and "night" modes will then be made through the ISFccc mode. srs@ TruSurround XT S rS0_ is a trademark of the film for professional certification by the user to experience the best their LG HDTV...
... "and the double-D symbol are trademarks or registered trademarks of Dolby Laboratories. H.-_ml HDMI, the HDMI logo and High-Definition Multimedia Interface are trademarks of HDMI Licensing LLC." It allows the viewer to inquire about an ISF certified technician. It ...TV contains the detailed calibrations necessary for a more film-like experience 8 The resulting ISF "day" and "night" modes will then be made through the ISFccc mode. srs@ TruSurround XT S rS0_ is a trademark of the film for professional certification by the user to experience the best their LG HDTV...
Owners Manual
Page 9
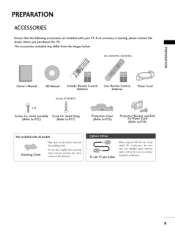
... removing stain, Excessive pressure may differ from the images below. The accessories included may cause scratch or discoloration. D-sub 15 pin Cable When using the VGA (D-sub 15 pin cable) PC connection, the user must use shielded signal interface cables with ferrite cores to R15) Not included with all models Polishing...
... removing stain, Excessive pressure may differ from the images below. The accessories included may cause scratch or discoloration. D-sub 15 pin Cable When using the VGA (D-sub 15 pin cable) PC connection, the user must use shielded signal interface cables with ferrite cores to R15) Not included with all models Polishing...

Owners Manual
Page 10
...Button ENTER VOLUME CHANNEL z POWER Button Button (-, +) Buttons (V,A) Buttons iiii!:iiii iii!ii!iiii!i_iii_ii_ililii!_i!i_:i 32LH210C, 32/37/42LH200C, 42/47LH300C SPEAKER Remote Control Sensor, Power/Standby Indicator llluminates red in the OPTION menu. _ p.74) lliMii!iiiiii_i!ii llliiiiiiiii_Hi|_ilii]... llMiiiii_I iiiii_i_ii i'[i[[[[[::[ Iliiiiiiiiiliiiii_ii/i ]]I_l; llluminates blue when the TV is switched on. (Can be adjusted usin_ the Power Indicator in standby mode. PREPARATION FRONT PANELINFORMATION _ Image shown may differ...
...Button ENTER VOLUME CHANNEL z POWER Button Button (-, +) Buttons (V,A) Buttons iiii!:iiii iii!ii!iiii!i_iii_ii_ililii!_i!i_:i 32LH210C, 32/37/42LH200C, 42/47LH300C SPEAKER Remote Control Sensor, Power/Standby Indicator llluminates red in the OPTION menu. _ p.74) lliMii!iiiiii_i!ii llliiiiiiiii_Hi|_ilii]... llMiiiii_I iiiii_i_ii i'[i[[[[[::[ Iliiiiiiiiiliiiii_ii/i ]]I_l; llluminates blue when the TV is switched on. (Can be adjusted usin_ the Power Indicator in standby mode. PREPARATION FRONT PANELINFORMATION _ Image shown may differ...
Owners Manual
Page 11
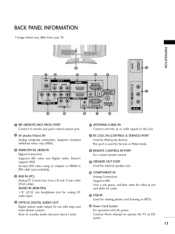
...HDMI IN Digital Connection. @ REMOTE CONTROL IN PORT For a wired remote control. "O _o m _o © z @ RJP(REMOTE JACK PACK) PORT Connect to remote jack pack control output port. @ ANTENNA/CABLE IN Connect over-the air or cable signals to DVl cable (not included). @ RGB IN (PC) Analog PC Connection. (VGA... PC audio input. OPTICAL DIGITAL AUDIO OUT Digital optical audio output for use with amps and home theater systems. @ USB IN Used for viewing photos and listening to operate the TV on DC power. 11 Note: In standby mode, this jack. @ AV (Audio/Video) IN Analog composite connection....
...HDMI IN Digital Connection. @ REMOTE CONTROL IN PORT For a wired remote control. "O _o m _o © z @ RJP(REMOTE JACK PACK) PORT Connect to remote jack pack control output port. @ ANTENNA/CABLE IN Connect over-the air or cable signals to DVl cable (not included). @ RGB IN (PC) Analog PC Connection. (VGA... PC audio input. OPTICAL DIGITAL AUDIO OUT Digital optical audio output for use with amps and home theater systems. @ USB IN Used for viewing photos and listening to operate the TV on DC power. 11 Note: In standby mode, this jack. @ AV (Audio/Video) IN Analog composite connection....
Owners Manual
Page 12
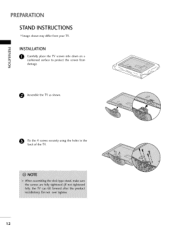
z Assemble the TV as shown. Fix the 4 screws securely using the holes in the back of the TV. 12 INSTALLATION m O Carefully place the TV screen side down on a cushioned surface to protect the screen from your TV. PREPARATION STAND INSTRUCTIONS _ Image shown may differ from © damage.
z Assemble the TV as shown. Fix the 4 screws securely using the holes in the back of the TV. 12 INSTALLATION m O Carefully place the TV screen side down on a cushioned surface to protect the screen from your TV. PREPARATION STAND INSTRUCTIONS _ Image shown may differ from © damage.
Owners Manual
Page 13
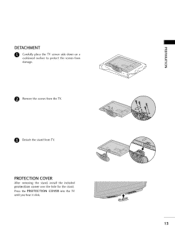
Press the PROTECTION COVER into the TV until you hear it click. 13 C) Z 0 Remove the screws from damage. PROTECTION COVER After removing the stand, install the included protection cover over the hole for the stand. DETACHMENT O Carefully place the TV screen side down on a cushioned surface to protect the screen from the TV. Detach the stand from TV.
Press the PROTECTION COVER into the TV until you hear it click. 13 C) Z 0 Remove the screws from damage. PROTECTION COVER After removing the stand, install the included protection cover over the hole for the stand. DETACHMENT O Carefully place the TV screen side down on a cushioned surface to protect the screen from the TV. Detach the stand from TV.

Owners Manual
Page 14
... that you use an LG brand wall mount when mounting the TV to a wall. If installed on a solid wall perpendicular to other building materials, please contact your wall mount on a ceiling or slanted wall, it may fall ...
... that you use an LG brand wall mount when mounting the TV to a wall. If installed on a solid wall perpendicular to other building materials, please contact your wall mount on a ceiling or slanted wall, it may fall ...

Owners Manual
Page 15
O ut the cables inside the CABLE MANAGEMENT CLIP and snap it closed. -O _o _o © z PROTECTIVE BRACKET CABLE MANAGEMENT CLIP 15 CABLEMANAGEMENT ,,,IImage shown may differ from being removed by accident. It will help prevent the power cable from your TV. 0 Connect the cables as shown. Secure the power cable with the PROTECTIVE BRACKET and SCREW as necessary. O Install the CABLE MANAGEMENT CLIP as shown. To connect additional equipment, see the EXTERNAL EQUIPMENT SETUP section.
O ut the cables inside the CABLE MANAGEMENT CLIP and snap it closed. -O _o _o © z PROTECTIVE BRACKET CABLE MANAGEMENT CLIP 15 CABLEMANAGEMENT ,,,IImage shown may differ from being removed by accident. It will help prevent the power cable from your TV. 0 Connect the cables as shown. Secure the power cable with the PROTECTIVE BRACKET and SCREW as necessary. O Install the CABLE MANAGEMENT CLIP as shown. To connect additional equipment, see the EXTERNAL EQUIPMENT SETUP section.

Owners Manual
Page 16
... can adjust the TV set manually to the left or right direction by 20 degrees to the user's guide provided with a Kensington Security System connector on all models. - Connect the Kensington Security System cable as notebook PCs and LCD projectors. z_ _ _ _Y 16 For the ...detailed installation and use of the Kensington company. For further information, contact http://www.kensington.com, the internet homepage of the Kensington Security System, refer to suit your TV. NOTE: The Kensington Security ...
... can adjust the TV set manually to the left or right direction by 20 degrees to the user's guide provided with a Kensington Security System connector on all models. - Connect the Kensington Security System cable as notebook PCs and LCD projectors. z_ _ _ _Y 16 For the ...detailed installation and use of the Kensington company. For further information, contact http://www.kensington.com, the internet homepage of the Kensington Security System, refer to suit your TV. NOTE: The Kensington Security ...

Owners Manual
Page 17
The TV must be attached to a desk so it cannot be pulled in a forward/backward direction, potentially causing injury or damaging the product. _e m Stand _e © z g 4-Screws (not provided as parts of the product) Desk (Except 47LH300C) 1-Screw (provided as parts of the product) Stand Desk 17 ATTACHING THE TV TO A DESK ""_Image shown may differ from your TV.
The TV must be attached to a desk so it cannot be pulled in a forward/backward direction, potentially causing injury or damaging the product. _e m Stand _e © z g 4-Screws (not provided as parts of the product) Desk (Except 47LH300C) 1-Screw (provided as parts of the product) Stand Desk 17 ATTACHING THE TV TO A DESK ""_Image shown may differ from your TV.
Owners Manual
Page 18
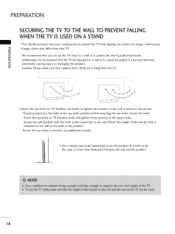
... the wall. Secure the wall brackets with the bolts (sold separately) to the holes in the product. Additionally, we recommend that you set up the TV close to tie the rope so it cannot fall over (when not using a wall mount). ,,,iImage shown may differ from your product has the bolts... the eye-bolts, loosen the bolts. Use a sturdy rope (sold separately) to the wall as shown in the upper holes. Insert the eye-bolts or TV brackets/bolts and tighten them securely in the picture. Match the height of the bracket that children don't climb on the wall to tie the...
... the wall. Secure the wall brackets with the bolts (sold separately) to the holes in the product. Additionally, we recommend that you set up the TV close to tie the rope so it cannot fall over (when not using a wall mount). ,,,iImage shown may differ from your product has the bolts... the eye-bolts, loosen the bolts. Use a sturdy rope (sold separately) to the wall as shown in the upper holes. Insert the eye-bolts or TV brackets/bolts and tighten them securely in the picture. Match the height of the bracket that children don't climb on the wall to tie the...

Owners Manual
Page 19
..._Image shown may differ from your dealer for assistance. 0_ Refer to bend the copper wire I when connecting the antenna. 2. Cable Cable TV Wall Jack _F Coaxial Wire (7S ohm) 01T_o improve the picture quality in a poor signal area, please purchase a signal amplifier and ...antenna needs to be split for outdoor antenna) I Copper Wir I Be careful not to http://AntennaWeb.org for more information about antennas and Digital TV. 19 Antenna (Analog or Digital) _D Wall Antenna Socket or Outdoor Antenna without a Cable Box m Connections. _D For optimum picture quality, adjust...
..._Image shown may differ from your dealer for assistance. 0_ Refer to bend the copper wire I when connecting the antenna. 2. Cable Cable TV Wall Jack _F Coaxial Wire (7S ohm) 01T_o improve the picture quality in a poor signal area, please purchase a signal amplifier and ...antenna needs to be split for outdoor antenna) I Copper Wir I Be careful not to http://AntennaWeb.org for more information about antennas and Digital TV. 19 Antenna (Analog or Digital) _D Wall Antenna Socket or Outdoor Antenna without a Cable Box m Connections. _D For optimum picture quality, adjust...

Owners Manual
Page 20
...on the remote control. XD top box to use Turn on the TV. 2. Match the jack colors (Y = green, PB = blue, and PR = red). Component Connection r'_ x m _D I. HD RECEIVERSETUP This TV can receive digital over-the-air/digital cable signals without an external ...digital set -top box operation.) Select the Component input source on the TV using the INPUT button on c the TV. However, if you have finished connecting all equipment.
...on the remote control. XD top box to use Turn on the TV. 2. Match the jack colors (Y = green, PB = blue, and PR = red). Component Connection r'_ x m _D I. HD RECEIVERSETUP This TV can receive digital over-the-air/digital cable signals without an external ...digital set -top box operation.) Select the Component input source on the TV using the INPUT button on c the TV. However, if you have finished connecting all equipment.

Owners Manual
Page 21
HDMI Connection 1. the HDMI/DVI m X m O No separate audio connection is necessary. z HDMI supports both audio and video. How to use 01T_urn on the remote control. C HDMI-DTV 26.97 2ZOO 33.71 33.75 6Z432 6Z50 23.976 24.00 29.97 30.00 59.94 60.00 21 m z (Refer to the owner's manual for the digital set-top box.) 01S_elect the HDMI1 or HDMI2 input source on the TV using m the INPUT button on the digital set-top box. How to connect O INon1noerct HtDheMIdig2itajal csketo-tnoptheboTxVto. m _D C 2.
HDMI Connection 1. the HDMI/DVI m X m O No separate audio connection is necessary. z HDMI supports both audio and video. How to use 01T_urn on the remote control. C HDMI-DTV 26.97 2ZOO 33.71 33.75 6Z432 6Z50 23.976 24.00 29.97 30.00 59.94 60.00 21 m z (Refer to the owner's manual for the digital set-top box.) 01S_elect the HDMI1 or HDMI2 input source on the TV using m the INPUT button on the digital set-top box. How to connect O INon1noerct HtDheMIdig2itajal csketo-tnoptheboTxVto. m _D C 2.


