Specification (English)
Page 1
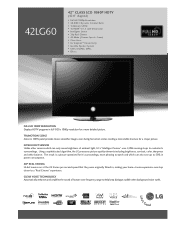
... that they were originally filmed in full 1920 x 1080p resolution for a crisper picture. Using a sophisticated algorithm, the LG processes picture quality elements including brightness, contrast, color, sharpness and white balance. The result is a picture optimized for it's surroundings, more detailed picture. 42LG60 42" CLASS LCD 1080P HDTV (42.0" diagonal) • Full HD 1080p Resolution • 50,000:1 Dynamic Contrast...
... that they were originally filmed in full 1920 x 1080p resolution for a crisper picture. Using a sophisticated algorithm, the LG processes picture quality elements including brightness, contrast, color, sharpness and white balance. The result is a picture optimized for it's surroundings, more detailed picture. 42LG60 42" CLASS LCD 1080P HDTV (42.0" diagonal) • Full HD 1080p Resolution • 50,000:1 Dynamic Contrast...
Specification (English)
Page 2
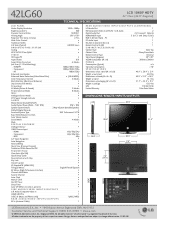
...Picture Reset • AV Mode (Picture & Sound) 3 Modes Picture Selection Mode 8 Modes ISFccc • Intelligent Sensor Mode • DTV Signal Strength Indicator • AUDIO Mono/Stereo/Dual (MTS/SAP) • Audio Outout Power (Watts - Component 60p/30p/24p - 42LG60 LCD 1080P HDTV 42" Class (42.0" diagonal) TECHNICAL SPECIFICATIONS LCD... Modes Mute • SPECIAL FEATURES Intelligent Sensor • 1080P Source Input - "LG Life's Good" is present) • SIDE AUDIO/VIDEO INPUTS/OUTPUTS L/R Audio/...
...Picture Reset • AV Mode (Picture & Sound) 3 Modes Picture Selection Mode 8 Modes ISFccc • Intelligent Sensor Mode • DTV Signal Strength Indicator • AUDIO Mono/Stereo/Dual (MTS/SAP) • Audio Outout Power (Watts - Component 60p/30p/24p - 42LG60 LCD 1080P HDTV 42" Class (42.0" diagonal) TECHNICAL SPECIFICATIONS LCD... Modes Mute • SPECIAL FEATURES Intelligent Sensor • 1080P Source Input - "LG Life's Good" is present) • SIDE AUDIO/VIDEO INPUTS/OUTPUTS L/R Audio/...
Owner's Manual (English)
Page 6
...82 TruMotion Demo 82 Local Dimming 83 Local Dimming Demo 83 Picture Reset 84 Power Indicator 85 Image Sticking Minimization (ISM) Method 86 Power Saving Picture Mode 87 4 CONTENTS WARNING / CAUTION A SAFETY INSTRUCTIONS 1 FEATURE OF THIS TV 6 PREPARATION Accessories 7 Front Panel Information 8 Back Panel ... CONTROL Remote Control Functions 48 Turning On the TV 50 Channel Selection 50 Volume Adjustment 50 Quick Menu 51 Initial Setting 52 On-Screen Menus Selection 54 Channel Setup - Preset 74 Color Tone - Picture Mode - Black (Darkness) Level 79 Advanced Control - ...
...82 TruMotion Demo 82 Local Dimming 83 Local Dimming Demo 83 Picture Reset 84 Power Indicator 85 Image Sticking Minimization (ISM) Method 86 Power Saving Picture Mode 87 4 CONTENTS WARNING / CAUTION A SAFETY INSTRUCTIONS 1 FEATURE OF THIS TV 6 PREPARATION Accessories 7 Front Panel Information 8 Back Panel ... CONTROL Remote Control Functions 48 Turning On the TV 50 Channel Selection 50 Volume Adjustment 50 Quick Menu 51 Initial Setting 52 On-Screen Menus Selection 54 Channel Setup - Preset 74 Color Tone - Picture Mode - Black (Darkness) Level 79 Advanced Control - ...
Owner's Manual (English)
Page 10
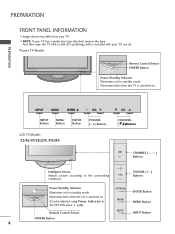
...MENU Button Remote Control Sensor INPUT INPUT Button POWER Button 8 I Image shown may differ from your TV has a protection tape attached, remove the tape. And then wipe the TV with a cloth (If a polishing cloth is switched on . (Can be adjusted using Power Indicator...INPUT Button ENTER VOL MENU Button VOL CH ENTER VOLUME Button (-, +) Buttons CH LCD TV Models 32/42/47/52LG70, 47LG90 CH CHANNEL (E,D)Buttons CH CHANNEL ( , ) Buttons Intelligent Sensor Adjusts picture according to the surrounding VOL conditions VOLUME (+, -) Buttons Power/Standby Indicator Illuminates red ...
...MENU Button Remote Control Sensor INPUT INPUT Button POWER Button 8 I Image shown may differ from your TV has a protection tape attached, remove the tape. And then wipe the TV with a cloth (If a polishing cloth is switched on . (Can be adjusted using Power Indicator...INPUT Button ENTER VOL MENU Button VOL CH ENTER VOLUME Button (-, +) Buttons CH LCD TV Models 32/42/47/52LG70, 47LG90 CH CHANNEL (E,D)Buttons CH CHANNEL ( , ) Buttons Intelligent Sensor Adjusts picture according to the surrounding VOL conditions VOLUME (+, -) Buttons Power/Standby Indicator Illuminates red ...
Owner's Manual (English)
Page 11
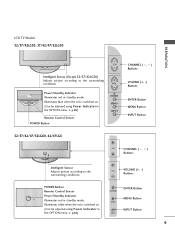
... the OPTION menu. VOL VOLUME (+, -) Buttons POWER Button Remote Control Sensor Power/Standby Indicator Illuminates red in standby mode. LCD TV Models 32/37/42LG30, 37/42/47/52LG50 PREPARATION CH Intelligent Sensor (Except 32/37/42LG30) Adjusts picture according to the surrounding conditions. G p.85) ENTER MENU INPUT ENTER Button MENU Button INPUT Button 9
... the OPTION menu. VOL VOLUME (+, -) Buttons POWER Button Remote Control Sensor Power/Standby Indicator Illuminates red in standby mode. LCD TV Models 32/37/42LG30, 37/42/47/52LG50 PREPARATION CH Intelligent Sensor (Except 32/37/42LG30) Adjusts picture according to the surrounding conditions. G p.85) ENTER MENU INPUT ENTER Button MENU Button INPUT Button 9
Owner's Manual (English)
Page 23
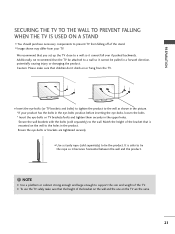
... the product to the wall as shown in the picture. * If your TV. Ensure the eye-bolts or brackets are the same. 21 G To use the TV safely make sure that children don't climb on or...the eye-bolts position before inserting the eye-bolts, loosen the bolts. * Insert the eye-bolts or TV brackets/bolts and tighten them securely in the product. Secure the wall brackets with the bolts (sold ...separately) to tie the product. I Image shown may differ from the TV. Caution: Please make sure that is safer to the wall. Match the height of the bracket that...
... the product to the wall as shown in the picture. * If your TV. Ensure the eye-bolts or brackets are the same. 21 G To use the TV safely make sure that children don't climb on or...the eye-bolts position before inserting the eye-bolts, loosen the bolts. * Insert the eye-bolts or TV brackets/bolts and tighten them securely in the product. Secure the wall brackets with the bolts (sold ...separately) to tie the product. I Image shown may differ from the TV. Caution: Please make sure that is safer to the wall. Match the height of the bracket that...
Owner's Manual (English)
Page 24
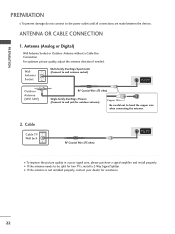
... the power outlet until all connections are made between the devices. I If the antenna needs to be split for assistance. 22 For optimum picture quality, adjust the antenna direction if needed. PREPARATION PREPARATION I To prevent damage do not connect to bend the copper wire when connecting the antenna.... ( ) 2. ANTENNA OR CABLE CONNECTION 1. I If the antenna is not installed properly, contact your dealer for two TV's, install a 2-Way Signal Splitter. Antenna (Analog or Digital) Wall Antenna Socket or Outdoor Antenna without a Cable Box Connection. Cable Cable...
... the power outlet until all connections are made between the devices. I If the antenna needs to be split for assistance. 22 For optimum picture quality, adjust the antenna direction if needed. PREPARATION PREPARATION I To prevent damage do not connect to bend the copper wire when connecting the antenna.... ( ) 2. ANTENNA OR CABLE CONNECTION 1. I If the antenna is not installed properly, contact your dealer for two TV's, install a 2-Way Signal Splitter. Antenna (Analog or Digital) Wall Antenna Socket or Outdoor Antenna without a Cable Box Connection. Cable Cable...
Owner's Manual (English)
Page 31
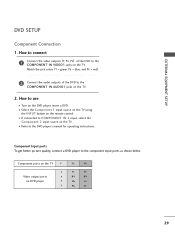
I Select the Component 1 input source on the TV using the INPUT button on the TV. Component Input ports To get better picture quality, connect a DVD player to the COMPONENT IN VIDEO1 jacks on the remote control. How to connect 1 Connect the video outputs (Y, PB, PR) of the ...DVD to the COMPONENT IN AUDIO1 jacks on the TV. I Refer to COMPONENT IN 2 ...
I Select the Component 1 input source on the TV using the INPUT button on the TV. Component Input ports To get better picture quality, connect a DVD player to the COMPONENT IN VIDEO1 jacks on the remote control. How to connect 1 Connect the video outputs (Y, PB, PR) of the ...DVD to the COMPONENT IN AUDIO1 jacks on the TV. I Refer to COMPONENT IN 2 ...
Owner's Manual (English)
Page 35
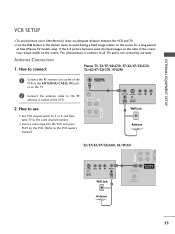
... owner's manual.) EO L(MONO) AUDIO R ANT OUT S-VIDEO VIDEO L R ANT IN OUTPUT SWITCH Wall Jack 2 Antenna AV IN 1 COMP AUDIO 32/37/42/47/52LG60, 42/47LGX COAX OPTIC 1 S-VIDEO VIDEO L R ANT OUT RS-232C IN ANTENNA/ CABLE IN (SERVICE ONLY) OUTPUT SWITCH ANT IN Wall Jack 2 REMOTE CONTROL IN... having a fixed image remain on the screen. ANTENNA/ CABLE IN et on the sides of the VCR to use I To avoid picture noise (interference), leave an adequate distance between the VCR and TV. UDIO OUT COAXIAL 1 2 Connect the antenna cable to the RF antenna in the Option menu to all...
... owner's manual.) EO L(MONO) AUDIO R ANT OUT S-VIDEO VIDEO L R ANT IN OUTPUT SWITCH Wall Jack 2 Antenna AV IN 1 COMP AUDIO 32/37/42/47/52LG60, 42/47LGX COAX OPTIC 1 S-VIDEO VIDEO L R ANT OUT RS-232C IN ANTENNA/ CABLE IN (SERVICE ONLY) OUTPUT SWITCH ANT IN Wall Jack 2 REMOTE CONTROL IN... having a fixed image remain on the screen. ANTENNA/ CABLE IN et on the sides of the VCR to use I To avoid picture noise (interference), leave an adequate distance between the VCR and TV. UDIO OUT COAXIAL 1 2 Connect the antenna cable to the RF antenna in the Option menu to all...
Owner's Manual (English)
Page 40
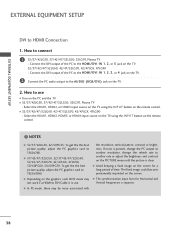
...button on the TV. 32/37/42/47/52LG60, 42/47/52LG70, 42/47LGX, 47LG90 - If noise is present, change the refresh rate to 1360x768. G Avoid keeping a fixed image on the screen for Horizontal and Vertical frequencies is in use I Turn on the PICTURE menu until the picture is clear. ...The fixed image could become permanently imprinted on the remote control. ! I 32/37/42LG30, 37/42/47/52LG50, 32LG70, Plasma TV - NOTES G 32/37/42LG30, 42/50PG25: To get the the best picture quality, adjust the PC graphics card to use . EXTERNAL EQUIPMENT SETUP EXTERNAL EQUIPMENT SETUP DVI to connect...
...button on the TV. 32/37/42/47/52LG60, 42/47/52LG70, 42/47LGX, 47LG90 - If noise is present, change the refresh rate to 1360x768. G Avoid keeping a fixed image on the screen for Horizontal and Vertical frequencies is in use I Turn on the PICTURE menu until the picture is clear. ...The fixed image could become permanently imprinted on the remote control. ! I 32/37/42LG30, 37/42/47/52LG50, 32LG70, Plasma TV - NOTES G 32/37/42LG30, 42/50PG25: To get the the best picture quality, adjust the PC graphics card to use . EXTERNAL EQUIPMENT SETUP EXTERNAL EQUIPMENT SETUP DVI to connect...
Owner's Manual (English)
Page 44
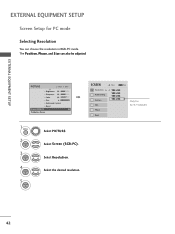
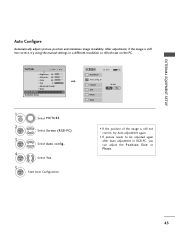
... Selecting Resolution You can also be adjusted. SCREEN Resolution G Auto config. EXTERNAL EQUIPMENT SETUP EXTERNAL EQUIPMENT SETUP Screen Setup for 32/37/42LG30 42 Select the desired resolution. PICTURE Move Enter E • Brightness 50 • Sharpness 60 • Color 60 • Tint 0R G • Advanced Control • Reset Screen (RGB-PC) TruMotion...
... Selecting Resolution You can also be adjusted. SCREEN Resolution G Auto config. EXTERNAL EQUIPMENT SETUP EXTERNAL EQUIPMENT SETUP Screen Setup for 32/37/42LG30 42 Select the desired resolution. PICTURE Move Enter E • Brightness 50 • Sharpness 60 • Color 60 • Tint 0R G • Advanced Control • Reset Screen (RGB-PC) TruMotion...
Owner's Manual (English)
Page 45
... Resolution Auto config. To Set Yes No • If the position of the image is still not correct, try Auto adjustment again. • If picture needs to be adjusted again after Auto adjustment in RGB-PC, you can adjust the Position, S i z e or P h a s e. 43...Brightness 50 • Sharpness 60 • Color 60 • Tint 0R G • Advanced Control • Reset Screen (RGB-PC) TruMotion Demo 1 MENU 2 ENTER 3 ENTER Select PICTURE. After adjustment, if the image is still not correct, try using the manual settings or a different resolution or refresh rate on the PC.
... Resolution Auto config. To Set Yes No • If the position of the image is still not correct, try Auto adjustment again. • If picture needs to be adjusted again after Auto adjustment in RGB-PC, you can adjust the Position, S i z e or P h a s e. 43...Brightness 50 • Sharpness 60 • Color 60 • Tint 0R G • Advanced Control • Reset Screen (RGB-PC) TruMotion Demo 1 MENU 2 ENTER 3 ENTER Select PICTURE. After adjustment, if the image is still not correct, try using the manual settings or a different resolution or refresh rate on the PC.
Owner's Manual (English)
Page 46
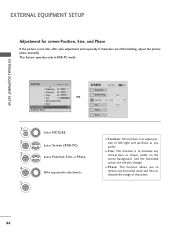
... a s e: This function allows you prefer. I S i z e: This function is to remove any vertical bars or stripes visible on the screen background. PICTURE Move Enter E • Brightness 50 • Sharpness 60 • Color 60 • Tint 0R G • Advanced Control • Reset Screen (RGB...adjustment and especially if characters are still trembling, adjust the picture phase manually. EXTERNAL EQUIPMENT SETUP EXTERNAL EQUIPMENT SETUP Adjustment for screen Position, Size, and Phase If the picture is to adjust picture to left/right and up/down as you to minimize...
... a s e: This function allows you prefer. I S i z e: This function is to remove any vertical bars or stripes visible on the screen background. PICTURE Move Enter E • Brightness 50 • Sharpness 60 • Color 60 • Tint 0R G • Advanced Control • Reset Screen (RGB...adjustment and especially if characters are still trembling, adjust the picture phase manually. EXTERNAL EQUIPMENT SETUP EXTERNAL EQUIPMENT SETUP Adjustment for screen Position, Size, and Phase If the picture is to adjust picture to left/right and up/down as you to minimize...
Owner's Manual (English)
Page 47
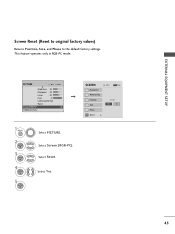
PICTURE Move Enter E • Brightness 50 • Sharpness 60 • Color 60 • Tint 0R G • Advanced Control • Reset Screen (RGB-PC) TruMotion Demo 1 MENU 2 ENTER 3 ENTER 4 ENTER 5 ENTER Select PICTURE. Position Size Phase Reset G Move MENU Prev. Select Screen (RGB-PC). Select Y e s. To Set Yes No 45 EXTERNAL EQUIPMENT SETUP Screen Reset (Reset to original factory values) Returns Position, S i z e, and Phase to the default factory settings. Select Reset. This feature operates only in RGB-PC mode. SCREEN Resolution Auto config.
PICTURE Move Enter E • Brightness 50 • Sharpness 60 • Color 60 • Tint 0R G • Advanced Control • Reset Screen (RGB-PC) TruMotion Demo 1 MENU 2 ENTER 3 ENTER 4 ENTER 5 ENTER Select PICTURE. Position Size Phase Reset G Move MENU Prev. Select Screen (RGB-PC). Select Y e s. To Set Yes No 45 EXTERNAL EQUIPMENT SETUP Screen Reset (Reset to original factory values) Returns Position, S i z e, and Phase to the default factory settings. Select Reset. This feature operates only in RGB-PC mode. SCREEN Resolution Auto config.
Owner's Manual (English)
Page 53
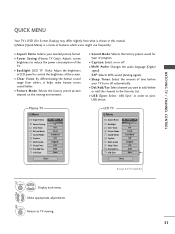
...Multi Audio Sleep Timer CH Del/Add/Fav USB Eject F 16:9 G 3 Off Vivid Standard Off English Off Add Eject Close LCD TV Q.Menu Aspect Ratio Backlight Clear Voice Picture Mode Sound Mode Caption Multi Audio Sleep Timer CH Del/Add/Fav USB Eject F 16:9 G 3 Off Vivid Standard Off ... Select channel you want to add/delete or add the channel to the Favorite List. I Backlight (LCD TV Only): Adjust the brightness of LCD panel to reduce the power consumption of time before your desired picture format. I Multi Audio: Changes the audio language (Digital signal). MENU 2 Display each menu. SAP...
...Multi Audio Sleep Timer CH Del/Add/Fav USB Eject F 16:9 G 3 Off Vivid Standard Off English Off Add Eject Close LCD TV Q.Menu Aspect Ratio Backlight Clear Voice Picture Mode Sound Mode Caption Multi Audio Sleep Timer CH Del/Add/Fav USB Eject F 16:9 G 3 Off Vivid Standard Off ... Select channel you want to add/delete or add the channel to the Favorite List. I Backlight (LCD TV Only): Adjust the brightness of LCD panel to reduce the power consumption of time before your desired picture format. I Multi Audio: Changes the audio language (Digital signal). MENU 2 Display each menu. SAP...
Owner's Manual (English)
Page 54
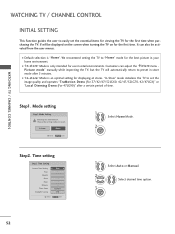
...42/47/52LG60, 42/47/52LG70, 42/47LGX)" or "Local Dimming Demo (For 47LG90)" after 5 minutes. In Store Home Enter RETURN Exit 1 Select H o m e Mode. 2 ENTER Step2. We recommend setting the TV to set the essential items for viewing the TV for the first time. I Default selection is an optimal setting for the best picture... in your home environment. Mode Setting ! It can adjust the "Picture menu Picture mode" manually while inspecting the TV, but the TV will be activated from the user menus. I "In-store" ...
...42/47/52LG60, 42/47/52LG70, 42/47LGX)" or "Local Dimming Demo (For 47LG90)" after 5 minutes. In Store Home Enter RETURN Exit 1 Select H o m e Mode. 2 ENTER Step2. We recommend setting the TV to set the essential items for viewing the TV for the first time. I Default selection is an optimal setting for the best picture... in your home environment. Mode Setting ! It can adjust the "Picture menu Picture mode" manually while inspecting the TV, but the TV will be activated from the user menus. I "In-store" ...
Owner's Manual (English)
Page 56
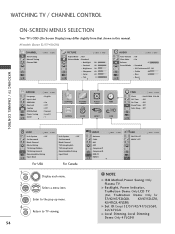
...Power Saving: Only Plasma TV. G Backlight, Power Indicator, TruMotion Demo: Only LCD TV. (But, T r u M o t i o n D e m o: Only for 37/42/47/52LG60, 42/47/52LG70, 42/47LGX, 47LG90) G Set ID: Except 32/37/42/47/52LG60, 4 2 / 4 7 L G X. WATCHING TV / CHANNEL CONTROL ON-SCREEN MENUS SELECTION Your TV's OSD (On Screen ... Bass 50 • Reset E WATCHING TV / CHANNEL CONTROL OPTION Language Input Label SIMPLINK Key Lock Caption ISM Method Power Saving Set ID E Move Enter : English : On : Off : Off : Normal : Level 0 : 1 CHANNEL PICTURE AUDIO TIME OPTION LOCK INPUT USB TIME Move...
...Power Saving: Only Plasma TV. G Backlight, Power Indicator, TruMotion Demo: Only LCD TV. (But, T r u M o t i o n D e m o: Only for 37/42/47/52LG60, 42/47/52LG70, 42/47LGX, 47LG90) G Set ID: Except 32/37/42/47/52LG60, 4 2 / 4 7 L G X. WATCHING TV / CHANNEL CONTROL ON-SCREEN MENUS SELECTION Your TV's OSD (On Screen ... Bass 50 • Reset E WATCHING TV / CHANNEL CONTROL OPTION Language Input Label SIMPLINK Key Lock Caption ISM Method Power Saving Set ID E Move Enter : English : On : Off : Off : Normal : Level 0 : 1 CHANNEL PICTURE AUDIO TIME OPTION LOCK INPUT USB TIME Move...
Owner's Manual (English)
Page 57
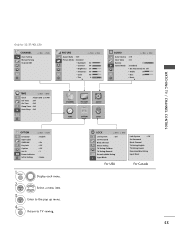
WATCHING TV / CHANNEL CONTROL Only for 32/37/42LG30 CHANNEL Auto Tuning Manual Tuning Channel Edit Move Enter PICTURE Move Aspect Ratio : 16:9 Picture Mode : Standard • Backlight • Contrast • Brightness • Sharpness • Color • Tint E 80 90 50 60 60 0R ...Reset E TIME Move Enter Clock : Feb/21/2008 2:10 AM Off Time : Off On Time : Off Sleep Timer : Off Auto Sleep : Off CHANNEL PICTURE AUDIO TIME OPTION LOCK OPTION Language Input Label SIMPLINK Key Lock Caption Set ID Power Indicator Initial Setting Move Enter : English : On : Off : Off :...
WATCHING TV / CHANNEL CONTROL Only for 32/37/42LG30 CHANNEL Auto Tuning Manual Tuning Channel Edit Move Enter PICTURE Move Aspect Ratio : 16:9 Picture Mode : Standard • Backlight • Contrast • Brightness • Sharpness • Color • Tint E 80 90 50 60 60 0R ...Reset E TIME Move Enter Clock : Feb/21/2008 2:10 AM Off Time : Off On Time : Off Sleep Timer : Off Auto Sleep : Off CHANNEL PICTURE AUDIO TIME OPTION LOCK OPTION Language Input Label SIMPLINK Key Lock Caption Set ID Power Indicator Initial Setting Move Enter : English : On : Off : Off :...
Owner's Manual (English)
Page 63
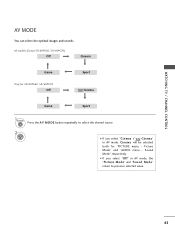
Picture Mode" and "AUDIO menu - WATCHING TV / CHANNEL CONTROL AV MODE You can select the optimal images and sounds. Sound Mode" respectively. I If you select "O f f" in AV mode, Cinema will be selected both for 50/60PG60, 50/60PG70 Off Sport Cinema Game Sport 1AV MODE Press the AV MODE button repeatedly to select the desired source. 2 ENTER I If you select "Cinema / Cinema" in AV mode, the "Picture Mode" and "Sound Mode" return to previous selected value. 61 All models (Except 50/60PG60, 50/60PG70) Off Cinema Game Only for "PICTURE menu -
Picture Mode" and "AUDIO menu - WATCHING TV / CHANNEL CONTROL AV MODE You can select the optimal images and sounds. Sound Mode" respectively. I If you select "O f f" in AV mode, Cinema will be selected both for 50/60PG60, 50/60PG70 Off Sport Cinema Game Sport 1AV MODE Press the AV MODE button repeatedly to select the desired source. 2 ENTER I If you select "Cinema / Cinema" in AV mode, the "Picture Mode" and "Sound Mode" return to previous selected value. 61 All models (Except 50/60PG60, 50/60PG70) Off Cinema Game Only for "PICTURE menu -
Owner's Manual (English)
Page 74
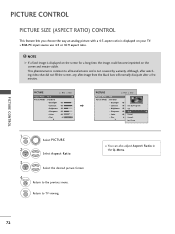
...8226; Backlight • Contrast • Brightness • Sharpness • Color • Tint E 80 90 50 60 60 0R Enter G PICTURE Move Enter Aspect Ratio : 16:9 Picture Mode : Standard • Backlight • Contrast • Brightness • Sharpness • Color • Tint E 80 90 Set By Program... 50 4:3 60 16:9 60 Zoom1 0 R Zoom2 G Just Scan 1 MENU Select PICTURE. 2 ENTER 3 ENTER Select Aspect Ratio. Select the desired picture format. 4 RETURN Return to TV viewing. Although, after watching video that did not fill the screen, any after-image from the ...
...8226; Backlight • Contrast • Brightness • Sharpness • Color • Tint E 80 90 50 60 60 0R Enter G PICTURE Move Enter Aspect Ratio : 16:9 Picture Mode : Standard • Backlight • Contrast • Brightness • Sharpness • Color • Tint E 80 90 Set By Program... 50 4:3 60 16:9 60 Zoom1 0 R Zoom2 G Just Scan 1 MENU Select PICTURE. 2 ENTER 3 ENTER Select Aspect Ratio. Select the desired picture format. 4 RETURN Return to TV viewing. Although, after watching video that did not fill the screen, any after-image from the ...


