
Owners Manual
Page 1
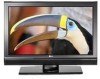
LCD TV I PLASMA TV OWNER'S MANUAL LCD TV MODELS PLASMA TV MODEL 32LCSDC 32LCSDCS 32LCSDCB 37LCSDC 37LCSDCB 37LCSDC1 42LCSDC 32LXSDC 32LXSDCS 42LBSDC 32LCSOC 32LCSOCS 32LCSOCB 32LXSOC 32LXSOCS 37LCSOC 37LCSOCB 42LBSOC 42LCSOC 32LGS00H 37LGS00H 42LGS00H 42PX8DC 42PG65C 42PG60C Please read this information to your set. _perating Jmber and serial number of the set. label attached on the back cover and quote this your dealer when you require service.
LCD TV I PLASMA TV OWNER'S MANUAL LCD TV MODELS PLASMA TV MODEL 32LCSDC 32LCSDCS 32LCSDCB 37LCSDC 37LCSDCB 37LCSDC1 42LCSDC 32LXSDC 32LXSDCS 42LBSDC 32LCSOC 32LCSOCS 32LCSOCB 32LXSOC 32LXSOCS 37LCSOC 37LCSOCB 42LBSOC 42LCSOC 32LGS00H 37LGS00H 42LGS00H 42PX8DC 42PG65C 42PG60C Please read this information to your set. _perating Jmber and serial number of the set. label attached on the back cover and quote this your dealer when you require service.
Owners Manual
Page 4
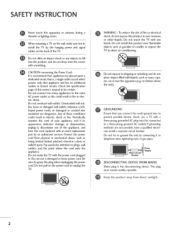
...your appliance, and if its appearance indicates damage or deterioration, unplug iL discontinue use a damaged or loose power cord. Do not touch the TV with a three-prong grounded AC plug must remain readily operable. Breaker SPuopwpelyr DISCONNECTING DEVICE FROM MAINS Mains plug is , a single outlet circuit...powers only that is the disconnecting device. SAFETY IN Never touch this owner's manual to be certain. When mounting a TV on the wall, make the TV with liquids, such as gasoline or candles or expose the TV to direct air conditioning. @ Do not expose to dripping or splashing and ...
...your appliance, and if its appearance indicates damage or deterioration, unplug iL discontinue use a damaged or loose power cord. Do not touch the TV with a three-prong grounded AC plug must remain readily operable. Breaker SPuopwpelyr DISCONNECTING DEVICE FROM MAINS Mains plug is , a single outlet circuit...powers only that is the disconnecting device. SAFETY IN Never touch this owner's manual to be certain. When mounting a TV on the wall, make the TV with liquids, such as gasoline or candles or expose the TV to direct air conditioning. @ Do not expose to dripping or splashing and ...
Owners Manual
Page 6
... 34 On-Screen Menus Selection 35 Channel Setup 36 - TV Rating English & French 79 Troubleshooting 80 Maintenance 82 Product Specifications 83 Programming the Remote Control 84 Set ID 86 IR Codes 87 Color Tone - User Mode 48 XD - Downloadable Rating 77 - Preset 46 Manual Picture Adjustment - Auto Clock Setup 65 - Add / Delete...
... 34 On-Screen Menus Selection 35 Channel Setup 36 - TV Rating English & French 79 Troubleshooting 80 Maintenance 82 Product Specifications 83 Programming the Remote Control 84 Set ID 86 IR Codes 87 Color Tone - User Mode 48 XD - Downloadable Rating 77 - Preset 46 Manual Picture Adjustment - Auto Clock Setup 65 - Add / Delete...
Owners Manual
Page 7
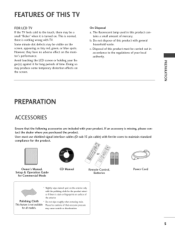
...Manual Remote Control, Batteries * Slightly wipe stained spot on surface of that the following accessories are included with your finger(s) against it is turned on the screen, appearing as tiny red, green, or blue spots. Some minute dot defects may be visible on . b. OF THiS TV FOR LCD TV If the TV... feels cold to the touch, there may be a small "flicker" when it for the product exterior if there is stain or fingerprint on the exterior only with general household waste. Avoid touching the LCD screen or holding your product. ...
...Manual Remote Control, Batteries * Slightly wipe stained spot on surface of that the following accessories are included with your finger(s) against it is turned on the screen, appearing as tiny red, green, or blue spots. Some minute dot defects may be visible on . b. OF THiS TV FOR LCD TV If the TV... feels cold to the touch, there may be a small "flicker" when it for the product exterior if there is stain or fingerprint on the exterior only with general household waste. Avoid touching the LCD screen or holding your product. ...

Owners Manual
Page 23
... audio output of the digital set . However, if you have finished connecting all equipment. 01T_his part of the digital set z top box to the owner's manual for LCD TV(Except 32/37/42LGSOOH) models. m c 2. Yes No Yes Yes Yes Yes Yes Yes 21 Match the jack colors _D c (Y = green, PB = blue, and PR...
... audio output of the digital set . However, if you have finished connecting all equipment. 01T_his part of the digital set z top box to the owner's manual for LCD TV(Except 32/37/42LGSOOH) models. m c 2. Yes No Yes Yes Yes Yes Yes Yes 21 Match the jack colors _D c (Y = green, PB = blue, and PR...
Owners Manual
Page 24
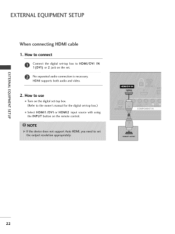
"O 22 How to connect Connect the digital set-top box to use "O m Turn on the digital set . How to HDMI/DVI IN 1 (DVI) or 2 jack on the remote control. EXTERNALEQUIPMENT SETUP When connecting HDM[ cable 1. z _> m _D c 2. m _o HDMI supports both audio and video. m x No separated audio connection is necessary. z (Refer to the owner's manual for the digital set-top box.) m Select HDMI1/DVI or HDMI2 input source with using c the INPUT button on the set -top box.
"O 22 How to connect Connect the digital set-top box to use "O m Turn on the digital set . How to HDMI/DVI IN 1 (DVI) or 2 jack on the remote control. EXTERNALEQUIPMENT SETUP When connecting HDM[ cable 1. z _> m _D c 2. m _o HDMI supports both audio and video. m x No separated audio connection is necessary. z (Refer to the owner's manual for the digital set-top box.) m Select HDMI1/DVI or HDMI2 input source with using c the INPUT button on the set -top box.
Owners Manual
Page 25
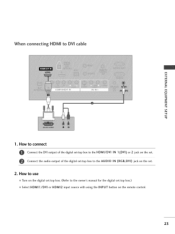
How to connect Connect the DVI output of the digital set-top box to DVi cable m x m _o z m XZ) c @ m z m c 1. How to use 01T_urn on the digital set-top box. (Refer to the HDMI/DVI IN 1 (DVI) or 2 jack on the set. When connecting HDM[ to the AUDIO IN (RGB,DVI) jack on the set. 2. Connect the audio output of the digital set-top box to the owner's manual for the digital set-top box.) 01S_elect HDMI1/DVI or HDMI2 input source with using the INPUT button on the remote control. 23
How to connect Connect the DVI output of the digital set-top box to DVi cable m x m _o z m XZ) c @ m z m c 1. How to use 01T_urn on the digital set-top box. (Refer to the HDMI/DVI IN 1 (DVI) or 2 jack on the set. When connecting HDM[ to the AUDIO IN (RGB,DVI) jack on the set. 2. Connect the audio output of the digital set-top box to the owner's manual for the digital set-top box.) 01S_elect HDMI1/DVI or HDMI2 input source with using the INPUT button on the remote control. 23
Owners Manual
Page 26
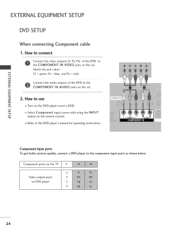
...to connect cable Connect the video outputs (Y, PB, PR) of the DVD to use m z m Turn on DVD player 24 Component ports on the TV Video output ports on the DVD player, insert a DVD. How to the COMPONENT IN AUDIO jacks on the set . PB PR Component Input ports To... get better picture quality, connect a DVD player to the DVD player's manual for operating instructions. Match the jack colors m x (Y = green, PB = blue, and PR = red). m XD c 2. m z Connect the audio outputs of the DVD to the ...
...to connect cable Connect the video outputs (Y, PB, PR) of the DVD to use m z m Turn on DVD player 24 Component ports on the TV Video output ports on the DVD player, insert a DVD. How to the COMPONENT IN AUDIO jacks on the set . PB PR Component Input ports To... get better picture quality, connect a DVD player to the DVD player's manual for operating instructions. Match the jack colors m x (Y = green, PB = blue, and PR = red). m XD c 2. m z Connect the audio outputs of the DVD to the ...
Owners Manual
Page 27
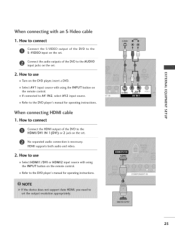
m XD c 01_If connected to AV IN2, select AV2 input source. 01_Refer to the DVD player's manual for operating instructions. HDMI supports both audio and video. 2. n_Refer to the DVD player's manual for operating instructions. 2S How to connect Connect the S-VIDEO output of the DVD to the AUDIO input jacks on the set...
m XD c 01_If connected to AV IN2, select AV2 input source. 01_Refer to the DVD player's manual for operating instructions. HDMI supports both audio and video. 2. n_Refer to the DVD player's manual for operating instructions. 2S How to connect Connect the S-VIDEO output of the DVD to the AUDIO input jacks on the set...
Owners Manual
Page 28
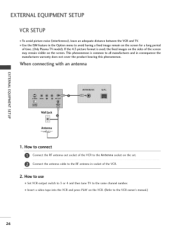
... bearing this phenomenon. When connecting with an antenna m x .-t m z m JC) c m z .-t m Wall Jack c Antenna 1. If the 4:3 picture format is common to the VCR owner's manual.) 26 How to connect Connect the RF antenna out socket of the VCR to the RF antenna in the Option menu to avoid having a fixed...remain visible on the screen for a long period of the VCR. 2. How to use 01_Set VCR output switch to 3 or 4 and then tune TV to the same channel number. 01_Insert a video tape into the VCR and press PLAY on the set. This phenomenon is used; EXTERNALEQUIPMENT SETUP VCR ...
... bearing this phenomenon. When connecting with an antenna m x .-t m z m JC) c m z .-t m Wall Jack c Antenna 1. If the 4:3 picture format is common to the VCR owner's manual.) 26 How to connect Connect the RF antenna out socket of the VCR to the RF antenna in the Option menu to avoid having a fixed...remain visible on the screen for a long period of the VCR. 2. How to use 01_Set VCR output switch to 3 or 4 and then tune TV to the same channel number. 01_Insert a video tape into the VCR and press PLAY on the set. This phenomenon is used; EXTERNALEQUIPMENT SETUP VCR ...

Owners Manual
Page 29
...the AUDIO input jacks on m the remote control. of the VCR to the Connect the audio outputs of the VCR to the VCR owner's manual.) z 01S_elect AV1 input source with using the INPUT button on the set . XD c 01_If connected to connect Connect the S-VIDEO output S-VIDEO... input on the remote control. 01_If connected to connect Connect the AUDIO/VIDEO jacks between TV and VCR. How to AV IN2, select AV2 input source. When connecting with an S-Video cable 1. Match the jack colors (Video = yellow, Audio...
...the AUDIO input jacks on m the remote control. of the VCR to the Connect the audio outputs of the VCR to the VCR owner's manual.) z 01S_elect AV1 input source with using the INPUT button on the set . XD c 01_If connected to connect Connect the S-VIDEO output S-VIDEO... input on the remote control. 01_If connected to connect Connect the AUDIO/VIDEO jacks between TV and VCR. How to AV IN2, select AV2 input source. When connecting with an S-Video cable 1. Match the jack colors (Video = yellow, Audio...
Owners Manual
Page 30
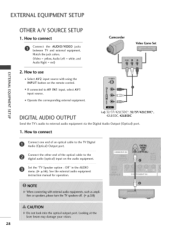
How to the TV Digital Audio (Optical) Output port. How to connect Connect one end of the optical cable to use x m 01_Select AV2 input source with using the z INPUT button on the audio equipment. See the external audio equipment instruction manual for operation. 28 Connect the... other end of an optical cable to connect Connect the AUDIO/VIDEO jacks between TV and external equipment. How to the digital audio (optical) input on the remote...
How to the TV Digital Audio (Optical) Output port. How to connect Connect one end of the optical cable to use x m 01_Select AV2 input source with using the z INPUT button on the audio equipment. See the external audio equipment instruction manual for operation. 28 Connect the... other end of an optical cable to connect Connect the AUDIO/VIDEO jacks between TV and external equipment. How to the digital audio (optical) input on the remote...
Owners Manual
Page 37
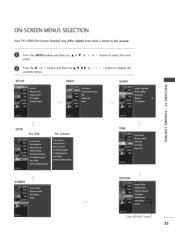
ON-SCREEN MENUS SELECTION Your TV's OSD (On Screen Display) may differ slightly from what is shown in this manual. SCREEN \\/ "/z OPTION Only 42PX8DC model 35 Press the MENU button and then use • or • or ^ or v button to select the each menu. @ Press the• or > button and then use• available menus. • _1 • or ^ v < > button to display the SETUP VIDEO AUDIO LOCK A\ ,/ For USA For Canada N "lz < N I > z z fT1 TIME N © Z © /, ,,,?
ON-SCREEN MENUS SELECTION Your TV's OSD (On Screen Display) may differ slightly from what is shown in this manual. SCREEN \\/ "/z OPTION Only 42PX8DC model 35 Press the MENU button and then use • or • or ^ or v button to select the each menu. @ Press the• or > button and then use• available menus. • _1 • or ^ v < > button to display the SETUP VIDEO AUDIO LOCK A\ ,/ For USA For Canada N "lz < N I > z z fT1 TIME N © Z © /, ,,,?
Owners Manual
Page 39
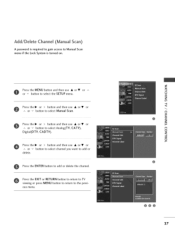
Press the EXIT or RETURN button to return to TV viewing or press MENU button to return to add or delete the channel. Press the ENTER button to the previous menu. _h -r" z < N I > @ z z fT1 N © Z © @ @@@ 37 Add/Delete Channel (Manual Scan) A password is turned on. Press the• or > button and then use...• butotorn >to bsuetlteocnt aMnadnuthael nSucsaen. • or• or Press the • or > button and then use • or • or ^ or v button to Manual Scan menu if the Lock System is required to gain access to select Analog...
Press the EXIT or RETURN button to return to TV viewing or press MENU button to return to add or delete the channel. Press the ENTER button to the previous menu. _h -r" z < N I > @ z z fT1 N © Z © @ @@@ 37 Add/Delete Channel (Manual Scan) A password is turned on. Press the• or > button and then use...• butotorn >to bsuetlteocnt aMnadnuthael nSucsaen. • or• or Press the • or > button and then use • or • or ^ or v button to Manual Scan menu if the Lock System is required to gain access to select Analog...
Owners Manual
Page 40
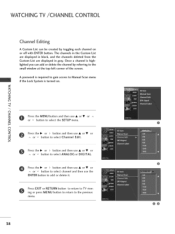
WATCHING TV/CHANNEL CONTROL Channel Editing A Custom List can add or delete the channel by toggling each channel on . The channels in the Custom List are displayed ... then use • or • or ^ z z or v button to select ANALOG or DIGITAL. Press EXIT or RETURN button to return to TV viewing or press MENU button to return to Manual Scan menu if the Lock System is highlighted you can be created by referring to the small window at the top...
WATCHING TV/CHANNEL CONTROL Channel Editing A Custom List can add or delete the channel by toggling each channel on . The channels in the Custom List are displayed ... then use • or • or ^ z z or v button to select ANALOG or DIGITAL. Press EXIT or RETURN button to return to TV viewing or press MENU button to return to Manual Scan menu if the Lock System is highlighted you can be created by referring to the small window at the top...
Owners Manual
Page 49
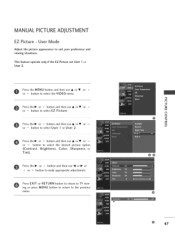
MANUAL PICTURE ADJUSTMENT EZ Picture - Press the MENU button and then use • or• or v button to select EZ Picture. Press the• or > button ... Press the• or > button and then use_l or• or < or > button to the previous menu. Press EXIT or RETURN button to return to TV viewing or press MENU button to return to make appropriate adjustments. or ^ Press the• or > button and then use • or• or v button...
MANUAL PICTURE ADJUSTMENT EZ Picture - Press the MENU button and then use • or• or v button to select EZ Picture. Press the• or > button ... Press the• or > button and then use_l or• or < or > button to the previous menu. Press EXIT or RETURN button to return to TV viewing or press MENU button to return to make appropriate adjustments. or ^ Press the• or > button and then use • or• or v button...
Owners Manual
Page 51
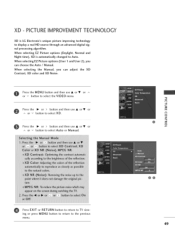
When selecting EZ Picture options (Daylight, Normal and Night time), XD is LG Electronic's unique picture improving technology to Auto. Press the • or > button ...XD is automatically changed to display a real HD source through an advanced digital signal processing algorithm. When selecting the Manual, you can adjust the XD Contrast, XD color and XD Noise. Press the MENU button and then use &#... - When selecting EZ Picture options (User I and User 2), you can choose the Auto / Manual. Press the • or > button and then use• or• or ^ or v button to select Auto or...
When selecting EZ Picture options (Daylight, Normal and Night time), XD is LG Electronic's unique picture improving technology to Auto. Press the • or > button ...XD is automatically changed to display a real HD source through an advanced digital signal processing algorithm. When selecting the Manual, you can adjust the XD Contrast, XD color and XD Noise. Press the MENU button and then use &#... - When selecting EZ Picture options (User I and User 2), you can choose the Auto / Manual. Press the • or > button and then use• or• or ^ or v button to select Auto or...

Owners Manual
Page 67
... • or• or v button to select the TIME menu. Press EXIT or RETURN button to return to TV viewing or press MENU button to return to select Auto Clock. Set the clock manually if the current time is set automatically from a digital channel signal. or ^ Press the • or > button and...
... • or• or v button to select the TIME menu. Press EXIT or RETURN button to return to TV viewing or press MENU button to return to select Auto Clock. Set the clock manually if the current time is set automatically from a digital channel signal. or ^ Press the • or > button and...
Owners Manual
Page 68
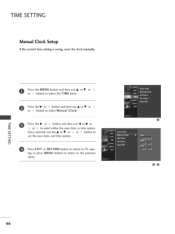
z Press EXIT or RETURN button to return to TV viewing or press MENU button to return to select either the year_ date, or time option. TIME SETTING Manual Clock Setup If the current time setting is wrong, reset the clock manually. Press the• or > button and then use_l or• or m < or > to... • or ^ or v button to select the TIME menu. Press the MENU button and then use the • or • or ^ or v button to select Manual Clock. Press the • or > button and then use • or • or ^ or v button to m set the year_ date, and time option.
z Press EXIT or RETURN button to return to TV viewing or press MENU button to return to select either the year_ date, or time option. TIME SETTING Manual Clock Setup If the current time setting is wrong, reset the clock manually. Press the• or > button and then use_l or• or m < or > to... • or ^ or v button to select the TIME menu. Press the MENU button and then use the • or • or ^ or v button to select Manual Clock. Press the • or > button and then use • or • or ^ or v button to m set the year_ date, and time option.
Owners Manual
Page 72
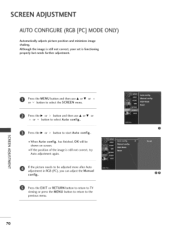
... start Auto config., N _D rT1 When Auto config, has finished, OK will be adjusted more after Auto adjustment in RGB (PC), you can adjust the Manual config.. Press the• or > button and then use • or • or ^ or v button to be rT1 z shown on screen. _D If the position... not correct, try c Auto adjustment again. -4 rT1 z -4 If the picture needs to select the SCREEN menu. Press the EXIT or RETURN button to return to TV viewing or press the MENU button to return to select Auto config.. EEN ADJUSTMENT AUTO CONFIGURE (RGB [PC] MODE ONLY) Automatically shaking.
... start Auto config., N _D rT1 When Auto config, has finished, OK will be adjusted more after Auto adjustment in RGB (PC), you can adjust the Manual config.. Press the• or > button and then use • or • or ^ or v button to be rT1 z shown on screen. _D If the position... not correct, try c Auto adjustment again. -4 rT1 z -4 If the picture needs to select the SCREEN menu. Press the EXIT or RETURN button to return to TV viewing or press the MENU button to return to select Auto config.. EEN ADJUSTMENT AUTO CONFIGURE (RGB [PC] MODE ONLY) Automatically shaking.


