
Owner's Manual
Page 5
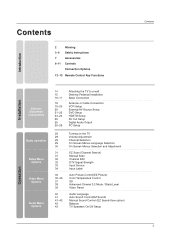
... TV Volume Adjustment Channel Selection On Screen Menus Language Selection On Screen Menus Selection and Adjustment EZ Scan (Channel Search) Manual Scan Channel Edit DTV Signal Strength Input Source Input Label Auto Picture Control(EZ Picture) Color Temperature Control XD Advanced-Cinema 3:2 Mode / Black Level Video Reset Audio Language Auto Sound...
... TV Volume Adjustment Channel Selection On Screen Menus Language Selection On Screen Menus Selection and Adjustment EZ Scan (Channel Search) Manual Scan Channel Edit DTV Signal Strength Input Source Input Label Auto Picture Control(EZ Picture) Color Temperature Control XD Advanced-Cinema 3:2 Mode / Black Level Video Reset Audio Language Auto Sound...
Owner's Manual
Page 7
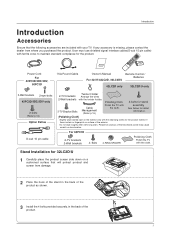
... Slightly wipe stained spot on the exterior only with your TV. Please be cautious of the product. 7 User must use shielded signal interface cables(D-sub 15 pin cable) with the cloth. For 60PC1D 2-TV brackets 2-Wall brackets 4- Introduction Introduction Accessories Ensure that ... CH 5 EZ ADJUST PIC EZ APM SOUND 0 SAP 8 9 FLASHBK 6 3 FREEZE Remote Control / For 42PC3D/3DC/3DV, For 32/37/42LC2D, 32LC2DU Batteries 50PC3D 42LC2D only 32LC2D/U only 2-Wall brackets 2-eye-bolts 42PC3D/3DC/3DV only 2-bolts (Refer p.14) Option Extras D-sub 15 pin cable Twister Holder ...
... Slightly wipe stained spot on the exterior only with your TV. Please be cautious of the product. 7 User must use shielded signal interface cables(D-sub 15 pin cable) with the cloth. For 60PC1D 2-TV brackets 2-Wall brackets 4- Introduction Introduction Accessories Ensure that ... CH 5 EZ ADJUST PIC EZ APM SOUND 0 SAP 8 9 FLASHBK 6 3 FREEZE Remote Control / For 42PC3D/3DC/3DV, For 32/37/42LC2D, 32LC2DU Batteries 50PC3D 42LC2D only 32LC2D/U only 2-Wall brackets 2-eye-bolts 42PC3D/3DC/3DV only 2-bolts (Refer p.14) Option Extras D-sub 15 pin cable Twister Holder ...
Owner's Manual
Page 9
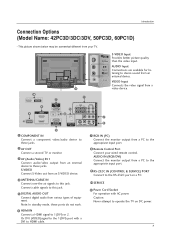
... jacks. S-VIDEO Input AV IN 2 Provides better picture quality than the video input. VIDEO Input Connects the video signal from an S-VIDEO device. 4 ANTENNA/CABLE IN Connect over-the air signals to HDMI cable. Caution: Never attempt to operate the TV on a PC. 10 SERVICE 11 Power Cord Socket ...be somewhat different from your wired remote control. AUDIO IN (RGB/DVI) Connect the monitor output from an external device to this jack. Connect cable signals to these ports do notVwIDEOork. 8 Remote Control Port Connect your TV. COMPONENT IN AV OUT AV IN 1 COMPONENT IN AV OUT AV IN 1...
... jacks. S-VIDEO Input AV IN 2 Provides better picture quality than the video input. VIDEO Input Connects the video signal from an S-VIDEO device. 4 ANTENNA/CABLE IN Connect over-the air signals to HDMI cable. Caution: Never attempt to operate the TV on a PC. 10 SERVICE 11 Power Cord Socket ...be somewhat different from your wired remote control. AUDIO IN (RGB/DVI) Connect the monitor output from an external device to this jack. Connect cable signals to these ports do notVwIDEOork. 8 Remote Control Port Connect your TV. COMPONENT IN AV OUT AV IN 1 COMPONENT IN AV OUT AV IN 1...
Owner's Manual
Page 11
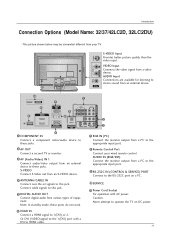
... to the RS-232C port on DC power. 6 HDMI IN Connect a HDMI signal to operate the TV on a PC. 10 SERVICE 11 Power Cord Socket For... an S-VIDEO device. 4 ANTENNA/CABLE IN Connect over-the air signals to these jacks. Caution: Never attempt to 1(DVI) or 2. AUDIO...shown below may be somewhat different from a video device. VIDEO Input Connects the video signal from your wired remote control. Note: In standby mode, these jacks. 9 video.../video output from various types of equipment. Connect cable signals to HDMI cable. 11 Or DVI (VIDEO)signal to the 1(DVI) port with AC power. COMPONENT...
... to the RS-232C port on DC power. 6 HDMI IN Connect a HDMI signal to operate the TV on a PC. 10 SERVICE 11 Power Cord Socket For... an S-VIDEO device. 4 ANTENNA/CABLE IN Connect over-the air signals to these jacks. Caution: Never attempt to 1(DVI) or 2. AUDIO...shown below may be somewhat different from a video device. VIDEO Input Connects the video signal from your wired remote control. Note: In standby mode, these jacks. 9 video.../video output from various types of equipment. Connect cable signals to HDMI cable. 11 Or DVI (VIDEO)signal to the 1(DVI) port with AC power. COMPONENT...
Owner's Manual
Page 18
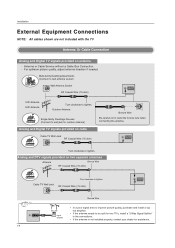
...RF Coaxial Wire (75 ohm) ANTENNA/ CABLE IN COMPONENT IN AV OUT AV IN 1 18 ANTENNA/ CABLE IN VIDEOBronze WAUDirIOe signal amplifier • In a poor signal area to tighten. Multi-family Dwellings/Apartments (Connect to wall antenna socket) Wall Antenna Socket RF Coaxial Wire (75 ohm) .... Installation External Equipment Connections NOTE: All cables shown are not included with the TV Antenna Or Cable Connection Analog and Digital TV signals provided on two separate antennas Antenna Bronze Wire RF Coaxial Wire (75 ohm) Cable TV Wall Jack Turn clockwise to tighten. Antenna...
...RF Coaxial Wire (75 ohm) ANTENNA/ CABLE IN COMPONENT IN AV OUT AV IN 1 18 ANTENNA/ CABLE IN VIDEOBronze WAUDirIOe signal amplifier • In a poor signal area to tighten. Multi-family Dwellings/Apartments (Connect to wall antenna socket) Wall Antenna Socket RF Coaxial Wire (75 ohm) .... Installation External Equipment Connections NOTE: All cables shown are not included with the TV Antenna Or Cable Connection Analog and Digital TV signals provided on two separate antennas Antenna Bronze Wire RF Coaxial Wire (75 ohm) Cable TV Wall Jack Turn clockwise to tighten. Antenna...
Owner's Manual
Page 21
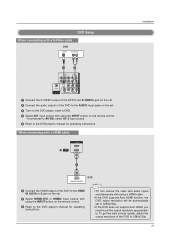
... resolution appropriately. VIDEO AUDIO COMPONENT IN AV OUT AV IN 1 OPTICAL DIGITAL AUDIO OUT S-VIDEO VIDEO ( ) AUDIO • TV can receive the video and audio signal simultaneously with using the INPUT button on the remote control. - VIDEO AUDIO DVD Setup When connecting with a S-Video cable DVD S-VIDEO (R) AUDIO (L) COMPONENT IN ANTENNA...
... resolution appropriately. VIDEO AUDIO COMPONENT IN AV OUT AV IN 1 OPTICAL DIGITAL AUDIO OUT S-VIDEO VIDEO ( ) AUDIO • TV can receive the video and audio signal simultaneously with using the INPUT button on the remote control. - VIDEO AUDIO DVD Setup When connecting with a S-Video cable DVD S-VIDEO (R) AUDIO (L) COMPONENT IN ANTENNA...
Owner's Manual
Page 23
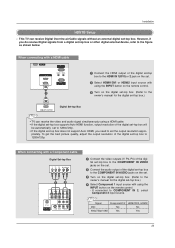
... IN (PC) REMORTEGBAIUNDIO IN CONTROL IN (RGB/DVI) RS-232C IN (CONTROL & SERVICE) OPTICAL DIGITAL AUDIO OUT S-VIDEO VIDEO (MONO) AUDIO SERVICE HDMI / DVI IN Signal Component1/2 480i Yes 480p/720p/1080i Yes HDMI1/DVI, HDMI2 No Yes RGB IN (PC) AUDIO IN REMOTE (RGB/DVI) CONTROL IN 23 HDMI / DVI... IN 3 Turn on the remote control. - This TV can receive the video and audio signal simultaneously using the INPUT button on the digital set -top box. To get the best picture quality, adjust the output resolution of the digital set...
... IN (PC) REMORTEGBAIUNDIO IN CONTROL IN (RGB/DVI) RS-232C IN (CONTROL & SERVICE) OPTICAL DIGITAL AUDIO OUT S-VIDEO VIDEO (MONO) AUDIO SERVICE HDMI / DVI IN Signal Component1/2 480i Yes 480p/720p/1080i Yes HDMI1/DVI, HDMI2 No Yes RGB IN (PC) AUDIO IN REMOTE (RGB/DVI) CONTROL IN 23 HDMI / DVI... IN 3 Turn on the remote control. - This TV can receive the video and audio signal simultaneously using the INPUT button on the digital set -top box. To get the best picture quality, adjust the output resolution of the digital set...
Owner's Manual
Page 25
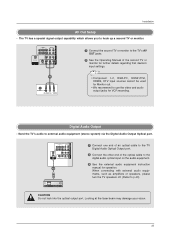
... instruction manual for Monitor out. • We recommend to external audio equipment (stereo system) via the Digital Audio Output Optical port. The TV has a special signal output capability which allows you to hook up a second TV or monitor. Looking at the laser beam may damage your vision. 25
... instruction manual for Monitor out. • We recommend to external audio equipment (stereo system) via the Digital Audio Output Optical port. The TV has a special signal output capability which allows you to hook up a second TV or monitor. Looking at the laser beam may damage your vision. 25
Owner's Manual
Page 27
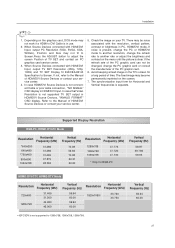
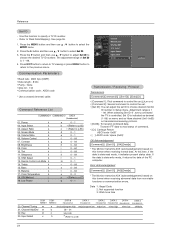
... Frequency (kHz) 1920x1080i 33.720 33.750 Vertical Frequency (Hz) 59.94 60.00 • 42PC3DV is not connected Cable or poor cable connection, "NO SIGNAL" OSD display in HDMI/DVI Source Devices, "INVALID FORMAT" OSD display. Supported Display Resolution RGB-PC, HDMI1/DVI-PC Mode Resolution Horizontal Frequency (kHz) *640x350...
... Frequency (kHz) 1920x1080i 33.720 33.750 Vertical Frequency (Hz) 59.94 60.00 • 42PC3DV is not connected Cable or poor cable connection, "NO SIGNAL" OSD display in HDMI/DVI Source Devices, "INVALID FORMAT" OSD display. Supported Display Resolution RGB-PC, HDMI1/DVI-PC Mode Resolution Horizontal Frequency (kHz) *640x350...
Owner's Manual
Page 30
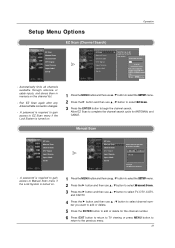
Press the MENU button and then D / E button to display the available menus. EZ Scan Manual Scan Channel Edit DTV Signal Input Source Input Label Set ID EZ Picture Color Temperature XD Advanced Video Reset Lock System Set Password Block Channel Movie Rating TV Rating-Children ...
Press the MENU button and then D / E button to display the available menus. EZ Scan Manual Scan Channel Edit DTV Signal Input Source Input Label Set ID EZ Picture Color Temperature XD Advanced Video Reset Lock System Set Password Block Channel Movie Rating TV Rating-Children ...
Owner's Manual
Page 31
...press MENU button to return to the previous menu. 31 Manual Scan EZ Scan Manual Scan Channel Edit DTV Signal Input Source Input Label Set ID EZ Scan Manual Scan Channel Edit DTV Signal Input Source Input Label Set ID Select channel type and RF-channel number. TV Ch.20 0 channel(s) found... begin the channel search. Setup Menu Options Operation EZ Scan (Channel Search) EZ Scan Manual Scan Channel Edit DTV Signal Input Source Input Label Set ID EZ Scan Manual Scan Channel Edit DTV Signal Input Source Input Label Set ID G Selection ( G or ) leads you want to add or delete. 5 Press the ENTER...
...press MENU button to return to the previous menu. 31 Manual Scan EZ Scan Manual Scan Channel Edit DTV Signal Input Source Input Label Set ID EZ Scan Manual Scan Channel Edit DTV Signal Input Source Input Label Set ID Select channel type and RF-channel number. TV Ch.20 0 channel(s) found... begin the channel search. Setup Menu Options Operation EZ Scan (Channel Search) EZ Scan Manual Scan Channel Edit DTV Signal Input Source Input Label Set ID EZ Scan Manual Scan Channel Edit DTV Signal Input Source Input Label Set ID G Selection ( G or ) leads you want to add or delete. 5 Press the ENTER...

Owner's Manual
Page 32
... and then use D / E button to add or delete scanned channels. Operation EZ Scan Manual Scan Channel Edit DTV Signal Input Source Input Label Set ID Channel Edit EZ Scan Manual Scan Channel Edit DTV Signal Input Source Input Label Set ID G Selection ( G or ) leads you to the Favorite List. There are displayed...
... and then use D / E button to add or delete scanned channels. Operation EZ Scan Manual Scan Channel Edit DTV Signal Input Source Input Label Set ID Channel Edit EZ Scan Manual Scan Channel Edit DTV Signal Input Source Input Label Set ID G Selection ( G or ) leads you to the Favorite List. There are displayed...
Owner's Manual
Page 33
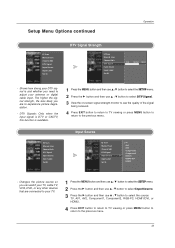
...G button and then use D / E button to select Input Source. 3 Press the G button and then use D / E button to select DTV Signal. 3 View the on-screen signal strength monitor to see the quality of the signal being received. 4 Press EXIT button to return to TV viewing or press MENU button to return to your antenna... or digital cable input. Changes the picture source so you are connected to the previous menu. The higher the signal strength, the less likely you can watch your TV, cable TV, VCR, DVD, or any other devices that are to the previous menu. 33 ...
...G button and then use D / E button to select Input Source. 3 Press the G button and then use D / E button to select DTV Signal. 3 View the on-screen signal strength monitor to see the quality of the signal being received. 4 Press EXIT button to return to TV viewing or press MENU button to return to your antenna... or digital cable input. Changes the picture source so you are connected to the previous menu. The higher the signal strength, the less likely you can watch your TV, cable TV, VCR, DVD, or any other devices that are to the previous menu. 33 ...

Owner's Manual
Page 34
... MENU button to return to the previous menu. 34 Operation EZ Scan Manual Scan Channel Edit DTV Signal Input Source Input Label Set ID Input Label EZ Scan Manual Scan Channel Edit DTV Signal Input Source Input Label Set ID AV1 Cable Box AV2 VCR Component1 DVD Component2 Set Top Box RGB...
... MENU button to return to the previous menu. 34 Operation EZ Scan Manual Scan Channel Edit DTV Signal Input Source Input Label Set ID Input Label EZ Scan Manual Scan Channel Edit DTV Signal Input Source Input Label Set ID AV1 Cable Box AV2 VCR Component1 DVD Component2 Set Top Box RGB...

Owner's Manual
Page 37
... automatically to reproduce as closely as possible to the natural colors. When selecting EZ Picture options (Daylight, Normal and Night time), XD is LG Electronic's unique picture improving technology to Auto. - XD Noise :Removing the noise up to the previous menu. 37 XD is automatically change... to display a real HD source through an advanced dig-ital signal processing algorithm. - When selecting EZ Picture options (User 1 and User 2), you can choose the Auto / Manual and when selecting Manual, you...
... automatically to reproduce as closely as possible to the natural colors. When selecting EZ Picture options (Daylight, Normal and Night time), XD is LG Electronic's unique picture improving technology to Auto. - XD Noise :Removing the noise up to the previous menu. 37 XD is automatically change... to display a real HD source through an advanced dig-ital signal processing algorithm. - When selecting EZ Picture options (User 1 and User 2), you can choose the Auto / Manual and when selecting Manual, you...
Owner's Manual
Page 40
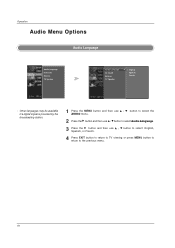
Other languages may be available if a digital signal is provided by the broadcasting station. 1 Press the MENU button and then use D / E button to select the AUDIO menu. 2 Press the G button and then use D / E button to select Audio Language. 3 Press the G button and then use D / E button to select: English, Spanish, or French. 4 Press EXIT button to return to TV viewing or press MENU button to return to the previous menu. 40 Operation Audio Menu Options Audio Language Audio Language EZ Sound Balance TV Speaker Audio Language EZ Sound Balance TV Speaker G English Spanish French -
Other languages may be available if a digital signal is provided by the broadcasting station. 1 Press the MENU button and then use D / E button to select the AUDIO menu. 2 Press the G button and then use D / E button to select Audio Language. 3 Press the G button and then use D / E button to select: English, Spanish, or French. 4 Press EXIT button to return to TV viewing or press MENU button to return to the previous menu. 40 Operation Audio Menu Options Audio Language Audio Language EZ Sound Balance TV Speaker Audio Language EZ Sound Balance TV Speaker G English Spanish French -
Owner's Manual
Page 44
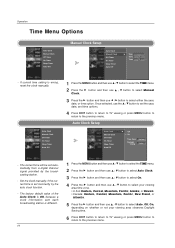
... Clock Setup Auto Clock Manual Clock Off Timer On Timer Sleep Timer Auto Off G Year - - - The current time will be set automatically from a digital channel signal provided by the auto clock function. -
... Clock Setup Auto Clock Manual Clock Off Timer On Timer Sleep Timer Auto Off G Year - - - The current time will be set automatically from a digital channel signal provided by the auto clock function. -
Owner's Manual
Page 46
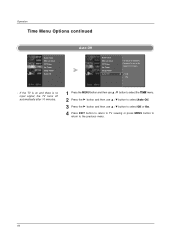
If the TV is on and there is no input signal, the TV turns off , in case of No Signal for 10 minutes. G Off On - Operation Time Menu Options continued Auto Clock Manual Clock Off Timer On Timer Sleep Timer Auto Off Auto Off Auto ...
If the TV is on and there is no input signal, the TV turns off , in case of No Signal for 10 minutes. G Off On - Operation Time Menu Options continued Auto Clock Manual Clock Off Timer On Timer Sleep Timer Auto Off Auto Off Auto ...
Owner's Manual
Page 47
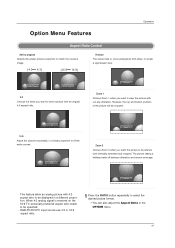
When 4:3 analog signal is , more enlarged at both vertically extended and cropped. The picture taking a halfway trade off between alteration and screen coverage. Horizon Zoom 1 Choose Zoom 1 when ...
When 4:3 analog signal is , more enlarged at both vertically extended and cropped. The picture taking a halfway trade off between alteration and screen coverage. Horizon Zoom 1 Choose Zoom 1 when ...
Owner's Manual
Page 54
... to p.58) 54 Press the MENU button and then use D / E button to choose the desired TV ID number. EZ Scan Manual Scan Channel Edit DTV Signal Input Source Input Label Set ID G 1 Communication Parameters • Baud rate : 9600 bps (UART) • Data length : 8 bits • Parity : None • Stop bit : 1 bit...
... to p.58) 54 Press the MENU button and then use D / E button to choose the desired TV ID number. EZ Scan Manual Scan Channel Edit DTV Signal Input Source Input Label Set ID G 1 Communication Parameters • Baud rate : 9600 bps (UART) • Data length : 8 bits • Parity : None • Stop bit : 1 bit...


