

Owner's Manual
Page 1
Refer to the label on the back cover and quote this manual carefully before operating your dealer when requiring service. To your set . Retain it for future reference. Record model number and serial number of the set . ENGLISH LCD TV PLASMA TV OWNER'S MANUAL LCD TV MODELS PLASMA TV MODELS 26LC4R* 26LC7R* 32LC4R* 32LC7R* 37LC4R* 37LC7R* 42LC4R* 42LC7R* 32LB9R* 42LB9R* 42PC5R* 42PC5RV* 42PC7R* 50PC5R* Please read this information.
Refer to the label on the back cover and quote this manual carefully before operating your dealer when requiring service. To your set . Retain it for future reference. Record model number and serial number of the set . ENGLISH LCD TV PLASMA TV OWNER'S MANUAL LCD TV MODELS PLASMA TV MODELS 26LC4R* 26LC7R* 32LC4R* 32LC7R* 37LC4R* 37LC7R* 42LC4R* 42LC7R* 32LB9R* 42LB9R* 42PC5R* 42PC5RV* 42PC7R* 50PC5R* Please read this information.

Owner's Manual
Page 3
... This feature is not available for all models. This may cause scratching or discolouration. POSITION 8 0 HOLD INDEX 6 9 1 4 VOL FAV MUTE 2 7 5 3 TIME SIZE REVEAL ? Owner's Manual Owner's manual Owner's Manual Batteries EXIT LIST OK MENU RATIO PIP PSRIM-PLINK PIP PIP PR+ INPUTTINVPUT POWER DVD TEXT STB TMVODE Q.VIEW SLEEP PIP I /II INPUT OK...
... This feature is not available for all models. This may cause scratching or discolouration. POSITION 8 0 HOLD INDEX 6 9 1 4 VOL FAV MUTE 2 7 5 3 TIME SIZE REVEAL ? Owner's Manual Owner's manual Owner's Manual Batteries EXIT LIST OK MENU RATIO PIP PSRIM-PLINK PIP PIP PR+ INPUTTINVPUT POWER DVD TEXT STB TMVODE Q.VIEW SLEEP PIP I /II INPUT OK...

Owner's Manual
Page 4
... Key Functions 32 Turning on the TV 34 Programme Selection 34 Volume Adjustment 34 On Screen Menus Selection and Adjustment ......35 Auto Programme Tuning 36 Manual Programme Tuning 37 Fine Tuning 38 Assigning a Station Name 39 Programme Edit 40 Favourite Programme 41 Selecting the Programme Table 42 Key lock 43 44... Setup 26 - Picture Mode-User Option 52 - User Option 53 - Picture Improvement Technology 54 Demo 55 Advanced - Auto Colour Tone Control(Warm/Medium/Cool) 51 Manual Picture Adjustment - Cinema 56 Advanced - Sound Mode 62 Sound Setting Adjustment -
... Key Functions 32 Turning on the TV 34 Programme Selection 34 Volume Adjustment 34 On Screen Menus Selection and Adjustment ......35 Auto Programme Tuning 36 Manual Programme Tuning 37 Fine Tuning 38 Assigning a Station Name 39 Programme Edit 40 Favourite Programme 41 Selecting the Programme Table 42 Key lock 43 44... Setup 26 - Picture Mode-User Option 52 - User Option 53 - Picture Improvement Technology 54 Demo 55 Advanced - Auto Colour Tone Control(Warm/Medium/Cool) 51 Manual Picture Adjustment - Cinema 56 Advanced - Sound Mode 62 Sound Setting Adjustment -
Owner's Manual
Page 12
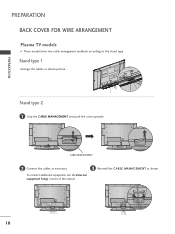
Stand type 1 Arrange the cables as necessary. CABLE MANAGEMENT 2 Connect the cables as shown picture. Stand type 2 1 Grip the CABLE MANAGEMENT and push the cover upwards. To connect additional equipment, see the External equipment Setup section of the manual. 3 Reinstall the CABLE MANAGEMENT as shown. 10 PREPARATION PREPARATION BACK COVER FOR WIRE ARRANGEMENT Plasma TV models ■ These models have two cable arrangement methods according to the stand type.
Stand type 1 Arrange the cables as necessary. CABLE MANAGEMENT 2 Connect the cables as shown picture. Stand type 2 1 Grip the CABLE MANAGEMENT and push the cover upwards. To connect additional equipment, see the External equipment Setup section of the manual. 3 Reinstall the CABLE MANAGEMENT as shown. 10 PREPARATION PREPARATION BACK COVER FOR WIRE ARRANGEMENT Plasma TV models ■ These models have two cable arrangement methods according to the stand type.

Owner's Manual
Page 17
If connected to the owner's manual for the LCD TV models. Signal 480i/576i 480p/576p 720p/1080i 1080p Component Yes Yes Yes No HDMI1/2 No Yes Yes Yes 1 2 VIDEO AUDIO ...
If connected to the owner's manual for the LCD TV models. Signal 480i/576i 480p/576p 720p/1080i 1080p Component Yes Yes Yes No HDMI1/2 No Yes Yes Yes 1 2 VIDEO AUDIO ...

Owner's Manual
Page 18
... IN Connecting a set-top box with using the INPUT button on the remote control. 3 Turn on the digital set-top box. (Refer to the owner's manual for the digital set-top box.) HHDDMMI DI/DVVI ININ 1 HHDDMMII IINN 2 1 ! G If the digital set -top box supports Auto HDMI function, the output resolution...
... IN Connecting a set-top box with using the INPUT button on the remote control. 3 Turn on the digital set-top box. (Refer to the owner's manual for the digital set-top box.) HHDDMMI DI/DVVI ININ 1 HHDDMMII IINN 2 1 ! G If the digital set -top box supports Auto HDMI function, the output resolution...

Owner's Manual
Page 19
Connecting with a HDMI to DVI cable HHDDMMI DI/DVVI ININ 1 HDMI IN RGB IN RGB(PC) AUDIO (RGB/DVI) RGB(PC) AUDIO (RGB/DVI) AV IN 1 AV OUT L/MONO 1 2 EXTERNAL EQUIPMENT SETUP 1 Connect the DVI output of the digital set-top box to the HDMI/DVI IN 1 jack on the TV. 2 Connect the audio output of the digital set-top box to the AUDIO(RGB/DVI) jack on the TV. 3 Turn on the digital set-top box. (Refer to the owner's manual for the digital set-top box.) 4 Select HDMI1 input source using the INPUT button on the remote control. 17
Connecting with a HDMI to DVI cable HHDDMMI DI/DVVI ININ 1 HDMI IN RGB IN RGB(PC) AUDIO (RGB/DVI) RGB(PC) AUDIO (RGB/DVI) AV IN 1 AV OUT L/MONO 1 2 EXTERNAL EQUIPMENT SETUP 1 Connect the DVI output of the digital set-top box to the HDMI/DVI IN 1 jack on the TV. 2 Connect the audio output of the digital set-top box to the AUDIO(RGB/DVI) jack on the TV. 3 Turn on the digital set-top box. (Refer to the owner's manual for the digital set-top box.) 4 Select HDMI1 input source using the INPUT button on the remote control. 17
Owner's Manual
Page 20
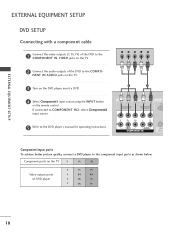
... ports on the remote control. HDMI DVI IN HDMI IN RG If connected to COMPONENT IN2, select Component2 input source. 1 5 Refer to the DVD player's manual for operating instructions. 2 VIDEO AUDIO COMPONENT IN Component Input ports To achieve better picture quality, connect a DVD player to the COMPO-
... ports on the remote control. HDMI DVI IN HDMI IN RG If connected to COMPONENT IN2, select Component2 input source. 1 5 Refer to the DVD player's manual for operating instructions. 2 VIDEO AUDIO COMPONENT IN Component Input ports To achieve better picture quality, connect a DVD player to the COMPO-
Owner's Manual
Page 21
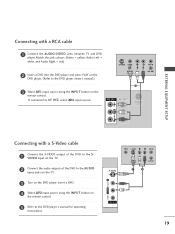
... 1 Connect the AUDIO/VIDEO jacks between TV and DVD player. HDMI IN ENT IN 2 Connect the audio outputs of the DVD to the DVD player's manual for operating instructions. Match the jack colours (Video = yellow, Audio Left = white, and Audio Right = red) S-VIDEO VIDEO L R ANT IN 2 Insert a DVD... into the DVD player and press PLAY on the DVD player. (Refer to the DVD player owner's manual.) OUTPUT SWITCH ANT OUT 3 Select AV1 input source using the INPUT button on the remote control. 5 Refer to the S VIDEO input on the remote control...
... 1 Connect the AUDIO/VIDEO jacks between TV and DVD player. HDMI IN ENT IN 2 Connect the audio outputs of the DVD to the DVD player's manual for operating instructions. Match the jack colours (Video = yellow, Audio Left = white, and Audio Right = red) S-VIDEO VIDEO L R ANT IN 2 Insert a DVD... into the DVD player and press PLAY on the DVD player. (Refer to the DVD player owner's manual.) OUTPUT SWITCH ANT OUT 3 Select AV1 input source using the INPUT button on the remote control. 5 Refer to the S VIDEO input on the remote control...

Owner's Manual
Page 22
... HDMI IN 2 jack on the remote control. To get the best picture quality, adjust the output resolution of the source device to the DVD player's manual for operating instructions. 1 ! NOTE G The TV can receive video and audio signals simultaneously when using the INPUT button on the TV. 2 Select HDMI1 or HDMI2...
... HDMI IN 2 jack on the remote control. To get the best picture quality, adjust the output resolution of the source device to the DVD player's manual for operating instructions. 1 ! NOTE G The TV can receive video and audio signals simultaneously when using the INPUT button on the TV. 2 Select HDMI1 or HDMI2...

Owner's Manual
Page 24
... = yellow, Audio Left = white, and Audio Right = red) 2 Insert a video tape into the VCR and press PLAY on the VCR. (Refer to the VCR owner's manual.) 3 Select AV1 input source using the INPUT button on the remote control. VIDEO L/MONO A EXTERNAL EQUIPMENT SETUP AV IN 2 Connecting with a RCA cable S-VIDEO VIDEO...
... = yellow, Audio Left = white, and Audio Right = red) 2 Insert a video tape into the VCR and press PLAY on the VCR. (Refer to the VCR owner's manual.) 3 Select AV1 input source using the INPUT button on the remote control. VIDEO L/MONO A EXTERNAL EQUIPMENT SETUP AV IN 2 Connecting with a RCA cable S-VIDEO VIDEO...

Owner's Manual
Page 25
... of the VCR to the S VIDEO input on the remote control. ! NOTE G If both S-VIDEO and VIDEO sockets have been conneced to the VCR owner's manual.) 4 Select AV2 input source using the INPUT button on the TV. EXTERNAL EQUIPMENT SETUP Connecting with a S-Video cable 1 Connect the S-VIDEO output of the VCR...
... of the VCR to the S VIDEO input on the remote control. ! NOTE G If both S-VIDEO and VIDEO sockets have been conneced to the VCR owner's manual.) 4 Select AV2 input source using the INPUT button on the TV. EXTERNAL EQUIPMENT SETUP Connecting with a S-Video cable 1 Connect the S-VIDEO output of the VCR...
Owner's Manual
Page 30
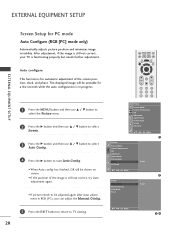
..... VGA Mode Reset G To Set DE F G OK MENU 5 Press the EXIT button to return to start Auto Config.. • When Auto config. Manual Config. After adjustment, if the image is still not correct, your TV is for automatic adjustment of the image is still not correct, try Auto...and phase. EXTERNAL EQUIPMENT SETUP EXTERNAL EQUIPMENT SETUP Screen Setup for a few seconds while the auto configuration is in RGB (PC), you can adjust the Manual Config.. has finished, OK will be adjusted again after Auto adjustment in progress. 1 Press the MENU button and then use D / E button to ...
..... VGA Mode Reset G To Set DE F G OK MENU 5 Press the EXIT button to return to start Auto Config.. • When Auto config. Manual Config. After adjustment, if the image is still not correct, your TV is for automatic adjustment of the image is still not correct, try Auto...and phase. EXTERNAL EQUIPMENT SETUP EXTERNAL EQUIPMENT SETUP Screen Setup for a few seconds while the auto configuration is in RGB (PC), you can adjust the Manual Config.. has finished, OK will be adjusted again after Auto adjustment in progress. 1 Press the MENU button and then use D / E button to ...
Owner's Manual
Page 31
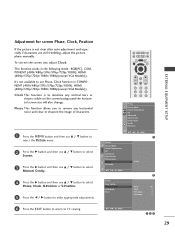
... select the Picture menu. 2 Press the G button and then use D / E button to select Screen. 3 Press the G button and then use D / E button to select Manual Config.. 4 Press the G button and then use Phase, Clock function in the following mode : RGB[PC], COMPONENT (480i/480p/576i/576p/720p/1080i), HDMI (480p... This function allows you to TV viewing. VGA Mode Reset G Phase Clock H-Position V-Position 1 2 50 0 0 0 DE F G OK MENU 345 29 Manual Config. Clock This function is not clear after auto adjustment and especially if characters are still trembling, adjust the picture phase...
... select the Picture menu. 2 Press the G button and then use D / E button to select Screen. 3 Press the G button and then use D / E button to select Manual Config.. 4 Press the G button and then use Phase, Clock function in the following mode : RGB[PC], COMPONENT (480i/480p/576i/576p/720p/1080i), HDMI (480p... This function allows you to TV viewing. VGA Mode Reset G Phase Clock H-Position V-Position 1 2 50 0 0 0 DE F G OK MENU 345 29 Manual Config. Clock This function is not clear after auto adjustment and especially if characters are still trembling, adjust the picture phase...
Owner's Manual
Page 32
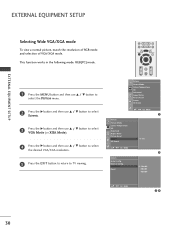
... DE F G OK MENU 1 Picture Picture Mode Colour Temperature XD Advanced Aspect Ratio Picture Reset Screen XD Demo G To Set DE F G OK MENU 2 Screen Auto Config. Manual Config.
... DE F G OK MENU 1 Picture Picture Mode Colour Temperature XD Advanced Aspect Ratio Picture Reset Screen XD Demo G To Set DE F G OK MENU 2 Screen Auto Config. Manual Config.
Owner's Manual
Page 33
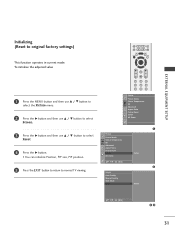
Manual Config. VGA Mode Reset G To Set DE F G OK MENU 34 31 To initialize the adjusted value 1 Press the MENU button and then use D / E button to ...
Manual Config. VGA Mode Reset G To Set DE F G OK MENU 34 31 To initialize the adjusted value 1 Press the MENU button and then use D / E button to ...

Owner's Manual
Page 37
... to display each menu. 2 Press the G button and then D / E button to select a menu item. 3 Change the setting of an item in this manual, the OSD (On Screen Display) may differ slightly from your TV's because it provides graphical presentation. You can move to adjust the screen status conveniently...(On Screen Display) may be different from that shown in the sub or pull-down menu with F / G button. Setup Auto Tuning Manual Tuning Programme Edit Favourite Programme DE F G OK MENU Setup MENU Picture Picture Mode Colour Temperature XD Advanced Aspect Ratio Picture Reset Screen XD Demo...
... to display each menu. 2 Press the G button and then D / E button to select a menu item. 3 Change the setting of an item in this manual, the OSD (On Screen Display) may differ slightly from your TV's because it provides graphical presentation. You can move to adjust the screen status conveniently...(On Screen Display) may be different from that shown in the sub or pull-down menu with F / G button. Setup Auto Tuning Manual Tuning Programme Edit Favourite Programme DE F G OK MENU Setup MENU Picture Picture Mode Colour Temperature XD Advanced Aspect Ratio Picture Reset Screen XD Demo...

Owner's Manual
Page 38
Stations can be tuned using automatic or manual modes. It is recommended that you use Auto tuning during installation of it, i.e.'05' for 5. 7 Press the D / E button to select Search. 8 Press the G button to ... stations which can be received are stored. LIST MENU Q.VIEW EXIT SLEEP OK FAV VOL PR MUTE Setup Auto Tuning Manual Tuning Programme Edit Favourite Programme DE F G OK MENU 1 Setup Auto Tuning Manual Tuning Programme Edit Favourite Programme G To Set DE F G OK MENU 2 Auto Tuning System Storage From Search G BG I /II (U.K. / Ireland...
Stations can be tuned using automatic or manual modes. It is recommended that you use Auto tuning during installation of it, i.e.'05' for 5. 7 Press the D / E button to select Search. 8 Press the G button to ... stations which can be received are stored. LIST MENU Q.VIEW EXIT SLEEP OK FAV VOL PR MUTE Setup Auto Tuning Manual Tuning Programme Edit Favourite Programme DE F G OK MENU 1 Setup Auto Tuning Manual Tuning Programme Edit Favourite Programme G To Set DE F G OK MENU 2 Auto Tuning System Storage From Search G BG I /II (U.K. / Ireland...

Owner's Manual
Page 39
... desire. 1 Press the MENU button and then D / E button to select the Setup menu. 2 Press the G button and then D / E button to select Manual Tuning. 3 Press the G button and then D / E button to select Storage. 4 Press the F / G button or NUMBER buttons to select the desired programme ...PROGRAMME CONTROL LIST MENU Q.VIEW EXIT SLEEP OK FAV VOL PR MUTE 1 2 3 4 5 6 7 8 9 0 TIME HOLD Setup Auto Tuning Manual Tuning Programme Edit Favourite Programme DE F G OK MENU 1 Setup Auto Tuning MMaannuuaall TTuunniinngg Programme Edit Favourite Programme G To Set DE F G OK MENU...
... desire. 1 Press the MENU button and then D / E button to select the Setup menu. 2 Press the G button and then D / E button to select Manual Tuning. 3 Press the G button and then D / E button to select Storage. 4 Press the F / G button or NUMBER buttons to select the desired programme ...PROGRAMME CONTROL LIST MENU Q.VIEW EXIT SLEEP OK FAV VOL PR MUTE 1 2 3 4 5 6 7 8 9 0 TIME HOLD Setup Auto Tuning Manual Tuning Programme Edit Favourite Programme DE F G OK MENU 1 Setup Auto Tuning MMaannuuaall TTuunniinngg Programme Edit Favourite Programme G To Set DE F G OK MENU...

Owner's Manual
Page 40
... Storage System Band Channel Fine Search Name G F/G DE F G OK MENU 345 38 LIST MENU Q.VIEW EXIT SLEEP OK FAV VOL PR MUTE 1 2 3 4 5 6 7 8 9 Setup Auto Tuning Manual Tuning Programme Edit Favourite Programme 4 Press the G button and then F / G button to fine tune for the best picture and sound. 5 Press the O K button to store... necessary if reception is poor. 1 Press the MENU button and then D / E button to select the Setup menu. 2 Press the G button and then D / E button to select Manual Tuning. 3 Press the G button and then D / E button to normal TV viewing.
... Storage System Band Channel Fine Search Name G F/G DE F G OK MENU 345 38 LIST MENU Q.VIEW EXIT SLEEP OK FAV VOL PR MUTE 1 2 3 4 5 6 7 8 9 Setup Auto Tuning Manual Tuning Programme Edit Favourite Programme 4 Press the G button and then F / G button to fine tune for the best picture and sound. 5 Press the O K button to store... necessary if reception is poor. 1 Press the MENU button and then D / E button to select the Setup menu. 2 Press the G button and then D / E button to select Manual Tuning. 3 Press the G button and then D / E button to normal TV viewing.


