
Owner's Manual (English)
Page 1
www.lgusa.com / www.lg.ca ENERGY STAR is a set . See the label attached on the back cover and quote this information to your set of the set. has determined that this product meets the ENERGY STAR guidelines for future reference. LCD TV OWNER'S MANUAL LCD TV MODELS 37LB5D / 42LB5D / 47LB5D 52LB5D 32LB4D / 37LB4D / 42LB4D Please read this manual carefully...
www.lgusa.com / www.lg.ca ENERGY STAR is a set . See the label attached on the back cover and quote this information to your set of the set. has determined that this product meets the ENERGY STAR guidelines for future reference. LCD TV OWNER'S MANUAL LCD TV MODELS 37LB5D / 42LB5D / 47LB5D 52LB5D 32LB4D / 37LB4D / 42LB4D Please read this manual carefully...
Owner's Manual (English)
Page 6
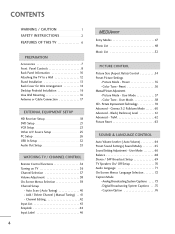
... 26 USB In Setup 32 Audio Out Setup 33 WATCHING TV / CHANNEL CONTROL Remote Control Functions 34 Turning on TV 36 Channel Selection 37 Volume Adjustment 38 On-Screen Menus Selection 39 Channel Setup - Channel Editing 42 Input List 43 SimpLink 44 Input Label 46 4 MEDIAHOST ...MEDIAHOST Entry Modes 47 Photo List 48 Music List 52 PICTURE CONTROL Picture Size (Aspect Ratio) Control 54 Preset Picture Settings...
... 26 USB In Setup 32 Audio Out Setup 33 WATCHING TV / CHANNEL CONTROL Remote Control Functions 34 Turning on TV 36 Channel Selection 37 Volume Adjustment 38 On-Screen Menus Selection 39 Channel Setup - Channel Editing 42 Input List 43 SimpLink 44 Input Label 46 4 MEDIAHOST ...MEDIAHOST Entry Modes 47 Photo List 48 Music List 52 PICTURE CONTROL Picture Size (Aspect Ratio) Control 54 Preset Picture Settings...
Owner's Manual (English)
Page 7
Auto Clock Setup 77 - Manual Clock Setup 78 Auto On/ Off Time Setting 79 Sleep Time Setting 80 Auto Shut-off Setting 81 PARENTAL CONTROL / RATINGS Set Password & Lock System 82 Channel Blocking 84 Movie & TV Rating 85 External Input Blocking 88 Key Lock 88 APPENDIX Troubleshooting 89 Maintenance 91 Product Specifications 92 Programming the Remote Control 94 IR Codes 98 External Control through RS-232C 100 5 TIME SETTING Clock Setting -
Auto Clock Setup 77 - Manual Clock Setup 78 Auto On/ Off Time Setting 79 Sleep Time Setting 80 Auto Shut-off Setting 81 PARENTAL CONTROL / RATINGS Set Password & Lock System 82 Channel Blocking 84 Movie & TV Rating 85 External Input Blocking 88 Key Lock 88 APPENDIX Troubleshooting 89 Maintenance 91 Product Specifications 92 Programming the Remote Control 94 IR Codes 98 External Control through RS-232C 100 5 TIME SETTING Clock Setting -
Owner's Manual (English)
Page 10
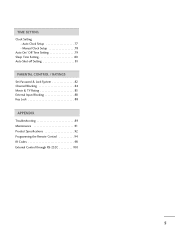
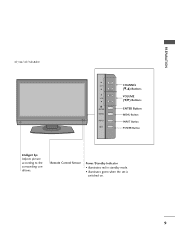
...Indicator • illuminates red in standby mode. • illuminates green when the set is included with your product has a protection tape attached, remove the tape. I If your product, use it). 32/37/42LB4D CH CHANNEL (E,D) Buttons VOLUME VOL (F,G) Buttons ENTER MENU ENTER Button MENU Button... INPUT INPUT Button R /I Here shown may be somewhat different from your TV. And then wipe the product with a cloth (If a polishing cloth is...
...Indicator • illuminates red in standby mode. • illuminates green when the set is included with your product has a protection tape attached, remove the tape. I If your product, use it). 32/37/42LB4D CH CHANNEL (E,D) Buttons VOLUME VOL (F,G) Buttons ENTER MENU ENTER Button MENU Button... INPUT INPUT Button R /I Here shown may be somewhat different from your TV. And then wipe the product with a cloth (If a polishing cloth is...
Owner's Manual (English)
Page 11
PREPARATION 37/42/47/52LB5D CH VOL ENTER MENU INPUT /I CHANNEL (E,D) Buttons VOLUME (F,G) Buttons ENTER Button MENU Button INPUT Button POWER Button Intelligent Eye Adjusts picture according to the surrounding conditions. Remote Control Sensor Power/Standby Indicator • illuminates red in standby mode. • illuminates green when the set is switched on. 9
PREPARATION 37/42/47/52LB5D CH VOL ENTER MENU INPUT /I CHANNEL (E,D) Buttons VOLUME (F,G) Buttons ENTER Button MENU Button INPUT Button POWER Button Intelligent Eye Adjusts picture according to the surrounding conditions. Remote Control Sensor Power/Standby Indicator • illuminates red in standby mode. • illuminates green when the set is switched on. 9
Owner's Manual (English)
Page 14
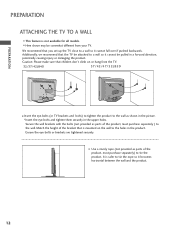
... a wall so it cannot be somewhat different from the TV. 32/37/42LB4D 37/42/47/52LB5D I Here shown may be pulled in a forward direction, potentially causing injury or damaging the product. Additionally, we recommend that you set up the TV close to the holes in the upper holes. We recommend... that the TV be attached to the wall. Ensure the...
... a wall so it cannot be somewhat different from the TV. 32/37/42LB4D 37/42/47/52LB5D I Here shown may be pulled in a forward direction, potentially causing injury or damaging the product. Additionally, we recommend that you set up the TV close to the holes in the upper holes. We recommend... that the TV be attached to the wall. Ensure the...
Owner's Manual (English)
Page 20
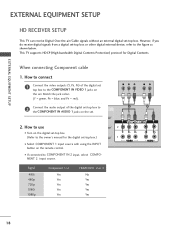
... Digital Contents. However, if you do receive digital signals from a digital set . EXTERNAL EQUIPMENT SETUP EXTERNAL EQUIPMENT SETUP HD RECEIVER SETUP This TV can receive Digital Over-the-air/Cable signals without an external digital set -top bo(xDV.)I) I If connected to the figure as shown below.... This TV supports HDCP (High-bandwidth Digital Contents Protection) protocol for the digital set -top box. How to use I Turn on the remote control...
... Digital Contents. However, if you do receive digital signals from a digital set . EXTERNAL EQUIPMENT SETUP EXTERNAL EQUIPMENT SETUP HD RECEIVER SETUP This TV can receive Digital Over-the-air/Cable signals without an external digital set -top bo(xDV.)I) I If connected to the figure as shown below.... This TV supports HDCP (High-bandwidth Digital Contents Protection) protocol for the digital set -top box. How to use I Turn on the remote control...
Owner's Manual (English)
Page 21
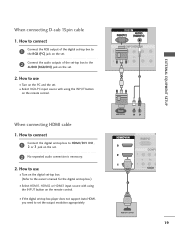
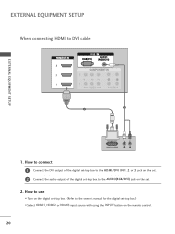
... connecting HDMI cable 1. How to connect 1 Connect the RGB output of the digital set-top box to the RGB (PC) jack on the set. 2 Connect the audio outputs of the set-top box to the AUDIO (RGB/DVI) jack on the set . 2 No separated audio connection is necessary. 2. How to connect 1 Connect the ... 19 How to HDMI/DVI IN1, 2 or 3 jack on the remote control. How to use I Turn on the digital set-top box. (Refer to set -top box.) I Turn on the remote control. I If the digital set-top box player does not support Auto HDMI, you need to the owner's manual for the digital...
... connecting HDMI cable 1. How to connect 1 Connect the RGB output of the digital set-top box to the RGB (PC) jack on the set. 2 Connect the audio outputs of the set-top box to the AUDIO (RGB/DVI) jack on the set . 2 No separated audio connection is necessary. 2. How to connect 1 Connect the ... 19 How to HDMI/DVI IN1, 2 or 3 jack on the remote control. How to use I Turn on the digital set-top box. (Refer to set -top box.) I Turn on the remote control. I If the digital set-top box player does not support Auto HDMI, you need to the owner's manual for the digital...
Owner's Manual (English)
Page 22
How to use I Select HDMI1, HDMI2 or HDMI3 input source with using the INPUT button on the digital set-top box. (Refer to the owner's manual for the digital set . 2. How to connect 1 Connect the DVI output of the digital set-top box to the HDMI/DVI IN1, 2 or 3 jack on the set. 2 Connect the audio output of the digital set-top box to DVI cable RGB 3 EXTERNAL EQUIPMENT SETUP 2 1 DVI-DTV OUTPUT L R 1. EXTERNAL EQUIPMENT SETUP When connecting HDMI to the AUDIO(RGB/DVI) jack on the set -top box.) I Turn on the remote control. 20
How to use I Select HDMI1, HDMI2 or HDMI3 input source with using the INPUT button on the digital set-top box. (Refer to the owner's manual for the digital set . 2. How to connect 1 Connect the DVI output of the digital set-top box to the HDMI/DVI IN1, 2 or 3 jack on the set. 2 Connect the audio output of the digital set-top box to DVI cable RGB 3 EXTERNAL EQUIPMENT SETUP 2 1 DVI-DTV OUTPUT L R 1. EXTERNAL EQUIPMENT SETUP When connecting HDMI to the AUDIO(RGB/DVI) jack on the set -top box.) I Turn on the remote control. 20
Owner's Manual (English)
Page 23
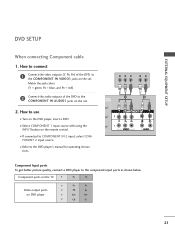
... I Select COMPONENT 1 input source with using the INPUT button on the DVD player, insert a DVD. I Refer to the COMPONENT IN VIDEO1 jacks on the set . 2. EXTERNAL EQUIPMENT SETUP DVD SETUP When connecting Component cable 1. tions. Y PB PR L R 1 2 Component Input ports To get better picture quality,... red). 2 Connect the audio outputs of the DVD to the DVD player's manual for operating instruc- Component ports on the TV Y PB PR Video output ports on the set . PONENT 2 input source. How to connect 1 Connect the video outputs (Y, PB, PR) of the DVD to the ...
... I Select COMPONENT 1 input source with using the INPUT button on the DVD player, insert a DVD. I Refer to the COMPONENT IN VIDEO1 jacks on the set . 2. EXTERNAL EQUIPMENT SETUP DVD SETUP When connecting Component cable 1. tions. Y PB PR L R 1 2 Component Input ports To get better picture quality,... red). 2 Connect the audio outputs of the DVD to the DVD player's manual for operating instruc- Component ports on the TV Y PB PR Video output ports on the set . PONENT 2 input source. How to connect 1 Connect the video outputs (Y, PB, PR) of the DVD to the ...
Owner's Manual (English)
Page 24
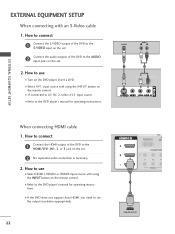
... DVD to the DVD player's manual for operating instructions. How to connect 1 Connect the HDMI output of the DVD to the S-VIDEO input on the set . 2 No separated audio connection is necessary. 2. S-VIDEO AUDIO L R 1 2 EXTERNAL EQUIPMENT SETUP When connecting HDMI cable 1. I Select HDMI1, HDMI2 .... I If the DVD does not support Auto HDMI, you need to use I Refer to the AUDIO input jacks on the set the output resolution appropriately. 22 1 HDMI-DVD OUTPUT EXTERNAL EQUIPMENT SETUP When connecting with using the INPUT button on the remote control. ...
... DVD to the DVD player's manual for operating instructions. How to connect 1 Connect the HDMI output of the DVD to the S-VIDEO input on the set . 2 No separated audio connection is necessary. 2. S-VIDEO AUDIO L R 1 2 EXTERNAL EQUIPMENT SETUP When connecting HDMI cable 1. I Select HDMI1, HDMI2 .... I If the DVD does not support Auto HDMI, you need to use I Refer to the AUDIO input jacks on the set the output resolution appropriately. 22 1 HDMI-DVD OUTPUT EXTERNAL EQUIPMENT SETUP When connecting with using the INPUT button on the remote control. ...
Owner's Manual (English)
Page 25
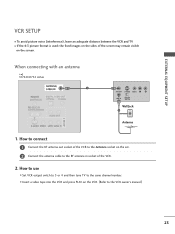
... used; the fixed images on the sides of the VCR. 2. When connecting with an antenna i.e) 37/42/47/52 inches ANTENNA/ CABLE IN 1 ANT OUT S-VIDEO VIDEO L R ANT IN OUTPUT SWITCH Wall Jack...1. EXTERNAL EQUIPMENT SETUP VCR SETUP I To avoid picture noise (interference), leave an adequate distance between the VCR and TV I Insert a video tape into the VCR and press PLAY on the VCR. (Refer to the VCR owner's ... to the Antenna socket on the set. 2 Connect the antenna cable to the same channel number. How to use I Set VCR output switch to 3 or 4 and then tune TV to the RF antenna in socket ...
... used; the fixed images on the sides of the VCR. 2. When connecting with an antenna i.e) 37/42/47/52 inches ANTENNA/ CABLE IN 1 ANT OUT S-VIDEO VIDEO L R ANT IN OUTPUT SWITCH Wall Jack...1. EXTERNAL EQUIPMENT SETUP VCR SETUP I To avoid picture noise (interference), leave an adequate distance between the VCR and TV I Insert a video tape into the VCR and press PLAY on the VCR. (Refer to the VCR owner's ... to the Antenna socket on the set. 2 Connect the antenna cable to the same channel number. How to use I Set VCR output switch to 3 or 4 and then tune TV to the RF antenna in socket ...
Owner's Manual (English)
Page 26
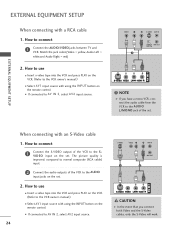
...VCR to the AUDIO input jacks on the remote control. How to use I Insert a video tape into the VCR and press PLAY on the set . 2. EXTERNAL EQUIPMENT SETUP EXTERNAL EQUIPMENT SETUP When connecting with an S-Video cable 1. Match the jack colors(Video = yellow, Audio Left = white... to the VCR owner's manual.) I D E O input on the VCR. (Refer to connect 1 Connect the S-VIDEO output of the set. I If connected to connect 1 Connect the AUDIO/VIDEO jacks between TV and VCR. How to AV IN 2, select A V 2 input source. VIDEO L R S-VIDEO ANT IN ANTENNA/ OUTPUT ANT OUT SWITCH...
...VCR to the AUDIO input jacks on the remote control. How to use I Insert a video tape into the VCR and press PLAY on the set . 2. EXTERNAL EQUIPMENT SETUP EXTERNAL EQUIPMENT SETUP When connecting with an S-Video cable 1. Match the jack colors(Video = yellow, Audio Left = white... to the VCR owner's manual.) I D E O input on the VCR. (Refer to connect 1 Connect the S-VIDEO output of the set. I If connected to connect 1 Connect the AUDIO/VIDEO jacks between TV and VCR. How to AV IN 2, select A V 2 input source. VIDEO L R S-VIDEO ANT IN ANTENNA/ OUTPUT ANT OUT SWITCH...
Owner's Manual (English)
Page 27
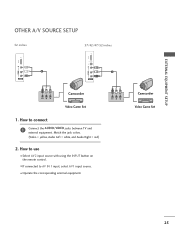
..., Audio Left = white, and Audio Right = red) 2. VIDEO L R Camcorder Video Game Set 25 I Operate the corresponding external equipment. How to connect 1 Connect the AUDIO/VIDEO jacks between TV and external equipment. EXTERNAL EQUIPMENT SETUP OTHER A/V SOURCE SETUP 32 inches 37/42/47/52 inches USB IN USB IN VIDEO L/MONO AUDIO R 1 AV IN...
..., Audio Left = white, and Audio Right = red) 2. VIDEO L R Camcorder Video Game Set 25 I Operate the corresponding external equipment. How to connect 1 Connect the AUDIO/VIDEO jacks between TV and external equipment. EXTERNAL EQUIPMENT SETUP OTHER A/V SOURCE SETUP 32 inches 37/42/47/52 inches USB IN USB IN VIDEO L/MONO AUDIO R 1 AV IN...
Owner's Manual (English)
Page 28
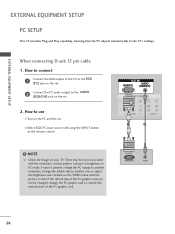
... card or consult the manufacturer of the PC to the RGB (PC) jack on the set. 2 Connect the PC audio output to the TV's settings. EXTERNAL EQUIPMENT SETUP EXTERNAL EQUIPMENT SETUP PC SETUP This TV provides Plug and Play capability, meaning that the PC adjusts automatically to the AUDIO (RGB/DVI...) jack on your TV. If noise is present, change the PC output to use I Select RGB-...
... card or consult the manufacturer of the PC to the RGB (PC) jack on the set. 2 Connect the PC audio output to the TV's settings. EXTERNAL EQUIPMENT SETUP EXTERNAL EQUIPMENT SETUP PC SETUP This TV provides Plug and Play capability, meaning that the PC adjusts automatically to the AUDIO (RGB/DVI...) jack on your TV. If noise is present, change the PC output to use I Select RGB-...
Owner's Manual (English)
Page 29
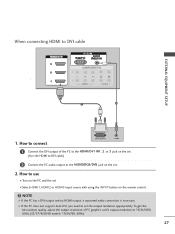
To get the best picture quality, adjust the output resolution of the PC to the HDMI/DVI IN1, 2 or 3 jack on the set. (Use the HDMI to DVI cable) 2 Connect the PC audio output to the AUDIO(RGB/DVI) jack on the remote control. How to connect DVI-... 1 2 1. G If the PC does not support Auto DVI, you need to use I Turn on the PC and the set I Select HDMI1, HDMI2 or HDMI3 input source with using the INPUT button on the set the output resolution appropriately. NOTE G If the PC has a DVI output and no HDMI output, a separated audio connection...
To get the best picture quality, adjust the output resolution of the PC to the HDMI/DVI IN1, 2 or 3 jack on the set. (Use the HDMI to DVI cable) 2 Connect the PC audio output to the AUDIO(RGB/DVI) jack on the remote control. How to connect DVI-... 1 2 1. G If the PC does not support Auto DVI, you need to use I Turn on the PC and the set I Select HDMI1, HDMI2 or HDMI3 input source with using the INPUT button on the set the output resolution appropriately. NOTE G If the PC has a DVI output and no HDMI output, a separated audio connection...

Owner's Manual (English)
Page 32
... the INPUT button on the remote control. EXTERNAL EQUIPMENT SETUP EXTERNAL EQUIPMENT SETUP Screen Setup for PC mode Overview When the RGB input, of the set is connected to enter the screen adjustment menu.
... the INPUT button on the remote control. EXTERNAL EQUIPMENT SETUP EXTERNAL EQUIPMENT SETUP Screen Setup for PC mode Overview When the RGB input, of the set is connected to enter the screen adjustment menu.

Owner's Manual (English)
Page 33
... use D / E or F / G button to make appropriate adjustments. Position This function is -16 ~ +16. Phase This function allows you prefer. Resolution Position Size Phase Reset G Initialize Settings. And the horizontal screen size will also change. EXTERNAL EQUIPMENT SETUP Adjustment for screen Resolution, Position, Size, Phase, Reset 1 Use D or E button to select Resolution...
... use D / E or F / G button to make appropriate adjustments. Position This function is -16 ~ +16. Phase This function allows you prefer. Resolution Position Size Phase Reset G Initialize Settings. And the horizontal screen size will also change. EXTERNAL EQUIPMENT SETUP Adjustment for screen Resolution, Position, Size, Phase, Reset 1 Use D or E button to select Resolution...
Owner's Manual (English)
Page 35
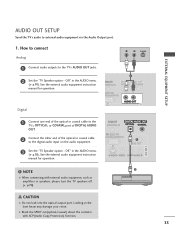
... or COAXIAL port of DIGITAL AUDIO OUT. 2 Connect the other end of the optical or coaxial cable to the TV's AUDIO OUT jacks. 2 Set the "TV Speaker option - Looking at the laser beam may damage your vision. See the external audio equipment instruction manual for operation. NOTE G...with ACP(Audio Copy Protection) function. 1 2 33 How to connect Analog 1 Connect audio outputs to the digital audio input on the audio equipment. 3 Set the "TV Speaker option - Off" in the AUDIO menu. (G p.70). G Block the SPDIF out(optical/coaxial) about the contents with external audio equipment, such as...
... or COAXIAL port of DIGITAL AUDIO OUT. 2 Connect the other end of the optical or coaxial cable to the TV's AUDIO OUT jacks. 2 Set the "TV Speaker option - Looking at the laser beam may damage your vision. See the external audio equipment instruction manual for operation. NOTE G...with ACP(Audio Copy Protection) function. 1 2 33 How to connect Analog 1 Connect audio outputs to the digital audio input on the audio equipment. 3 Set the "TV Speaker option - Off" in the AUDIO menu. (G p.70). G Block the SPDIF out(optical/coaxial) about the contents with external audio equipment, such as...
Owner's Manual (English)
Page 36
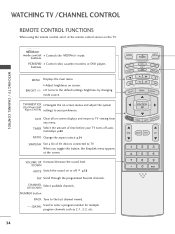
...remote control, aim it at the screen. I It turns to TV viewing from any menu. CHANNEL UP/DOWN Select available channels. EXIT Clear all on-screen displays and return to the default settings brightness by changing mode source. MEDIAHOST MEDIAHOST mode control I Adjust ...brightness on the TV. NUMBER button BACK Tune to the last channel viewed. - (DASH) Used to your TV turns off . THUMBSTICK I Control video cassette recorders ...
...remote control, aim it at the screen. I It turns to TV viewing from any menu. CHANNEL UP/DOWN Select available channels. EXIT Clear all on-screen displays and return to the default settings brightness by changing mode source. MEDIAHOST MEDIAHOST mode control I Adjust ...brightness on the TV. NUMBER button BACK Tune to the last channel viewed. - (DASH) Used to your TV turns off . THUMBSTICK I Control video cassette recorders ...


