Owners Manual
Page 1
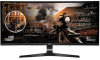
IPS LED Monitor (LED Monitor) Model List 34UC79G www.lg.com Owner's Manual IPS LED MONITOR (LED MONITOR*) *LG LED Monitors are LCD Monitors with LED Backlighting. Please read the safety information carefully before using the product.
IPS LED Monitor (LED Monitor) Model List 34UC79G www.lg.com Owner's Manual IPS LED MONITOR (LED MONITOR*) *LG LED Monitors are LCD Monitors with LED Backlighting. Please read the safety information carefully before using the product.

Owners Manual
Page 2
...3 ASSEMBLING AND PREPARING-- 4 -- Supported Drivers and Software 5 -- Factory Support Mode 32 -- Product Components 4 -- Installing the Monitor 9 Assembling the Stand Installing on a Table Adjusting the Stand Height Adjusting the Angle Tidying up Cables Using the Kensington lock Detaching ...the Stand Body Installing the wall mount plate Installing on the Wall USING THE MONITOR 15 -- Product and Button Description 6 How to a PC 16 HDMI connection DisplayPort connection -- Connecting to Use the Joystick Button Input...
...3 ASSEMBLING AND PREPARING-- 4 -- Supported Drivers and Software 5 -- Factory Support Mode 32 -- Product Components 4 -- Installing the Monitor 9 Assembling the Stand Installing on a Table Adjusting the Stand Height Adjusting the Angle Tidying up Cables Using the Kensington lock Detaching ...the Stand Body Installing the wall mount plate Installing on the Wall USING THE MONITOR 15 -- Product and Button Description 6 How to a PC 16 HDMI connection DisplayPort connection -- Connecting to Use the Joystick Button Input...
Owners Manual
Page 3
...DisplayPort compliance logo and DisplayPort compliance logo for more information on display if there is a registered trademark of "Automatic Standby". Visit www.lg.com for dual-mode source devices are trademarks or registered trademarks of the Video Electronics Standards Association. The terms HDMI and HDMI High-...ENGLISH 3 LICENSE Each model has different licenses. The following content is only applied to the monitor which is sold in Europe market and which needs to meet the ErP Directive: * This monitor is set to be disabled, change the option to display. * To make this setting be...
...DisplayPort compliance logo and DisplayPort compliance logo for more information on display if there is a registered trademark of "Automatic Standby". Visit www.lg.com for dual-mode source devices are trademarks or registered trademarks of the Video Electronics Standards Association. The terms HDMI and HDMI High-...ENGLISH 3 LICENSE Each model has different licenses. The following content is only applied to the monitor which is sold in Europe market and which needs to meet the ErP Directive: * This monitor is set to be disabled, change the option to display. * To make this setting be...
Owners Manual
Page 5
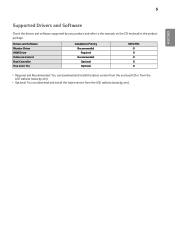
Drivers and Software Monitor Driver ASM Driver OnScreen Control Dual Controller True Color Pro Installation Priority Recommended Required Recommended Optional Optional 34UC79G O X O X X yyRequired and Recommended: You can download and install the latest version from the LGE website (www.lg.com). 5 ENGLISH Supported Drivers and Software Check the drivers and software supported by your product and refer to the manuals on the CD enclosed in the product package. yyOptional: You can download and install the latest version from the enclosed CD or from the LGE website (www.lg.com).
Drivers and Software Monitor Driver ASM Driver OnScreen Control Dual Controller True Color Pro Installation Priority Recommended Required Recommended Optional Optional 34UC79G O X O X X yyRequired and Recommended: You can download and install the latest version from the LGE website (www.lg.com). 5 ENGLISH Supported Drivers and Software Check the drivers and software supported by your product and refer to the manuals on the CD enclosed in the product package. yyOptional: You can download and install the latest version from the enclosed CD or from the LGE website (www.lg.com).

Owners Manual
Page 6
6 Product and Button Description ENGLISH Joystick Button Power LED yyOn: power is on the monitor. Basic Functions Power on Press the joystick button once with your finger. Power off Press and hold the joystick button once with your finger to turn off How to turn on yyOff: power is off the monitor. ◄/► Volume Control You can easily control the functions of the monitor by moving it left/right with your finger to Use the Joystick Button You can control the volume by pressing the joystick button or moving the joystick button left/right.
6 Product and Button Description ENGLISH Joystick Button Power LED yyOn: power is on the monitor. Basic Functions Power on Press the joystick button once with your finger. Power off Press and hold the joystick button once with your finger to turn off How to turn on yyOff: power is off the monitor. ◄/► Volume Control You can easily control the functions of the monitor by moving it left/right with your finger to Use the Joystick Button You can control the volume by pressing the joystick button or moving the joystick button left/right.

Owners Manual
Page 7
7 NOTE yyThe joystick button is located at the bottom of the monitor. Input Connector ENGLISH
7 NOTE yyThe joystick button is located at the bottom of the monitor. Input Connector ENGLISH

Owners Manual
Page 8
...the joystick button to shock or excessive vibration. yyWhen holding the monitor, the screen should face toward you use the monitor panel without the stand base, its side or tilt it . yyPlace the monitor in the original box or packing material before attempting to move it... sideways. yyWhen transporting the monitor, do not expose the monitor to malfunction. ENGLISH 8 Moving and Lifting the Monitor When moving or lifting the monitor, follow these instructions to prevent the monitor from being scratched or damaged and to ensure safe transportation...
...the joystick button to shock or excessive vibration. yyWhen holding the monitor, the screen should face toward you use the monitor panel without the stand base, its side or tilt it . yyPlace the monitor in the original box or packing material before attempting to move it... sideways. yyWhen transporting the monitor, do not expose the monitor to malfunction. ENGLISH 8 Moving and Lifting the Monitor When moving or lifting the monitor, follow these instructions to prevent the monitor from being scratched or damaged and to ensure safe transportation...

Owners Manual
Page 9
Stand Base or 2 Stand Hinge ENGLISH Installing the Monitor Assembling the Stand 1 3 Cable Holder * Assemble the Cable Holder. 9 Stand Body CAUTION yyTo protect the screen, place the screen face down on the screen pad which is inside the box.
Stand Base or 2 Stand Hinge ENGLISH Installing the Monitor Assembling the Stand 1 3 Cable Holder * Assemble the Cable Holder. 9 Stand Body CAUTION yyTo protect the screen, place the screen face down on the screen pad which is inside the box.

Owners Manual
Page 10
..., so they may cause damage to the monitor. The force applied to the monitor screen may look different from the actual product. NOTE yyPress the stand until the button reaches the top. This may cause damage to it. yyDo not carry the monitor upside down by the product warranty. yyApplying ...excessive force when tightening screws may cause the monitor to fall off the stand and could result in this way will not be covered by just...
..., so they may cause damage to the monitor. The force applied to the monitor screen may look different from the actual product. NOTE yyPress the stand until the button reaches the top. This may cause damage to it. yyDo not carry the monitor upside down by the product warranty. yyApplying ...excessive force when tightening screws may cause the monitor to fall off the stand and could result in this way will not be covered by just...

Owners Manual
Page 11
... nearest retail store. CAUTION yyUnplug the power cord before moving or installing the monitor. Cautions When Connecting Power Cord 100-240 V ~ yyMake sure to use the power cord that is risk of... the monitor to the monitor and then plug the power cord into the wall outlet. 2 100 mm 100 mm 100 mm 100... in the product package and connect it on the bottom of electric shock. Place the monitor at least 100 mm away from the wall to ensure sufficient ventilation. 2 Connect the power adapter to turn on the...
... nearest retail store. CAUTION yyUnplug the power cord before moving or installing the monitor. Cautions When Connecting Power Cord 100-240 V ~ yyMake sure to use the power cord that is risk of... the monitor to the monitor and then plug the power cord into the wall outlet. 2 100 mm 100 mm 100 mm 100... in the product package and connect it on the bottom of electric shock. Place the monitor at least 100 mm away from the wall to ensure sufficient ventilation. 2 Connect the power adapter to turn on the...

Owners Manual
Page 12
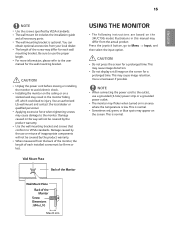
...the stand body to avoid injury to your fingers. ENGLISH 12 Adjusting the Stand Height 1 Place the monitor mounted on the stand base in an upright position. 2 Adjust the angle of the monitor. The angle of the screen can be adjusted forward or backward from -5° to touch or ...adjusting the angle of the screen. yyBe careful not to 20° for safety. Adjusting the Angle 1 Place the monitor mounted on the stand base in an upright position. 2 Handle the monitor with both hands for a comfortable viewing experience. 20° -5° Max 120.0 mm Rear Front WARNING yyWhen ...
...the stand body to avoid injury to your fingers. ENGLISH 12 Adjusting the Stand Height 1 Place the monitor mounted on the stand base in an upright position. 2 Adjust the angle of the monitor. The angle of the screen can be adjusted forward or backward from -5° to touch or ...adjusting the angle of the screen. yyBe careful not to 20° for safety. Adjusting the Angle 1 Place the monitor mounted on the stand base in an upright position. 2 Handle the monitor with both hands for a comfortable viewing experience. 20° -5° Max 120.0 mm Rear Front WARNING yyWhen ...

Owners Manual
Page 13
...holder and mouse holder as shown in the illustration. Mouse holder NOTE yyThe Kensington security system is located at http://www.kensington.com. Cable holder Monitor head Using the Kensington lock The connector for the Kensington security system is optional. For more information on installation and usage, refer to 3°...can be slightly rotated up or down (up Cables Arrange the cables using the Kensington security system cable. Adjust the horizontal level of the monitor head. Tidying up to the Kensington lock owner's manual or visit the website at the bottom of the...
...holder and mouse holder as shown in the illustration. Mouse holder NOTE yyThe Kensington security system is located at http://www.kensington.com. Cable holder Monitor head Using the Kensington lock The connector for the Kensington security system is optional. For more information on installation and usage, refer to 3°...can be slightly rotated up or down (up Cables Arrange the cables using the Kensington security system cable. Adjust the horizontal level of the monitor head. Tidying up to the Kensington lock owner's manual or visit the website at the bottom of the...
Owners Manual
Page 14
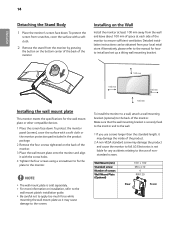
... align it may damage the product and cause the monitor to apply too much force while mounting the wall mount plate as it with a soft cloth. 2 Remove the stand from your local retail store. LG Electronics is sold separately. To protect the screen from scratches, cover the surface with... the screw holes. 4 Tighten the four screws using a screwdriver to fix the plate to the use screws longer than the standard length, it may damage the inside of the monitor. Alternatively, please...
... align it may damage the product and cause the monitor to apply too much force while mounting the wall mount plate as it with a soft cloth. 2 Remove the stand from your local retail store. LG Electronics is sold separately. To protect the screen from scratches, cover the surface with... the screw holes. 4 Tighten the four screws using a screwdriver to fix the plate to the use screws longer than the standard length, it may damage the inside of the monitor. Alternatively, please...
Owners Manual
Page 15
...yyThe wall mount kit includes the installation guide and all necessary parts. yyWhen measured from the back of the monitor, the length of the screw may differ from your local dealer. CAUTION yyDo not press the screen for...turned on the 34UC79G model. Wall Mount Plate Back of the Monitor Screw Dimensions : M4 x L10 Max 8 mm yyDo not display a still image on the screen. Wall Mount Plate Back of the Monitor USING THE MONITOR yyThe following ...(3-hole) power strip or a grounded power outlet. Use an authorized LG wall mount and contact the local dealer or qualified personnel.
...yyThe wall mount kit includes the installation guide and all necessary parts. yyWhen measured from the back of the monitor, the length of the screw may differ from your local dealer. CAUTION yyDo not press the screen for...turned on the 34UC79G model. Wall Mount Plate Back of the Monitor Screw Dimensions : M4 x L10 Max 8 mm yyDo not display a still image on the screen. Wall Mount Plate Back of the Monitor USING THE MONITOR yyThe following ...(3-hole) power strip or a grounded power outlet. Use an authorized LG wall mount and contact the local dealer or qualified personnel.
Owners Manual
Page 16
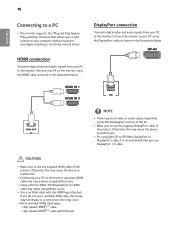
...DP (DisplayPort) to HDMI cable may cause the device to malfunction. High-Speed HDMI®/TM cable with the HDMI logo attached. Connect the monitor to your computer without having to reconfigure anything or install any manual drivers. Connect your PC to the... monitor. DisplayPort connection Transmits digital video and audio signals from your PC to the monitor using the DisplayPort cable as shown in the illustration below . Otherwise, this may occur. If you do not ...
...DP (DisplayPort) to HDMI cable may cause the device to malfunction. High-Speed HDMI®/TM cable with the HDMI logo attached. Connect the monitor to your computer without having to reconfigure anything or install any manual drivers. Connect your PC to the... monitor. DisplayPort connection Transmits digital video and audio signals from your PC to the monitor using the DisplayPort cable as shown in the illustration below . Otherwise, this may occur. If you do not ...

Owners Manual
Page 17
yyUsing a DVI to HDMI / DP (DisplayPort) to HDMI cable may cause the device to the monitor using the HDMI cable as a USB hub. yyUse a certified cable with Ethernet (sold separately) (sold separately) Connecting Peripherals USB Cable connection The USB port on ... cable, the screen may not display or a connection error may occur. If you do not use the supplied HDMI cable of the product to the monitor. AV AV NOTE yyMake sure to the USB IN port can be controlled from your AV device to malfunction.
yyUsing a DVI to HDMI / DP (DisplayPort) to HDMI cable may cause the device to the monitor using the HDMI cable as a USB hub. yyUse a certified cable with Ethernet (sold separately) (sold separately) Connecting Peripherals USB Cable connection The USB port on ... cable, the screen may not display or a connection error may occur. If you do not use the supplied HDMI cable of the product to the monitor. AV AV NOTE yyMake sure to the USB IN port can be controlled from your AV device to malfunction.
Owners Manual
Page 18
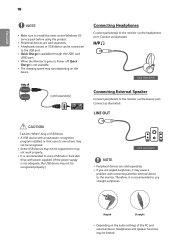
...yyIf you use straight earphones. Therefore, it is recommended to use angled earphones, it may cause a problem with connecting another external device to the monitor. ENGLISH 18 NOTE yyMake sure to Power off, Quick Charge is not available. yyA keyboard, mouse, or USB device can be limited. CAUTION ... USB Device yyA USB device with power supplied. (If the power supply is not adequate, the USB device may be connected to the monitor via the headphones port. Angled Straight yyDepending on the device. yyThe charging speed may vary depending on the audio settings of the PC and ...
...yyIf you use straight earphones. Therefore, it is recommended to use angled earphones, it may cause a problem with connecting another external device to the monitor. ENGLISH 18 NOTE yyMake sure to Power off, Quick Charge is not available. yyA keyboard, mouse, or USB device can be limited. CAUTION ... USB Device yyA USB device with power supplied. (If the power supply is not adequate, the USB device may be connected to the monitor via the headphones port. Angled Straight yyDepending on the device. yyThe charging speed may vary depending on the audio settings of the PC and ...

Owners Manual
Page 19
...▲ Main menu enabled Main menu disabled ▼ Main menu enabled Enables the main menu. Adjusts the monitor volume level. Displays information on the current input. Turns off the monitor. Exits the main menu. Enters the Input feature. Displays information on the current input. Sets input mode....9668;/►) to set the options. 3 Press the joystick button once more to turn off the monitor this way at any time, including when the OSD is on.) Adjusts the monitor volume level. Enters the Menu features. Enters the Game features. Sets the picture mode for gaming....
...▲ Main menu enabled Main menu disabled ▼ Main menu enabled Enables the main menu. Adjusts the monitor volume level. Displays information on the current input. Turns off the monitor. Exits the main menu. Enters the Input feature. Displays information on the current input. Sets input mode....9668;/►) to set the options. 3 Press the joystick button once more to turn off the monitor this way at any time, including when the OSD is on.) Adjusts the monitor volume level. Enters the Menu features. Enters the Game features. Sets the picture mode for gaming....
Owners Manual
Page 20
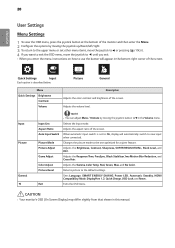
... Contrast, Sharpness, SUPER RESOLUTION+, Black Level, and DFC. Adjusts the Gamma, Color Temp, Red, Green, Blue, and Six Color. CAUTION •• Your monitor's OSD (On Screen Display) may differ slightly from that shown in this manual. Adjusts the Response Time, FreeSync, Black Stabilizer,1ms Motion Blur Reduction, and... to the default settings. ENGLISH 20 User Settings Menu Settings 1 To view the OSD menu, press the joystick button at the bottom of the monitor and then enter the Menu. 2 Configure the options by moving the joystick up/down/left/right. 3 To return to the upper menu or ...
... Contrast, Sharpness, SUPER RESOLUTION+, Black Level, and DFC. Adjusts the Gamma, Color Temp, Red, Green, Blue, and Six Color. CAUTION •• Your monitor's OSD (On Screen Display) may differ slightly from that shown in this manual. Adjusts the Response Time, FreeSync, Black Stabilizer,1ms Motion Blur Reduction, and... to the default settings. ENGLISH 20 User Settings Menu Settings 1 To view the OSD menu, press the joystick button at the bottom of the monitor and then enter the Menu. 2 Configure the options by moving the joystick up/down/left/right. 3 To return to the upper menu or ...

Owners Manual
Page 21
... items, move the joystick to ▼in the Volume menu. Menu > Quick Settings Brightness Contrast Volume Description Adjusts the color contrast and brightness of the monitor and then enter the Menu. 2 Go to Quick Settings by moving the joystick. 3 Configure the options following the instructions that ap- Quick Settings 1 To view...
... items, move the joystick to ▼in the Volume menu. Menu > Quick Settings Brightness Contrast Volume Description Adjusts the color contrast and brightness of the monitor and then enter the Menu. 2 Go to Quick Settings by moving the joystick. 3 Configure the options following the instructions that ap- Quick Settings 1 To view...


