

Specification (English)
Page 2
...Component 60p/30p/24p - HDMI 60p/30p/24p - 32LG60 LCD 1080P HDTV 32" Class (31.5" diagonal) TECHNICAL SPECIFICATIONS LCD PANEL Native Display Resolution 1920 x 1080p Brightness (cd...• Parental Control w/V-Chip • Key Lock • Closed Caption • LG SimpLink™ (HDMI CEC) • Trilingual Menus English/French/Spanish EZ Menus (High...8226; Channel Add/Delete • Favorite Channel • Auto Clock • Manual Clock • On/Off Timer • Sleep Timer • Auto Off ...
...Component 60p/30p/24p - HDMI 60p/30p/24p - 32LG60 LCD 1080P HDTV 32" Class (31.5" diagonal) TECHNICAL SPECIFICATIONS LCD PANEL Native Display Resolution 1920 x 1080p Brightness (cd...• Parental Control w/V-Chip • Key Lock • Closed Caption • LG SimpLink™ (HDMI CEC) • Trilingual Menus English/French/Spanish EZ Menus (High...8226; Channel Add/Delete • Favorite Channel • Auto Clock • Manual Clock • On/Off Timer • Sleep Timer • Auto Off ...
Owner's Manual (English)
Page 1
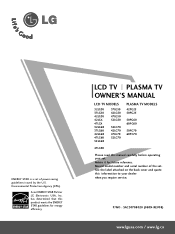
... product meets the ENERGY STAR guidelines for future reference. P/NO : SAC30708020 (0809-REV08) www.lgusa.com / www.lg.ca LCD TV PLASMA TV OWNER'S MANUAL LCD TV MODELS 32LG30 37LG30 42LG30 42LGX 47LGX 32LG60 37LG60 42LG60 47LG60 52LG60 37LG50 42LG50 47LG50 52LG50 32LG70 42LG70 47LG70 52LG70 PLASMA TV MODELS 42PG25 50PG25 50PG60 60PG60 50PG70 60PG70 47LG90 Please read this...
... product meets the ENERGY STAR guidelines for future reference. P/NO : SAC30708020 (0809-REV08) www.lgusa.com / www.lg.ca LCD TV PLASMA TV OWNER'S MANUAL LCD TV MODELS 32LG30 37LG30 42LG30 42LGX 47LGX 32LG60 37LG60 42LG60 47LG60 52LG60 37LG50 42LG50 47LG50 52LG50 32LG70 42LG70 47LG70 52LG70 PLASMA TV MODELS 42PG25 50PG25 50PG60 60PG60 50PG70 60PG70 47LG90 Please read this...
Owner's Manual (English)
Page 4
..., have the cord replaced with liquids, such as gasoline or candles or expose the TV to direct air conditioning. 16 Do not expose to dripping or splashing and do not expose this owner's manual to ground the unit by the hanging power and signal cables on the back of ... 19 Keep the product away from physical or mechanical abuse, such as this apparatus or antenna during a thunder or lighting storm. When mounting a TV on shelves above the unit). 17 GROUNDING Ensure that appliance and has no additional outlets or branch circuits. Check the specification page of these conditions...
..., have the cord replaced with liquids, such as gasoline or candles or expose the TV to direct air conditioning. 16 Do not expose to dripping or splashing and do not expose this owner's manual to ground the unit by the hanging power and signal cables on the back of ... 19 Keep the product away from physical or mechanical abuse, such as this apparatus or antenna during a thunder or lighting storm. When mounting a TV on shelves above the unit). 17 GROUNDING Ensure that appliance and has no additional outlets or branch circuits. Check the specification page of these conditions...
Owner's Manual (English)
Page 6
... Care 80 Advanced Control - Black (Darkness) Level 79 Advanced Control - CONTENTS WARNING / CAUTION A SAFETY INSTRUCTIONS 1 FEATURE OF THIS TV 6 PREPARATION Accessories 7 Front Panel Information 8 Back Panel Information 10 Stand Instruction 13 VESA Wall Mounting 17 Cable Management 18 Desktop Pedestal Installation... Functions 48 Turning On the TV 50 Channel Selection 50 Volume Adjustment 50 Quick Menu 51 Initial Setting 52 On-Screen Menus Selection 54 Channel Setup - Picture Mode - User Mode 76 - Picture Mode - Preset 75 Manual Picture Adjustment - TruMotion 82 ...
... Care 80 Advanced Control - Black (Darkness) Level 79 Advanced Control - CONTENTS WARNING / CAUTION A SAFETY INSTRUCTIONS 1 FEATURE OF THIS TV 6 PREPARATION Accessories 7 Front Panel Information 8 Back Panel Information 10 Stand Instruction 13 VESA Wall Mounting 17 Cable Management 18 Desktop Pedestal Installation... Functions 48 Turning On the TV 50 Channel Selection 50 Volume Adjustment 50 Quick Menu 51 Initial Setting 52 On-Screen Menus Selection 54 Channel Setup - Picture Mode - User Mode 76 - Picture Mode - Preset 75 Manual Picture Adjustment - TruMotion 82 ...

Owner's Manual (English)
Page 7
Auto Clock Setup 101 Manual Clock Setup 102 Auto On/Off Time Setting 103 Sleep Timer Setting 104 Auto Shut-off Setting 105 PARENTAL CONTROL / RATINGS Set Password & Lock System 106 Channel Blocking 109 Movie & TV Rating 110 Downloadable Rating 115 External Input Blocking 116 Key lock... 98 - Digital Broadcasting System Captions 99 - Caption Option 100 TIME SETTING Clock Setting - User Mode 90 Clear Voice 91 Balance 92 TV Speakers On/Off Setup 93 Audio Reset 94 Stereo/SAP Broadcast Setup 95 Audio Language 96 On-Screen Menus Language Selection 97 Caption Mode ...
Auto Clock Setup 101 Manual Clock Setup 102 Auto On/Off Time Setting 103 Sleep Timer Setting 104 Auto Shut-off Setting 105 PARENTAL CONTROL / RATINGS Set Password & Lock System 106 Channel Blocking 109 Movie & TV Rating 110 Downloadable Rating 115 External Input Blocking 116 Key lock... 98 - Digital Broadcasting System Captions 99 - Caption Option 100 TIME SETTING Clock Setting - User Mode 90 Clear Voice 91 Balance 92 TV Speakers On/Off Setup 93 Audio Reset 94 Stereo/SAP Broadcast Setup 95 Audio Language 96 On-Screen Menus Language Selection 97 Caption Mode ...
Owner's Manual (English)
Page 9
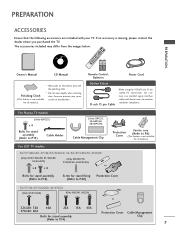
... ENTER VOL FAV AV MODE 1 4 MUTE 2 7 5 3 8 6 0 9 FLASHBK CH P A G E 1.5V 1.5V Copyright© 2007 LGE, All Rights Reserved. Owner's Manual CD Manual * Wipe spots on the exterior only with ferrite cores to P.6) (This feature is missing, please contact the dealer where you purchased the..., 42/47LGX (Only 32/37LG60) (Only 42LG60, 42LGX) or 32LG60: 3EA 4EA 2EA 1EA 4EA 37LG60: 4EA Protection Cover Cable Management Bolts for all models.) For LCD TV models 32/37/42LG30, 37/42/47/52LG50, 32/42/47/52LG70, 47LG90 (Only 32/37/42LG30, 37/42LG50, 32/42LG70) (Only 32LG30/...
... ENTER VOL FAV AV MODE 1 4 MUTE 2 7 5 3 8 6 0 9 FLASHBK CH P A G E 1.5V 1.5V Copyright© 2007 LGE, All Rights Reserved. Owner's Manual CD Manual * Wipe spots on the exterior only with ferrite cores to P.6) (This feature is missing, please contact the dealer where you purchased the..., 42/47LGX (Only 32/37LG60) (Only 42LG60, 42LGX) or 32LG60: 3EA 4EA 2EA 1EA 4EA 37LG60: 4EA Protection Cover Cable Management Bolts for all models.) For LCD TV models 32/37/42LG30, 37/42/47/52LG50, 32/42/47/52LG70, 47LG90 (Only 32/37/42LG30, 37/42LG50, 32/42LG70) (Only 32LG30/...
Owner's Manual (English)
Page 19
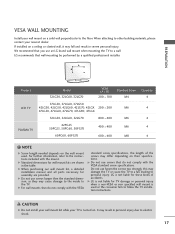
...floor. G Do not use screws longer then the standard dimension, as they may cause damage to the inside to follow the TV installation instructions. G LG is used . A B Product LCD TV PLASMA TV Model 32LG30, 32LG60, 32LG70 VESA (A * B) 200 * 100 37LG30, 37LG60, 37LG50 42LG30, 42LG50, 42LG60, 42LG70, 42LGX 200 * 200...specified wall mount is not liable for wall mount kits are provided. G When purchasing our wall mount kit, a detailed installation manual and all parts necessary for these kinds of the screws may result in severe personal injury. CAUTION G Do not install your ...
...floor. G Do not use screws longer then the standard dimension, as they may cause damage to the inside to follow the TV installation instructions. G LG is used . A B Product LCD TV PLASMA TV Model 32LG30, 32LG60, 32LG70 VESA (A * B) 200 * 100 37LG30, 37LG60, 37LG50 42LG30, 42LG50, 42LG60, 42LG70, 42LGX 200 * 200...specified wall mount is not liable for wall mount kits are provided. G When purchasing our wall mount kit, a detailed installation manual and all parts necessary for these kinds of the screws may result in severe personal injury. CAUTION G Do not install your ...
Owner's Manual (English)
Page 22
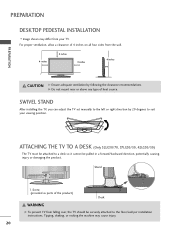
... direction, potentially causing injury or damaging the product. G Do not mount near or above any type of the product) Desk WARNING G To prevent TV from the wall. 4 inches 4 inches 4 inches 4 inches CAUTION G Ensure adequate ventilation by 20 degrees to the floor/wall per installation instructions...., 42LG30/50) The TV must be attached to a desk so it cannot be securely attached to suit your TV. PREPARATION PREPARATION DESKTOP PEDESTAL INSTALLATION I Image shown may cause injury. 20 SWIVEL STAND After installing the TV, you can adjust the TV set manually to the left or right...
... direction, potentially causing injury or damaging the product. G Do not mount near or above any type of the product) Desk WARNING G To prevent TV from the wall. 4 inches 4 inches 4 inches 4 inches CAUTION G Ensure adequate ventilation by 20 degrees to the floor/wall per installation instructions...., 42LG30/50) The TV must be attached to a desk so it cannot be securely attached to suit your TV. PREPARATION PREPARATION DESKTOP PEDESTAL INSTALLATION I Image shown may cause injury. 20 SWIVEL STAND After installing the TV, you can adjust the TV set manually to the left or right...
Owner's Manual (English)
Page 25
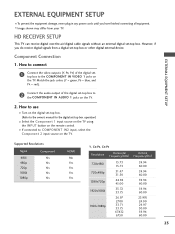
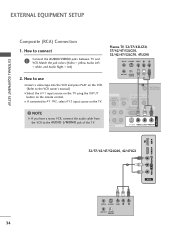
... SETUP EXTERNAL EQUIPMENT SETUP I If connected to COMPONENT IN2 input, select the Component 2 input source on the TV. Match the jack colors (Y = green, PB = blue, and PR = red). 2 Connect the audio... output of the digital settop box to the COMPONENT IN AUDIO 1 jacks on the TV. However, if you have finished connecting all equipment. How to connect 1 Connect the video outputs (Y, PB,...Select the Component 1 input source on the TV using the INPUT button on the digital set-top box. (Refer to the owner's manual for the digital set -top box to the...
... SETUP EXTERNAL EQUIPMENT SETUP I If connected to COMPONENT IN2 input, select the Component 2 input source on the TV. Match the jack colors (Y = green, PB = blue, and PR = red). 2 Connect the audio... output of the digital settop box to the COMPONENT IN AUDIO 1 jacks on the TV. However, if you have finished connecting all equipment. How to connect 1 Connect the video outputs (Y, PB,...Select the Component 1 input source on the TV using the INPUT button on the digital set-top box. (Refer to the owner's manual for the digital set -top box to the...
Owner's Manual (English)
Page 27
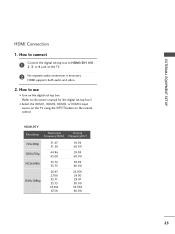
... -top box.) I Select the HDMI1, HDMI2, HDMI3, or HDMI4 input source on the TV using the INPUT button on the TV. 2 No separate audio connection is necessary. How to connect 1 Connect the digital set-top box to the owner's manual for the digital set -top box. (Refer to HDMI/DVI IN1, 2, 3, or 4 jack...
... -top box.) I Select the HDMI1, HDMI2, HDMI3, or HDMI4 input source on the TV using the INPUT button on the TV. 2 No separate audio connection is necessary. How to connect 1 Connect the digital set-top box to the owner's manual for the digital set -top box. (Refer to HDMI/DVI IN1, 2, 3, or 4 jack...
Owner's Manual (English)
Page 29
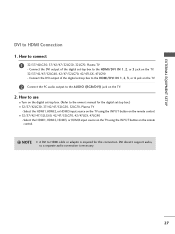
... DVI doesn't support audio, so a separate audio connection is required for the digital set -top box to the owner's manual for this connection. Select the HDMI1, HDMI2, or HDMI3 input source on the TV using the INPUT button on the digital set-top box. (Refer to the HDMI/DVI IN 1, 2, or 3 jack... the remote control. ! Connect the DVI output of the digital set-top box to the HDMI/DVI IN 1, 2, 3, or 4 jack on the TV. 2 Connect the PC audio output to use I 32/37/42/47/52LG60, 42/47/52LG70, 42/47LGX, 47LG90 - Select the HDMI1, HDMI2, HDMI3, or HDMI4 input source on the...
... DVI doesn't support audio, so a separate audio connection is required for the digital set -top box to the owner's manual for this connection. Select the HDMI1, HDMI2, or HDMI3 input source on the TV using the INPUT button on the digital set-top box. (Refer to the HDMI/DVI IN 1, 2, or 3 jack... the remote control. ! Connect the DVI output of the digital set-top box to the HDMI/DVI IN 1, 2, 3, or 4 jack on the TV. 2 Connect the PC audio output to use I 32/37/42/47/52LG60, 42/47/52LG70, 42/47LGX, 47LG90 - Select the HDMI1, HDMI2, HDMI3, or HDMI4 input source on the...
Owner's Manual (English)
Page 31
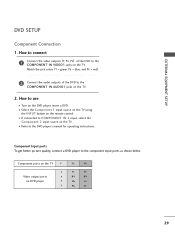
...input, select the Component 2 input source on the TV. 2. Component ports on the TV Y Y Video output ports Y on the remote control. I Turn on the TV. Component Input ports To get better picture quality, connect a DVD player to the DVD player's manual for operating instructions. Match the jack colors (Y =... green, PB = blue, and PR = red). 2 Connect the audio outputs of the DVD to the COMPONENT IN AUDIO1 jacks on the TV. I Select the Component 1 input source on the TV using the INPUT button on...
...input, select the Component 2 input source on the TV. 2. Component ports on the TV Y Y Video output ports Y on the remote control. I Turn on the TV. Component Input ports To get better picture quality, connect a DVD player to the DVD player's manual for operating instructions. Match the jack colors (Y =... green, PB = blue, and PR = red). 2 Connect the audio outputs of the DVD to the COMPONENT IN AUDIO1 jacks on the TV. I Select the Component 1 input source on the TV using the INPUT button on...

Owner's Manual (English)
Page 33
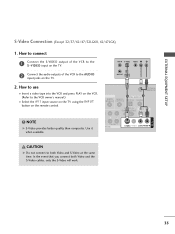
... to connect 1 Connect the S-VIDEO output of the DVD to the S -VIDEO input on the TV. 2 Connect the audio outputs of the DVD to the DVD player's manual for operating instructions. I Select the A V 1 input source on the TV using the INPUT button on the DVD player, insert a DVD. EXTERNAL EQUIPMENT SETUP S-Video Connection...
... to connect 1 Connect the S-VIDEO output of the DVD to the S -VIDEO input on the TV. 2 Connect the audio outputs of the DVD to the DVD player's manual for operating instructions. I Select the A V 1 input source on the TV using the INPUT button on the DVD player, insert a DVD. EXTERNAL EQUIPMENT SETUP S-Video Connection...
Owner's Manual (English)
Page 34
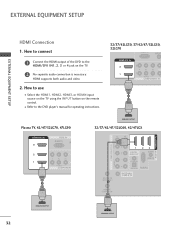
... HDMI1, HDMI2, HDMI3, or HDMI4 input source on the TV using the INPUT button on the TV. 2 No separate audio connection is necessary. How to connect 1 Connect the HDMI output of the DVD to the DVD player's manual for operating instructions. 32/37/42LG30, 37/42/47/52LG50, 32LG70 RGB(PC) AUDIO... (RGB/D HDMI/DVI IN 2 1 2 Y 1 PB PR L VIDEO A COMPONENT IN 1 RGB IN HDMI/DVI IN Plasma TV, 42/47/52LG70, 47LG90 HDMI/DVI IN 3 RGB IN RGB...
... HDMI1, HDMI2, HDMI3, or HDMI4 input source on the TV using the INPUT button on the TV. 2 No separate audio connection is necessary. How to connect 1 Connect the HDMI output of the DVD to the DVD player's manual for operating instructions. 32/37/42LG30, 37/42/47/52LG50, 32LG70 RGB(PC) AUDIO... (RGB/D HDMI/DVI IN 2 1 2 Y 1 PB PR L VIDEO A COMPONENT IN 1 RGB IN HDMI/DVI IN Plasma TV, 42/47/52LG70, 47LG90 HDMI/DVI IN 3 RGB IN RGB...
Owner's Manual (English)
Page 35
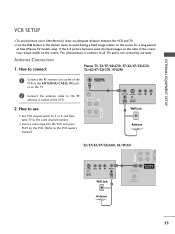
... only). I Set VCR output switch to 3 or 4 and then tune TV to the VCR owner's manual.) EO L(MONO) AUDIO R ANT OUT S-VIDEO VIDEO L R ANT IN OUTPUT SWITCH Wall Jack 2 Antenna AV IN 1 COMP AUDIO 32/37/42/47/52LG60, 42/47LGX COAX OPTIC 1 S-VIDEO VIDEO L R ANT OUT RS-232C IN...the ANTENNA/CABLE IN sock- Antenna Connection 1. This phenomenon is used; ANTENNA/ CABLE IN et on the screen. How to connect Plasma TV, 32/37/42LG30, 37/42/47/52LG50, 32/42/47/52LG70, 47LG90 1 Connect the RF antenna out socket of the VCR. AUDIO OUT E) 2. UDIO OUT COAXIAL 1 2 Connect...
... only). I Set VCR output switch to 3 or 4 and then tune TV to the VCR owner's manual.) EO L(MONO) AUDIO R ANT OUT S-VIDEO VIDEO L R ANT IN OUTPUT SWITCH Wall Jack 2 Antenna AV IN 1 COMP AUDIO 32/37/42/47/52LG60, 42/47LGX COAX OPTIC 1 S-VIDEO VIDEO L R ANT OUT RS-232C IN...the ANTENNA/CABLE IN sock- Antenna Connection 1. This phenomenon is used; ANTENNA/ CABLE IN et on the screen. How to connect Plasma TV, 32/37/42LG30, 37/42/47/52LG50, 32/42/47/52LG70, 47LG90 1 Connect the RF antenna out socket of the VCR. AUDIO OUT E) 2. UDIO OUT COAXIAL 1 2 Connect...
Owner's Manual (English)
Page 36
...on the VCR. (Refer to the VCR owner's manual.) I If connected to AV IN2, select AV2 input source on the remote control. NOTE G If you have a mono VCR, connect the audio cable from the VCR to connect 1 Connect the AUDIO/VIDEO jacks between TV and VCR. Match the jack colors (Video = ...yellow, Audio Left = white, and Audio Right = red) 2. Plasma TV, 32/37/42LG30, 37/42/47/52LG50, 32/42/47/52LG70, 47LG90 ANT IN S-VIDEO VIDEO L R ANT OUT OUTPUT SWITCH 1 ANTENNA/ ...
...on the VCR. (Refer to the VCR owner's manual.) I If connected to AV IN2, select AV2 input source on the remote control. NOTE G If you have a mono VCR, connect the audio cable from the VCR to connect 1 Connect the AUDIO/VIDEO jacks between TV and VCR. Match the jack colors (Video = ...yellow, Audio Left = white, and Audio Right = red) 2. Plasma TV, 32/37/42LG30, 37/42/47/52LG50, 32/42/47/52LG70, 47LG90 ANT IN S-VIDEO VIDEO L R ANT OUT OUTPUT SWITCH 1 ANTENNA/ ...
Owner's Manual (English)
Page 37
... connect 1 Connect the S-VIDEO output of the VCR to the S -VIDEO input on the TV. 2 Connect the audio outputs of the VCR to the VCR owner's manual.) I Select the A V 1 input source on the TV using the INPUT button on the TV. 2. ANT IN S-VIDEO VIDEO L R ANT OUT OUTPUT SWITCH ANTENNA/ CABLE IN D1IGITAL AUDIO... L(MONO) AUDIO R CAUTION G Do not connect to both Video and the S-Video cables, only the S-Video will work. 35 EXTERNAL EQUIPMENT SETUP S-Video Connection (Except 32/37/42/47/52LG60, 42/47LGX) 1.
... connect 1 Connect the S-VIDEO output of the VCR to the S -VIDEO input on the TV. 2 Connect the audio outputs of the VCR to the VCR owner's manual.) I Select the A V 1 input source on the TV using the INPUT button on the TV. 2. ANT IN S-VIDEO VIDEO L R ANT OUT OUTPUT SWITCH ANTENNA/ CABLE IN D1IGITAL AUDIO... L(MONO) AUDIO R CAUTION G Do not connect to both Video and the S-Video cables, only the S-Video will work. 35 EXTERNAL EQUIPMENT SETUP S-Video Connection (Except 32/37/42/47/52LG60, 42/47LGX) 1.
Owner's Manual (English)
Page 45
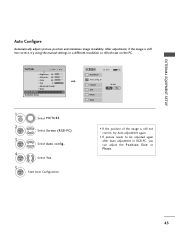
... Control • Reset Screen (RGB-PC) TruMotion Demo 1 MENU 2 ENTER 3 ENTER Select PICTURE. After adjustment, if the image is still not correct, try using the manual settings or a different resolution or refresh rate on the PC. To Set Yes No • If the position of the image is still not correct...
... Control • Reset Screen (RGB-PC) TruMotion Demo 1 MENU 2 ENTER 3 ENTER Select PICTURE. After adjustment, if the image is still not correct, try using the manual settings or a different resolution or refresh rate on the PC. To Set Yes No • If the position of the image is still not correct...
Owner's Manual (English)
Page 46
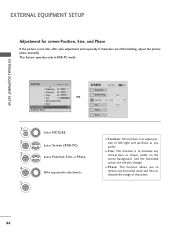
... the image of characters. 44 I Position: This function is not clear after auto adjustment and especially if characters are still trembling, adjust the picture phase manually. Make appropriate adjustments. And the horizontal screen size will also change. I P h a s e: This function allows you to left/right and up/down as you prefer. EXTERNAL...
... the image of characters. 44 I Position: This function is not clear after auto adjustment and especially if characters are still trembling, adjust the picture phase manually. Make appropriate adjustments. And the horizontal screen size will also change. I P h a s e: This function allows you to left/right and up/down as you prefer. EXTERNAL...
Owner's Manual (English)
Page 49
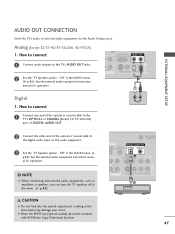
...ACP(Audio Copy Protection) function. AV IN 1 EXTERNAL EQUIPMENT SETUP AUDIO OUT CONNECTION Send the TV's audio to the TV's AUDIO OUT jacks. 2 Set the "TV Speaker option - See the external audio equipment instruction manual for operation. ! How to connect 1 Connect one end of the optical or coaxial cable... to the TV's OPTICAL or COAXIAL (Except 32/37/42LG30) port of DIGITAL AUDIO OUT. 2 Connect the other end of the optical or coaxial ...
...ACP(Audio Copy Protection) function. AV IN 1 EXTERNAL EQUIPMENT SETUP AUDIO OUT CONNECTION Send the TV's audio to the TV's AUDIO OUT jacks. 2 Set the "TV Speaker option - See the external audio equipment instruction manual for operation. ! How to connect 1 Connect one end of the optical or coaxial cable... to the TV's OPTICAL or COAXIAL (Except 32/37/42LG30) port of DIGITAL AUDIO OUT. 2 Connect the other end of the optical or coaxial ...


