
Owners Manual
Page 1
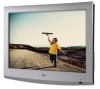
OWNER'S MANUAL LCD TV Please read this manual carefully before operating your set and retain it for future reference. 22LG3DDH 26LG3DDH 32LG3DDH P/NO : SAC34026007 (1006-REV02) www.lg.com
OWNER'S MANUAL LCD TV Please read this manual carefully before operating your set and retain it for future reference. 22LG3DDH 26LG3DDH 32LG3DDH P/NO : SAC34026007 (1006-REV02) www.lg.com
Owners Manual
Page 4
... twisted, kinked, pinched, closed in . The plug must be placed upon . Periodically examine the cord of fire or electrical shock, do not expose this owner's manual to telephone wires, lightening rods, or gas pipes. that is the disconnecting device. Overloaded wall outlets, loose or damaged wall outlets, extension cords, frayed power...
... twisted, kinked, pinched, closed in . The plug must be placed upon . Periodically examine the cord of fire or electrical shock, do not expose this owner's manual to telephone wires, lightening rods, or gas pipes. that is the disconnecting device. Overloaded wall outlets, loose or damaged wall outlets, extension cords, frayed power...

Owners Manual
Page 6
Auto Clock Setup 61 Manual Clock Setup 62 Auto On/Off Time Setting 63 Sleep Timer Setting 64 PARENTAL CONTROL / RATINGS Set Password & Lock System 65 Channel Blocking 68 Movie & ... Setup 55 Audio Language 56 On-Screen Menus Language Selection 57 Caption Mode - Picture Mode - Add / Delete Channel (Manual Tuning 36 - Analog Broadcasting System Captions 58 - Auto Scan (Auto Tuning 35 - Preset . 42 Manual Picture Adjustment - User Mode 43 Picture Improvement Technology 44 Picture Reset 46 Demo Mode 47 SOUND & LANGUAGE CONTROL...
Auto Clock Setup 61 Manual Clock Setup 62 Auto On/Off Time Setting 63 Sleep Timer Setting 64 PARENTAL CONTROL / RATINGS Set Password & Lock System 65 Channel Blocking 68 Movie & ... Setup 55 Audio Language 56 On-Screen Menus Language Selection 57 Caption Mode - Picture Mode - Add / Delete Channel (Manual Tuning 36 - Analog Broadcasting System Captions 58 - Auto Scan (Auto Tuning 35 - Preset . 42 Manual Picture Adjustment - User Mode 43 Picture Improvement Technology 44 Picture Reset 46 Demo Mode 47 SOUND & LANGUAGE CONTROL...

Owners Manual
Page 8
...wipe roughly when removing stains. (This feature is NOT included with your TV. Owner's Manual CD Manual Power Cord Protective Bracket and Bolt for Power Cord (Refer to maintain standards compliance. For 26/32LG3DDH For 22LG3DDH Protection Cover (Refer to P.11) Cable Management Clip (Refer to P.12...models.) * Wipe spots on the exterior only with ferrite cores to P.12) (This feature is not available for the 22/26/32LG3DDH models. The installer remote control is not avail- PREPARATION PREPERATION ACCESSORIES Ensure that the following accessories are included with the TV. 7 ...
...wipe roughly when removing stains. (This feature is NOT included with your TV. Owner's Manual CD Manual Power Cord Protective Bracket and Bolt for Power Cord (Refer to maintain standards compliance. For 26/32LG3DDH For 22LG3DDH Protection Cover (Refer to P.11) Cable Management Clip (Refer to P.12...models.) * Wipe spots on the exterior only with ferrite cores to P.12) (This feature is not available for the 22/26/32LG3DDH models. The installer remote control is not avail- PREPARATION PREPERATION ACCESSORIES Ensure that the following accessories are included with the TV. 7 ...

Owners Manual
Page 15
...not comply with the mount. G When purchasing our wall mount kit, a detailed installation manual and all parts necessary for assembly are shown in personal injury due to a fall ... Wall Mounting Bracket (sold separately) PREPARATION 22LG3DDH 100 * 100 M4 4 RW120 26LG3DDH 200 * 100 M4 4 32LG3DDH RW230 RW230 AW-47LG30M ! Do not tighten the screws too much. CAUTION G Do not install your wall mount...screws that wall mounting be securely attached to follow the TV installation instructions. LG is used . G LG is not liable for TV damage or personal injury when a non-VESA or...
...not comply with the mount. G When purchasing our wall mount kit, a detailed installation manual and all parts necessary for assembly are shown in personal injury due to a fall ... Wall Mounting Bracket (sold separately) PREPARATION 22LG3DDH 100 * 100 M4 4 RW120 26LG3DDH 200 * 100 M4 4 32LG3DDH RW230 RW230 AW-47LG30M ! Do not tighten the screws too much. CAUTION G Do not install your wall mount...screws that wall mounting be securely attached to follow the TV installation instructions. LG is used . G LG is not liable for TV damage or personal injury when a non-VESA or...

Owners Manual
Page 18
... plug in any power cords until you do receive digital signals from a digital set-top box or other digital external device, refer to the owner's manual for 32LG3DDH model. How to connect 1 Connect the video outputs (Y, PB, PR) of the digital set-top box to the COMPONENT IN VIDEO jacks on the...
... plug in any power cords until you do receive digital signals from a digital set-top box or other digital external device, refer to the owner's manual for 32LG3DDH model. How to connect 1 Connect the video outputs (Y, PB, PR) of the digital set-top box to the COMPONENT IN VIDEO jacks on the...

Owners Manual
Page 19
....00 1920x1080p 67.50 60.00 18 HDMI supports both audio and video. 2. How to connect 1 Connect the digital set-top box to the owner's manual for the digital set -top box. (Refer to HDMI/DVI IN jack on the remote control. EXTERNAL EQUIPMENT SETUP EXTERNAL EQUIPMENT SETUP HDMI Connection 1.
....00 1920x1080p 67.50 60.00 18 HDMI supports both audio and video. 2. How to connect 1 Connect the digital set-top box to the owner's manual for the digital set -top box. (Refer to HDMI/DVI IN jack on the remote control. EXTERNAL EQUIPMENT SETUP EXTERNAL EQUIPMENT SETUP HDMI Connection 1.

Owners Manual
Page 20
... the digital set-top box. (Refer to the owner's manual for this connection. How to connect 1 Connect the DVI output of the digital set-top box to the AUDIO IN(RGB/DVI) or AV IN AUDIO jack on the remote control. 26/32LG3DDH HDMI/DVI IN UPDATE R USB IN SERVICE ONLY RS...
... the digital set-top box. (Refer to the owner's manual for this connection. How to connect 1 Connect the DVI output of the digital set-top box to the AUDIO IN(RGB/DVI) or AV IN AUDIO jack on the remote control. 26/32LG3DDH HDMI/DVI IN UPDATE R USB IN SERVICE ONLY RS...

Owners Manual
Page 21
... AUDIO AUDIO IN (RGB/DVI) CO COMPONENT AV IN 1 IN Component Input ports To get better picture quality, connect a DVD player to the DVD player's manual for operating instructions. How to the COMPONENT IN AUDIO jacks on the TV. UPDATE RESET Component ports on the TV Y Y Video output ports Y on the...
... AUDIO AUDIO IN (RGB/DVI) CO COMPONENT AV IN 1 IN Component Input ports To get better picture quality, connect a DVD player to the DVD player's manual for operating instructions. How to the COMPONENT IN AUDIO jacks on the TV. UPDATE RESET Component ports on the TV Y Y Video output ports Y on the...

Owners Manual
Page 22
HDMI Connection 1. COMPONENT IN AV IN 1 RS-232C IN (SERVICE ONLY) ( ) RGB IN (PC) AUDIO IN (RGB/DVI) CO HDMI/DVI IN UPDATE USB IN SERVUCE ONLY AUDIO (MONO) VIDEO 1 VIDEO AUDIO HDMI OUTPUT EXTERNAL EQUIPMENT SETUP RESET 21 I Select the HDMI input source on the TV using the INPUT button on the TV. 2 No separate audio connection is necessary. HDMI supports both audio and video. 2. How to connect 1 Connect the HDMI output of the DVD to the DVD player's manual for operating instructions. How to use I Refer to the HDMI/DVI IN jack on the remote control.
HDMI Connection 1. COMPONENT IN AV IN 1 RS-232C IN (SERVICE ONLY) ( ) RGB IN (PC) AUDIO IN (RGB/DVI) CO HDMI/DVI IN UPDATE USB IN SERVUCE ONLY AUDIO (MONO) VIDEO 1 VIDEO AUDIO HDMI OUTPUT EXTERNAL EQUIPMENT SETUP RESET 21 I Select the HDMI input source on the TV using the INPUT button on the TV. 2 No separate audio connection is necessary. HDMI supports both audio and video. 2. How to connect 1 Connect the HDMI output of the DVD to the DVD player's manual for operating instructions. How to use I Refer to the HDMI/DVI IN jack on the remote control.

Owners Manual
Page 23
... VCR and press PLAY on the VCR. (Refer to all TVs and is not covered by warranty. This phenomenon is common to the VCR owner's manual.) 1 S-VIDEO VIDEO L R ANT OUT OUTPUT SWITCH ANT IN Wall Jack 2 ANTENNA IN M.P.I Set VCR output switch to 3 or 4 and then tune TV to the RF...
... VCR and press PLAY on the VCR. (Refer to all TVs and is not covered by warranty. This phenomenon is common to the VCR owner's manual.) 1 S-VIDEO VIDEO L R ANT OUT OUTPUT SWITCH ANT IN Wall Jack 2 ANTENNA IN M.P.I Set VCR output switch to 3 or 4 and then tune TV to the RF...

Owners Manual
Page 24
How to the VCR owner's manual.) I Select the A V or A V 1 input source on the TV using the INPUT button on the remote control. How to use I If connected to the AUDIO L(MONO) ...
How to the VCR owner's manual.) I Select the A V or A V 1 input source on the TV using the INPUT button on the remote control. How to use I If connected to the AUDIO L(MONO) ...
Owners Manual
Page 30
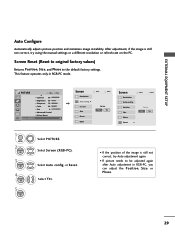
... feature operates only in RGB-PC, you can adjust the Position, S i z e or P h a s e. 29 After adjustment, if the image is still not correct, try using the manual settings or a different resolution or refresh rate on the PC. Position Size Phase Reset G Move Prev. or Reset. Select Auto config. G Position Size Phase Reset...
... feature operates only in RGB-PC, you can adjust the Position, S i z e or P h a s e. 29 After adjustment, if the image is still not correct, try using the manual settings or a different resolution or refresh rate on the PC. Position Size Phase Reset G Move Prev. or Reset. Select Auto config. G Position Size Phase Reset...

Owners Manual
Page 31
... config. Select Screen (RGB-PC). I Position: This function is not clear after auto adjustment and especially if characters are still trembling, adjust the picture phase manually. And the horizontal screen size will also change. EXTERNAL EQUIPMENT SETUP EXTERNAL EQUIPMENT SETUP Adjustment for screen Position, Size, and Phase If the picture is...
... config. Select Screen (RGB-PC). I Position: This function is not clear after auto adjustment and especially if characters are still trembling, adjust the picture phase manually. And the horizontal screen size will also change. EXTERNAL EQUIPMENT SETUP EXTERNAL EQUIPMENT SETUP Adjustment for screen Position, Size, and Phase If the picture is...

Owners Manual
Page 35
WATCHING TV / CHANNEL CONTROL ON-SCREEN MENUS SELECTION Your TV's OSD (On Screen Display) may differ slightly from that shown in this manual. CHANNEL Auto Tuning Manual Tuning Channel Edit Channel Label Move Enter PICTURE Move Aspect Ratio : 16:9 Picture Mode : Standard • Backlight • Contrast • Brightness • Sharpness • Color &#...
WATCHING TV / CHANNEL CONTROL ON-SCREEN MENUS SELECTION Your TV's OSD (On Screen Display) may differ slightly from that shown in this manual. CHANNEL Auto Tuning Manual Tuning Channel Edit Channel Label Move Enter PICTURE Move Aspect Ratio : 16:9 Picture Mode : Standard • Backlight • Contrast • Brightness • Sharpness • Color &#...

Owners Manual
Page 36
... Channel Edit Channel Label Move Enter CHANNEL Auto Tuning Manual Tuning Channel Edit Channel Label Move Enter Check your residence or move the TV. I The TV will be updated during TV broadcasting hours. Yes No 1 ... I Automatically finds all channels available through antenna or cable inputs, and stores them in memory on the channel list. I When setting the Auto tuning or Manual tuning, the number of maximum channel you set up in the LOCK Menu to allow a channel search. The previous channel information will ask for a password...
... Channel Edit Channel Label Move Enter CHANNEL Auto Tuning Manual Tuning Channel Edit Channel Label Move Enter Check your residence or move the TV. I The TV will be updated during TV broadcasting hours. Yes No 1 ... I Automatically finds all channels available through antenna or cable inputs, and stores them in memory on the channel list. I When setting the Auto tuning or Manual tuning, the number of maximum channel you set up in the LOCK Menu to allow a channel search. The previous channel information will ask for a password...

Owners Manual
Page 37
... DIGITAL G Select channel type and RF-channel number. Channel F2 G DIGITAL 2-1 Bad Normal Good Delete Close I When setting the Auto tuning or Manual tuning, the number of the signal being received. Use the password you set up in the LOCK Menu to the previous menu. WATCHING TV / ...is subject to add or delete. I The TV will ask for a password if parental control has been activated (LOCK Menu). CHANNEL Auto Tuning Manual Tuning Channel Edit Channel Label Move Enter 1 MENU 2 ENTER Select CHANNEL. Return to see the quality of maximum channel you want to change ...
... DIGITAL G Select channel type and RF-channel number. Channel F2 G DIGITAL 2-1 Bad Normal Good Delete Close I When setting the Auto tuning or Manual tuning, the number of the signal being received. Use the password you set up in the LOCK Menu to the previous menu. WATCHING TV / ...is subject to add or delete. I The TV will ask for a password if parental control has been activated (LOCK Menu). CHANNEL Auto Tuning Manual Tuning Channel Edit Channel Label Move Enter 1 MENU 2 ENTER Select CHANNEL. Return to see the quality of maximum channel you want to change ...

Owners Manual
Page 38
... Edit List are displayed in black and the channels deleted from the Channel Edit List are displayed in the Channel Edit menu. CHANNEL Auto Tuning Manual Tuning Channel Edit Channel Label Move Enter Ch. Select Channel Edit. 3 ENTER Select a channel. 4 CC Select channel you wish to select it in blue. button...
... Edit List are displayed in black and the channels deleted from the Channel Edit List are displayed in the Channel Edit menu. CHANNEL Auto Tuning Manual Tuning Channel Edit Channel Label Move Enter Ch. Select Channel Edit. 3 ENTER Select a channel. 4 CC Select channel you wish to select it in blue. button...

Owners Manual
Page 39
Select Channel Label. MENU 38 CHANNEL Auto Tuning Manual Tuning Channel Edit Channel Label Move Enter CHANNEL Auto Tuning Manual Tuning Channel Edit Channel Label Move Enter Channel DIGITAL 2-1 Logo F Disney G Close 1 MENU 2 ENTER 3 ENTER Select CHANNEL. If a channel label is provided on the signal ...
Select Channel Label. MENU 38 CHANNEL Auto Tuning Manual Tuning Channel Edit Channel Label Move Enter CHANNEL Auto Tuning Manual Tuning Channel Edit Channel Label Move Enter Channel DIGITAL 2-1 Logo F Disney G Close 1 MENU 2 ENTER 3 ENTER Select CHANNEL. If a channel label is provided on the signal ...

Owners Manual
Page 43
.... Preset There are adjustable. I S p o r t: This is the video mode to realize fast response speed in the user menus. You can use a preset, change each setting manually.
.... Preset There are adjustable. I S p o r t: This is the video mode to realize fast response speed in the user menus. You can use a preset, change each setting manually.


