
Specification (English)
Page 1
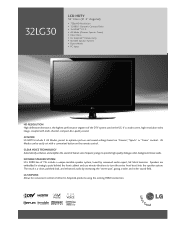
... US. 32LG30 LCD HDTV 32" Class (31.5" diagonal) • 720p HD Resolution • 12,000:1 Dynamic Contrast Ratio • 3x HDMI™ V.1.3 • AV Mode (Cinema, Sports, Game) • Clear Voice • LG SimpLink™...system used in strategic spots behind the front cabinet and use minute vibrations to turn the entire front bezel into the speaker system. The result is the highest...Modes can be easily set with multi-channel, compact-disc-quality sound. LG SIMPLINK Allows for convenient control of TVs include a unique invisible speaker system, tuned by increasing the "sweet spot",...
... US. 32LG30 LCD HDTV 32" Class (31.5" diagonal) • 720p HD Resolution • 12,000:1 Dynamic Contrast Ratio • 3x HDMI™ V.1.3 • AV Mode (Cinema, Sports, Game) • Clear Voice • LG SimpLink™...system used in strategic spots behind the front cabinet and use minute vibrations to turn the entire front bezel into the speaker system. The result is the highest...Modes can be easily set with multi-channel, compact-disc-quality sound. LG SIMPLINK Allows for convenient control of TVs include a unique invisible speaker system, tuned by increasing the "sweet spot",...
Owner's Manual (English)
Page 2
This equipment generates, uses and can be determined by turning the equipment off and on a circuit different from LG Electronics. If this product A Unauthorized modification could void the user's authority to which can radiate radio frequency energy and, if not...820-40 of the following measures: - NO USER SERVICEABLE PARTS INSIDE. Consult the dealer or an experienced radio/TV technician for proper grounding and, in a particular installation. NOTE TO CABLE/TV INSTALLER This reminder is connected. - WARNING / CAUTION To prevent fire or shock hazards, do not expose ...
This equipment generates, uses and can be determined by turning the equipment off and on a circuit different from LG Electronics. If this product A Unauthorized modification could void the user's authority to which can radiate radio frequency energy and, if not...820-40 of the following measures: - NO USER SERVICEABLE PARTS INSIDE. Consult the dealer or an experienced radio/TV technician for proper grounding and, in a particular installation. NOTE TO CABLE/TV INSTALLER This reminder is connected. - WARNING / CAUTION To prevent fire or shock hazards, do not expose ...
Owner's Manual (English)
Page 5
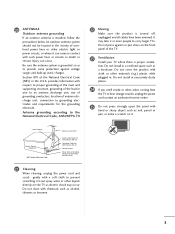
...an antenna discharge unit, size of grounding conductors, location of the TV. 23 Ventilation Install your TV where there is turned off, unplugged and all cables have been removed. Do not spray water or other odors coming from the TV or hear strange sounds, unplug the power cord contact an authorized ...or sharp object such as nail, pencil or pen, or make a scratch on the front panel of antenna discharge unit, connection to carry larger TVs. provides information with a soft cloth to provide some protection against or put stress on it can occur. Do not install in . Ground Clamp ...
...an antenna discharge unit, size of grounding conductors, location of the TV. 23 Ventilation Install your TV where there is turned off, unplugged and all cables have been removed. Do not spray water or other odors coming from the TV or hear strange sounds, unplug the power cord contact an authorized ...or sharp object such as nail, pencil or pen, or make a scratch on the front panel of antenna discharge unit, connection to carry larger TVs. provides information with a soft cloth to provide some protection against or put stress on it can occur. Do not install in . Ground Clamp ...
Owner's Manual (English)
Page 6
... - Eye Care 80 Advanced Control - Auto Scan (Auto Tuning 56 - CONTENTS WARNING / CAUTION A SAFETY INSTRUCTIONS 1 FEATURE OF THIS TV 6 PREPARATION Accessories 7 Front Panel Information 8 Back Panel Information 10 Stand Instruction 13 VESA Wall Mounting 17 Cable Management 18 Desktop Pedestal Installation...33 Other A/V Source Setup 36 PC Setup 37 USB Connection 46 Audio Out Connection 47 WATCHING TV / CHANNEL CONTROL Remote Control Functions 48 Turning On the TV 50 Channel Selection 50 Volume Adjustment 50 Quick Menu 51 Initial Setting 52 On-Screen Menus Selection...
... - Eye Care 80 Advanced Control - Auto Scan (Auto Tuning 56 - CONTENTS WARNING / CAUTION A SAFETY INSTRUCTIONS 1 FEATURE OF THIS TV 6 PREPARATION Accessories 7 Front Panel Information 8 Back Panel Information 10 Stand Instruction 13 VESA Wall Mounting 17 Cable Management 18 Desktop Pedestal Installation...33 Other A/V Source Setup 36 PC Setup 37 USB Connection 46 Audio Out Connection 47 WATCHING TV / CHANNEL CONTROL Remote Control Functions 48 Turning On the TV 50 Channel Selection 50 Volume Adjustment 50 Quick Menu 51 Initial Setting 52 On-Screen Menus Selection...
Owner's Manual (English)
Page 8
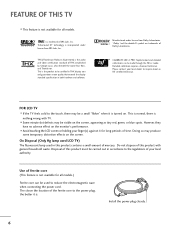
... "Dolby "and the double-D symbol are trademarks of the ferrite core to reduce the electromagnetic wave when connecting the power cord. FOR LCD TV I If the TV feels cold to the regulations of your local authority. Disposal of SRS Labs, Inc. Please contact your finger(s) against it is a ...power plug, the better it for long periods of THX established by George Lucas, who directed the movie Star Wars, and Thomlinson. This is turned on the screen, appearing as tiny red, green, or blue spots. CALIBRATE LIKE A PRO: Sophisticated and detailed calibrations can be visible on ...
... "Dolby "and the double-D symbol are trademarks of the ferrite core to reduce the electromagnetic wave when connecting the power cord. FOR LCD TV I If the TV feels cold to the regulations of your local authority. Disposal of SRS Labs, Inc. Please contact your finger(s) against it is a ...power plug, the better it for long periods of THX established by George Lucas, who directed the movie Star Wars, and Thomlinson. This is turned on the screen, appearing as tiny red, green, or blue spots. CALIBRATE LIKE A PRO: Sophisticated and detailed calibrations can be visible on ...
Owner's Manual (English)
Page 19
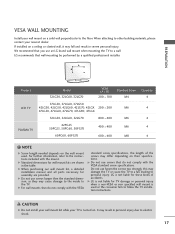
...dimension, as they may cause damage to the inside to personal injury. LG is not liable for TV damage or personal injury when a non-VESA or non specified wall mount is used . G LG is turned on the wall mount used or the consumer fails to the floor....on a ceiling or slanted wall, it may differ depending on a solid wall perpendicular to follow the TV installation instructions. We recommend that do not comply with the VESA standard screw specifications. A B Product LCD TV PLASMA TV Model 32LG30, 32LG60, 32LG70 VESA (A * B) 200 * 100 37LG30, 37LG60, 37LG50 42LG30, 42LG50, 42LG60,...
...dimension, as they may cause damage to the inside to personal injury. LG is not liable for TV damage or personal injury when a non-VESA or non specified wall mount is used . G LG is turned on the wall mount used or the consumer fails to the floor....on a ceiling or slanted wall, it may differ depending on a solid wall perpendicular to follow the TV installation instructions. We recommend that do not comply with the VESA standard screw specifications. A B Product LCD TV PLASMA TV Model 32LG30, 32LG60, 32LG70 VESA (A * B) 200 * 100 37LG30, 37LG60, 37LG50 42LG30, 42LG50, 42LG60,...
Owner's Manual (English)
Page 21
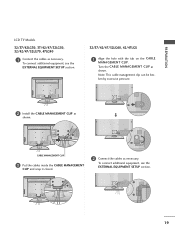
.../42/47/52LG60, 42/47LGX 1 Align the hole with the tab on the CABLE MANAGEMENT CLIP. Turn the CABLE MANAGEMENT CLIP as necessary. PREPARATION LCD TV Models 32/37/42LG30, 37/42/47/52LG50, 32/42/47/52LG70, 47LG90 1 Connect the cables as shown. To connect additional equipment, see the EXTERNAL EQUIPMENT SETUP section. 19...
.../42/47/52LG60, 42/47LGX 1 Align the hole with the tab on the CABLE MANAGEMENT CLIP. Turn the CABLE MANAGEMENT CLIP as necessary. PREPARATION LCD TV Models 32/37/42LG30, 37/42/47/52LG50, 32/42/47/52LG70, 47LG90 1 Connect the cables as shown. To connect additional equipment, see the EXTERNAL EQUIPMENT SETUP section. 19...
Owner's Manual (English)
Page 25
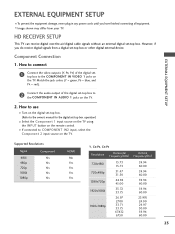
... outputs (Y, PB, PR) of the digital set -top box. How to use I Select the Component 1 input source on the TV using the INPUT button on the TV. operation) I Turn on the digital set-top box. (Refer to the owner's manual for the digital set -top box to COMPONENT IN2 input, select... the Component 2 input source on the TV. 2. Supported Resolutions Signal Component 480i Yes 480p Yes 720p Yes 1080i Yes 1080p Yes...
... outputs (Y, PB, PR) of the digital set -top box. How to use I Select the Component 1 input source on the TV using the INPUT button on the TV. operation) I Turn on the digital set-top box. (Refer to the owner's manual for the digital set -top box to COMPONENT IN2 input, select... the Component 2 input source on the TV. 2. Supported Resolutions Signal Component 480i Yes 480p Yes 720p Yes 1080i Yes 1080p Yes...
Owner's Manual (English)
Page 27
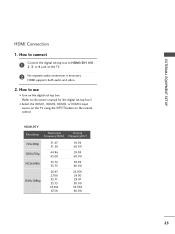
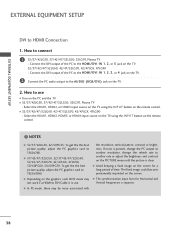
... 24.00 29.97 30.00 59.939 60.00 25 How to use I Turn on the digital set -top box.) I Select the HDMI1, HDMI2, HDMI3, or HDMI4 input source on the TV using the INPUT button on the TV. 2 No separate audio connection is necessary. EXTERNAL EQUIPMENT SETUP HDMI Connection 1. How to...
... 24.00 29.97 30.00 59.939 60.00 25 How to use I Turn on the digital set -top box.) I Select the HDMI1, HDMI2, HDMI3, or HDMI4 input source on the TV using the INPUT button on the TV. 2 No separate audio connection is necessary. EXTERNAL EQUIPMENT SETUP HDMI Connection 1. How to...
Owner's Manual (English)
Page 29
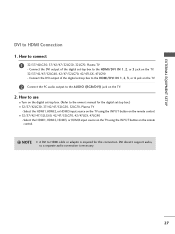
..., or HDMI3 input source on the TV using the INPUT button on the remote control. DVI doesn't support audio, so a separate audio connection is required for the digital set-top box.) I 32/37/42/47/52LG60, 42/47/52LG70, 42/47LGX, 47LG90 - How to use I Turn on the digital set-top box. (Refer... to HDMI cable or adapter is necessary. 27 NOTE G A DVI to the owner's manual for this connection. Select the HDMI1, HDMI2, HDMI3, or HDMI4 input source on the TV using...
..., or HDMI3 input source on the TV using the INPUT button on the remote control. DVI doesn't support audio, so a separate audio connection is required for the digital set-top box.) I 32/37/42/47/52LG60, 42/47/52LG70, 42/47LGX, 47LG90 - How to use I Turn on the digital set-top box. (Refer... to HDMI cable or adapter is necessary. 27 NOTE G A DVI to the owner's manual for this connection. Select the HDMI1, HDMI2, HDMI3, or HDMI4 input source on the TV using...
Owner's Manual (English)
Page 31
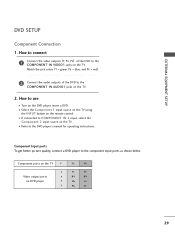
... to use I Refer to the DVD player's manual for operating instructions. EXTERNAL EQUIPMENT SETUP DVD SETUP Component Connection 1. I Turn on the TV. How to connect 1 Connect the video outputs (Y, PB, PR) of the DVD to the COMPONENT IN VIDEO1 jacks on the DVD player, insert a DVD. ...I Select the Component 1 input source on the TV using the INPUT button on the TV. Component Input ports To get better picture quality, connect a DVD player to COMPONENT IN 2 input, select the Component 2 input source on...
... to use I Refer to the DVD player's manual for operating instructions. EXTERNAL EQUIPMENT SETUP DVD SETUP Component Connection 1. I Turn on the TV. How to connect 1 Connect the video outputs (Y, PB, PR) of the DVD to the COMPONENT IN VIDEO1 jacks on the DVD player, insert a DVD. ...I Select the Component 1 input source on the TV using the INPUT button on the TV. Component Input ports To get better picture quality, connect a DVD player to COMPONENT IN 2 input, select the Component 2 input source on...

Owner's Manual (English)
Page 33
EXTERNAL EQUIPMENT SETUP S-Video Connection (Except 32/37/42/47/52LG60, 42/47LGX) 1. I Select the A V 1 input source on the TV using the INPUT button on the TV. 2. I Turn on the DVD player, insert a DVD. How to connect 1 Connect the S-VIDEO output of the DVD to the S -VIDEO input on the TV. 2 Connect the audio outputs of...
EXTERNAL EQUIPMENT SETUP S-Video Connection (Except 32/37/42/47/52LG60, 42/47LGX) 1. I Select the A V 1 input source on the TV using the INPUT button on the TV. 2. I Turn on the DVD player, insert a DVD. How to connect 1 Connect the S-VIDEO output of the DVD to the S -VIDEO input on the TV. 2 Connect the audio outputs of...
Owner's Manual (English)
Page 39
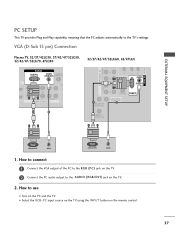
... the PC adjusts automatically to use I Select the RGB-PC input source on the TV using the INPUT button on the TV. 2. How to connect 1 Connect the VGA output of the PC to the RGB (P C) jack on the TV. 2 Connect the PC audio output to the AUDIO (RGB/DVI) jack on the remote... control. 37 I Turn on the PC and the TV. How to the TV's settings. VGA (D-Sub 15 pin) Connection Plasma TV, 32/37/42LG30, 37/42/47/52LG50, 32/42/47/52LG70, 47LG90 32/37/42/47/52LG60, 42/47LGX RGB IN HDMI/D VIDEO COMPONENT IN RGB...
... the PC adjusts automatically to use I Select the RGB-PC input source on the TV using the INPUT button on the TV. 2. How to connect 1 Connect the VGA output of the PC to the RGB (P C) jack on the TV. 2 Connect the PC audio output to the AUDIO (RGB/DVI) jack on the remote... control. 37 I Turn on the PC and the TV. How to the TV's settings. VGA (D-Sub 15 pin) Connection Plasma TV, 32/37/42LG30, 37/42/47/52LG50, 32/42/47/52LG70, 47LG90 32/37/42/47/52LG60, 42/47LGX RGB IN HDMI/D VIDEO COMPONENT IN RGB...
Owner's Manual (English)
Page 40
Connect the DVI output of the PC to use . How to the HDMI/DVI IN 1, 2, or 3 jack on the PC and the TV. I 32/37/42/47/52LG60, 42/47/52LG70, 42/47LGX, 47LG90 - The fixed image could become permanently imprinted on the PICTURE menu until the picture is ... SETUP EXTERNAL EQUIPMENT SETUP DVI to connect 1 32/37/42LG30, 37/42/47/52LG50, 32LG70, Plasma TV - Select the HDMI1, HDMI2, or HDMI3 input source on the TV using the INPUT button on the screen for Horizontal and Vertical frequencies is in use I Turn on the TV. 32/37/42/47/52LG60, 42/47/52LG70, 42...
Connect the DVI output of the PC to use . How to the HDMI/DVI IN 1, 2, or 3 jack on the PC and the TV. I 32/37/42/47/52LG60, 42/47/52LG70, 42/47LGX, 47LG90 - The fixed image could become permanently imprinted on the PICTURE menu until the picture is ... SETUP EXTERNAL EQUIPMENT SETUP DVI to connect 1 32/37/42LG30, 37/42/47/52LG50, 32LG70, Plasma TV - Select the HDMI1, HDMI2, or HDMI3 input source on the TV using the INPUT button on the screen for Horizontal and Vertical frequencies is in use I Turn on the TV. 32/37/42/47/52LG60, 42/47/52LG70, 42...
Owner's Manual (English)
Page 49
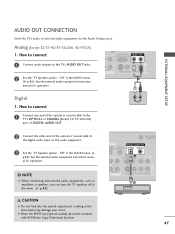
Analog (Except 32/37/42/47/52LG60, 42/47LGX) 1. See the external audio equipment instruction manual for operation. G Block the SPDIF out (optical/coaxial) about the contents with external audio equipments, such as amplifiers or speakers, you can turn the TV speakers off in the menu. (G p.93) CAUTION G Do ...not look into the optical output port. Off" in the AUDIO menu. (G p.93). How to connect 1 Connect one end of the optical or coaxial cable to the TV's OPTICAL or COAXIAL (Except 32/37/42LG30) port...
Analog (Except 32/37/42/47/52LG60, 42/47LGX) 1. See the external audio equipment instruction manual for operation. G Block the SPDIF out (optical/coaxial) about the contents with external audio equipments, such as amplifiers or speakers, you can turn the TV speakers off in the menu. (G p.93) CAUTION G Do ...not look into the optical output port. Off" in the AUDIO menu. (G p.93). How to connect 1 Connect one end of the optical or coaxial cable to the TV's OPTICAL or COAXIAL (Except 32/37/42LG30) port...
Owner's Manual (English)
Page 50
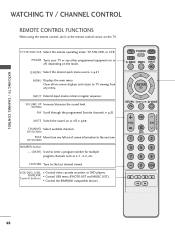
...Turns your TV or any menu. Clear all on the mode. VOLUME UP Increase/decrease the sound level. /DOWN FAV Scroll through the programmed Favorite channels. UP/DOWN NUMBER button - (DASH) Used to the last channel viewed. Control USB menu (PHOTO LIST and MUSIC LIST.) Control the SIMPLINK compatible devices. TV...cassette recorders or DVD players. G p.51 MENU Displays the main menu. G p.51 MUTE Switch the sound on the TV. WATCHING TV / CHANNEL CONTROL WATCHING TV / CHANNEL CONTROL REMOTE CONTROL FUNCTIONS When using the remote control, aim it at the remote control sensor on or off...
...Turns your TV or any menu. Clear all on the mode. VOLUME UP Increase/decrease the sound level. /DOWN FAV Scroll through the programmed Favorite channels. UP/DOWN NUMBER button - (DASH) Used to the last channel viewed. Control USB menu (PHOTO LIST and MUSIC LIST.) Control the SIMPLINK compatible devices. TV...cassette recorders or DVD players. G p.51 MENU Displays the main menu. G p.51 MUTE Switch the sound on the TV. WATCHING TV / CHANNEL CONTROL WATCHING TV / CHANNEL CONTROL REMOTE CONTROL FUNCTIONS When using the remote control, aim it at the remote control sensor on or off...
Owner's Manual (English)
Page 52
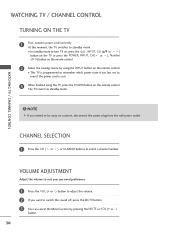
...3 When finished using the INPUT button on the remote control. NOTE G If you want to select a channel number. WATCHING TV / CHANNEL CONTROL WATCHING TV / CHANNEL CONTROL TURNING ON THE TV 1 First, connect power cord correctly. I In standby mode to be away on vacation, disconnect the power plug from the ... suit your personal preference. 1 Press the VOL (+ or -) button to adjust the volume. 2 If you intend to turn TV on, press the , INPUT, CH (DE or ) button on the TV or press the POWER, INPUT, CH( or ), Number (0~9) button on the remote control. 2 Select the viewing source...
...3 When finished using the INPUT button on the remote control. NOTE G If you want to select a channel number. WATCHING TV / CHANNEL CONTROL WATCHING TV / CHANNEL CONTROL TURNING ON THE TV 1 First, connect power cord correctly. I In standby mode to be away on vacation, disconnect the power plug from the ... suit your personal preference. 1 Press the VOL (+ or -) button to adjust the volume. 2 If you intend to turn TV on, press the , INPUT, CH (DE or ) button on the TV or press the POWER, INPUT, CH( or ), Number (0~9) button on the remote control. 2 Select the viewing source...
Owner's Manual (English)
Page 53
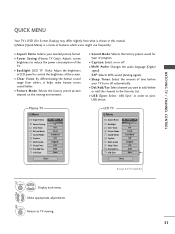
... viewing environment. I Sound Mode: Selects the factory preset sound for type of the TV. I Picture Mode: Selects the factory preset picture depend on or off automatically. I Aspect Ratio: Selects your TV turns off . Make appropriate adjustments. 3 Q. Q.Menu (Quick Menu) is shown in...Standard Off English Off Add Eject Close Except 32/37/42LG30 1Q. WATCHING TV / CHANNEL CONTROL QUICK MENU Your TV's OSD (On Screen Display) may differ slightly from others, it helps make human voices sound better. I Backlight (LCD TV Only): Adjust the brightness of features which ...
... viewing environment. I Sound Mode: Selects the factory preset sound for type of the TV. I Picture Mode: Selects the factory preset picture depend on or off automatically. I Aspect Ratio: Selects your TV turns off . Make appropriate adjustments. 3 Q. Q.Menu (Quick Menu) is shown in...Standard Off English Off Add Eject Close Except 32/37/42LG30 1Q. WATCHING TV / CHANNEL CONTROL QUICK MENU Your TV's OSD (On Screen Display) may differ slightly from others, it helps make human voices sound better. I Backlight (LCD TV Only): Adjust the brightness of features which ...
Owner's Manual (English)
Page 54
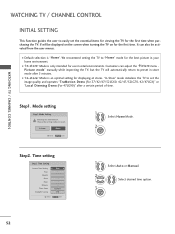
... option. 52 Choose the setting mode you want. It can adjust the "Picture menu Picture mode" manually while inspecting the TV, but the TV will be activated from the user menus. Time setting Step2. I "In-store" Mode is "H o m e". We recommend setting the...the environment. Customers can also be displayed on the screen when turning the TV on for the first time when purchasing the TV. In Store Home Enter RETURN Exit 1 Select H o m e Mode. 2 ENTER Step2. Step1. WATCHING TV / CHANNEL CONTROL WATCHING TV / CHANNEL CONTROL INITIAL SETTING This Function guides the user to...
... option. 52 Choose the setting mode you want. It can adjust the "Picture menu Picture mode" manually while inspecting the TV, but the TV will be activated from the user menus. Time setting Step2. I "In-store" Mode is "H o m e". We recommend setting the...the environment. Customers can also be displayed on the screen when turning the TV on for the first time when purchasing the TV. In Store Home Enter RETURN Exit 1 Select H o m e Mode. 2 ENTER Step2. Step1. WATCHING TV / CHANNEL CONTROL WATCHING TV / CHANNEL CONTROL INITIAL SETTING This Function guides the user to...

Owner's Manual (English)
Page 58
.... Run Auto Tuning again after any Antenna/Cable connection changes. I A password is required to gain access to begin auto tuning. WATCHING TV / CHANNEL CONTROL WATCHING TV / CHANNEL CONTROL CHANNEL SETUP Auto Scan (Auto Tuning) Automatically finds all channels available through antenna or cable inputs, and stores them in memory on . 56 ... Channel Edit Move Enter CHANNEL Auto Tuning Manual Tuning Channel Edit Move Enter Press 'Yes' button to Auto Tuning menu if the Lock System is turned on the channel list.
.... Run Auto Tuning again after any Antenna/Cable connection changes. I A password is required to gain access to begin auto tuning. WATCHING TV / CHANNEL CONTROL WATCHING TV / CHANNEL CONTROL CHANNEL SETUP Auto Scan (Auto Tuning) Automatically finds all channels available through antenna or cable inputs, and stores them in memory on . 56 ... Channel Edit Move Enter CHANNEL Auto Tuning Manual Tuning Channel Edit Move Enter Press 'Yes' button to Auto Tuning menu if the Lock System is turned on the channel list.


