
Owner's Manual (English)
Page 7
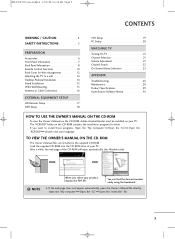
... automatically, open automatically. (for Window only) ! After a while, the web page of your language. Open the "My computer" Open the "LG" Open the "index.htm" file. 5 NOTE When you want to a wall 14 Desktop Pedestal Installation 14 Stand Installation 15 VESA Wall Mounting 15... 1/20/04 12:34 AM Page 5 CONTENTS WARNING / CAUTION 2 SAFETY INSTRUCTIONS 3 PREPARATION Accessories 6 Front Panel Information 7 Back Panel Information 8 Remote Control Functions 10 Back Cover for Wire Arrangement 12 Attaching the TV to install those programs, Open the "My Computer" Open the...
... automatically, open automatically. (for Window only) ! After a while, the web page of your language. Open the "My computer" Open the "LG" Open the "index.htm" file. 5 NOTE When you want to a wall 14 Desktop Pedestal Installation 14 Stand Installation 15 VESA Wall Mounting 15... 1/20/04 12:34 AM Page 5 CONTENTS WARNING / CAUTION 2 SAFETY INSTRUCTIONS 3 PREPARATION Accessories 6 Front Panel Information 7 Back Panel Information 8 Remote Control Functions 10 Back Cover for Wire Arrangement 12 Attaching the TV to install those programs, Open the "My Computer" Open the...
Owner's Manual (English)
Page 8
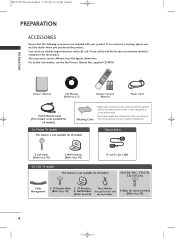
...or fingerprint on the exterior only with (Refer to p.14) the twist holder. 4-Bolts for stand assembly (Refer to p.5) 1 4 7 Remote Control, Batteries Power Cord 75ohm Round Cable (This feature is missing, please contact the dealer where you purchased the product. The accessories can be cautions...removing stain. Please be different from the figures shown here. If an accessory is not available for all models 32LC7D/7DC, 37LC7D, 32LG10 only Cable Management 2- TV Bracket Bolts 2- MFL34797033-en-simple 1/20/04 12:34 AM Page 6 PREPARATION PREPARATION ACCESSORIES Ensure that ...
...or fingerprint on the exterior only with (Refer to p.14) the twist holder. 4-Bolts for stand assembly (Refer to p.5) 1 4 7 Remote Control, Batteries Power Cord 75ohm Round Cable (This feature is missing, please contact the dealer where you purchased the product. The accessories can be cautions...removing stain. Please be different from the figures shown here. If an accessory is not available for all models 32LC7D/7DC, 37LC7D, 32LG10 only Cable Management 2- TV Bracket Bolts 2- MFL34797033-en-simple 1/20/04 12:34 AM Page 6 PREPARATION PREPARATION ACCESSORIES Ensure that ...
Owner's Manual (English)
Page 9
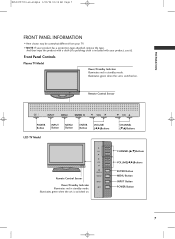
... ENTER MVOELNU ECHNTER VOL CH POWER Button INPUT Button MENU Button ENTER Button VOLUME (F,G)Buttons LCD TV Model CH CH VOL ENTER MENU VOL INPUT Remote Control Sensor Power/Standby Indicator Illuminates red in standby mode. Illuminates green when the set is switched on . Illuminates green when the set is switched on... the product with a cloth (If a polishing cloth is included with your TV. I Here shown may be somewhat different from your product, use it). Front Panel Controls Plasma TV Model Power/Standby Indicator Illuminates red in standby mode.
... ENTER MVOELNU ECHNTER VOL CH POWER Button INPUT Button MENU Button ENTER Button VOLUME (F,G)Buttons LCD TV Model CH CH VOL ENTER MENU VOL INPUT Remote Control Sensor Power/Standby Indicator Illuminates red in standby mode. Illuminates green when the set is switched on . Illuminates green when the set is switched on... the product with a cloth (If a polishing cloth is included with your TV. I Here shown may be somewhat different from your product, use it). Front Panel Controls Plasma TV Model Power/Standby Indicator Illuminates red in standby mode.
Owner's Manual (English)
Page 11
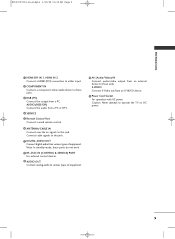
Connect cable signals to this jack. S-VIDEO Connect S-Video out from a PC or DTV. 4 SERVICE 5 Remote Control Port Connect a wired remote control. 6 ANTENNA/CABLE IN Connect over-the air signals to operate the TV on DC power. 9 AUDIO (RGB/DVI) Connect the audio from ... IN Connect a component video/audio device to these jacks. Note: In standby mode, these ports do not work. 8 RS-232C IN (CONTROL & SERVICE) PORT For external control devices. 9 AUDIO OUT Connect analog audio to various types of equipment. Caution: Never attempt to this jack. 7 DIGITAL AUDIO OUT Connect digital...
Connect cable signals to this jack. S-VIDEO Connect S-Video out from a PC or DTV. 4 SERVICE 5 Remote Control Port Connect a wired remote control. 6 ANTENNA/CABLE IN Connect over-the air signals to operate the TV on DC power. 9 AUDIO (RGB/DVI) Connect the audio from ... IN Connect a component video/audio device to these jacks. Note: In standby mode, these ports do not work. 8 RS-232C IN (CONTROL & SERVICE) PORT For external control devices. 9 AUDIO OUT Connect analog audio to various types of equipment. Caution: Never attempt to this jack. 7 DIGITAL AUDIO OUT Connect digital...
Owner's Manual (English)
Page 12
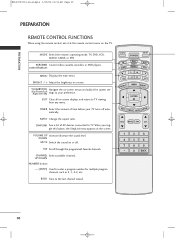
...RATIO Change the aspect ratio. FAV Scroll through the programmed Favorite channels. When you toggle this button, the SimpLink menu appears at the remote control sensor on -screen menus and adjust the system set- (Up/Down/Left Right/ENTER) tings to TV viewing from any menu. MFL34797033...-en-simple 1/20/04 12:34 AM Page 10 PREPARATION PREPARATION REMOTE CONTROL FUNCTIONS When using the remote control, aim it at the screen. MODE Select the remote's operating mode. THUMBSTICK Navigate the on the TV. UP/DOWN NUMBER button - (DASH) Used to...
...RATIO Change the aspect ratio. FAV Scroll through the programmed Favorite channels. When you toggle this button, the SimpLink menu appears at the remote control sensor on -screen menus and adjust the system set- (Up/Down/Left Right/ENTER) tings to TV viewing from any menu. MFL34797033...-en-simple 1/20/04 12:34 AM Page 10 PREPARATION PREPARATION REMOTE CONTROL FUNCTIONS When using the remote control, aim it at the screen. MODE Select the remote's operating mode. THUMBSTICK Navigate the on the TV. UP/DOWN NUMBER button - (DASH) Used to...
Owner's Manual (English)
Page 13
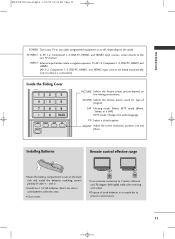
... range I Open the battery compartment cover on the back side and install the batteries matching correct polarity (+ with -). with +, - I Use a remote control up to 7 meters distance and 30 degree (left/right) within the receiving unit scope. TV INPUT POWER TV AUDIO DVD MODE CABLE INPUT VCR STB ...
... range I Open the battery compartment cover on the back side and install the batteries matching correct polarity (+ with -). with +, - I Use a remote control up to 7 meters distance and 30 degree (left/right) within the receiving unit scope. TV INPUT POWER TV AUDIO DVD MODE CABLE INPUT VCR STB ...

Owner's Manual (English)
Page 19
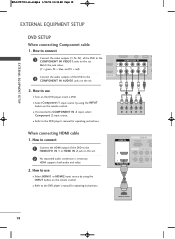
MFL34797033-en-simple 1/20/04 12:34 AM Page 17 EXTERNAL EQUIPMENT SETUP I Select Component 1 input source by using the INPUT button on the remote control. I This part of the digital set-top box to 2 the COMPONENT IN AUDIO 1 jacks on the set. When connecting Component cable 1. Match the jack colors (Y = ...
MFL34797033-en-simple 1/20/04 12:34 AM Page 17 EXTERNAL EQUIPMENT SETUP I Select Component 1 input source by using the INPUT button on the remote control. I This part of the digital set-top box to 2 the COMPONENT IN AUDIO 1 jacks on the set. When connecting Component cable 1. Match the jack colors (Y = ...
Owner's Manual (English)
Page 20
... DVD player's manual for operating instructions. 1 2 Y PB PR L R When connecting HDMI cable 1. I Select HDMI1 or HDMI2 input source by using the INPUT button on the remote control. I /DVI IN VIDEO AUDIO S- ( ) 2. I Refer to use I Select Component 1 input source by using the INPUT button on the...
... DVD player's manual for operating instructions. 1 2 Y PB PR L R When connecting HDMI cable 1. I Select HDMI1 or HDMI2 input source by using the INPUT button on the remote control. I /DVI IN VIDEO AUDIO S- ( ) 2. I Refer to use I Select Component 1 input source by using the INPUT button on the...
Owner's Manual (English)
Page 21
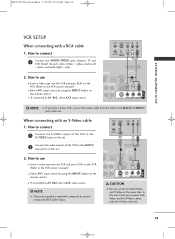
...AV IN 1 ! How to use I Insert a video tape into the VCR and press PLAY on the VCR. (Refer to the AUDIO input jacks on the remote control. NOTE G If you connect both Video and S-Video at the same time. ANT IN S-VIDEO VIDEO L R ANT OUT OUTPUT SWITCH 2 Connect the audio outputs... between TV and VCR. In the event that you have a mono VCR, connect the audio cable from the VCR to the S -VIDEO input on the remote control. MFL34797033-en-simple 1/20/04 12:34 AM Page 19 EXTERNAL EQUIPMENT SETUP ( ) VCR SETUP When connecting with an S-Video cable 1. How to connect 1...
...AV IN 1 ! How to use I Insert a video tape into the VCR and press PLAY on the VCR. (Refer to the AUDIO input jacks on the remote control. NOTE G If you connect both Video and S-Video at the same time. ANT IN S-VIDEO VIDEO L R ANT OUT OUTPUT SWITCH 2 Connect the audio outputs... between TV and VCR. In the event that you have a mono VCR, connect the audio cable from the VCR to the S -VIDEO input on the remote control. MFL34797033-en-simple 1/20/04 12:34 AM Page 19 EXTERNAL EQUIPMENT SETUP ( ) VCR SETUP When connecting with an S-Video cable 1. How to connect 1...
Owner's Manual (English)
Page 22
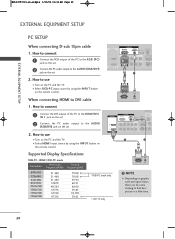
... card and signal status, there can be some shaking to the AUDIO (RGB/DVI) jack on the set. 2. I Turn on the remote control. NOTE G Depending on the remote control. How to connect 1 Connect the RGB output of the PC to the HDMI/DVI IN 1 jack on the set. 2 Connect the ...PC audio output to find best picture in a little time. 20 HDMI IN RGB IN RGB(PC) AUDIO REMOTE (RGB/DVI) SERVICE CONTROL IN COMPONENT IN RS-232C IN (CONTROL & SERV 2 2 1 1 HDMI/DVI IN VIDEO AUDIO S-VIDEO VI ( ) 1 ( ) 2 When connecting HDMI to the RGB (P C) jack on the set ...
... card and signal status, there can be some shaking to the AUDIO (RGB/DVI) jack on the set. 2. I Turn on the remote control. NOTE G Depending on the remote control. How to connect 1 Connect the RGB output of the PC to the HDMI/DVI IN 1 jack on the set. 2 Connect the ...PC audio output to find best picture in a little time. 20 HDMI IN RGB IN RGB(PC) AUDIO REMOTE (RGB/DVI) SERVICE CONTROL IN COMPONENT IN RS-232C IN (CONTROL & SERV 2 2 1 1 HDMI/DVI IN VIDEO AUDIO S-VIDEO VI ( ) 1 ( ) 2 When connecting HDMI to the RGB (P C) jack on the set ...
Owner's Manual (English)
Page 23
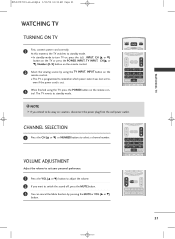
...volume to suit your personal preference. 1 Press the VOL (D or E) button to adjust the volume. 2 If you intend to be away on the remote control. The TV reverts to standby mode. I This TV is out. 3 When finished using the TV INPUT, INPUT button on vacation, disconnect the power ... to switch the sound off, press the MUTE button. 3 You can cancel the Mute function by using the TV, press the POWER button on the remote control. 2 Select the viewing source by pressing the MUTE or VOL (D or E) button. EXIT TIMER RATIO SIMPLINK VOL MUTE FAV CH 1 2 3 4 5 6 7 8 9 0 BACK ...
...volume to suit your personal preference. 1 Press the VOL (D or E) button to adjust the volume. 2 If you intend to be away on the remote control. The TV reverts to standby mode. I This TV is out. 3 When finished using the TV INPUT, INPUT button on vacation, disconnect the power ... to switch the sound off, press the MUTE button. 3 You can cancel the Mute function by using the TV, press the POWER button on the remote control. 2 Select the viewing source by pressing the MUTE or VOL (D or E) button. EXIT TIMER RATIO SIMPLINK VOL MUTE FAV CH 1 2 3 4 5 6 7 8 9 0 BACK ...
Owner's Manual (English)
Page 28
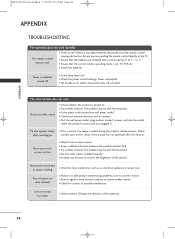
...No or poor color or poor picture I Adjust Color in pictures I Keep a sufficient distance between the product and the remote control causing obstruction. I Check antenna (Change the direction of the antenna). 26 I Check to receive weaker station. Poor reception on . The... The operation does not work . I No broadcast on contact your antenna direction and/or location. I Ensure that the batteries are pointing the remote control directly at the TV. I Is the power cord inserted into the outlet where the product's power cord was plugged in. I Try another ...
...No or poor color or poor picture I Adjust Color in pictures I Keep a sufficient distance between the product and the remote control causing obstruction. I Check antenna (Change the direction of the antenna). 26 I Check to receive weaker station. Poor reception on . The... The operation does not work . I No broadcast on contact your antenna direction and/or location. I Ensure that the batteries are pointing the remote control directly at the TV. I Is the power cord inserted into the outlet where the product's power cord was plugged in. I Try another ...


