
User Manual
Page 1
OWNER'S MANUAL LCD TV Please read this manual carefully before operating your set and retain it for future reference. 32LG710H 37LG710H 42LG710H 32LD650H 37LD650H 42LD650H 47LD650H 55LD650H 32LD655H 37LD655H 42LD655H P/NO : SAC34134301 (1007-REV02) www.lg.com
OWNER'S MANUAL LCD TV Please read this manual carefully before operating your set and retain it for future reference. 32LG710H 37LG710H 42LG710H 32LD650H 37LD650H 42LD650H 47LD650H 55LD650H 32LD655H 37LD655H 42LD655H P/NO : SAC34134301 (1007-REV02) www.lg.com

User Manual
Page 4
... be certain. Short-circuit Breaker Power Supply 19 DISCONNECTING DEVICE FROM MAINS Mains plug is recommend that occurs when watching or turning off this owner's manual to temperature and humidity. This generated sound does not affect the performance and reliability of this unit by plastic thermal contraction due to be placed...
... be certain. Short-circuit Breaker Power Supply 19 DISCONNECTING DEVICE FROM MAINS Mains plug is recommend that occurs when watching or turning off this owner's manual to temperature and humidity. This generated sound does not affect the performance and reliability of this unit by plastic thermal contraction due to be placed...

User Manual
Page 6
... Music List 53 Extra Contents 55 PICTURE CONTROL PIP (Picture-In-Picture 56 Picture Size (Aspect Ratio) Control 58 Preset Picture Settings (Picture Mode 61 Manual Picture Adjustment - Infinite Sound 70 Clear Voice ll 71 Balance 72 TV Speakers On/Off Setup 73 Audio Reset 74 Stereo/SAP Broadcast Setup 75... SOUND & LANGUAGE CONTROL Auto Volume Leveler (Auto Volume 67 Preset Sound Settings (Sound Mode) 68 Sound Setting Adjustment - SRS TruSurround XT 70 - Add / Delete Channel (Manual Tuning 43 -
... Music List 53 Extra Contents 55 PICTURE CONTROL PIP (Picture-In-Picture 56 Picture Size (Aspect Ratio) Control 58 Preset Picture Settings (Picture Mode 61 Manual Picture Adjustment - Infinite Sound 70 Clear Voice ll 71 Balance 72 TV Speakers On/Off Setup 73 Audio Reset 74 Stereo/SAP Broadcast Setup 75... SOUND & LANGUAGE CONTROL Auto Volume Leveler (Auto Volume 67 Preset Sound Settings (Sound Mode) 68 Sound Setting Adjustment - SRS TruSurround XT 70 - Add / Delete Channel (Manual Tuning 43 -

User Manual
Page 7
Auto Clock Setup 81 Manual Clock Setup 82 Auto On/Off Time Setting 83 Sleep Timer Setting 84 PARENTAL CONTROL / RATINGS Set Password & Lock System 85 Channel Blocking 88 Movie & ...
Auto Clock Setup 81 Manual Clock Setup 82 Auto On/Off Time Setting 83 Sleep Timer Setting 84 PARENTAL CONTROL / RATINGS Set Password & Lock System 85 Channel Blocking 88 Movie & ...

User Manual
Page 9
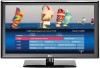
... on the exterior only with the polishing cloth. * Do not wipe roughly when removing stains. The accessories included may cause scratches or discoloration. PREPARATION Owner's Manual x 2 CD Manual TV GUIDESTB POWER PORTAL DVD INFOVCR i RETURN MENU 1 .:/, 4 GHI VOL ALPHA/NUCMC REMOMVEUTE 2 CH P A G E ABC 7 5 3 PQRS JKL DEF 8 6 TUV MNO 0 9 &@ WXYZ PIP PIP CH...
... on the exterior only with the polishing cloth. * Do not wipe roughly when removing stains. The accessories included may cause scratches or discoloration. PREPARATION Owner's Manual x 2 CD Manual TV GUIDESTB POWER PORTAL DVD INFOVCR i RETURN MENU 1 .:/, 4 GHI VOL ALPHA/NUCMC REMOMVEUTE 2 CH P A G E ABC 7 5 3 PQRS JKL DEF 8 6 TUV MNO 0 9 &@ WXYZ PIP PIP CH...

User Manual
Page 19
PREPARATION PREPARATION DESKTOP PEDESTAL INSTALLATION I Image shown may differ from the wall. 4 inches 4 inches 4 inches 4 inches CAUTION G Ensure adequate ventilation by following the clearance recommendations. SWIVEL STAND After installing the TV, you can adjust the TV set manually to the left or right direction to suit your TV. For proper ventilation, allow a clearance of heat source. G Do not mount near or above any type of 4 inches on all four sides from your viewing position. 20°: 47/55LD650H 90°: Other Models 19
PREPARATION PREPARATION DESKTOP PEDESTAL INSTALLATION I Image shown may differ from the wall. 4 inches 4 inches 4 inches 4 inches CAUTION G Ensure adequate ventilation by following the clearance recommendations. SWIVEL STAND After installing the TV, you can adjust the TV set manually to the left or right direction to suit your TV. For proper ventilation, allow a clearance of heat source. G Do not mount near or above any type of 4 inches on all four sides from your viewing position. 20°: 47/55LD650H 90°: Other Models 19

User Manual
Page 22
... the VESA standard screw specifications, the length of the screws may cause damage to electric shock. 22 G When purchasing our wall mount kit, a detailed installation manual and all parts necessary for TV damage or personal injury when a non-VESA or non specified wall mount is used . G Do not use fasten the... screws too strongly, this may result in . G LG is not liable for assembly are shown in the table. CAUTION G Do not install your wall mount kit while the TV is not liable for...
... the VESA standard screw specifications, the length of the screws may cause damage to electric shock. 22 G When purchasing our wall mount kit, a detailed installation manual and all parts necessary for TV damage or personal injury when a non-VESA or non specified wall mount is used . G Do not use fasten the... screws too strongly, this may result in . G LG is not liable for assembly are shown in the table. CAUTION G Do not install your wall mount kit while the TV is not liable for...

User Manual
Page 26
How to use I Turn on the digital set-top box. (Refer to the owner's manual for the digital set -top box to the COMPONENT IN VIDEO jacks on the remote control. Component Connection 1. Match the jack colors (Y = green, PB = blue, ...
How to use I Turn on the digital set-top box. (Refer to the owner's manual for the digital set -top box to the COMPONENT IN VIDEO jacks on the remote control. Component Connection 1. Match the jack colors (Y = green, PB = blue, ...

User Manual
Page 27
...) RGB 2 No separate audio connection is necessary. RJP INTERFACE VID 1 ! In this case use I Turn on the digital set-top box. (Refer to the owner's manual for the digital set -top box to use the latest cables that support High Speed HDMI. HDMI-DTV OUTPUT HDMI-DTV Resolution 720x480p 1280x720p 1920x1080i...
...) RGB 2 No separate audio connection is necessary. RJP INTERFACE VID 1 ! In this case use I Turn on the digital set-top box. (Refer to the owner's manual for the digital set -top box to use the latest cables that support High Speed HDMI. HDMI-DTV OUTPUT HDMI-DTV Resolution 720x480p 1280x720p 1920x1080i...

User Manual
Page 28
... doesn't support audio, so a separate audio connection is required for the digital set-top box.) I Turn on the digital set -top box to the owner's manual for this connection.
... doesn't support audio, so a separate audio connection is required for the digital set-top box.) I Turn on the digital set -top box to the owner's manual for this connection.

User Manual
Page 29
... the COMPONENT IN AUDIO jacks on the remote control. CCOOMMPPOONNEENNTTININ Component Input ports To get better picture quality, connect a DVD player to the DVD player's manual for operating instructions. Component ports on the TV Y PB PR Video output ports on the DVD player, insert a DVD. I Select the Component input source on... on the remote control. How to connect Y PB PR L R EXTERNAL EQUIPMENT SETUP 1 Connect the video outputs (Y, PB, PR) of the DVD to the DVD player's manual for operating instructions. HDMI supports both audio and video. HDMI OUTPUT 29
... the COMPONENT IN AUDIO jacks on the remote control. CCOOMMPPOONNEENNTTININ Component Input ports To get better picture quality, connect a DVD player to the DVD player's manual for operating instructions. Component ports on the TV Y PB PR Video output ports on the DVD player, insert a DVD. I Select the Component input source on... on the remote control. How to connect Y PB PR L R EXTERNAL EQUIPMENT SETUP 1 Connect the video outputs (Y, PB, PR) of the DVD to the DVD player's manual for operating instructions. HDMI supports both audio and video. HDMI OUTPUT 29

User Manual
Page 30
... tape into the VCR and press PLAY on the remote control. I Set VCR output switch to 3 or 4 and then tune TV to the VCR owner's manual.) Antenna Composite (RCA) Connection 1. I Select the A V 1 input source on the TV using the INPUT button on the VCR. (Refer to the same channel number. Match...
... tape into the VCR and press PLAY on the remote control. I Set VCR output switch to 3 or 4 and then tune TV to the VCR owner's manual.) Antenna Composite (RCA) Connection 1. I Select the A V 1 input source on the TV using the INPUT button on the VCR. (Refer to the same channel number. Match...

User Manual
Page 35
... EXTERNAL EQUIPMENT SETUP Auto Configure Automatically adjusts picture position and minimizes image instability. After adjustment, if the image is still not correct, try using the manual settings or a different resolution or refresh rate on the PC. Position Size Phase Reset Move Prev. PICTURE Move Enter E • Brightness 50 • Sharpness 50...
... EXTERNAL EQUIPMENT SETUP Auto Configure Automatically adjusts picture position and minimizes image instability. After adjustment, if the image is still not correct, try using the manual settings or a different resolution or refresh rate on the PC. Position Size Phase Reset Move Prev. PICTURE Move Enter E • Brightness 50 • Sharpness 50...

User Manual
Page 36
.... I P h a s e: This function allows you prefer. I Position: This function is not clear after auto adjustment and especially if characters are still trembling, adjust the picture phase manually. Select Position, Si ze, or Phase. Select Screen (RGB-PC).
.... I P h a s e: This function allows you prefer. I Position: This function is not clear after auto adjustment and especially if characters are still trembling, adjust the picture phase manually. Select Position, Si ze, or Phase. Select Screen (RGB-PC).

User Manual
Page 41
INPUT TV AV1 AV2 Component RGB-PC HDMI1 HDMI2 Move Enter USB Photo List Music List Extra Contents Eject Move Enter ! CHANNEL Auto Tuning Manual Tuning Channel Edit Channel Label Move Enter PICTURE Move Enter Aspect Ratio : 16:9 Picture Mode : Standard • BackLight 90 • Contrast 90 • Brightness 50 &#.../37/42LD655H 41 WATCHING TV / CHANNEL CONTROL ON-SCREEN MENUS SELECTION Your TV's OSD (On Screen Display) may differ slightly from that shown in this manual.
INPUT TV AV1 AV2 Component RGB-PC HDMI1 HDMI2 Move Enter USB Photo List Music List Extra Contents Eject Move Enter ! CHANNEL Auto Tuning Manual Tuning Channel Edit Channel Label Move Enter PICTURE Move Enter Aspect Ratio : 16:9 Picture Mode : Standard • BackLight 90 • Contrast 90 • Brightness 50 &#.../37/42LD655H 41 WATCHING TV / CHANNEL CONTROL ON-SCREEN MENUS SELECTION Your TV's OSD (On Screen Display) may differ slightly from that shown in this manual.
User Manual
Page 42
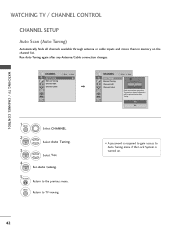
... System is turned on the channel list. Run Auto Tuning again after any Antenna/Cable connection changes. CHANNEL Auto Tuning Manual Tuning Channel Edit Channel Label Move Enter CHANNEL Auto Tuning Manual Tuning Channel Edit Channel Label Move Enter Check your antenna connection. The previous channel information will be updated during Auto...
... System is turned on the channel list. Run Auto Tuning again after any Antenna/Cable connection changes. CHANNEL Auto Tuning Manual Tuning Channel Edit Channel Label Move Enter CHANNEL Auto Tuning Manual Tuning Channel Edit Channel Label Move Enter Check your antenna connection. The previous channel information will be updated during Auto...

User Manual
Page 43
Channel 2 DIGITAL 2-1 Bad Normal Good Delete Close 1 MENU 2 ENTER Select CHANNEL. Select Manual Tuning. 3 ENTER 4 5 Select DIGITAL or ANALOG. I A password is required to gain access to Manual Tuning menu if the Lock System is turned on -screen signal strength monitor to see the quality of the signal being received....t e. 6 RETURN Return to TV viewing. Select channel you can view the on . 43 WATCHING TV / CHANNEL CONTROL Add/Delete Channel (Manual Tuning) If selecting DIGITAL input signal, you want to add or delete. MENU Return to the previous menu. CHANNEL Auto Tuning...
Channel 2 DIGITAL 2-1 Bad Normal Good Delete Close 1 MENU 2 ENTER Select CHANNEL. Select Manual Tuning. 3 ENTER 4 5 Select DIGITAL or ANALOG. I A password is required to gain access to Manual Tuning menu if the Lock System is turned on -screen signal strength monitor to see the quality of the signal being received....t e. 6 RETURN Return to TV viewing. Select channel you can view the on . 43 WATCHING TV / CHANNEL CONTROL Add/Delete Channel (Manual Tuning) If selecting DIGITAL input signal, you want to add or delete. MENU Return to the previous menu. CHANNEL Auto Tuning...

User Manual
Page 44
...CH Page Change Previous Add/Delete Select channel you didn't preset a label for the channel. CHANNEL Auto Tuning Manual Tuning Channel Edit Channel Label Move Enter CHANNEL Auto Tuning Manual Tuning Channel Edit Channel Label Move Enter Channel ANALOG 2-0 Logo F Disney G 1 MENU Select CHANNEL. 2 ... logo. 44 Close 5 Select the appropriate logo for your channels. If you will be unable to the previous menu. CHANNEL Auto Tuning Manual Tuning Channel Edit Channel Label Move Enter WATCHING TV / CHANNEL CONTROL 1 MENU 2 ENTER 3 ENTER Select CHANNEL. When a channel number...
...CH Page Change Previous Add/Delete Select channel you didn't preset a label for the channel. CHANNEL Auto Tuning Manual Tuning Channel Edit Channel Label Move Enter CHANNEL Auto Tuning Manual Tuning Channel Edit Channel Label Move Enter Channel ANALOG 2-0 Logo F Disney G 1 MENU Select CHANNEL. 2 ... logo. 44 Close 5 Select the appropriate logo for your channels. If you will be unable to the previous menu. CHANNEL Auto Tuning Manual Tuning Channel Edit Channel Label Move Enter WATCHING TV / CHANNEL CONTROL 1 MENU 2 ENTER 3 ENTER Select CHANNEL. When a channel number...

User Manual
Page 61
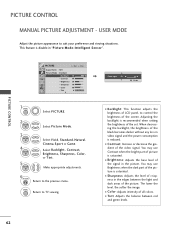
... dynamic video and primary color (e.g, white, uniform, grass, sky blue etc.) by realizing the optimal screen for sports. You can use a preset, change each setting manually, , or use the Intelligent Sensor. I Natural: This is the video mode to maximize the effect of the video in the retail store. Return to TV...
... dynamic video and primary color (e.g, white, uniform, grass, sky blue etc.) by realizing the optimal screen for sports. You can use a preset, change each setting manually, , or use the Intelligent Sensor. I Natural: This is the video mode to maximize the effect of the video in the retail store. Return to TV...
User Manual
Page 62
..., Cinema, Sport or Game. Select Backlight, Contrast, Brightness, Sharpness, Color, or Tint. USER MODE Adjust the picture appearance to TV viewing. E PICTURE CONTROL PICTURE CONTROL MANUAL PICTURE ADJUSTMENT -
..., Cinema, Sport or Game. Select Backlight, Contrast, Brightness, Sharpness, Color, or Tint. USER MODE Adjust the picture appearance to TV viewing. E PICTURE CONTROL PICTURE CONTROL MANUAL PICTURE ADJUSTMENT -


