
Owners Manual
Page 1
www.lg.com OWNER'S MANUAL LCD TV Please read this manual carefully before operating your set and retain it for future reference.
www.lg.com OWNER'S MANUAL LCD TV Please read this manual carefully before operating your set and retain it for future reference.
Owners Manual
Page 3
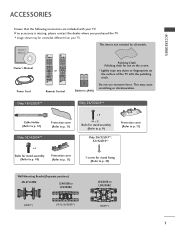
... your TV. ACCESSORIES ACCESSORIES Ensure that the following accessories are included with the polishing cloth. If an accessory is not included for all models. Owner's Manual Power Cord ENERGY AV MODE INPUT SAVING 123 456 789 LIST 0 Q.VIEW MARK FAV RATIO MUTE P PA G E MENU CLEAR VOICE II Q.MENU or OK BACK...
... your TV. ACCESSORIES ACCESSORIES Ensure that the following accessories are included with the polishing cloth. If an accessory is not included for all models. Owner's Manual Power Cord ENERGY AV MODE INPUT SAVING 123 456 789 LIST 0 Q.VIEW MARK FAV RATIO MUTE P PA G E MENU CLEAR VOICE II Q.MENU or OK BACK...

Owners Manual
Page 4
Picture Mode-Preset 71 Manual Picture Adjustment - Picture Mode-User option 72 Picture Improvement Technology 73 Expert Picture Control 74 Picture Reset 77 Power Indicator 78 Demo Mode 79 Mode ... Turning on the TV 36 Programme Selection 36 Volume Adjustment 36 Quick Menu 37 On-Screen Menus Selection and Adjustment..... 38 Auto Programme Tuning 39 Manual Programme Tuning 40 Programme Edit 42 Selecting the Programme List 44 2 PICTURE CONTROL Picture Size (Aspect Ratio) Control 68 Energy Saving 70 Preset Picture Settings...
Picture Mode-Preset 71 Manual Picture Adjustment - Picture Mode-User option 72 Picture Improvement Technology 73 Expert Picture Control 74 Picture Reset 77 Power Indicator 78 Demo Mode 79 Mode ... Turning on the TV 36 Programme Selection 36 Volume Adjustment 36 Quick Menu 37 On-Screen Menus Selection and Adjustment..... 38 Auto Programme Tuning 39 Manual Programme Tuning 40 Programme Edit 42 Selecting the Programme List 44 2 PICTURE CONTROL Picture Size (Aspect Ratio) Control 68 Energy Saving 70 Preset Picture Settings...

Owners Manual
Page 14
Only 26/32LD3**, 32/42LD4** 1 Connect the cables asACnINecessary. To connect additional equipment, see the External Equipment Setup section of the manual. If the TV is dropped, you may be injured or the TV may be damaged. Only 19/22LD3** After Connecting the cables as necessary, install ...
Only 26/32LD3**, 32/42LD4** 1 Connect the cables asACnINecessary. To connect additional equipment, see the External Equipment Setup section of the manual. If the TV is dropped, you may be injured or the TV may be damaged. Only 19/22LD3** After Connecting the cables as necessary, install ...

Owners Manual
Page 15
.... However, they have no adverse effect on the back panel. POSITIONING YOUR DISPLAY (Only 19/22LD3**) I After installing the TV, you can adjust the TV manually to the left or right direction by 20 degrees to the touch, there may be a small "flicker" when when it for maximum comfort. • Tilt...
.... However, they have no adverse effect on the back panel. POSITIONING YOUR DISPLAY (Only 19/22LD3**) I After installing the TV, you can adjust the TV manually to the left or right direction by 20 degrees to the touch, there may be a small "flicker" when when it for maximum comfort. • Tilt...

Owners Manual
Page 19
... box to the COMPONENT IN VIDEO jacks on the TV. /DVI IN 2 Connect the audio output of the digital set-top box to the owner's manual for the 26/32LD33* models. EXTERNAL EQUIPMENT SETUP 1 EXTERNAL EQUIPMENT SETUP I Image shown may be somewhat different from your TV. I This section on External Equipment...
... box to the COMPONENT IN VIDEO jacks on the TV. /DVI IN 2 Connect the audio output of the digital set-top box to the owner's manual for the 26/32LD33* models. EXTERNAL EQUIPMENT SETUP 1 EXTERNAL EQUIPMENT SETUP I Image shown may be somewhat different from your TV. I This section on External Equipment...

Owners Manual
Page 20
..., HDMI2(Except 19/22LD3**) or HDMI3(Only 32/42LD4**) input source using the INPUT button on the digital set-top box. (Refer to the owner's manual for more than 10m for HDMI cable, and recommend to HDMI/DVI IN 1, HDMI/DVI IN 2(Except 19/22LD3**) or HDMI IN 3(Only 32/42LD4...
..., HDMI2(Except 19/22LD3**) or HDMI3(Only 32/42LD4**) input source using the INPUT button on the digital set-top box. (Refer to the owner's manual for more than 10m for HDMI cable, and recommend to HDMI/DVI IN 1, HDMI/DVI IN 2(Except 19/22LD3**) or HDMI IN 3(Only 32/42LD4...

Owners Manual
Page 21
AUDIO IN (RGB/DVI) 2 RGB IN (PC) VIDEO /MONO AUD 1 /DVI IN Y PB PR L VIDEO AUDIO COMPONENT IN 1 2 19 EXTERNAL EQUIPMENT SETUP Connecting with an HDMI to DVI cable 1 Connect the digital set-top box to HDMI/DVI IN 1 jack on the TV. 2 Connect the audio output of the digital set-top box to the AUDIO IN (RGB/DVI) jack on the TV. 3 Turn on the digital set-top box. (Refer to the owner's manual for the digital set-top box.) 4 Select HDMI1input source using the INPUT button on the remote control.
AUDIO IN (RGB/DVI) 2 RGB IN (PC) VIDEO /MONO AUD 1 /DVI IN Y PB PR L VIDEO AUDIO COMPONENT IN 1 2 19 EXTERNAL EQUIPMENT SETUP Connecting with an HDMI to DVI cable 1 Connect the digital set-top box to HDMI/DVI IN 1 jack on the TV. 2 Connect the audio output of the digital set-top box to the AUDIO IN (RGB/DVI) jack on the TV. 3 Turn on the digital set-top box. (Refer to the owner's manual for the digital set-top box.) 4 Select HDMI1input source using the INPUT button on the remote control.

Owners Manual
Page 22
Component ports on the TV Y PB PR Video output ports on the remote control. 5 Refer to the DVD player's manual for operating instruc- 1 EXTERNAL EQUIPMENT SETUP EXTERNAL EQUIPMENT SETUP DVD SETUP Connecting with a component cable 1 Connect the video outputs (Y, PB, PR) of the DVD to ...
Component ports on the TV Y PB PR Video output ports on the remote control. 5 Refer to the DVD player's manual for operating instruc- 1 EXTERNAL EQUIPMENT SETUP EXTERNAL EQUIPMENT SETUP DVD SETUP Connecting with a component cable 1 Connect the video outputs (Y, PB, PR) of the DVD to ...

Owners Manual
Page 23
G We recommed less than 10m for HDMI cable, and recommend to the DVD player's manual for more than that your HDMI cable is High Speed HDMI Cable. EXTERNAL EQUIPMENT SETUP Connecting the HDMI cable 1 Connect the HDMI output of the ...
G We recommed less than 10m for HDMI cable, and recommend to the DVD player's manual for more than that your HDMI cable is High Speed HDMI Cable. EXTERNAL EQUIPMENT SETUP Connecting the HDMI cable 1 Connect the HDMI output of the ...

Owners Manual
Page 25
...*) I IN (RGB/DVI) VIDEO L(MONO) AUDIO R Y PB PR L R ANTENNA VIDEO AUDIO IN COMPONENT IN VIDEO L(MONO) AUDIO R 1 ANTENNA IN ! If connected to the VCR owner's manual.) 3 Select A V 1 input source using the INPUT button on the VCR. (Refer to AV IN2, select A V 2input source. Match the jack colours (Video = yellow, Audio Left...
...*) I IN (RGB/DVI) VIDEO L(MONO) AUDIO R Y PB PR L R ANTENNA VIDEO AUDIO IN COMPONENT IN VIDEO L(MONO) AUDIO R 1 ANTENNA IN ! If connected to the VCR owner's manual.) 3 Select A V 1 input source using the INPUT button on the VCR. (Refer to AV IN2, select A V 2input source. Match the jack colours (Video = yellow, Audio Left...

Owners Manual
Page 27
...'s AV OUT jacks. NOTE G Component, RGB, HDMI input sources cannot be used for VCR recording. R VARIABLE AUDIO OUT AV OUT ANTENNA IN See the Operating Manual of the stereo amplifier to the VARIABLE AUDIO OUT jacks on the TV. EXTERNAL EQUIPMENT SETUP AV IN 1 1 EXTERNAL STEREO SETUP (Only 32LD4**) Use to...
...'s AV OUT jacks. NOTE G Component, RGB, HDMI input sources cannot be used for VCR recording. R VARIABLE AUDIO OUT AV OUT ANTENNA IN See the Operating Manual of the stereo amplifier to the VARIABLE AUDIO OUT jacks on the TV. EXTERNAL EQUIPMENT SETUP AV IN 1 1 EXTERNAL STEREO SETUP (Only 32LD4**) Use to...

Owners Manual
Page 31
... for screen Position, Size, Phase If the picture is not clear after auto adjustment and especially if characters are still trembling, adjust the picture phase manually. Position operates in RGB mode. PICTURE SSccrreeeenn Move OK E • Contrast 90 • Brightness 50 • Sharpness 60 • Colour 60 • Tint 0R G •...
... for screen Position, Size, Phase If the picture is not clear after auto adjustment and especially if characters are still trembling, adjust the picture phase manually. Position operates in RGB mode. PICTURE SSccrreeeenn Move OK E • Contrast 90 • Brightness 50 • Sharpness 60 • Colour 60 • Tint 0R G •...

Owners Manual
Page 39
... After completing Zoom Setting, the display goes back to Q.Menu. • Clear Voice ll : By differentiating the human sound range from that shown in this manual. Selects your desired Sound Mode. • AUDIO : Selects the sound output. • Sleep Timer : Sets the sleep timer. • Favourite : Selects the favourite On or...
... After completing Zoom Setting, the display goes back to Q.Menu. • Clear Voice ll : By differentiating the human sound range from that shown in this manual. Selects your desired Sound Mode. • AUDIO : Selects the sound output. • Sleep Timer : Sets the sleep timer. • Favourite : Selects the favourite On or...

Owners Manual
Page 40
... the MENU/EXIT button to return to normal TV viewing. • Press the BACK button to move to the previous menu screen. SETUP Auto Tuning Manual Tuning Programme Edit Move OK PICTURE Move OK Aspect Ratio : 16:9 Energy Saving : Off Picture Mode : Vivid • Backlight 100 • Contrast 100 • Brightness... AND ADJUSTMENT I Image shown may differ slightly from your TV. Your TV's OSD (On Screen Display) may be somewhat different from that shown in this manual.
... the MENU/EXIT button to return to normal TV viewing. • Press the BACK button to move to the previous menu screen. SETUP Auto Tuning Manual Tuning Programme Edit Move OK PICTURE Move OK Aspect Ratio : 16:9 Energy Saving : Off Picture Mode : Vivid • Backlight 100 • Contrast 100 • Brightness... AND ADJUSTMENT I Image shown may differ slightly from your TV. Your TV's OSD (On Screen Display) may be somewhat different from that shown in this manual.

Owners Manual
Page 41
... PROGRAMME TUNING Use this to automatically find and store all previously stored service information will be deleted. ton. SETUP Auto Tuning Manual Tuning Programme Edit Move OK SETUP Auto Tuning Manual Tuning Programme Edit Move OK Check your antenna connection. Otherwise select N o. • Press the MENU/EXIT button to return to normal...
... PROGRAMME TUNING Use this to automatically find and store all previously stored service information will be deleted. ton. SETUP Auto Tuning Manual Tuning Programme Edit Move OK SETUP Auto Tuning Manual Tuning Programme Edit Move OK Check your antenna connection. Otherwise select N o. • Press the MENU/EXIT button to return to normal...

Owners Manual
Page 42
...SECAM D/K (China / Africa) M : Philippines • To store another channel, repeat steps 3 to 9. 40 WATCHING TV / PROGRAMME CONTROL MANUAL PROGRAMME TUNING Manual Tuning lets you manually tune and arrange the stations in whatever order you desire. or 1 2 3 Select the desired pro- 456 7 8 9 gramme number on.... the desired or 456 789 channel number. 0 Commence searching. Select Manual Tuning. WATCHING TV / PROGRAMME CONTROL SETUP Auto Tuning Manual Tuning Programme Edit Move OK SETUP Auto Tuning Manual Tuning Programme Edit Move OK Storage System Band Channel Fine Search Name ...
...SECAM D/K (China / Africa) M : Philippines • To store another channel, repeat steps 3 to 9. 40 WATCHING TV / PROGRAMME CONTROL MANUAL PROGRAMME TUNING Manual Tuning lets you manually tune and arrange the stations in whatever order you desire. or 1 2 3 Select the desired pro- 456 7 8 9 gramme number on.... the desired or 456 789 channel number. 0 Commence searching. Select Manual Tuning. WATCHING TV / PROGRAMME CONTROL SETUP Auto Tuning Manual Tuning Programme Edit Move OK SETUP Auto Tuning Manual Tuning Programme Edit Move OK Storage System Band Channel Fine Search Name ...

Owners Manual
Page 43
...OK make your choice of the second character, and so on. WATCHING TV / PROGRAMME CONTROL SETUP Auto Tuning Manual Tuning Programme Edit Move OK SETUP Auto Tuning Manual Tuning Programme Edit Move OK Storage System Band Channel Fine Search Name F 1G BG V/UHF 0 FG FG ...-, and blank. OK Select S t o r e. 6 OK A Fine Tuning Normally fine tuning is only necessary if reception is poor. 1 4 MENU Select SETUP. 2 5 OK Select Manual Tuning. OK Select S t o r e. 3 OK Select F in e. 6 OK • Press the MENU/EXIT button to return to normal TV viewing. • Press the BACK ...
...OK make your choice of the second character, and so on. WATCHING TV / PROGRAMME CONTROL SETUP Auto Tuning Manual Tuning Programme Edit Move OK SETUP Auto Tuning Manual Tuning Programme Edit Move OK Storage System Band Channel Fine Search Name F 1G BG V/UHF 0 FG FG ...-, and blank. OK Select S t o r e. 6 OK A Fine Tuning Normally fine tuning is only necessary if reception is poor. 1 4 MENU Select SETUP. 2 5 OK Select Manual Tuning. OK Select S t o r e. 3 OK Select F in e. 6 OK • Press the MENU/EXIT button to return to normal TV viewing. • Press the BACK ...

Owners Manual
Page 44
... to select the skipped programme, directly enter the programme number with the NUMBER buttons or select it in the Programme edit menu. SETUP Auto Tuning Manual Tuning Programme Edit Move OK 1 C 01 Delete Pr. WATCHING TV / PROGRAMME CONTROL WATCHING TV / PROGRAMME CONTROL PROGRAMME EDIT When a programme number is skipped, it means...
... to select the skipped programme, directly enter the programme number with the NUMBER buttons or select it in the Programme edit menu. SETUP Auto Tuning Manual Tuning Programme Edit Move OK 1 C 01 Delete Pr. WATCHING TV / PROGRAMME CONTROL WATCHING TV / PROGRAMME CONTROL PROGRAMME EDIT When a programme number is skipped, it means...

Owners Manual
Page 74
PICTURE CONTROL MANUAL PICTURE ADJUSTMENT Picture Mode-User option Backlight To control the brightness of the screen, adjust the brightness of using Backlight - Contrast Adjusts the difference between ...
PICTURE CONTROL MANUAL PICTURE ADJUSTMENT Picture Mode-User option Backlight To control the brightness of the screen, adjust the brightness of using Backlight - Contrast Adjusts the difference between ...


