
Owners Manual
Page 5
... Stand Installation 12 VESA Wall Mounting 13 Desktop Pedestal Installation 13 Back Cover for Wire Arrangement 14 Attaching the TV to a Wall 16 Antenna or Cable Connection 17 Picture Size (Aspect Ratio) Control 44 Preset Picture Settings - Picture Mode - User Mode 48 XD - Auto Scan (Auto Tuning 36 - Preset...54 HD Receiver Setup 18 DVD Setup 21 VCR Setup 23 Other A/V Source Setup 25 PC Setup 26 Audio Out Setup 31 Remote Control Functions 32 Turning On TV 34 Channel Selection 34 Volume Adjustment 34 On-Screen Menus Selection 35 Channel Setup - User Mode 57 Balance 58...
... Stand Installation 12 VESA Wall Mounting 13 Desktop Pedestal Installation 13 Back Cover for Wire Arrangement 14 Attaching the TV to a Wall 16 Antenna or Cable Connection 17 Picture Size (Aspect Ratio) Control 44 Preset Picture Settings - Picture Mode - User Mode 48 XD - Auto Scan (Auto Tuning 36 - Preset...54 HD Receiver Setup 18 DVD Setup 21 VCR Setup 23 Other A/V Source Setup 25 PC Setup 26 Audio Out Setup 31 Remote Control Functions 32 Turning On TV 34 Channel Selection 34 Volume Adjustment 34 On-Screen Menus Selection 35 Channel Setup - User Mode 57 Balance 58...

Owners Manual
Page 6
Auto Clock Setup 67 - Manual Clock Setup 68 Auto On/Off Timer Setting 69 Sleep Timer Setting 70 Auto Shut-off Setting 71 Set Password & Lock System 72 Channel Blocking 74 External Input Blocking 74 Movie & TV Rating 75 Troubleshooting 78 Maintenance 80 Product Specifications 81 Programming the Remote Control 83 IR Codes 87 External Control Through RS-232C 89 Open Source License 96 S Clock Setting -
Auto Clock Setup 67 - Manual Clock Setup 68 Auto On/Off Timer Setting 69 Sleep Timer Setting 70 Auto Shut-off Setting 71 Set Password & Lock System 72 Channel Blocking 74 External Input Blocking 74 Movie & TV Rating 75 Troubleshooting 78 Maintenance 80 Product Specifications 81 Programming the Remote Control 83 IR Codes 87 External Control Through RS-232C 89 Open Source License 96 S Clock Setting -

Owners Manual
Page 7
... aspect-ratio screens, and AC3 digital audio. The fluorescent lamp used in accordance to the HDMI (high-definition multimedia interface), LG TV with this product with TV. Do not dispose of mercury. A subset of SRS Labs, Inc. ""_Some minute dot defects may produce some temporary distortion...monitor's performance. ""_Avoid touching the LCD screen or holding your local authority. 6 Disposal of this product must be carried out in this product contains a small amount of this logo works easily with one remote control. With HDMI CEC support of LG's audio/video device connected to ...
... aspect-ratio screens, and AC3 digital audio. The fluorescent lamp used in accordance to the HDMI (high-definition multimedia interface), LG TV with this product with TV. Do not dispose of mercury. A subset of SRS Labs, Inc. ""_Some minute dot defects may produce some temporary distortion...monitor's performance. ""_Avoid touching the LCD screen or holding your local authority. 6 Disposal of this product must be carried out in this product contains a small amount of this logo works easily with one remote control. With HDMI CEC support of LG's audio/video device connected to ...

Owners Manual
Page 8
... pin cable) with ferrite cores to p.16) D-sub 15 pin Cable Cable Management 7 Please be different from the figures shown here. 0 z Owner's Manual CD Manual Remote Control, Batteries Power Cord 75ohm Round Cable Polishing Cloth * Slightly wipe stained spot on surface of that the following accessories are included with the polishing cloth...
... pin cable) with ferrite cores to p.16) D-sub 15 pin Cable Cable Management 7 Please be different from the figures shown here. 0 z Owner's Manual CD Manual Remote Control, Batteries Power Cord 75ohm Round Cable Polishing Cloth * Slightly wipe stained spot on surface of that the following accessories are included with the polishing cloth...
Owners Manual
Page 9
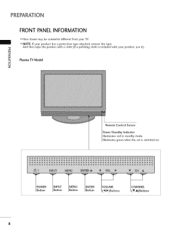
PREPARATION FRONT PANELINFORMATION ,,,IHere shown may be somewhat different from your product, use it). _o r'rl _o Plasma TV Model i © z Remote Control Sensor Power/Standby Indicator Illuminates red in standby mode. P__OWER _INPUT I Button I Button I Button _ENTER I Button "_VOLUME_ I (4l, l_)Buttons I (T,A)Buttons 8 Illuminates green when the set is included with your TV. ""_NOTE: If your product has a protection tape attached, remove the tape. -0 And then wipe the product with a cloth (If a polishing cloth is switched on.
PREPARATION FRONT PANELINFORMATION ,,,IHere shown may be somewhat different from your product, use it). _o r'rl _o Plasma TV Model i © z Remote Control Sensor Power/Standby Indicator Illuminates red in standby mode. P__OWER _INPUT I Button I Button I Button _ENTER I Button "_VOLUME_ I (4l, l_)Buttons I (T,A)Buttons 8 Illuminates green when the set is included with your TV. ""_NOTE: If your product has a protection tape attached, remove the tape. -0 And then wipe the product with a cloth (If a polishing cloth is switched on.

Owners Manual
Page 10
"0 m © z (A,V)Buttons (_I,I_) Buttons Button Button Button Button 9 llluminates green when the set is switched on. LCD TV Model Remote Control Sensor Power/Standby Indicator llluminates red in standby mode.
"0 m © z (A,V)Buttons (_I,I_) Buttons Button Button Button Button 9 llluminates green when the set is switched on. LCD TV Model Remote Control Sensor Power/Standby Indicator llluminates red in standby mode.

Owners Manual
Page 12
.... @ AUDIO OUT Connect analog audio to this jack. @ DIGITAL AUDIO OUT Connect digital audio from a PC or DTV. @ SERVICE O Remote Control Port Connect a wired remote control. Caution: Never attempt to either input. @ COMPONENT IN Connect a component jacks. ANTENNA/CABLE IN Connect over-the air signals to various types of ...output from an external Connect S-Video out from a PC. -O _o m _o © z @ HDMI/DVI IN 1, HDMI IN 2 Connect a HDMI (DVI) connection to operate the TV on DC power. 11 Power Cord Socket For operation with AC power. video/audio device to this jack.
.... @ AUDIO OUT Connect analog audio to this jack. @ DIGITAL AUDIO OUT Connect digital audio from a PC or DTV. @ SERVICE O Remote Control Port Connect a wired remote control. Caution: Never attempt to either input. @ COMPONENT IN Connect a component jacks. ANTENNA/CABLE IN Connect over-the air signals to various types of ...output from an external Connect S-Video out from a PC. -O _o m _o © z @ HDMI/DVI IN 1, HDMI IN 2 Connect a HDMI (DVI) connection to operate the TV on DC power. 11 Power Cord Socket For operation with AC power. video/audio device to this jack.

Owners Manual
Page 19
...connected to the COMPONENT IN AUDIO 1 jacks on r_3 X:) the set -top box or other digital external device, refer to the owner's manual for LCD TV model. How to use picture for the digital set -top box. When connecting Component cable r_3 x I. Match the jack colors (Y = green, ...jacks on the set. ©V/q c 2. "O r_3 z O onnect the audio output of EXTERNAL EQUIPMENT SETUP mainly use -O Turn on the remote control. EXTERNAL EQUIPMENT SETUP 01T_o prevent the equipment damage, never plug in any power cords until you do receive digital signals from a digital set . ...
...connected to the COMPONENT IN AUDIO 1 jacks on r_3 X:) the set -top box or other digital external device, refer to the owner's manual for LCD TV model. How to use picture for the digital set -top box. When connecting Component cable r_3 x I. Match the jack colors (Y = green, ...jacks on the set. ©V/q c 2. "O r_3 z O onnect the audio output of EXTERNAL EQUIPMENT SETUP mainly use -O Turn on the remote control. EXTERNAL EQUIPMENT SETUP 01T_o prevent the equipment damage, never plug in any power cords until you do receive digital signals from a digital set . ...

Owners Manual
Page 20
How to connect m X m O CoronHnDeMctI thIeN d2igijtaacl kseotn-tothpe bsoext.to use 01T_urn on the remote control. C m z 2. m C (Refer to the owner's manual for the digital set-top box.) "O 01S_elect HDMI1 or HDMI2 input source by using the INPUT button on the digital ...
How to connect m X m O CoronHnDeMctI thIeN d2igijtaacl kseotn-tothpe bsoext.to use 01T_urn on the remote control. C m z 2. m C (Refer to the owner's manual for the digital set-top box.) "O 01S_elect HDMI1 or HDMI2 input source by using the INPUT button on the digital ...

Owners Manual
Page 21
How to use 01T_urn on the digital set-top box. (Refer to the owner's manual for the digital set-top box.) 01S_elect HDMI1 input source by using the INPUT button on the set. How to connect O Connect the DVI output of the digital set-top box to the AUDIO (RGB/DVl) jack on the set -top box to DVI cable m x m z m X:) c 2 "O m z m c "O 1. EXTERNALEQUIPMENT SETUP When connecting HDMI to the HDMI/DVI IN 1 jack on the remote control. 2O O Connect the audio output of the digital set . 2.
How to use 01T_urn on the digital set-top box. (Refer to the owner's manual for the digital set-top box.) 01S_elect HDMI1 input source by using the INPUT button on the set. How to connect O Connect the DVI output of the digital set-top box to the AUDIO (RGB/DVl) jack on the set -top box to DVI cable m x m z m X:) c 2 "O m z m c "O 1. EXTERNALEQUIPMENT SETUP When connecting HDMI to the HDMI/DVI IN 1 jack on the remote control. 2O O Connect the audio output of the digital set . 2.

Owners Manual
Page 22
DVD SETUP When connecting Component cable 1. m z 2. Component ports on the TV Video output ports on the remote control. 01_If connected to the COMPONENT IN AUDIO1 jacks on the set . How to connect O Connect the video outputs (Y, PB, PR) of the DVD to COMPONENT ...
DVD SETUP When connecting Component cable 1. m z 2. Component ports on the TV Video output ports on the remote control. 01_If connected to the COMPONENT IN AUDIO1 jacks on the set . How to connect O Connect the video outputs (Y, PB, PR) of the DVD to COMPONENT ...

Owners Manual
Page 23
c "O 01_Select AV1 input source by using the INPUT button on the remote control. 01_Refer to use XD 01_Turn on the set. z 01_If connected to the DVD player's manual for operating instructions. 22 How to the DVD player's manual ... 1. How to connect O onnect the S-VIDEO output of the DVD to use 01_Select HDMI1 or HDMI2 input source by using the INPUT button on the remote control. HDMI supports both audio and video. 2. x O onnect the audio outputs of the DVD to the AUDIO input jacks on the set . _o z _> 2. r-r1 01_Refer to...
c "O 01_Select AV1 input source by using the INPUT button on the remote control. 01_Refer to use XD 01_Turn on the set. z 01_If connected to the DVD player's manual for operating instructions. 22 How to the DVD player's manual ... 1. How to connect O onnect the S-VIDEO output of the DVD to use 01_Select HDMI1 or HDMI2 input source by using the INPUT button on the remote control. HDMI supports both audio and video. 2. x O onnect the audio outputs of the DVD to the AUDIO input jacks on the set . _o z _> 2. r-r1 01_Refer to...
Owners Manual
Page 25
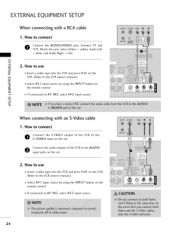
...1. EXTERNALEQUIPMENT SETUP When connecting with an S-Video cable 1. How to connect Connect the S-VIDEO output of the VCR to the AUDIO input jacks on the remote control. 01_If connected to the VCR owner's manual.) 01_Select AV1 input source by using the INPUT button on the set . How to use _o z 01I_nsert ...PLAY on the VCR. (Refer to AM IN2, select AM2 input source. 24 m z 01_If connected to connect O Connect the AUDIO/VIDEO jacks between TV and VCR. How to AV IN2, select AV2 input source. Match the jack colors (Video = yellow, Audio Left = white, and Audio Right = red...
...1. EXTERNALEQUIPMENT SETUP When connecting with an S-Video cable 1. How to connect Connect the S-VIDEO output of the VCR to the AUDIO input jacks on the remote control. 01_If connected to the VCR owner's manual.) 01_Select AV1 input source by using the INPUT button on the set . How to use _o z 01I_nsert ...PLAY on the VCR. (Refer to AM IN2, select AM2 input source. 24 m z 01_If connected to connect O Connect the AUDIO/VIDEO jacks between TV and VCR. How to AV IN2, select AV2 input source. Match the jack colors (Video = yellow, Audio Left = white, and Audio Right = red...

Owners Manual
Page 26
Match the jack colors. (Video = yellow, Audio Left = white, and Audio Right = red) 2. How to use 01_Select AV2 input source by using the INPUT button on the remote control. 01_If connected to connect 0 Connect the AUDIO/VIDEO jacks between TV and external equipment. How to AV IN I input, select AV I input source. 01_Operate the corresponding external equipment. Camcorder Video Game Set r_ x r_ _o z r_ X:) c r_ z r_ c -O 25 OTHERA/V SOURCESETUP 1.
Match the jack colors. (Video = yellow, Audio Left = white, and Audio Right = red) 2. How to use 01_Select AV2 input source by using the INPUT button on the remote control. 01_If connected to connect 0 Connect the AUDIO/VIDEO jacks between TV and external equipment. How to AV IN I input, select AV I input source. 01_Operate the corresponding external equipment. Camcorder Video Game Set r_ x r_ _o z r_ X:) c r_ z r_ c -O 25 OTHERA/V SOURCESETUP 1.

Owners Manual
Page 27
X:) c "O Connect the PC audio output to the RGB (PC) m O jack on the set . m c -O 2. How to connect _o z Connect the RGB output of the PC to the AUDIO (RGB/DVI) m z O jack on the set . How to the TV's settings. When connecting D-sub 15 pin cable m x m 1. EXTERNALEQUIPMENT SETUP PC SETUP This TV provides Plug and Play capability, meaning that the PC adjusts automatically to use 01_Turn on the PC and the TV. 01_Select RGB-PC input source by using the INPUT button on the remote control. 26
X:) c "O Connect the PC audio output to the RGB (PC) m O jack on the set . m c -O 2. How to connect _o z Connect the RGB output of the PC to the AUDIO (RGB/DVI) m z O jack on the set . How to the TV's settings. When connecting D-sub 15 pin cable m x m 1. EXTERNALEQUIPMENT SETUP PC SETUP This TV provides Plug and Play capability, meaning that the PC adjusts automatically to use 01_Turn on the PC and the TV. 01_Select RGB-PC input source by using the INPUT button on the remote control. 26

Owners Manual
Page 28
e Connect the PC audio output to use 01_Turn on the PC and the TV. 01_Select HDMI1 input source by using the INPUT button on the set . How to the AUDIO (RGB/DVI) jack on the remote control. 27 How to connect O onnect the DVI output of the PC to DVI cable AUDIO m x ,-I m z r,'l-i .0 c m z ,-I I"'1"1 ,-t c 1. When connecting HDMI to the HDMI/DVI IN 1 jack on the set . 2.
e Connect the PC audio output to use 01_Turn on the PC and the TV. 01_Select HDMI1 input source by using the INPUT button on the set . How to the AUDIO (RGB/DVI) jack on the remote control. 27 How to connect O onnect the DVI output of the PC to DVI cable AUDIO m x ,-I m z r,'l-i .0 c m z ,-I I"'1"1 ,-t c 1. When connecting HDMI to the HDMI/DVI IN 1 jack on the set . 2.

Owners Manual
Page 30
...ver- When you select resolution of characters. 29 And the hori- tical bars or stripes visible on the remote control. zontal screen size will also change the resolution, select the proper resolution m x in present input to see... Output, Select RGB-PC with using the INPUT button on the screen background. m z m X:) c For Plasma TV m Adjustment for PC mode Overview When the RGB input of the set is to minimize any horizontal noise and clear ... is to adjust picture to left/right and up/down asyou prefer. For LCD TV @@@ Resolution This function allows you change .
...ver- When you select resolution of characters. 29 And the hori- tical bars or stripes visible on the remote control. zontal screen size will also change the resolution, select the proper resolution m x in present input to see... Output, Select RGB-PC with using the INPUT button on the screen background. m z m X:) c For Plasma TV m Adjustment for PC mode Overview When the RGB input of the set is to minimize any horizontal noise and clear ... is to adjust picture to left/right and up/down asyou prefer. For LCD TV @@@ Resolution This function allows you change .

Owners Manual
Page 33
...; SIMPLINK See a list of time before your preference. VCR/DVD Control video cassette recorders or DVD players. N -r" BRIGHT -/+ Adjust the brightness on the TV. UP/DOWN NUMBER button -- (DASH) Used to the last channel viewed. 32 WATCHING TV / CHANNEL CONTROL REMOTE CONTROL FUNCTIONS When using the remote control, aim it at the screen. _p.41 VOLUME UP Increase/decrease...
...; SIMPLINK See a list of time before your preference. VCR/DVD Control video cassette recorders or DVD players. N -r" BRIGHT -/+ Adjust the brightness on the TV. UP/DOWN NUMBER button -- (DASH) Used to the last channel viewed. 32 WATCHING TV / CHANNEL CONTROL REMOTE CONTROL FUNCTIONS When using the remote control, aim it at the screen. _p.41 VOLUME UP Increase/decrease...

Owners Manual
Page 35
trol. VOLUMEADJUSTMENT Adjust the volume to standby mode. z < O When finished using the TV INPUT, INPUT button on the remote control. 01T_his TV is out. The TV reverts to suit your personal preference. WATCHING TV / CHANNEL CONTROL TURNING ON TV @ First, connect power cord correctly. If you want to select a channel number. N I >...to switch the sound off, press the MUTE button. You can cancel the Mute function by using the TV, press the POWER button on the remote control. @ Select the viewing source by pressing the MUTE or VOL (A or V) button. 34 Press the...
trol. VOLUMEADJUSTMENT Adjust the volume to standby mode. z < O When finished using the TV INPUT, INPUT button on the remote control. 01T_his TV is out. The TV reverts to suit your personal preference. WATCHING TV / CHANNEL CONTROL TURNING ON TV @ First, connect power cord correctly. If you want to select a channel number. N I >...to switch the sound off, press the MUTE button. You can cancel the Mute function by using the TV, press the POWER button on the remote control. @ Select the viewing source by pressing the MUTE or VOL (A or V) button. 34 Press the...

Owners Manual
Page 39
...z You can create your Favorite List. The surfing icon will now see a screen filled with ENTER button. Press EXIT button to return to TV viewing or press MENU button to return to Press the I_ button. Once a channel is highlighted and < then add or delete the channel to...and then use the ENTER button to the Favorite List. WATCHING TV / CHANNEL CONTROL Channel Editing From the default channel list created from the Auto Tuning channel search, you can add or delete the channel by toggling each channel on the remote control when a channel is high- The channels in the Custom ...
...z You can create your Favorite List. The surfing icon will now see a screen filled with ENTER button. Press EXIT button to return to TV viewing or press MENU button to return to Press the I_ button. Once a channel is highlighted and < then add or delete the channel to...and then use the ENTER button to the Favorite List. WATCHING TV / CHANNEL CONTROL Channel Editing From the default channel list created from the Auto Tuning channel search, you can add or delete the channel by toggling each channel on the remote control when a channel is high- The channels in the Custom ...


