Owners Manual - English
Page 2
... 17 - DisplayPort connection 20 - USB Cable connection - Menu Settings 29 - -Quick Settings 30 - -PBP 31 - -Picture 33 - -Sound 34 - -General 35 - -Reset 36 - -Picture mode 37 TROUBLESHOOTING 39 SPECIFICATIONS 39 29UM67 40 29UB67 41 34UM67 42 34UB67 43 Factory support mode (DVI...Joystick Button 9 Moving and Lifting the Monitor 10 Installing the Monitor 10 - Connecting Headphones 23 INSTALLING LG MONITOR SOFTWARE 26 Installing The Dual Controller 28 USER SETTINGS 29 Customizing settings 29 - How to External Devices 22 - ENEGNLGISH 2 Contents CONTENTS 3 LICENSE 4 ASSEMBLING AND ...
... 17 - DisplayPort connection 20 - USB Cable connection - Menu Settings 29 - -Quick Settings 30 - -PBP 31 - -Picture 33 - -Sound 34 - -General 35 - -Reset 36 - -Picture mode 37 TROUBLESHOOTING 39 SPECIFICATIONS 39 29UM67 40 29UB67 41 34UM67 42 34UB67 43 Factory support mode (DVI...Joystick Button 9 Moving and Lifting the Monitor 10 Installing the Monitor 10 - Connecting Headphones 23 INSTALLING LG MONITOR SOFTWARE 26 Installing The Dual Controller 28 USER SETTINGS 29 Customizing settings 29 - How to External Devices 22 - ENEGNLGISH 2 Contents CONTENTS 3 LICENSE 4 ASSEMBLING AND ...
Owners Manual - English
Page 3
... Compliance Logo for more information on display if there is no adjustment to display. * To make this setting be disabled, change the option to 'Off' in the United States and other countries. Visit www.lg.com for dual-mode source are trademarks or registered trademarks of HDMI Licensing LLC in OSD menu...
... Compliance Logo for more information on display if there is no adjustment to display. * To make this setting be disabled, change the option to 'Off' in the United States and other countries. Visit www.lg.com for dual-mode source are trademarks or registered trademarks of HDMI Licensing LLC in OSD menu...
Owners Manual - English
Page 17
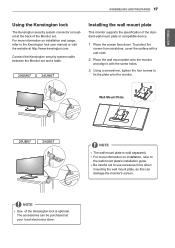
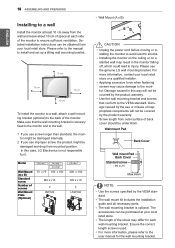
... standard wall mount plate or compatible device. 1 Place the screen face down. Installing the wall mount plate This monitor supports the specification of the Monitor set and a table. To protect the screen from scratches, cover the surface with a soft cloth. 2 Place the wall mount plate onto the monitor and align it... monitor. For more information on installation and usage, refer to the wall mount plate's installation guide. Connect the Kensington security system cable between the Monitor set .
... standard wall mount plate or compatible device. 1 Place the screen face down. Installing the wall mount plate This monitor supports the specification of the Monitor set and a table. To protect the screen from scratches, cover the surface with a soft cloth. 2 Place the wall mount plate onto the monitor and align it... monitor. For more information on installation and usage, refer to the wall mount plate's installation guide. Connect the Kensington security system cable between the Monitor set .
Owners Manual - English
Page 18
Please refer to the manual to install and set up a tilting wall mounting bracket. 10 cm 10 cm 10 cm ... be damaged and drop from mounted position. Model Wall Mount (A x B) Standard screw Number of screws Wall Mount Plate (Optional) 29UM67 75 x 75 34UM67 34UB67 100 x 100 M4 x L10 4 RW120 29UB67 200 x 100 M4 x L10 4 LSW140 yyWall Mount... (A x B) AB CAUTION yyUnplug the power cord before moving or in this case, LG Electronics is optional. stalling the monitor to the monitor. ENEGNLGISH 18 ASSEMBLING AND PREPARING Installing to a wall Install the monitor...
Please refer to the manual to install and set up a tilting wall mounting bracket. 10 cm 10 cm 10 cm ... be damaged and drop from mounted position. Model Wall Mount (A x B) Standard screw Number of screws Wall Mount Plate (Optional) 29UM67 75 x 75 34UM67 34UB67 100 x 100 M4 x L10 4 RW120 29UB67 200 x 100 M4 x L10 4 LSW140 yyWall Mount... (A x B) AB CAUTION yyUnplug the power cord before moving or in this case, LG Electronics is optional. stalling the monitor to the monitor. ENEGNLGISH 18 ASSEMBLING AND PREPARING Installing to a wall Install the monitor...
Owners Manual - English
Page 22
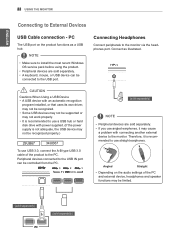
..., or that uses its own driver, may be connected to the PC. Peripheral devices connected to the monitor. PC The USB port on the audio settings of the product to the USB port. yy If you use USB 3.0, connect the A-B type USB 3.0 cable of the PC and external device, headphones and...
..., or that uses its own driver, may be connected to the PC. Peripheral devices connected to the monitor. PC The USB port on the audio settings of the product to the USB port. yy If you use USB 3.0, connect the A-B type USB 3.0 cable of the PC and external device, headphones and...
Owners Manual - English
Page 23
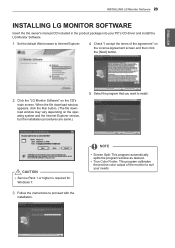
... yyService Pack 1 or higher is required for Windows 7. 3 Follow the instructions to suit your PC's CD driver and install the LG Monitor Software. 1 Set the default Web browser to Internet Explorer. 4 Check "I accept the terms of the monitor to proceed with the installation. When the...program calibrates the precise color output of the agreement" on the License Agreement screen and then click the [Next] button. 2 Click the "LG Monitor Software" on the operating system and the Internet Explorer version, but the installation procedures are same.) 5 Select the program that you want ...
... yyService Pack 1 or higher is required for Windows 7. 3 Follow the instructions to suit your PC's CD driver and install the LG Monitor Software. 1 Set the default Web browser to Internet Explorer. 4 Check "I accept the terms of the monitor to proceed with the installation. When the...program calibrates the precise color output of the agreement" on the License Agreement screen and then click the [Next] button. 2 Click the "LG Monitor Software" on the operating system and the Internet Explorer version, but the installation procedures are same.) 5 Select the program that you want ...
Owners Manual - English
Page 26
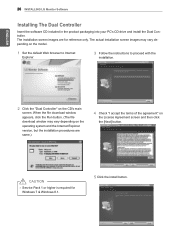
...] button. When the file download window appears, click the Run button. (The file download window may vary depending on the model. 1 Set the default Web browser to Internet Explorer. 3 Follow the instructions to proceed with the installation. 2 Click the "Dual Controller" on the ... Windows 8.1. 5 Click the install button. The actual installation screen images may vary depending on the CD's main screen. ENEGNLGISH 26 INSTALLING LG Monitor Software Installing The Dual Controller Insert the software CD included in the product packaging into your PC's CD drive and install the Dual...
...] button. When the file download window appears, click the Run button. (The file download window may vary depending on the model. 1 Set the default Web browser to Internet Explorer. 3 Follow the instructions to proceed with the installation. 2 Click the "Dual Controller" on the ... Windows 8.1. 5 Click the install button. The actual installation screen images may vary depending on the CD's main screen. ENEGNLGISH 26 INSTALLING LG Monitor Software Installing The Dual Controller Insert the software CD included in the product packaging into your PC's CD drive and install the Dual...
Owners Manual - English
Page 28
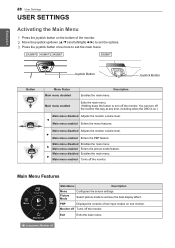
... menu enabled Turns off Main Menu Description Menu Picture Mode Configures the screen settings. Main menu enabled Exits the main menu. (Holding down (▲/▼) and left/right(◄/►) to set the options. 3 Press the joystick button once more to achieve the best... Long presEsx:itMonitor off Monitor off Monitor off LoLnogngpMrpeorsneissto:srM:oMoffnointoitroor fofff Long press: Monitor off the monitor. 28 User Settings USER SETTINGS Activating the Main Menu 1 Press the joystick button on one monitor. Monitor off Turns off the monitor. ENEGNLGISH Joystick ...
... menu enabled Turns off Main Menu Description Menu Picture Mode Configures the screen settings. Main menu enabled Exits the main menu. (Holding down (▲/▼) and left/right(◄/►) to set the options. 3 Press the joystick button once more to achieve the best... Long presEsx:itMonitor off Monitor off Monitor off LoLnogngpMrpeorsneissto:srM:oMoffnointoitroor fofff Long press: Monitor off the monitor. 28 User Settings USER SETTINGS Activating the Main Menu 1 Press the joystick button on one monitor. Monitor off Turns off the monitor. ENEGNLGISH Joystick ...
Owners Manual - English
Page 29
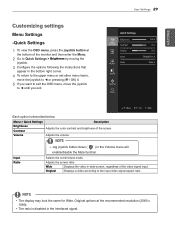
... mode. Original Displays a video according to ◄ until you exit. Wide Displays the video in the interlaced signal. User Settings 29 Each option is disabled in wide-screen, regardless of the screen. NOTE yyThe display may look the same for Wide, ...joystick. 3 Configure the options following the instructions that appear in the Volume menu will enable/disable the Mute function. ENEGNLGISH Customizing settings Menu Settings -Quick Settings 1 To view the OSD menu, press the joystick button at the recommended resolution (2560 x 1080). NOTE yyJog joystick button ...
... mode. Original Displays a video according to ◄ until you exit. Wide Displays the video in the interlaced signal. User Settings 29 Each option is disabled in wide-screen, regardless of the screen. NOTE yyThe display may look the same for Wide, ...joystick. 3 Configure the options following the instructions that appear in the Volume menu will enable/disable the Mute function. ENEGNLGISH Customizing settings Menu Settings -Quick Settings 1 To view the OSD menu, press the joystick button at the recommended resolution (2560 x 1080). NOTE yyJog joystick button ...
Owners Manual - English
Page 30
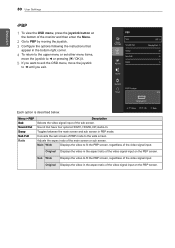
... the aspect ratio of the sub screen. Sub Wide Displays the video to ◄ until you exit. Each option is described below. ENEGNLGISH 30 User Settings -PBP 1 To view the OSD menu, press the joystick button at the bottom of the monitor and then enter the Menu. 2 Go to PBP by... moving the joystick. 3 Configure the options following the instructions that appear in the bottom right corner. 4 To return to the upper menu or set other menu items, move the joystick to ◄ or pressing ( / OK) it. 5 If you want to exit the OSD menu, move the joystick to fit...
... the aspect ratio of the sub screen. Sub Wide Displays the video to ◄ until you exit. Each option is described below. ENEGNLGISH 30 User Settings -PBP 1 To view the OSD menu, press the joystick button at the bottom of the monitor and then enter the Menu. 2 Go to PBP by... moving the joystick. 3 Configure the options following the instructions that appear in the bottom right corner. 4 To return to the upper menu or set other menu items, move the joystick to ◄ or pressing ( / OK) it. 5 If you want to exit the OSD menu, move the joystick to fit...
Owners Manual - English
Page 31
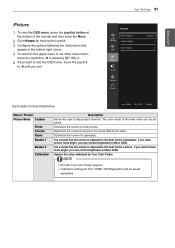
... video. It is adjusted to the best for DVI / HDMI / DP(DisplayPort) will be adjusted. Optimizes the screen to adjust each element. yyCalibration settings for the cartoon. If you want screen more bright, you can control brightness in Menu OSD. Menu > Picture Picture Mode Custom Photo Cinema Game Reader... ◄ or pressing ( / OK) it. 5 If you want to exit the OSD menu, move the joystick to ◄ until you exit. User Settings 31 Each option is adjusted to improve the visual effects of the main menu can control brightness in Menu OSD. Optimizes the screen for the...
... video. It is adjusted to the best for DVI / HDMI / DP(DisplayPort) will be adjusted. Optimizes the screen to adjust each element. yyCalibration settings for the cartoon. If you want screen more bright, you can control brightness in Menu OSD. Menu > Picture Picture Mode Custom Photo Cinema Game Reader... ◄ or pressing ( / OK) it. 5 If you want to exit the OSD menu, move the joystick to ◄ until you exit. User Settings 31 Each option is adjusted to improve the visual effects of the main menu can control brightness in Menu OSD. Optimizes the screen for the...
Owners Manual - English
Page 32
...(Red_Hue, Red_Saturation, Green_Hue, Green_Saturation, Blue_Hue, Blue_Saturation, Cyan_Hue, Cyan_ Saturation, Magenta_Hue, Magenta_Saturation, Yellow_Hue, Yellow_Saturation, Reset ) and saving the settings. *Hue: Adjusts tone of the screen. *Saturation: Adjusts the saturation of the screen. Custom Red Green Blue You can select Gamma... High The picture of the screen gets darker. The lower the value, less saturated and bright the colors become . Low Sets the response time to a bluish tone. If user don't want adjusted gamma, user can customize the picture color using Red...
...(Red_Hue, Red_Saturation, Green_Hue, Green_Saturation, Blue_Hue, Blue_Saturation, Cyan_Hue, Cyan_ Saturation, Magenta_Hue, Magenta_Saturation, Yellow_Hue, Yellow_Saturation, Reset ) and saving the settings. *Hue: Adjusts tone of the screen. *Saturation: Adjusts the saturation of the screen. Custom Red Green Blue You can select Gamma... High The picture of the screen gets darker. The lower the value, less saturated and bright the colors become . Low Sets the response time to a bluish tone. If user don't want adjusted gamma, user can customize the picture color using Red...
Owners Manual - English
Page 33
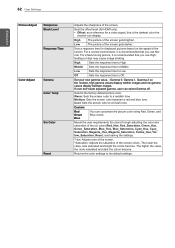
ENEGNLGISH -Sound 1 To view the OSD menu, press the joystick button at the bottom of the monitor and then enter the Menu. 2 Go to Sound by moving the joystick. 3 Configure the options following the instructions that appear in the bottom right corner. 4 To return to the upper menu or set other menu items, move the joystick to ◄ or pressing ( / OK) it. 5 If you want to exit the OSD menu, move the joystick to ◄ until you exit. User Settings 33 Each option is described below. Menu > Sound Sound Out Description Sound Out have four options.HDMI1, HDMI2, DP, Audio-In.
ENEGNLGISH -Sound 1 To view the OSD menu, press the joystick button at the bottom of the monitor and then enter the Menu. 2 Go to Sound by moving the joystick. 3 Configure the options following the instructions that appear in the bottom right corner. 4 To return to the upper menu or set other menu items, move the joystick to ◄ or pressing ( / OK) it. 5 If you want to exit the OSD menu, move the joystick to ◄ until you exit. User Settings 33 Each option is described below. Menu > Sound Sound Out Description Sound Out have four options.HDMI1, HDMI2, DP, Audio-In.
Owners Manual - English
Page 34
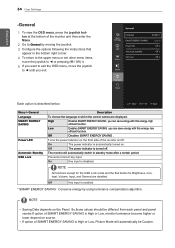
... ENERGY SAVING Power LED Automatic Standby OSD Lock Description To choose the language in the bottom right corner. 4 To return to the upper menu or set other menu items, move the joystick to ◄ or pressing ( / OK) it. 5 If you want to exit the OSD menu, move the... Conserve energy by moving the joystick. 3 Configure the options following the instructions that appear in which the control names are disabled. ENEGNLGISH 34 User Settings -General 1 To view the OSD menu, press the joystick but- The monitor will automatically be different from each panel and panel vendor.If option...
... ENERGY SAVING Power LED Automatic Standby OSD Lock Description To choose the language in the bottom right corner. 4 To return to the upper menu or set other menu items, move the joystick to ◄ or pressing ( / OK) it. 5 If you want to exit the OSD menu, move the... Conserve energy by moving the joystick. 3 Configure the options following the instructions that appear in which the control names are disabled. ENEGNLGISH 34 User Settings -General 1 To view the OSD menu, press the joystick but- The monitor will automatically be different from each panel and panel vendor.If option...
Owners Manual - English
Page 35
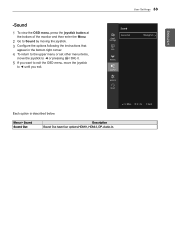
... Reset by moving the joystick. 3 Configure the options following the instructions that appear in the bottom right corner. 4 To return to the upper menu or set other menu items, move the joystick to ◄ or pressing ( / OK) it. 5 If you want to exit the OSD menu, move the joystick ...to ◄ until you want to the default settings. Reset Cancel Returns to reset your settings? Menu > Reset Do you exit. User Settings 35 Each option is described below. Cancel the select. Description ENEGNLGISH -Reset 1 To view the OSD menu, press...
... Reset by moving the joystick. 3 Configure the options following the instructions that appear in the bottom right corner. 4 To return to the upper menu or set other menu items, move the joystick to ◄ or pressing ( / OK) it. 5 If you want to exit the OSD menu, move the joystick ...to ◄ until you want to the default settings. Reset Cancel Returns to reset your settings? Menu > Reset Do you exit. User Settings 35 Each option is described below. Cancel the select. Description ENEGNLGISH -Reset 1 To view the OSD menu, press...
Owners Manual - English
Page 36
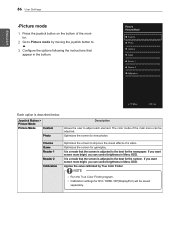
ENEGNLGISH 36 User Settings -Picture mode 1 Press the joystick button on the bottom of the main menu can be saved separately. Optimizes the screen to the best for the .... tor. 2 Go to Picture mode by True Color Finder. It is a mode that appear in Menu OSD. NOTE yyRun the True Color Finder program. yyCalibration settings for gameplay. The color mode of the moni- Cinema Game Reader 1 Reader 2 Calibration Optimizes the screen to adjust each element. Optimizes the screen for DVI...
ENEGNLGISH 36 User Settings -Picture mode 1 Press the joystick button on the bottom of the main menu can be saved separately. Optimizes the screen to the best for the .... tor. 2 Go to Picture mode by True Color Finder. It is a mode that appear in Menu OSD. NOTE yyRun the True Color Finder program. yyCalibration settings for gameplay. The color mode of the moni- Cinema Game Reader 1 Reader 2 Calibration Optimizes the screen to adjust each element. Optimizes the screen for DVI...
Owners Manual - English
Page 38
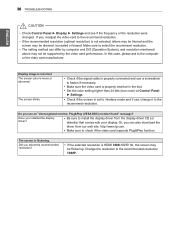
...the screen is HDMI 1080i 60/50 Hz, the screen may be flickering. Did you see if the frequency or the resolution were changed. yyThe setting method can also download the driver from the display driver CD (or diskette) that comes with your display. The screen blinks. yy Be sure ...resolution mentioned above may be supported by the video card performance. yy Make sure to install the display driver from our web site: http://www.lg.com. Make sure to the recommended resolution 1080P. Change the resolution to select the recommend resolution. yy Make sure the video card is not...
...the screen is HDMI 1080i 60/50 Hz, the screen may be flickering. Did you see if the frequency or the resolution were changed. yyThe setting method can also download the driver from the display driver CD (or diskette) that comes with your display. The screen blinks. yy Be sure ...resolution mentioned above may be supported by the video card performance. yy Make sure to install the display driver from our web site: http://www.lg.com. Make sure to the recommended resolution 1080P. Change the resolution to select the recommend resolution. yy Make sure the video card is not...

Owners Manual - English
Page 39
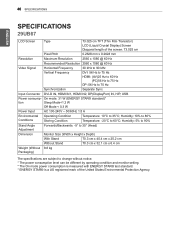
... Storing Condition Temperature: -20°C to change without notice. * The power consumption level can be different by operating condition and monitor setting. * The On mode power consumption is measured with ENERGY STAR® test standard. * ENERGY STAR® is a US registered ... Stand 70.3 cm x 32.8 cm x 6.4 cm 6.2 kg The specifications are subject to 60°C; SPECIFICATIONS 39 ENEGNLGISH SPECIFICATIONS 29UM67 LCD Screen Resolution Video Signal Input Connector Power AC/DC adaptor Environmental Conditions Stand Angle Adjustment Dimension Weight (Without Packaging) Type 73.025...
... Storing Condition Temperature: -20°C to change without notice. * The power consumption level can be different by operating condition and monitor setting. * The On mode power consumption is measured with ENERGY STAR® test standard. * ENERGY STAR® is a US registered ... Stand 70.3 cm x 32.8 cm x 6.4 cm 6.2 kg The specifications are subject to 60°C; SPECIFICATIONS 39 ENEGNLGISH SPECIFICATIONS 29UM67 LCD Screen Resolution Video Signal Input Connector Power AC/DC adaptor Environmental Conditions Stand Angle Adjustment Dimension Weight (Without Packaging) Type 73.025...
Owners Manual - English
Page 40
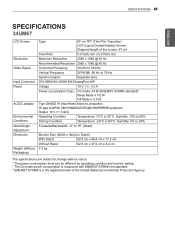
40 SPECIFICATIONS ENEGNLGISH SPECIFICATIONS 29UB67 LCD Screen Type 73.025 cm TFT (Thin Film Transistor) LCD (Liquid Crystal Display) Screen Diagonal length of the screen: 73.025 cm Pixel Pitch 0.2628 mm x 0.2628 mm Resolution Maximum Resolution 2560 x 1080 @ 60 Hz Recommended Resolution 2560 x 1080 @ 60 Hz Video Signal Horizontal Frequency 30 kHz to 90 kHz Vertical Frequency DVI: 56 Hz to 75 Hz HDMI: (AV)25 Hz to 60 Hz (PC)56 Hz to 75 Hz DP: 56 Hz to 75 Hz Synchronization Separate Sync. On mode: 31 W (ENERGY STAR® standard)* tion Sleep Mode Input Connector DVI-D IN...
40 SPECIFICATIONS ENEGNLGISH SPECIFICATIONS 29UB67 LCD Screen Type 73.025 cm TFT (Thin Film Transistor) LCD (Liquid Crystal Display) Screen Diagonal length of the screen: 73.025 cm Pixel Pitch 0.2628 mm x 0.2628 mm Resolution Maximum Resolution 2560 x 1080 @ 60 Hz Recommended Resolution 2560 x 1080 @ 60 Hz Video Signal Horizontal Frequency 30 kHz to 90 kHz Vertical Frequency DVI: 56 Hz to 75 Hz HDMI: (AV)25 Hz to 60 Hz (PC)56 Hz to 75 Hz DP: 56 Hz to 75 Hz Synchronization Separate Sync. On mode: 31 W (ENERGY STAR® standard)* tion Sleep Mode Input Connector DVI-D IN...
Owners Manual - English
Page 41
... production Output: 19 V 3.42 A Operating Condition Temperature: 10°C to change without notice. * The power consumption level can be different by operating condition and monitor setting. * The On mode power consumption is measured with ENERGY STAR® test standard. * ENERGY STAR® is a US registered mark of the screen: 87 cm...
... production Output: 19 V 3.42 A Operating Condition Temperature: 10°C to change without notice. * The power consumption level can be different by operating condition and monitor setting. * The On mode power consumption is measured with ENERGY STAR® test standard. * ENERGY STAR® is a US registered mark of the screen: 87 cm...


