Owners Manual - English
Page 2
... - HDMI connection 22 Connecting to a PC 19 - PC 22 - Installing onto a table 14 - Menu Settings 29 - -Quick Settings 30 - -PBP 31 - -Picture 33 - -Sound 34 - -General 35 - -Reset 36 - -Picture mode 37 TROUBLESHOOTING 39 SPECIFICATIONS 39 29UM67 40 29UB67 41 34UM67 42 34UB67 43 Factory support mode (DVI-D/ HDMI/ DisplayPort) 43 HDMI Timing (Video) 43 Indicator 44 PROPER POSTURE 44 Proper Posture for Using the Monitor Pivot feature 17 - USB Cable connection - Using the cable holder 13 - Assembling the stand base 12 - Installing the wall mount...
... - HDMI connection 22 Connecting to a PC 19 - PC 22 - Installing onto a table 14 - Menu Settings 29 - -Quick Settings 30 - -PBP 31 - -Picture 33 - -Sound 34 - -General 35 - -Reset 36 - -Picture mode 37 TROUBLESHOOTING 39 SPECIFICATIONS 39 29UM67 40 29UB67 41 34UM67 42 34UB67 43 Factory support mode (DVI-D/ HDMI/ DisplayPort) 43 HDMI Timing (Video) 43 Indicator 44 PROPER POSTURE 44 Proper Posture for Using the Monitor Pivot feature 17 - USB Cable connection - Using the cable holder 13 - Assembling the stand base 12 - Installing the wall mount...
Owners Manual - English
Page 3
... monitor is set to be turned off automatically in 4 hours after you turned on the license. ENEGNLGISH LICENSE 3 LICENSE Each model has different licenses. The terms HDMI and HDMI High-Definition Multimedia Interface, and the HDMI logo are all registered trademarks of "Automatic Standby". Visit www.lg.com for dual-mode source are trademarks or registered trademarks of HDMI Licensing LLC in OSD menu...
... monitor is set to be turned off automatically in 4 hours after you turned on the license. ENEGNLGISH LICENSE 3 LICENSE Each model has different licenses. The terms HDMI and HDMI High-Definition Multimedia Interface, and the HDMI logo are all registered trademarks of "Automatic Standby". Visit www.lg.com for dual-mode source are trademarks or registered trademarks of HDMI Licensing LLC in OSD menu...

Owners Manual - English
Page 8
ENEGNLGISH 8 ASSEMBLING AND PREPARING How to Use the Joystick Button You can control the volume by pressing the joystick button or moving the joystick button left /right with your finger to turn on the monitor. Power off the monitor. ◄/► Volume Control You can easily control the functions of the monitor. Basic Functions Power on Press the joystick button once with your finger to turn off Press and hold the joystick button once with your finger. NOTE yy The joystick button is located at the bottom of the monitor by moving it left /right.
ENEGNLGISH 8 ASSEMBLING AND PREPARING How to Use the Joystick Button You can control the volume by pressing the joystick button or moving the joystick button left /right with your finger to turn on the monitor. Power off the monitor. ◄/► Volume Control You can easily control the functions of the monitor. Basic Functions Power on Press the joystick button once with your finger to turn off Press and hold the joystick button once with your finger. NOTE yy The joystick button is located at the bottom of the monitor by moving it left /right.
Owners Manual - English
Page 13
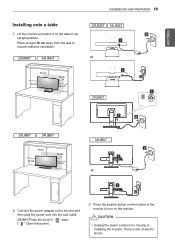
... cm ASSEMBLING AND PREPARING 13 10 cm 10 cm 10 cm 10 cm or 2 Connect the power adapter to turn on the table in an upright position. CAUTION yyUnplug the power cord prior to ensure sufficient ventilation. There is risk of the monitor to the monitor and then plug the power cord into the wall outlet. 29UB67:Press the knob in " " state. (" " Open the power). 3 Press...
... cm ASSEMBLING AND PREPARING 13 10 cm 10 cm 10 cm 10 cm or 2 Connect the power adapter to turn on the table in an upright position. CAUTION yyUnplug the power cord prior to ensure sufficient ventilation. There is risk of the monitor to the monitor and then plug the power cord into the wall outlet. 29UB67:Press the knob in " " state. (" " Open the power). 3 Press...
Owners Manual - English
Page 17
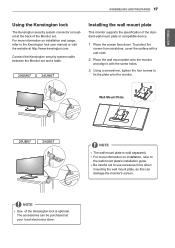
... the wall mount plate's installation guide. NOTE yyUse of the Kensington lock is sold separately. Wall Mount Plate NOTE yyThe wall mount plate is optional. Connect the Kensington security system cable between the Monitor set . To protect the screen from scratches, cover the surface with a soft cloth. 2 Place the wall mount plate onto the monitor and align it with the screw holes. 3 Using a screwdriver, tighten the four screws to the Kensington lock user manual...
... the wall mount plate's installation guide. NOTE yyUse of the Kensington lock is sold separately. Wall Mount Plate NOTE yyThe wall mount plate is optional. Connect the Kensington security system cable between the Monitor set . To protect the screen from scratches, cover the surface with a soft cloth. 2 Place the wall mount plate onto the monitor and align it with the screw holes. 3 Using a screwdriver, tighten the four screws to the Kensington lock user manual...
Owners Manual - English
Page 18
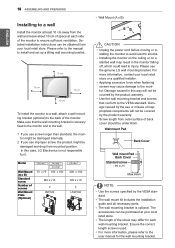
... the use or misuse of space at each wall mounting bracket. yyThe wall mount kit includes the installation guide and all necessary parts. Wall mount Pad Back Cover Wall mount Pad Back Cover Standard screw Max.8mm NOTE yyUse the screws specified by the product warranty. Please refer to the manual to install and set up a tilting wall mounting bracket. 10 cm 10 cm 10 cm 10 cm To install the monitor to a wall, attach a wall mounting...
... the use or misuse of space at each wall mounting bracket. yyThe wall mount kit includes the installation guide and all necessary parts. Wall mount Pad Back Cover Wall mount Pad Back Cover Standard screw Max.8mm NOTE yyUse the screws specified by the product warranty. Please refer to the manual to install and set up a tilting wall mounting bracket. 10 cm 10 cm 10 cm 10 cm To install the monitor to a wall, attach a wall mounting...
Owners Manual - English
Page 19
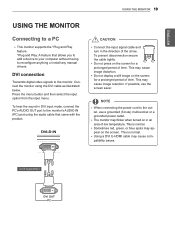
... USING THE MONITOR 19 USING THE MONITOR Connecting to a PC yyThis monitor supports the *Plug and Play feature. *Plug and Play: A feature that came with the product. To hear the sound in DVI input mode, connect the PC's AUDIO OUT port to reconfigure anything or install any manual drivers. yyThe monitor may cause image distortion. DVI connection Transmits digital video signals to the outlet, use the screen saver. NOTE yyWhen connecting the power cord to the monitor. This is normal. Connect the monitor using the audio cable...
... USING THE MONITOR 19 USING THE MONITOR Connecting to a PC yyThis monitor supports the *Plug and Play feature. *Plug and Play: A feature that came with the product. To hear the sound in DVI input mode, connect the PC's AUDIO OUT port to reconfigure anything or install any manual drivers. yyThe monitor may cause image distortion. DVI connection Transmits digital video signals to the outlet, use the screen saver. NOTE yyWhen connecting the power cord to the monitor. This is normal. Connect the monitor using the audio cable...
Owners Manual - English
Page 22
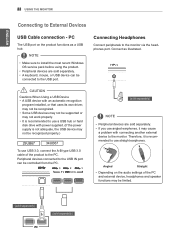
... Using a USB Device yy A USB device with an automatic recognition program installed, or that uses its own driver, may not be supported or may not be recognized. yy Some USB devices may not work properly. Peripheral devices connected to the USB port. Therefore, it may cause a problem with power supplied. (If the power supply is recommended to use USB 3.0, connect the A-B type USB 3.0 cable of the PC and external device, headphones and speaker...
... Using a USB Device yy A USB device with an automatic recognition program installed, or that uses its own driver, may not be supported or may not be recognized. yy Some USB devices may not work properly. Peripheral devices connected to the USB port. Therefore, it may cause a problem with power supplied. (If the power supply is recommended to use USB 3.0, connect the A-B type USB 3.0 cable of the PC and external device, headphones and speaker...
Owners Manual - English
Page 29
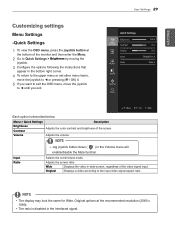
... color contrast and brightness of the video signal input. Adjusts the screen ratio. NOTE yyThe display may look the same for Wide, Original options at the bottom of the monitor and then enter the Menu. 2 Go to Quick Settings > Brightness by moving the joystick. 3 Configure the options following the instructions that appear in wide-screen, regardless of the screen. ENEGNLGISH Customizing settings Menu Settings -Quick Settings 1 To view the OSD menu, press the joystick button at the recommended resolution...
... color contrast and brightness of the video signal input. Adjusts the screen ratio. NOTE yyThe display may look the same for Wide, Original options at the bottom of the monitor and then enter the Menu. 2 Go to Quick Settings > Brightness by moving the joystick. 3 Configure the options following the instructions that appear in wide-screen, regardless of the screen. ENEGNLGISH Customizing settings Menu Settings -Quick Settings 1 To view the OSD menu, press the joystick button at the recommended resolution...
Owners Manual - English
Page 30
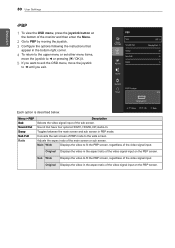
... Selects the video signal input of the main screen or sub screen. Original Displays the video in the aspect ratio of the video signal input on the PBP screen. Converts the sub screen of PBP mode to ◄ until you want to exit the OSD menu, move the joystick to the wide screen. Each option is described below. ENEGNLGISH 30 User Settings -PBP 1 To view the OSD menu, press the joystick button at...
... Selects the video signal input of the main screen or sub screen. Original Displays the video in the aspect ratio of the video signal input on the PBP screen. Converts the sub screen of PBP mode to ◄ until you want to exit the OSD menu, move the joystick to the wide screen. Each option is described below. ENEGNLGISH 30 User Settings -PBP 1 To view the OSD menu, press the joystick button at...
Owners Manual - English
Page 31
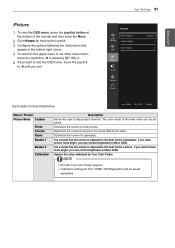
... DVI / HDMI / DP(DisplayPort) will be adjusted. NOTE yyRun the True Color Finder program. yyCalibration settings for the cartoon. User Settings 31 Each option is adjusted to ◄ until you exit. Optimizes the screen to improve the visual effects of the monitor and then enter the Menu. 2 Go to the best for gameplay. ENEGNLGISH -Picture 1 To view the OSD menu, press the joystick button at the bottom of a video...
... DVI / HDMI / DP(DisplayPort) will be adjusted. NOTE yyRun the True Color Finder program. yyCalibration settings for the cartoon. User Settings 31 Each option is adjusted to ◄ until you exit. Optimizes the screen to improve the visual effects of the monitor and then enter the Menu. 2 Go to the best for gameplay. ENEGNLGISH -Picture 1 To view the OSD menu, press the joystick button at the bottom of a video...
Owners Manual - English
Page 32
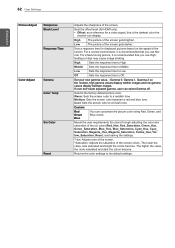
... the user requirements for HDMI only). Sets a response time for a video signal, this is the darkest color the monitor can display. Selects the factory default picture color. Cool: Sets the screen color to Off. Returns the color settings to High may cause image sticking. Setting to the default settings. For a fast-moving picture, it is recommended that you use Normal. If user don't want adjusted gamma, user can customize the picture color using Red, Green, and Blue colors. yy Offset: as a reference for displayed pictures based...
... the user requirements for HDMI only). Sets a response time for a video signal, this is the darkest color the monitor can display. Selects the factory default picture color. Cool: Sets the screen color to Off. Returns the color settings to High may cause image sticking. Setting to the default settings. For a fast-moving picture, it is recommended that you use Normal. If user don't want adjusted gamma, user can customize the picture color using Red, Green, and Blue colors. yy Offset: as a reference for displayed pictures based...
Owners Manual - English
Page 34
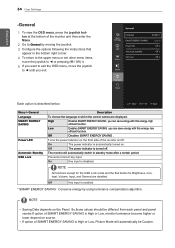
... view the OSD menu, press the joystick but- high efficient function. Off Disables SMART ENERGY SAVING . The monitor will automatically be different from each panel and panel vendor.If option of SMART ENERGY SAVING is High or Low, Picture Mode will automatically switch to ◄ until you can save energy with this energy- NOTE All functions except for the OSD Lock mode and the Exit button for Brightness, Contrast, Volume, Input...
... view the OSD menu, press the joystick but- high efficient function. Off Disables SMART ENERGY SAVING . The monitor will automatically be different from each panel and panel vendor.If option of SMART ENERGY SAVING is High or Low, Picture Mode will automatically switch to ◄ until you can save energy with this energy- NOTE All functions except for the OSD Lock mode and the Exit button for Brightness, Contrast, Volume, Input...
Owners Manual - English
Page 36
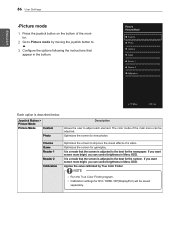
... Picture mode by True Color Finder. Each option is adjusted to the best for gameplay. Joystick Button > Picture Mode Picture Mode Custom Photo Description Allows the user to view photos. If you want screen more bright, you can control brightness in Menu OSD. Optimizes the screen for the cartoon. If you want screen more bright, you can be saved separately. It is a mode that the screen is adjusted to the best for DVI / HDMI / DP(DisplayPort) will be adjusted. Optimizes the screen...
... Picture mode by True Color Finder. Each option is adjusted to the best for gameplay. Joystick Button > Picture Mode Picture Mode Custom Photo Description Allows the user to view photos. If you want screen more bright, you can control brightness in Menu OSD. Optimizes the screen for the cartoon. If you want screen more bright, you can be saved separately. It is a mode that the screen is adjusted to the best for DVI / HDMI / DP(DisplayPort) will be adjusted. Optimizes the screen...
Owners Manual - English
Page 37
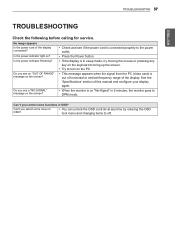
... the signal from the PC (video card) is connected properly to off. yy When the monitor is in OSD? yy You can unlock the OSD controls at any key on the screen? No image appears Is the power cord of this manual and configure your display again. yy Check and see if the power cord is out of horizontal or vertical frequency range of the display. TROUBLESHOOTING 37 ENEGNLGISH TROUBLESHOOTING Check the following before calling for service...
... the signal from the PC (video card) is connected properly to off. yy When the monitor is in OSD? yy You can unlock the OSD controls at any key on the screen? No image appears Is the power cord of this manual and configure your display again. yy Check and see if the power cord is out of horizontal or vertical frequency range of the display. TROUBLESHOOTING 37 ENEGNLGISH TROUBLESHOOTING Check the following before calling for service...
Owners Manual - English
Page 38
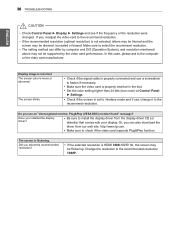
... the video card is flickering. Make sure to check if the video card supports Plug&Play function. Display image is incorrect The screen color is set to interlace mode and if yes, change it to install the display driver from our web site: http://www.lg.com. Do you can differ by computer and O/S (Operation System), and resolution mentioned above may be dimmed, truncated or biased. Or, you see if the frequency...
... the video card is flickering. Make sure to check if the video card supports Plug&Play function. Display image is incorrect The screen color is set to interlace mode and if yes, change it to install the display driver from our web site: http://www.lg.com. Do you can differ by computer and O/S (Operation System), and resolution mentioned above may be dimmed, truncated or biased. Or, you see if the frequency...

Owners Manual - English
Page 39
... SPECIFICATIONS 29UM67 LCD Screen Resolution Video Signal Input Connector Power AC/DC adaptor Environmental Conditions Stand Angle Adjustment Dimension Weight (Without Packaging) Type 73.025 cm TFT (Thin Film Transistor) LCD (Liquid Crystal Display) Screen Diagonal length of the screen: 73.025 cm Pixel Pitch 0.2628 mm x 0.2628 mm Maximum Resolution 2560 x 1080 @ 60 Hz Recommended Resolution 2560 x 1080 @ 60 Hz Horizontal Frequency 30 kHz to 90 kHz Vertical Frequency DP/HDMI :56 Hz to change...
... SPECIFICATIONS 29UM67 LCD Screen Resolution Video Signal Input Connector Power AC/DC adaptor Environmental Conditions Stand Angle Adjustment Dimension Weight (Without Packaging) Type 73.025 cm TFT (Thin Film Transistor) LCD (Liquid Crystal Display) Screen Diagonal length of the screen: 73.025 cm Pixel Pitch 0.2628 mm x 0.2628 mm Maximum Resolution 2560 x 1080 @ 60 Hz Recommended Resolution 2560 x 1080 @ 60 Hz Horizontal Frequency 30 kHz to 90 kHz Vertical Frequency DP/HDMI :56 Hz to change...
Owners Manual - English
Page 40
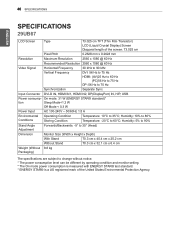
...; standard)* tion Sleep Mode Input Connector DVI-D IN, HDMI IN1, HDMI IN2, DP(DisplayPort) IN, H/P, USB Power consump- 40 SPECIFICATIONS ENEGNLGISH SPECIFICATIONS 29UB67 LCD Screen Type 73.025 cm TFT (Thin Film Transistor) LCD (Liquid Crystal Display) Screen Diagonal length of the screen: 73.025 cm Pixel Pitch 0.2628 mm x 0.2628 mm Resolution Maximum Resolution 2560 x 1080 @ 60 Hz Recommended Resolution 2560 x 1080 @ 60 Hz Video Signal Horizontal Frequency 30 kHz to 90 kHz Vertical Frequency DVI: 56 Hz...
...; standard)* tion Sleep Mode Input Connector DVI-D IN, HDMI IN1, HDMI IN2, DP(DisplayPort) IN, H/P, USB Power consump- 40 SPECIFICATIONS ENEGNLGISH SPECIFICATIONS 29UB67 LCD Screen Type 73.025 cm TFT (Thin Film Transistor) LCD (Liquid Crystal Display) Screen Diagonal length of the screen: 73.025 cm Pixel Pitch 0.2628 mm x 0.2628 mm Resolution Maximum Resolution 2560 x 1080 @ 60 Hz Recommended Resolution 2560 x 1080 @ 60 Hz Video Signal Horizontal Frequency 30 kHz to 90 kHz Vertical Frequency DVI: 56 Hz...
Owners Manual - English
Page 41
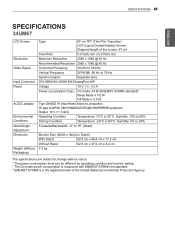
... Hz Horizontal Frequency 30 kHz to 90 kHz Vertical Frequency DP/HDMI :56 Hz to 75 Hz Synchronization Separate Sync. SPECIFICATIONS 41 ENEGNLGISH SPECIFICATIONS 34UM67 LCD Screen Resolution Video Signal Input Connector Power AC/DC adaptor Environmental Conditions Stand Angle Adjustment Dimension Weight (Without Packaging) Type 87 cm TFT (Thin Film Transistor) LCD (Liquid Crystal Display) Screen Diagonal length of the United States Environmental Protection Agency. DVI,HDMI IN1,HDMI IN2,DisplayPort,H/P Voltage 19 V 3.3 A Power consumption...
... Hz Horizontal Frequency 30 kHz to 90 kHz Vertical Frequency DP/HDMI :56 Hz to 75 Hz Synchronization Separate Sync. SPECIFICATIONS 41 ENEGNLGISH SPECIFICATIONS 34UM67 LCD Screen Resolution Video Signal Input Connector Power AC/DC adaptor Environmental Conditions Stand Angle Adjustment Dimension Weight (Without Packaging) Type 87 cm TFT (Thin Film Transistor) LCD (Liquid Crystal Display) Screen Diagonal length of the United States Environmental Protection Agency. DVI,HDMI IN1,HDMI IN2,DisplayPort,H/P Voltage 19 V 3.3 A Power consumption...
Owners Manual - English
Page 42
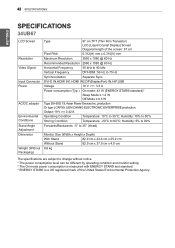
... kHz Vertical Frequency DP/HDMI :56 Hz to 75 Hz Synchronization Separate Sync. production Or type LCAP39, LIEN CHANG ELECTRONIC ENTERPRISE production. Humidity: 10% to 80% Storing Condition Temperature: -20°C to 35°C; 42 SPECIFICATIONS ENEGNLGISH SPECIFICATIONS 34UB67 LCD Screen Resolution Video Signal Input Connector Power AC/DC adaptor Environmental Conditions Stand Angle Adjustment Dimension Weight (Without Packaging) Type 87 cm TFT (Thin Film Transistor) LCD (Liquid Crystal Display) Screen...
... kHz Vertical Frequency DP/HDMI :56 Hz to 75 Hz Synchronization Separate Sync. production Or type LCAP39, LIEN CHANG ELECTRONIC ENTERPRISE production. Humidity: 10% to 80% Storing Condition Temperature: -20°C to 35°C; 42 SPECIFICATIONS ENEGNLGISH SPECIFICATIONS 34UB67 LCD Screen Resolution Video Signal Input Connector Power AC/DC adaptor Environmental Conditions Stand Angle Adjustment Dimension Weight (Without Packaging) Type 87 cm TFT (Thin Film Transistor) LCD (Liquid Crystal Display) Screen...


