Owners Manual
Page 1
Owner's Manual IPS LED MONITOR (LED MONITOR*) *LG LED Monitors are LCD Monitors with LED Backlighting. Please read the safety information carefully before using the product. IPS LED Monitor (LED Monitor) Model List 29UM50 29UM60 34UM60 www.lg.com
Owner's Manual IPS LED MONITOR (LED MONITOR*) *LG LED Monitors are LCD Monitors with LED Backlighting. Please read the safety information carefully before using the product. IPS LED Monitor (LED Monitor) Model List 29UM50 29UM60 34UM60 www.lg.com
Owners Manual
Page 2
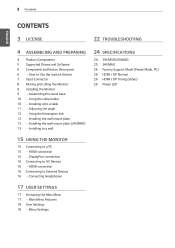
... 29UM50/29UM60 25 34UM60 26 Factory Support Mode (Preset Mode, PC) 26 HDMI / DP Normal 26 HDMI / DP Timing (Video) 26 Power LED 15 USING THE MONITOR 15 Connecting to External Devices 16 - Installing the wall mount plate (34UM60) 13 - HDMI connection 15 - Connecting Headphones 17 USER SETTINGS 17 Activating the Main Menu 17 - Assembling the stand base 10 - Main Menu Features 18 User Settings 18 - HDMI connection 16 Connecting to a PC 15 - Installing the wall mount plate 12 - DisplayPort connection 16 Connecting to Use the Joystick Button 7 Input Connector...
... 29UM50/29UM60 25 34UM60 26 Factory Support Mode (Preset Mode, PC) 26 HDMI / DP Normal 26 HDMI / DP Timing (Video) 26 Power LED 15 USING THE MONITOR 15 Connecting to External Devices 16 - Installing the wall mount plate (34UM60) 13 - HDMI connection 15 - Connecting Headphones 17 USER SETTINGS 17 Activating the Main Menu 17 - Assembling the stand base 10 - Main Menu Features 18 User Settings 18 - HDMI connection 16 Connecting to a PC 15 - Installing the wall mount plate 12 - DisplayPort connection 16 Connecting to Use the Joystick Button 7 Input Connector...

Owners Manual
Page 3
VESA, VESA logo, DisplayPort compliance logo and DisplayPort compliance logo for more information on display if there is set to be turned off automatically in 4 hours after you turned on the license. Visit www.lg.com for dual-mode source devices are trademarks or registered trademarks of HDMI Licensing Administrator, Inc. ENEGNLGISH LICENSE 3 LICENSE Each model has different licenses. The terms HDMI and...
VESA, VESA logo, DisplayPort compliance logo and DisplayPort compliance logo for more information on display if there is set to be turned off automatically in 4 hours after you turned on the license. Visit www.lg.com for dual-mode source devices are trademarks or registered trademarks of HDMI Licensing Administrator, Inc. ENEGNLGISH LICENSE 3 LICENSE Each model has different licenses. The terms HDMI and...

Owners Manual
Page 4
... change to ensure safety and product performance. yyIt is not included in all information and specifications in the box before using the product. yyThe product warranty will not cover damage or injury caused by the use generic cables not certified by LG, the screen may not display or there may look different from those shown here. CD(Owner's Manual) / Card Power Cord AC-DC Adapter...
... change to ensure safety and product performance. yyIt is not included in all information and specifications in the box before using the product. yyThe product warranty will not cover damage or injury caused by the use generic cables not certified by LG, the screen may not display or there may look different from those shown here. CD(Owner's Manual) / Card Power Cord AC-DC Adapter...

Owners Manual
Page 5
yyOptional: You can download and install the latest version from the enclosed CD or from the LGE website (www.lg.com). Drivers and Software Monitor Driver OnScreen Control Dual Controller Installation Priority Recommended Recommended Optional 29UM50/29UM60/34UM60 O O O yyRequired and Recommended: You can download and install the latest version from the LGE website (www.lg.com). ASSEMBLING AND PREPARING 5 ENEGNLGISH Supported Drivers and Software Check the drivers and software supported by your product and refer to the manuals on the CD enclosed in the product package.
yyOptional: You can download and install the latest version from the enclosed CD or from the LGE website (www.lg.com). Drivers and Software Monitor Driver OnScreen Control Dual Controller Installation Priority Recommended Recommended Optional 29UM50/29UM60/34UM60 O O O yyRequired and Recommended: You can download and install the latest version from the LGE website (www.lg.com). ASSEMBLING AND PREPARING 5 ENEGNLGISH Supported Drivers and Software Check the drivers and software supported by your product and refer to the manuals on the CD enclosed in the product package.
Owners Manual
Page 6
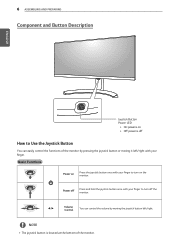
... Functions Power on the monitor. Power off Press and hold the joystick button once with your finger to turn off How to turn on Press the joystick button once with your finger to Use the Joystick Button You can control the volume by moving the joystick button left /right with your finger. NOTE yy The joystick button is off the monitor. ◄/► Volume Control You...
... Functions Power on the monitor. Power off Press and hold the joystick button once with your finger to turn off How to turn on Press the joystick button once with your finger to Use the Joystick Button You can control the volume by moving the joystick button left /right with your finger. NOTE yy The joystick button is off the monitor. ◄/► Volume Control You...
Owners Manual
Page 9
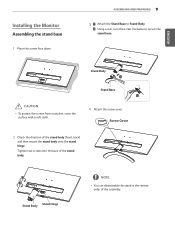
Installing the Monitor Assembling the stand base 1 Place the screen face down. Screw Cover 2 Check the direction of the stand body. ENEGNLGISH Stand Body Stand Base CAUTION yyTo protect the screen from scratches, cover the surface with a soft cloth. 4 Attach the screw cover. Tighten two screws into the back of the stand body (front, back) and then mount the stand body onto the stand hinge. Stand Body Stand Hinge NOTE yyYou can disassemble the stand in the...
Installing the Monitor Assembling the stand base 1 Place the screen face down. Screw Cover 2 Check the direction of the stand body. ENEGNLGISH Stand Body Stand Base CAUTION yyTo protect the screen from scratches, cover the surface with a soft cloth. 4 Attach the screw cover. Tighten two screws into the back of the stand body (front, back) and then mount the stand body onto the stand hinge. Stand Body Stand Hinge NOTE yyYou can disassemble the stand in the...
Owners Manual
Page 10
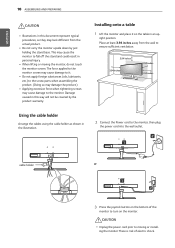
... of the monitor to moving the monitor, do not touch the monitor screen. This may look different from the wall to ensure sufficient ventilation. 3.94 inches 3.94 inches 3.94 inches 3.94 inches Using the cable holder Arrange the cables using the cable holder as shown in the illustration. 2 Connect the Power cord to it on the monitor. yyDo not apply foreign substances (oils, lubricants, etc.) to the screw parts when assembling the...
... of the monitor to moving the monitor, do not touch the monitor screen. This may look different from the wall to ensure sufficient ventilation. 3.94 inches 3.94 inches 3.94 inches 3.94 inches Using the cable holder Arrange the cables using the cable holder as shown in the illustration. 2 Connect the Power cord to it on the monitor. yyDo not apply foreign substances (oils, lubricants, etc.) to the screw parts when assembling the...

Owners Manual
Page 12
... screen face down . Installing the wall mount plate This monitor supports the specification of the standard wall mount plate or compatible device. 1 Place the screen face down . tor using a screwdriver. To protect the screen from scratches, cover the surface with a soft cloth. 2 Place the wall mount plate onto the monitor and align it with the screw holes. 3 Tighten the four screws to fix the plate to the back of the Monitor set...
... screen face down . Installing the wall mount plate This monitor supports the specification of the standard wall mount plate or compatible device. 1 Place the screen face down . tor using a screwdriver. To protect the screen from scratches, cover the surface with a soft cloth. 2 Place the wall mount plate onto the monitor and align it with the screw holes. 3 Tighten the four screws to fix the plate to the back of the Monitor set...

Owners Manual
Page 15
... you use HDMI PC, it can cause compatibility problem. Press the menu button and then select the input option from your computer without having to reconfigure anything or install any manual drivers. If you to add a device to your PC and A/V devices to the monitor. HDMI connection Transmits the digital video and audio signals from the input menu. yyUse a certified cable with Ethernet NOTE yyThere may be image noises. yyRecommended HDMI cable types...
... you use HDMI PC, it can cause compatibility problem. Press the menu button and then select the input option from your computer without having to reconfigure anything or install any manual drivers. If you to add a device to your PC and A/V devices to the monitor. HDMI connection Transmits the digital video and audio signals from the input menu. yyUse a certified cable with Ethernet NOTE yyThere may be image noises. yyRecommended HDMI cable types...
Owners Manual
Page 17
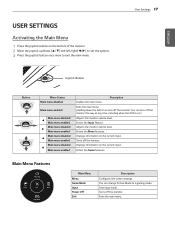
...Displays information on .) Adjusts the monitor volume level. Main Menu Features Power Off Power Off Input Input Exit Exit Menu Menu Power Off Game Mode Game Mode Input Exit Menu Power Off Game Mode Input Exit Menu Game Mode Main Menu Menu Game Mode Input Power Off Exit Description Configures the screen settings. Sets input mode. Turns off the monitor. You can turn off the monitor this way at any time, including when the OSD is on the current input. User Settings 17 Joystick Button Button Menu Status Main menu disabled Main menu enabled Main menu disabled...
...Displays information on .) Adjusts the monitor volume level. Main Menu Features Power Off Power Off Input Input Exit Exit Menu Menu Power Off Game Mode Game Mode Input Exit Menu Power Off Game Mode Input Exit Menu Game Mode Main Menu Menu Game Mode Input Power Off Exit Description Configures the screen settings. Sets input mode. Turns off the monitor. You can turn off the monitor this way at any time, including when the OSD is on the current input. User Settings 17 Joystick Button Button Menu Status Main menu disabled Main menu enabled Main menu disabled...

Owners Manual
Page 18
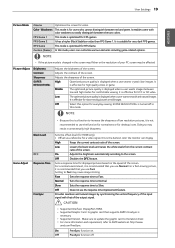
... brighten the screen in wide-screen, regardless of the video signal input. You can be adjusted. yy When you exit. ENEGNLGISH 18 User Settings User Settings Menu Settings 1 To view the OSD menu, press the joystick button at the recommended resolution (2560×1080). Optimizes the screen for photos. Each option is no Cinema1, Cinema2 menu on how to use the button will appear in the Volume menu. Quick Settings CAUTION Input Picture General yy Your monitor's OSD (On Screen Display) may look...
... brighten the screen in wide-screen, regardless of the video signal input. You can be adjusted. yy When you exit. ENEGNLGISH 18 User Settings User Settings Menu Settings 1 To view the OSD menu, press the joystick button at the recommended resolution (2560×1080). Optimizes the screen for photos. Each option is no Cinema1, Cinema2 menu on how to use the button will appear in the Volume menu. Quick Settings CAUTION Input Picture General yy Your monitor's OSD (On Screen Display) may look...
Owners Manual
Page 19
... Keeps the current contrast ratio of the screen. On Adjusts the brightness automatically according to Slow. Sets a response time for UCC or SD video. Provides seamless and natural images by synchronizing the vertical frequency of the output signal. CAUTION yy Supported Interface: DisplayPort,HDMI. FPS Game 1 This mode is displayed when a user wants smooth and natural images. Picture Adjust Brightness Contrast Sharpness SUPER RESOLUTION+ Adjusts the brightness of the screen. yy Supported Version : Make sure to update the...
... Keeps the current contrast ratio of the screen. On Adjusts the brightness automatically according to Slow. Sets a response time for UCC or SD video. Provides seamless and natural images by synchronizing the vertical frequency of the output signal. CAUTION yy Supported Interface: DisplayPort,HDMI. FPS Game 1 This mode is displayed when a user wants smooth and natural images. Picture Adjust Brightness Contrast Sharpness SUPER RESOLUTION+ Adjusts the brightness of the screen. yy Supported Version : Make sure to update the...
Owners Manual
Page 20
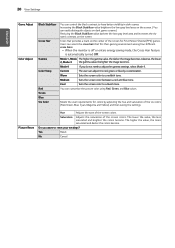
... contrast on the screen. Warm Sets the screen color to adjust the gamma settings, select Mode 4. Mode 4 If you want to a bluish tone. The higher the value, the more saturated and darker the colors become . Users can customize the picture color using Red, Green, and Blue colors. Likewise, the lower 2, Mode 3 the gamma value, the lighter the image becomes. Picture Reset Hue Adjusts the tone of the screen for colors by customization. Custom The user can adjust...
... contrast on the screen. Warm Sets the screen color to adjust the gamma settings, select Mode 4. Mode 4 If you want to a bluish tone. The higher the value, the more saturated and darker the colors become . Users can customize the picture color using Red, Green, and Blue colors. Likewise, the lower 2, Mode 3 the gamma value, the lighter the image becomes. Picture Reset Hue Adjusts the tone of the screen for colors by customization. Custom The user can adjust...
Owners Manual
Page 21
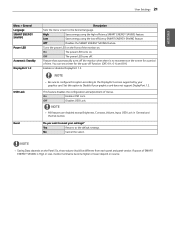
.... User Settings 21 ENEGNLGISH Menu > General Language SMART ENERGY SAVING Power LED Automatic Standby DisplayPort 1.2 OSD Lock Reset Description Sets the menu screen to the default settings. High Saves energy using the low-efficiency SMART ENERGY SAVING feature. Low Saves energy using the high-efficiency SMART ENERGY SAVING feature. Off Disables the SMART ENERGY SAVING feature. On The power LED turns on the Panel. Set this option according to reset your graphics card. NOTE yy All features are disabled except Brightness, Contrast, Volume, Input, OSD Lock in...
.... User Settings 21 ENEGNLGISH Menu > General Language SMART ENERGY SAVING Power LED Automatic Standby DisplayPort 1.2 OSD Lock Reset Description Sets the menu screen to the default settings. High Saves energy using the low-efficiency SMART ENERGY SAVING feature. Low Saves energy using the high-efficiency SMART ENERGY SAVING feature. Off Disables the SMART ENERGY SAVING feature. On The power LED turns on the Panel. Set this option according to reset your graphics card. NOTE yy All features are disabled except Brightness, Contrast, Volume, Input, OSD Lock in...
Owners Manual
Page 22
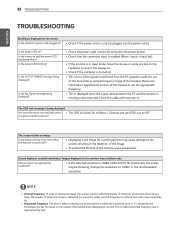
... Vertical frequency In order to display an image, the screen must be flickering. ENEGNLGISH 22 TROUBLESHOOTING TROUBLESHOOTING Nothing is displayed on . Is the monitor's power cord plugged in the retention of the monitor. Is the power LED blinking? yyCheck that the connected input is being displayed. The OSD lock message is enabled (Menu >Input > Input list). yyDisplaying a still image for a prolonged time may be refreshed dozens of times the screen is refreshed per second is called vertical frequency, or refresh rate, and is HDMI...
... Vertical frequency In order to display an image, the screen must be flickering. ENEGNLGISH 22 TROUBLESHOOTING TROUBLESHOOTING Nothing is displayed on . Is the monitor's power cord plugged in the retention of the monitor. Is the power LED blinking? yyCheck that the connected input is being displayed. The OSD lock message is enabled (Menu >Input > Input list). yyDisplaying a still image for a prolonged time may be refreshed dozens of times the screen is refreshed per second is called vertical frequency, or refresh rate, and is HDMI...
Owners Manual
Page 23
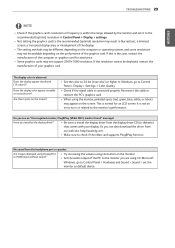
... monitor, Plug&Play (VESA DDC) monitor found" message? Or, you are using. Are images displayed using DisplayPort yyTry increasing the volume using the monitor, pixilated spots (red, green, blue, white, or black) may not be displayed, contact the manufacturer of the display. If the resolution cannot be available depending on the monitor. yyWhen using the button on the performance of the graphics card. or HDMI input without sound? yyNot setting the graphics card to the monitor you can also download...
... monitor, Plug&Play (VESA DDC) monitor found" message? Or, you are using. Are images displayed using DisplayPort yyTry increasing the volume using the monitor, pixilated spots (red, green, blue, white, or black) may not be displayed, contact the manufacturer of the display. If the resolution cannot be available depending on the monitor. yyWhen using the button on the performance of the graphics card. or HDMI input without sound? yyNot setting the graphics card to the monitor you can also download...
Owners Manual
Page 24
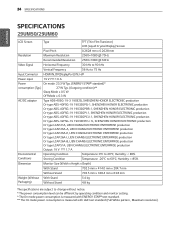
... SPECIFICATIONS 29UM50/29UM60 LCD Screen Type TFT (Thin Film Transistor) LCD (Liquid Crystal Display) Screen Pixel Pitch 0.2628 mm x 0.2628 mm Resolution Maximum Resolution 2560×1080 @ 75Hz Recommended Resolution 2560×1080 @ 60Hz Video Signal Horizontal Frequency 30 kHz to 90 kHz Vertical Frequency 56 Hz to 75 Hz Input Connector HDMI IN, DP(DisplayPort) IN, H/P Power input 19 V 1.6 A Power On mode: 23.3 W Typ. (ENERGY STAR® standard)* consumption (Typ.) 27 W Typ. (Outgoing condition)** Sleep Mode...
... SPECIFICATIONS 29UM50/29UM60 LCD Screen Type TFT (Thin Film Transistor) LCD (Liquid Crystal Display) Screen Pixel Pitch 0.2628 mm x 0.2628 mm Resolution Maximum Resolution 2560×1080 @ 75Hz Recommended Resolution 2560×1080 @ 60Hz Video Signal Horizontal Frequency 30 kHz to 90 kHz Vertical Frequency 56 Hz to 75 Hz Input Connector HDMI IN, DP(DisplayPort) IN, H/P Power input 19 V 1.6 A Power On mode: 23.3 W Typ. (ENERGY STAR® standard)* consumption (Typ.) 27 W Typ. (Outgoing condition)** Sleep Mode...

Owners Manual
Page 25
... Stand 6.4 kg 5.8 kg The specificat ions are subject to 60°C; SPECIFICATIONS 25 ENEGNLGISH SPECIFICATIONS 34UM60 LCD Screen Type TFT (Thin Film Transistor) LCD (Liquid Crystal Display) Screen Pixel Pitch 0.312 mm x 0.310 mm Resolution Maximum Resolution 2560×1080 @ 75 Hz Recommended Resolution 2560×1080 @ 60 Hz Video Signal Horizontal Frequency 30 kHz to 90 kHz Vertical Frequency 56 Hz to 75 Hz Input Connector HDMI IN, DP(DisplayPort) IN, H/P Power input...
... Stand 6.4 kg 5.8 kg The specificat ions are subject to 60°C; SPECIFICATIONS 25 ENEGNLGISH SPECIFICATIONS 34UM60 LCD Screen Type TFT (Thin Film Transistor) LCD (Liquid Crystal Display) Screen Pixel Pitch 0.312 mm x 0.310 mm Resolution Maximum Resolution 2560×1080 @ 75 Hz Recommended Resolution 2560×1080 @ 60 Hz Video Signal Horizontal Frequency 30 kHz to 90 kHz Vertical Frequency 56 Hz to 75 Hz Input Connector HDMI IN, DP(DisplayPort) IN, H/P Power input...
Owners Manual
Page 27
Read the owner's manual (CD) carefully and keep it at hand. MODEL SERIAL ENERGY STAR is intended for home usage. S. This device can be used in all regions. A.,Inc. Refer to the product provides information for more information on the ENERGY STAR ...set of Conformity Trade Name: LG Model : 29UM50,29UM60,34UM60 Responsible Party: LG Electronics Inc. As an ENERGY STAR Partner LGE U. Englewood Cliffs NJ 07632 U.S.A TEL: 201-266-2534 *above information is only for USA FCC Regulatory This device meets the EMC requirements for energy efficiency. Declaration of power-saving ...
Read the owner's manual (CD) carefully and keep it at hand. MODEL SERIAL ENERGY STAR is intended for home usage. S. This device can be used in all regions. A.,Inc. Refer to the product provides information for more information on the ENERGY STAR ...set of Conformity Trade Name: LG Model : 29UM50,29UM60,34UM60 Responsible Party: LG Electronics Inc. As an ENERGY STAR Partner LGE U. Englewood Cliffs NJ 07632 U.S.A TEL: 201-266-2534 *above information is only for USA FCC Regulatory This device meets the EMC requirements for energy efficiency. Declaration of power-saving ...


