Owners Manual
Page 1
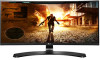
Please read the safety information carefully before using the product. IPS LED Monitor (LED Monitor) Model List 29UC88 www.lg.com Owner's Manual IPS LED MONITOR (LED MONITOR*) *LG LED Monitors are LCD Monitors with LED Backlighting.
Please read the safety information carefully before using the product. IPS LED Monitor (LED Monitor) Model List 29UC88 www.lg.com Owner's Manual IPS LED MONITOR (LED MONITOR*) *LG LED Monitors are LCD Monitors with LED Backlighting.
Owners Manual
Page 2
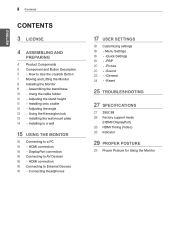
... - Menu Settings 18 - -Quick Settings 19 - -PBP 20 - -Picture 22 - -Sound 23 - -General 24 - -Reset 25 TROUBLESHOOTING 27 SPECIFICATIONS 27 29UC88 28 Factory support mode (HDMI/ DisplayPort) 28 HDMI Timing (Video) 28 Indicator 29 PROPER POSTURE 29 Proper Posture for Using the Monitor Assembling the stand base 10 - Installing the wall mount plate 14 - Installing to a wall 15 USING THE MONITOR 15 Connecting to Use the Joystick Button 7 Moving and Lifting the Monitor 8 Installing the Monitor 8 - Installing onto a table 12 - How to a PC 15 - Adjusting the stand height...
... - Menu Settings 18 - -Quick Settings 19 - -PBP 20 - -Picture 22 - -Sound 23 - -General 24 - -Reset 25 TROUBLESHOOTING 27 SPECIFICATIONS 27 29UC88 28 Factory support mode (HDMI/ DisplayPort) 28 HDMI Timing (Video) 28 Indicator 29 PROPER POSTURE 29 Proper Posture for Using the Monitor Assembling the stand base 10 - Installing the wall mount plate 14 - Installing to a wall 15 USING THE MONITOR 15 Connecting to Use the Joystick Button 7 Moving and Lifting the Monitor 8 Installing the Monitor 8 - Installing onto a table 12 - How to a PC 15 - Adjusting the stand height...
Owners Manual
Page 3
VESA, VESA logo, Display Port Compliance Logo and Display Port Compliance Logo for more information on display if there is set to be disabled, change the option to 'Off' in OSD menu of HDMI Licensing LLC in 4 hours after you turned on the license. The following content is only applied to the monitor which is sold in Europe market and which needs to meet the ErP Directive...
VESA, VESA logo, Display Port Compliance Logo and Display Port Compliance Logo for more information on display if there is set to be disabled, change the option to 'Off' in OSD menu of HDMI Licensing LLC in 4 hours after you turned on the license. The following content is only applied to the monitor which is sold in Europe market and which needs to meet the ErP Directive...
Owners Manual
Page 5
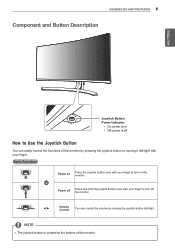
... the monitor. ◄/► Volume Control You can easily control the functions of the monitor. ASSEMBLING AND PREPARING 5 Component and Button Description ENEGNLGISH Joystick Button Power Indicator yyOn: power is on yyOff: power is located at the bottom of the monitor by moving it left /right. Basic Functions Power on the monitor. Power off Press and hold the joystick button once with your finger to turn off...
... the monitor. ◄/► Volume Control You can easily control the functions of the monitor. ASSEMBLING AND PREPARING 5 Component and Button Description ENEGNLGISH Joystick Button Power Indicator yyOn: power is on yyOff: power is located at the bottom of the monitor by moving it left /right. Basic Functions Power on the monitor. Power off Press and hold the joystick button once with your finger to turn off...
Owners Manual
Page 10
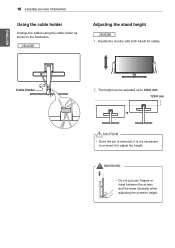
10 ASSEMBLING AND PREPARING Using the cable holder Arrange the cables using the cable holder as shown in the illustration. 29UC88 29UC88 Adjusting the stand height 1 Handle the monitor with both hands for safety. ENEGNLGISH Cable Holder 2 The height can be adjusted up to 120.0 mm. 120.0 mm CAUTION yyOnce the pin is removed, it is not necessary to re-insert it to adjust the height. WARNING yyDo not put your fingers or hand between the screen and the base (chassis) when adjusting the screen's height.
10 ASSEMBLING AND PREPARING Using the cable holder Arrange the cables using the cable holder as shown in the illustration. 29UC88 29UC88 Adjusting the stand height 1 Handle the monitor with both hands for safety. ENEGNLGISH Cable Holder 2 The height can be adjusted up to 120.0 mm. 120.0 mm CAUTION yyOnce the pin is removed, it is not necessary to re-insert it to adjust the height. WARNING yyDo not put your fingers or hand between the screen and the base (chassis) when adjusting the screen's height.
Owners Manual
Page 11
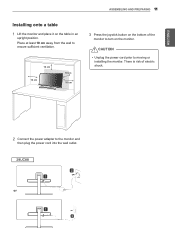
ENEGNLGISH ASSEMBLING AND PREPARING 11 Installing onto a table 1 Lift the monitor and place it on the monitor. or Place at least 10 cm away from the wall to ensure sufficient ventilation. 10 cm 10 cm 10 cm 10 cm 3 Press the joystick button on the bottom of electric shock. 2 Connect the power adapter to the monitor and then plug the power cord into the wall outlet. CAUTION yyUnplug the power cord prior to turn on the table in an upright position. There is risk of the monitor to moving or installing the monitor.
ENEGNLGISH ASSEMBLING AND PREPARING 11 Installing onto a table 1 Lift the monitor and place it on the monitor. or Place at least 10 cm away from the wall to ensure sufficient ventilation. 10 cm 10 cm 10 cm 10 cm 3 Press the joystick button on the bottom of electric shock. 2 Connect the power adapter to the monitor and then plug the power cord into the wall outlet. CAUTION yyUnplug the power cord prior to turn on the table in an upright position. There is risk of the monitor to moving or installing the monitor.
Owners Manual
Page 13
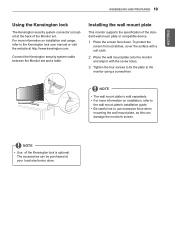
... the Monitor set and a table. Installing the wall mount plate This monitor supports the specification of the standard wall mount plate or compatible device. 1 Place the screen face down. yyFor more information on installation, refer to the Kensington lock user manual or visit the website at http://www.kensington.com. Connect the Kensington security system cable between the Monitor set . The accessories can damage the monitor's screen. To protect the screen from scratches, cover...
... the Monitor set and a table. Installing the wall mount plate This monitor supports the specification of the standard wall mount plate or compatible device. 1 Place the screen face down. yyFor more information on installation, refer to the Kensington lock user manual or visit the website at http://www.kensington.com. Connect the Kensington security system cable between the Monitor set . The accessories can damage the monitor's screen. To protect the screen from scratches, cover...

Owners Manual
Page 14
Detailed installation instructions can be covered by the product warranty. Model 29UC88 Wall Mount (A x B) Standard screw Number of screws Wall Mount Plate (Optional) 75 x 75 M4 x L10 4 RW120 yyWall Mount (A x B) AB CAUTION yyUnplug the power cord before moving or in the monitor falling off, which could lead to injury. yyScrew length from outer surface of back cover should be covered by the product warranty. yyThe wall mounting bracket is used. yyFor more...
Detailed installation instructions can be covered by the product warranty. Model 29UC88 Wall Mount (A x B) Standard screw Number of screws Wall Mount Plate (Optional) 75 x 75 M4 x L10 4 RW120 yyWall Mount (A x B) AB CAUTION yyUnplug the power cord before moving or in the monitor falling off, which could lead to injury. yyScrew length from outer surface of back cover should be covered by the product warranty. yyThe wall mounting bracket is used. yyFor more...
Owners Manual
Page 15
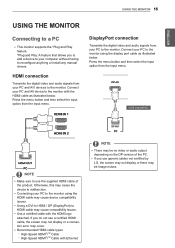
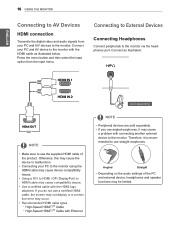
... of the product. yyIf you do not use generic cables not certified by LG, the screen may not display or there may occur. HDMI connection Transmits the digital video and audio signals from the input menu. (sold separately) NOTE yy Make sure to reconfigure anything or install any manual drivers. Press the menu button and then select the input option from your computer without having to use the supplied HDMI cable of the PC.
... of the product. yyIf you do not use generic cables not certified by LG, the screen may not display or there may occur. HDMI connection Transmits the digital video and audio signals from the input menu. (sold separately) NOTE yy Make sure to reconfigure anything or install any manual drivers. Press the menu button and then select the input option from your computer without having to use the supplied HDMI cable of the PC.
Owners Manual
Page 16
... Depending on the audio settings of the PC and external device, headphones and speaker functions may cause a problem with Ethernet NOTE yy Peripheral devices are sold separately) NOTE yy Make sure to use the supplied HDMI cable of the product. Connecting to External Devices Connecting Headphones Connect peripherals to the monitor using the HDMI cable may occur. Press the menu button and then select the input option from your...
... Depending on the audio settings of the PC and external device, headphones and speaker functions may cause a problem with Ethernet NOTE yy Peripheral devices are sold separately) NOTE yy Make sure to use the supplied HDMI cable of the product. Connecting to External Devices Connecting Headphones Connect peripherals to the monitor using the HDMI cable may occur. Press the menu button and then select the input option from your...
Owners Manual
Page 17
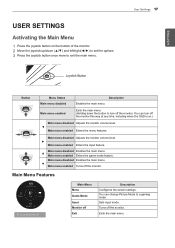
...can change Picture Mode to a gaming mode. Main menu disabled Enables the main menu. ▼ Main menu enabled Turns off Exit Description Configures the screen settings. Main Menu Features Main Menu Menu Game Mode Input Monitor off the monitor. Turns off the monitor. You can turn off the monitor. Sets input mode. Main menu disabled Adjusts the monitor volume level. ► Main menu enabled Enters the input feature. Joystick Button User Settings 17 Button Menu Status Main menu disabled Description Enables the main menu. Exits the main menu. Main menu disabled...
...can change Picture Mode to a gaming mode. Main menu disabled Enables the main menu. ▼ Main menu enabled Turns off Exit Description Configures the screen settings. Main Menu Features Main Menu Menu Game Mode Input Monitor off the monitor. Turns off the monitor. You can turn off the monitor. Sets input mode. Main menu disabled Adjusts the monitor volume level. ► Main menu enabled Enters the input feature. Joystick Button User Settings 17 Button Menu Status Main menu disabled Description Enables the main menu. Exits the main menu. Main menu disabled...
Owners Manual
Page 18
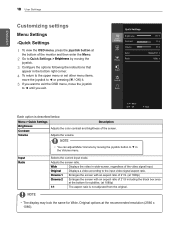
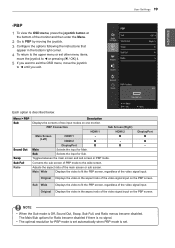
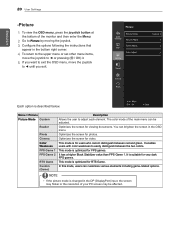
... the black box area at the bottom for Wide, Original options at the recommended resolution (2560 x 1080). Adjusts the screen ratio. yyThe display may look the same for subtitles. (at 1080p) 1:1 The aspect ratio is described below. Menu > Quick Settings Brightness Contrast Volume Description Adjusts the color contrast and brightness of the video signal input. ENEGNLGISH 18 User Settings Customizing settings Menu Settings -Quick Settings 1 To view the OSD menu, press the joystick button at the bottom of the monitor and...
... the black box area at the bottom for Wide, Original options at the recommended resolution (2560 x 1080). Adjusts the screen ratio. yyThe display may look the same for subtitles. (at 1080p) 1:1 The aspect ratio is described below. Menu > Quick Settings Brightness Contrast Volume Description Adjusts the color contrast and brightness of the video signal input. ENEGNLGISH 18 User Settings Customizing settings Menu Settings -Quick Settings 1 To view the OSD menu, press the joystick button at the bottom of the monitor and...
Owners Manual
Page 19
... the input for PBP mode is set automatically when PBP mode is no signal. Main Wide Displays the video to the wide screen. yy The optimal resolution for Main. User Settings 19 Each option is Off, Sound Out, Swap, Sub Full, and Ratio menus become disabled if there is set other menu items, move the joystick to ◄ or pressing ( / OK) it. 5 If you want to exit the OSD menu...
... the input for PBP mode is set automatically when PBP mode is no signal. Main Wide Displays the video to the wide screen. yy The optimal resolution for Main. User Settings 19 Each option is Off, Sound Out, Swap, Sub Full, and Ratio menus become disabled if there is set other menu items, move the joystick to ◄ or pressing ( / OK) it. 5 If you want to exit the OSD menu...
Owners Manual
Page 20
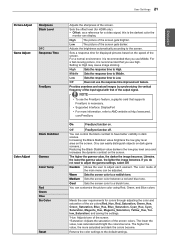
... games. Optimizes the screen for photos. This mode is described below. The color mode of the monitor and then enter the Menu. 2 Go to Picture by moving the joystick. 3 Configure the options following the instructions that appear in the OSD menu. It enables users with color weakness to adjust each element. It has a higher Black Stabilizer value than FPS Game 1. Optimizes the screen for video. Optimizes the screen for FPS...
... games. Optimizes the screen for photos. This mode is described below. The color mode of the monitor and then enter the Menu. 2 Go to Picture by moving the joystick. 3 Configure the options following the instructions that appear in the OSD menu. It enables users with color weakness to adjust each element. It has a higher Black Stabilizer value than FPS Game 1. Optimizes the screen for video. Optimizes the screen for FPS...
Owners Manual
Page 21
... value, the darker the image becomes. User Settings 21 ENEGNLGISH Picture Adjust Sharpness Black Level Game Adjust DFC Response Time FreeSync Black Stabilizer Color Adjust Gamma Color Temp Red Green Blue Six Color Reset Adjusts the sharpness of the input signal with that you use the response time improvement feature. Sets the offset level (for a video signal, this is recommended that of the screen colors. Sets a response time for colors through adjusting the color and saturation of the six...
... value, the darker the image becomes. User Settings 21 ENEGNLGISH Picture Adjust Sharpness Black Level Game Adjust DFC Response Time FreeSync Black Stabilizer Color Adjust Gamma Color Temp Red Green Blue Six Color Reset Adjusts the sharpness of the input signal with that you use the response time improvement feature. Sets the offset level (for a video signal, this is recommended that of the screen colors. Sets a response time for colors through adjusting the color and saturation of the six...
Owners Manual
Page 22
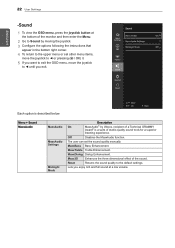
... User Settings -Sound 1 To view the OSD menu, press the joystick button at a low volume. Each option is a suite of the sound. MaxxBass Bass Enhancement. Menu > Sound MaxxAudio MaxxAudio MaxxAudio Settings Midnight Mode Description On MaxxAudio® by moving the joystick. 3 Configure the options following the instructions that appear in the bottom right corner. 4 To return to the upper menu or set the sound quality manually. The user can set...
... User Settings -Sound 1 To view the OSD menu, press the joystick button at a low volume. Each option is a suite of the sound. MaxxBass Bass Enhancement. Menu > Sound MaxxAudio MaxxAudio MaxxAudio Settings Midnight Mode Description On MaxxAudio® by moving the joystick. 3 Configure the options following the instructions that appear in the bottom right corner. 4 To return to the upper menu or set the sound quality manually. The user can set...
Owners Manual
Page 23
... the instructions that automatically turns off . High Saves energy using the low-efficiency SMART ENERGY SAVING feature. Off The power LED turns off the monitor when there is no movement on source. Off Enables key input. User Settings 23 Each option is High or Low, monitor luminance become higher or lower depend on the screen for the auto-off . NOTE yy All features are disabled except Brightness, Contrast, Volume, Input in Quick Settings, OSD Lock...
... the instructions that automatically turns off . High Saves energy using the low-efficiency SMART ENERGY SAVING feature. Off The power LED turns off the monitor when there is no movement on source. Off Enables key input. User Settings 23 Each option is High or Low, monitor luminance become higher or lower depend on the screen for the auto-off . NOTE yy All features are disabled except Brightness, Contrast, Volume, Input in Quick Settings, OSD Lock...
Owners Manual
Page 25
... power cable connection and press the power button. yyThis occurs when signals transferred from the PC (graphics card) are out of the horizontal or vertical frequency range of times the screen is refreshed per second, like a fluorescent lamp. The OSD lock message is being displayed? Are some functions not avail-able when you select the appropriate resolution? yyThe OSD is enabled (Menu > Quick Settings > Input). Screen display is unstable and shaky / Images displayed on and the power LED displaying white...
... power cable connection and press the power button. yyThis occurs when signals transferred from the PC (graphics card) are out of the horizontal or vertical frequency range of times the screen is refreshed per second, like a fluorescent lamp. The OSD lock message is being displayed? Are some functions not avail-able when you select the appropriate resolution? yyThe OSD is enabled (Menu > Quick Settings > Input). Screen display is unstable and shaky / Images displayed on and the power LED displaying white...
Owners Manual
Page 26
... (16 colors)? yyBe sure to the monitor's performance. On Microsoft Windows, go to the recommended (optimal) resolution in blurred text, a dimmed screen, a truncated display area, or misalignment of the computer or graphics card for an LCD screen. yySet the color to Control Panel > Hardware and Sound > Sound > set it related to install the display driver from the headphone port or speaker. yyTry increasing the volume using DisplayPort or HDMI input without sound? If the resolution cannot be...
... (16 colors)? yyBe sure to the monitor's performance. On Microsoft Windows, go to the recommended (optimal) resolution in blurred text, a dimmed screen, a truncated display area, or misalignment of the computer or graphics card for an LCD screen. yySet the color to Control Panel > Hardware and Sound > Sound > set it related to install the display driver from the headphone port or speaker. yyTry increasing the volume using DisplayPort or HDMI input without sound? If the resolution cannot be...
Owners Manual
Page 27
... SPECIFICATIONS 29UC88 LCD Screen Resolution Video Signal Input Connector Power AC/DC adaptor Environmental Conditions Audio Output Stand Angle Adjustment Dimension Weight (Without Packaging) Type TFT (Thin Film Transistor) LCD (Liquid Crystal Display) Screen Pixel Pitch 0.2628 mm x 0.2628 mm Maximum Resolution 2560 x 1080 @ 60 Hz Recommended Resolution 2560 x 1080 @ 60 Hz Horizontal Frequency 30 kHz to 90 kHz Vertical Frequency HDMI:(AV)25Hz to 60 Hz (PC)56Hz to75 Hz DP: 56 Hz to change...
... SPECIFICATIONS 29UC88 LCD Screen Resolution Video Signal Input Connector Power AC/DC adaptor Environmental Conditions Audio Output Stand Angle Adjustment Dimension Weight (Without Packaging) Type TFT (Thin Film Transistor) LCD (Liquid Crystal Display) Screen Pixel Pitch 0.2628 mm x 0.2628 mm Maximum Resolution 2560 x 1080 @ 60 Hz Recommended Resolution 2560 x 1080 @ 60 Hz Horizontal Frequency 30 kHz to 90 kHz Vertical Frequency HDMI:(AV)25Hz to 60 Hz (PC)56Hz to75 Hz DP: 56 Hz to change...


