

Owners Manual - English
Page 1
Please read the safety information carefully before using the product. 27MU67 www.lg.com Owner's Manual IPS LED MONITOR (LED MONITOR*) * Disclaimer: LG LED Monitor applies LCD screen with LED backlights.
Please read the safety information carefully before using the product. 27MU67 www.lg.com Owner's Manual IPS LED MONITOR (LED MONITOR*) * Disclaimer: LG LED Monitor applies LCD screen with LED backlights.
Owners Manual - English
Page 2
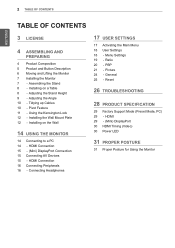
...Settings 18 - Picture 24 - Pivot Feature 11 - Using the Kensington Lock 12 - Installing on a Table 8 - Installing on the Wall 14 USING THE MONITOR 14 Connecting to a PC 14 - Tidying up Cables 10 - PBP 21 - Menu Settings 19 - HDMI 29 - (Mini) DisplayPort 30 HDMI Timing (...Video) 30 Power LED 31 PROPER POSTURE 31 Proper Posture for Using the Monitor Assembling the Stand 8 - General 25 - Reset 26 TROUBLESHOOTING 28 PRODUCT SPECIFICATION 29 Factory Support Mode (Preset Mode, PC) 29 - Adjusting the Angle ...
...Settings 18 - Picture 24 - Pivot Feature 11 - Using the Kensington Lock 12 - Installing on a Table 8 - Installing on the Wall 14 USING THE MONITOR 14 Connecting to a PC 14 - Tidying up Cables 10 - PBP 21 - Menu Settings 19 - HDMI 29 - (Mini) DisplayPort 30 HDMI Timing (...Video) 30 Power LED 31 PROPER POSTURE 31 Proper Posture for Using the Monitor Assembling the Stand 8 - General 25 - Reset 26 TROUBLESHOOTING 28 PRODUCT SPECIFICATION 29 Factory Support Mode (Preset Mode, PC) 29 - Adjusting the Angle ...

Owners Manual - English
Page 5
yy All of the buttons are touch sensitive and can be operated simply by touching them on the rear side of the monitor with your finger. Product and Button Description ASSEMBLING AND PREPARING 5 ENGLISH Power LED AC-IN On Switch PHQX Monitor buttons (Power Button) HDMI IN 1 HDMI IN 2 DP IN MiniDP IN H/P Input Connector NOTE yy Before turning on the monitor, please make sure that the switch on the bottom of product is On.
yy All of the buttons are touch sensitive and can be operated simply by touching them on the rear side of the monitor with your finger. Product and Button Description ASSEMBLING AND PREPARING 5 ENGLISH Power LED AC-IN On Switch PHQX Monitor buttons (Power Button) HDMI IN 1 HDMI IN 2 DP IN MiniDP IN H/P Input Connector NOTE yy Before turning on the monitor, please make sure that the switch on the bottom of product is On.

Owners Manual - English
Page 6
...may result in the original box or packing material before attempting to move it from being scratched. yy Before moving the monitor, keep it upright and never turn the monitor on its shape or size. yy Hold the bottom and side of the pixels used to create images. yy When ... toward you to prevent it . CAUTION yy Avoid touching the monitor screen as much as possible. -- yy When transporting the monitor, do not expose the monitor to the screen or some of the monitor frame firmly. yy When moving or lifting the monitor, disconnect the power cord and all other cables. ENGLISH 6 ...
...may result in the original box or packing material before attempting to move it from being scratched. yy Before moving the monitor, keep it upright and never turn the monitor on its shape or size. yy Hold the bottom and side of the pixels used to create images. yy When ... toward you to prevent it . CAUTION yy Avoid touching the monitor screen as much as possible. -- yy When transporting the monitor, do not expose the monitor to the screen or some of the monitor frame firmly. yy When moving or lifting the monitor, disconnect the power cord and all other cables. ENGLISH 6 ...

Owners Manual - English
Page 7
...can disassemble the stand in this way will not be covered by just holding the base. yy When lifting or moving the monitor, do not touch the monitor screen. The force applied to the monitor screen may cause damage to it. yy Applying excessive force when tightening screws may cause damage to the... the stand body before assembling the stand. 3 CAUTION yy To protect the screen from the actual product. ENGLISH Installing the Monitor Assembling the Stand 1 2 Stand Body ASSEMBLING AND PREPARING 7 4 Stand Base 5 Tape CAUTION yy Remove the tape attached to fall off the stand and could ...
...can disassemble the stand in this way will not be covered by just holding the base. yy When lifting or moving the monitor, do not touch the monitor screen. The force applied to the monitor screen may cause damage to it. yy Applying excessive force when tightening screws may cause damage to the... the stand body before assembling the stand. 3 CAUTION yy To protect the screen from the actual product. ENGLISH Installing the Monitor Assembling the Stand 1 2 Stand Body ASSEMBLING AND PREPARING 7 4 Stand Base 5 Tape CAUTION yy Remove the tape attached to fall off the stand and could ...
Owners Manual - English
Page 8
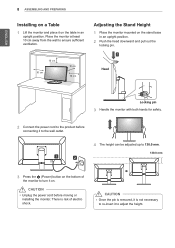
... from the wall to ensure sufficient ventilation. There is not necessary to re-insert it to adjust the height. Adjusting the Stand Height 1 Place the monitor mounted on the stand base in an upright position. CAUTION yy Unplug the power cord before connecting it to the wall outlet. 4 The height can...) button on the bottom of electric shock. CAUTION yy Once the pin is removed, it is risk of the monitor to turn it on. ENGLISH 8 ASSEMBLING AND PREPARING Installing on a Table 1 Lift the monitor and place it on the table in an upright position. 2 Push the head downward and pull out the...
... from the wall to ensure sufficient ventilation. There is not necessary to re-insert it to adjust the height. Adjusting the Stand Height 1 Place the monitor mounted on the stand base in an upright position. CAUTION yy Unplug the power cord before connecting it to the wall outlet. 4 The height can...) button on the bottom of electric shock. CAUTION yy Once the pin is removed, it is risk of the monitor to turn it on. ENGLISH 8 ASSEMBLING AND PREPARING Installing on a Table 1 Lift the monitor and place it on the table in an upright position. 2 Push the head downward and pull out the...

Owners Manual - English
Page 9
... the angle of the screen. WARNING yy To avoid injury to the fingers when adjusting the screen, do not hold the lower part of the monitor. 35 -5 3 You can be adjusted forward or backward from -5° to the right. 45˚ 45˚ Install the product on the stand base in... screen's height. yy Be careful not to swivel smoothly. ENGLISH ASSEMBLING AND PREPARING 9 WARNING yy Do not put your fingers or hand between the monitor and the wall. Adjusting the Angle 1 Place the monitor mounted on a flat surface to touch or press the scr3e5 e-5n area when adjusting the angle of the...
... the angle of the screen. WARNING yy To avoid injury to the fingers when adjusting the screen, do not hold the lower part of the monitor. 35 -5 3 You can be adjusted forward or backward from -5° to the right. 45˚ 45˚ Install the product on the stand base in... screen's height. yy Be careful not to swivel smoothly. ENGLISH ASSEMBLING AND PREPARING 9 WARNING yy Do not put your fingers or hand between the monitor and the wall. Adjusting the Angle 1 Place the monitor mounted on a flat surface to touch or press the scr3e5 e-5n area when adjusting the angle of the...

Owners Manual - English
Page 10
Head Stand WARNING yy To avoid scratching the stand base, make contact with the monitor. 1 Raise the monitor to rotate 90° clockwise. Pivot Feature The pivot feature allows the monitor to the maximum height. 2 Adjust the angle of the monitor in the direction of the arrow as shown in the figure. 35° ENGLISH 10 ASSEMBLING AND PREPARING Tidying up Cables Arrange the cables using the pivot feature, the stand does not make sure that when rotating the monitor using the cable holder as shown in the illustration.
Head Stand WARNING yy To avoid scratching the stand base, make contact with the monitor. 1 Raise the monitor to rotate 90° clockwise. Pivot Feature The pivot feature allows the monitor to the maximum height. 2 Adjust the angle of the monitor in the direction of the arrow as shown in the figure. 35° ENGLISH 10 ASSEMBLING AND PREPARING Tidying up Cables Arrange the cables using the pivot feature, the stand does not make sure that when rotating the monitor using the cable holder as shown in the illustration.

Owners Manual - English
Page 11
...screen pivot shortcut key provided with your fingers between the display and the stand base. 4 Complete the installation by rotating the moni- Connect the monitor to the Kensington lock owner's manual or visit the website at all. NOTE yy Auto Pivot feature of the... Monitor set. WARNING yy Take care when rotating the monitor if the cable is optional. yy The screen can obtain optional accessories from most electronics stores. Note that some Windows versions and ...
...screen pivot shortcut key provided with your fingers between the display and the stand base. 4 Complete the installation by rotating the moni- Connect the monitor to the Kensington lock owner's manual or visit the website at all. NOTE yy Auto Pivot feature of the... Monitor set. WARNING yy Take care when rotating the monitor if the cable is optional. yy The screen can obtain optional accessories from most electronics stores. Note that some Windows versions and ...
Owners Manual - English
Page 12
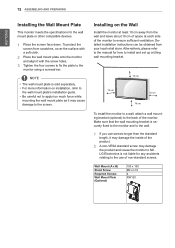
...wall mount plate or other compatible devices. 1 Place the screen face down. 12 ASSEMBLING AND PREPARING ENGLISH Installing the Wall Mount Plate This monitor meets the specifications for how to install and set up a tilting wall mounting bracket. 10 cm 10 cm 10 cm 10 cm To ...with the screw holes. 3 Tighten the four screws to fix the plate to the monitor using a screwdriver. Wall Mount (A x B) Stand Screw Required Screws Wall Mount Plate (Optional) 100 x 100 M4 x L10 4 RW120 LG Electronics is not liable for any accidents relating to the use screws longer than the standard...
...wall mount plate or other compatible devices. 1 Place the screen face down. 12 ASSEMBLING AND PREPARING ENGLISH Installing the Wall Mount Plate This monitor meets the specifications for how to install and set up a tilting wall mounting bracket. 10 cm 10 cm 10 cm 10 cm To ...with the screw holes. 3 Tighten the four screws to fix the plate to the monitor using a screwdriver. Wall Mount (A x B) Stand Screw Required Screws Wall Mount Plate (Optional) 100 x 100 M4 x L10 4 RW120 LG Electronics is not liable for any accidents relating to the use screws longer than the standard...
Owners Manual - English
Page 13
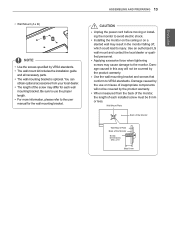
... to the user manual for each installed screw must be 8 mm or less. yy Use the wall mounting bracket and screws that conform to the monitor. yy The wall mount kit includes the installation guide and all necessary parts. ASSEMBLING AND PREPARING 13 ENGLISH yy Wall Mount (A x B) AB NOTE... yy Use the screws specified by the use the proper length. Use an authorized LG wall mount and contact the local dealer or qualified personnel. yy Applying excessive force when tightening screws may cause damage to VESA standards. yy The...
... to the user manual for each installed screw must be 8 mm or less. yy Use the wall mounting bracket and screws that conform to the monitor. yy The wall mount kit includes the installation guide and all necessary parts. ASSEMBLING AND PREPARING 13 ENGLISH yy Wall Mount (A x B) AB NOTE... yy Use the screws specified by the use the proper length. Use an authorized LG wall mount and contact the local dealer or qualified personnel. yy Applying excessive force when tightening screws may cause damage to VESA standards. yy The...
Owners Manual - English
Page 14
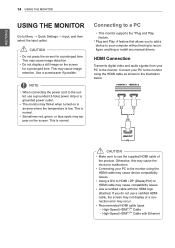
...red, green, or blue spots may cause image retention. HDMI IN 1 HDMI IN 2 CAUTIHODNMI IN 1 HDMI IN 2 yy Make sure to the monitor. Otherwise, this may occur. yy Connecting your PC to use a grounded (3-hole) power strip or a grounded power outlet. yy Use a certified ...the illustration below. Use a screensaver if possible. HDMI Connection Transmits digital video and audio signals from your PC to malfunction. yy The monitor may cause compatibility issues. Connect your computer without having to HDMI cable may flicker when turned on the screen for a prolonged time....
...red, green, or blue spots may cause image retention. HDMI IN 1 HDMI IN 2 CAUTIHODNMI IN 1 HDMI IN 2 yy Make sure to the monitor. Otherwise, this may occur. yy Connecting your PC to use a grounded (3-hole) power strip or a grounded power outlet. yy Use a certified ...the illustration below. Use a screensaver if possible. HDMI Connection Transmits digital video and audio signals from your PC to malfunction. yy The monitor may cause compatibility issues. Connect your computer without having to HDMI cable may flicker when turned on the screen for a prolonged time....

Owners Manual - English
Page 15
... the PC. yy Make sure to use the supplied HDMI cable of the product. yy If you do not use generic cables not certified by LG, the screen may not display or there may occur. High-Speed HDMI®/TM Cable with the HDMI logo attached. ENGLISH Using the... of the product. yy Using a DVI to HDMI / DP (DisplayPort) to HDMI cable may cause the device to the monitor using the HDMI cable as shown in the illustration below. Connect the monitor to your PC using the displayport cable as shown in the illustration below: DisplayPort DP IN Connecting AV Devices...
... the PC. yy Make sure to use the supplied HDMI cable of the product. yy If you do not use generic cables not certified by LG, the screen may not display or there may occur. High-Speed HDMI®/TM Cable with the HDMI logo attached. ENGLISH Using the... of the product. yy Using a DVI to HDMI / DP (DisplayPort) to HDMI cable may cause the device to the monitor using the HDMI cable as shown in the illustration below. Connect the monitor to your PC using the displayport cable as shown in the illustration below: DisplayPort DP IN Connecting AV Devices...
Owners Manual - English
Page 16
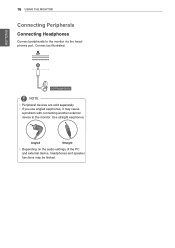
HDMI IN 1 HDMI IN 2 Connect as illustrated. Use straight earphones. H/P (sold separately) NOTE yy Peripheral devices are sold separately. Angled Straight yy Depending on the audio settings of the PC and external device, headphones and speaker functions may cause a problem with connecting another external device to the monitor via the headphones port. ENGLISH 16 Using the Monitor Connecting Peripherals Connecting Headphones Connect peripherals to the monitor. HDMI IN 1yyHIDf yMoIuINu2se angled earphones, it may be limited.
HDMI IN 1 HDMI IN 2 Connect as illustrated. Use straight earphones. H/P (sold separately) NOTE yy Peripheral devices are sold separately. Angled Straight yy Depending on the audio settings of the PC and external device, headphones and speaker functions may cause a problem with connecting another external device to the monitor via the headphones port. ENGLISH 16 Using the Monitor Connecting Peripherals Connecting Headphones Connect peripherals to the monitor. HDMI IN 1yyHIDf yMoIuINu2se angled earphones, it may be limited.
Owners Manual - English
Page 17
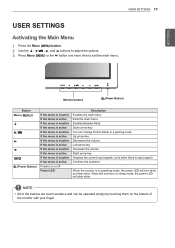
Power LED Description Enables the main menu. Up arrow key Decreases the volume. PHQX Monitor buttons (Power Button) PHQX Button Menu ( PHQX ) (Power Button) If the menu is inactive If the menu... to exit the main menu. Left arrow key Increases the volume. When the monitor is in operating mode, the power LED will turn white and then dims. When the monitor is in sleep mode, the power LED will blink white. ENGLISH User Settings ...options. 3 PPHreQsXs Menu ( ) or the button one more time to a gaming mode. Enables/disables Mute. NOTE yy All of the monitor with your finger.
Power LED Description Enables the main menu. Up arrow key Decreases the volume. PHQX Monitor buttons (Power Button) PHQX Button Menu ( PHQX ) (Power Button) If the menu is inactive If the menu... to exit the main menu. Left arrow key Increases the volume. When the monitor is in operating mode, the power LED will turn white and then dims. When the monitor is in sleep mode, the power LED will blink white. ENGLISH User Settings ...options. 3 PPHreQsXs Menu ( ) or the button one more time to a gaming mode. Enables/disables Mute. NOTE yy All of the monitor with your finger.
Owners Manual - English
Page 18
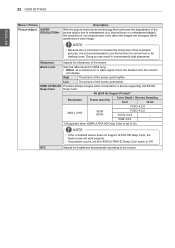
..., FreeSync, and Black Stabilizer. yy When you enter the menu, instructions on one monitor. Color Adjust Adjusts Gamma, Color Temperature, Red, Green, Blue, and Six Color. CAUTION yy Your monitor's OSD (On Screen Display) may differ slightly from that shown in the Volume menu... Exit Exits the OSD menu. Picture Adjust Adjusts SUPER RESOLUTION+, Sharpness, Black Level, HDMI ULTRA HD Deep Color, and DFC of the monitor. Adjusts Language, SMART ENERGY SAVING, Power LED, Automatic Standby, DisplayPort 1.2, and OSD Lock. Adjusts the volume level. Restores the default ...
..., FreeSync, and Black Stabilizer. yy When you enter the menu, instructions on one monitor. Color Adjust Adjusts Gamma, Color Temperature, Red, Green, Blue, and Six Color. CAUTION yy Your monitor's OSD (On Screen Display) may differ slightly from that shown in the Volume menu... Exit Exits the OSD menu. Picture Adjust Adjusts SUPER RESOLUTION+, Sharpness, Black Level, HDMI ULTRA HD Deep Color, and DFC of the monitor. Adjusts Language, SMART ENERGY SAVING, Power LED, Automatic Standby, DisplayPort 1.2, and OSD Lock. Adjusts the volume level. Restores the default ...
Owners Manual - English
Page 19
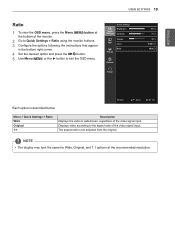
... Displays the video in the bottom right corner. ENGLISH User Settings 19 Ratio 1 To view the OSD menu, press the Menu ( the bottom of the monitor. ) button at the recommended resolution. PH4QXSet the desired option and press the button. 5PHUQsXe Menu ( ) or the button to the aspect ratio of the video... exit the OSD menu. NOTE yy The display may look the same for Wide, Original, and 1:1 options at 2 Go to Quick Settings > Ratio using the monitor buttons. 3 Configure the options following the instructions that appear in widescreen, regardless of the video signal input.
... Displays the video in the bottom right corner. ENGLISH User Settings 19 Ratio 1 To view the OSD menu, press the Menu ( the bottom of the monitor. ) button at the recommended resolution. PH4QXSet the desired option and press the button. 5PHUQsXe Menu ( ) or the button to the aspect ratio of the video... exit the OSD menu. NOTE yy The display may look the same for Wide, Original, and 1:1 options at 2 Go to Quick Settings > Ratio using the monitor buttons. 3 Configure the options following the instructions that appear in widescreen, regardless of the video signal input.
Owners Manual - English
Page 20
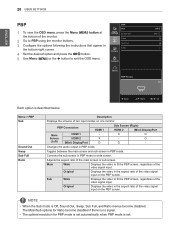
... for Ratio become disabled. X O Screen HDMI 2 X - 20 User Settings ENGLISH PBP 1 To view the OSD menu, press the Menu ( the bottom of the monitor. ) button at 2 Go to PBP using the monitor buttons. 3 Configure the options following the instructions that appear in the aspect ratio of the video signal input on one... monitor. Main Wide Displays the video to fit the PBP screen, regardless of the main screen or sub screen. NOTE yy When the Sub mode is ...
... for Ratio become disabled. X O Screen HDMI 2 X - 20 User Settings ENGLISH PBP 1 To view the OSD menu, press the Menu ( the bottom of the monitor. ) button at 2 Go to PBP using the monitor buttons. 3 Configure the options following the instructions that appear in the aspect ratio of the video signal input on one... monitor. Main Wide Displays the video to fit the PBP screen, regardless of the main screen or sub screen. NOTE yy When the Sub mode is ...
Owners Manual - English
Page 21
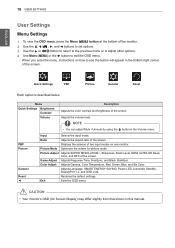
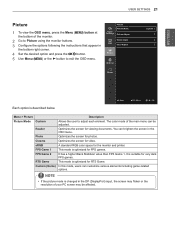
...and press the button. 5PHUQsXe Menu ( ) or the button to adjust each element. This mode is optimized for FPS games. Optimizes the screen for the monitor and printer. Quick Settings Picture Picture Mode Picture Adjust PBP Game Adjust Color Adjust Picture General Reset Custom > > > > Each option is described below.... exit the OSD menu. ENGLISH User Settings 21 Picture 1 To view the OSD menu, press the Menu ( the bottom of the monitor. ) button at 2 Go to Picture using the monitor buttons. 3 Configure the options following the instructions that appear in the OSD menu.
...and press the button. 5PHUQsXe Menu ( ) or the button to adjust each element. This mode is optimized for FPS games. Optimizes the screen for the monitor and printer. Quick Settings Picture Picture Mode Picture Adjust PBP Game Adjust Color Adjust Picture General Reset Custom > > > > Each option is described below.... exit the OSD menu. ENGLISH User Settings 21 Picture 1 To view the OSD menu, press the Menu ( the bottom of the monitor. ) button at 2 Go to Picture using the monitor buttons. 3 Configure the options following the instructions that appear in the OSD menu.
Owners Manual - English
Page 22
blurred focus or unsharpened edges), the resolution is the darkest color the monitor can display. yy If a problem occurs, set to Off. Black Level Sets the offset level (for HDMI only). • Offset as a reference for desktop icons. ...
blurred focus or unsharpened edges), the resolution is the darkest color the monitor can display. yy If a problem occurs, set to Off. Black Level Sets the offset level (for HDMI only). • Offset as a reference for desktop icons. ...


