Owners Manual - English
Page 1
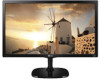
Owner's Manual IPS LED MONITOR (LED MONITOR*) *LG LED Monitors are LCD Monitors with LED Backlighting. IPS LED MONITOR MODEL 22MP57A 23MP57A 24MP57D 27MP57HQ 22MP57D 23MP57D 24MP57HQ 27MP57VQ 22MP57HQ 23MP57H 24MP57VQ 27MP57HT 22MP57VQ 23MP57HQ 23MP57VQ www.lg.com Please read this manual carefully before operating your set and retain it for future reference.
Owner's Manual IPS LED MONITOR (LED MONITOR*) *LG LED Monitors are LCD Monitors with LED Backlighting. IPS LED MONITOR MODEL 22MP57A 23MP57A 24MP57D 27MP57HQ 22MP57D 23MP57D 24MP57HQ 27MP57VQ 22MP57HQ 23MP57H 24MP57VQ 27MP57HT 22MP57VQ 23MP57HQ 23MP57VQ www.lg.com Please read this manual carefully before operating your set and retain it for future reference.
Owners Manual - English
Page 2
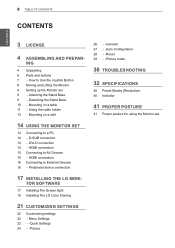
... cable holder 13 - Detaching the Stand Base 10 - ING 4 Unpacking 6 Parts and buttons 7 - Attaching the Stand Base 9 - D-SUB connection 14 - HDMI connection 15 Connecting to External Devices 16 - HDMI connection 16 Connecting to AV Devices 15 - Menu Settings 22 - -Quick Settings 24 - -Picture 26 - -General 27 - -Auto Configuration 28 - -Reset 29 - -Picture mode 30 TROUBLESHOOTING 32 SPECIFICATIONS 40 Preset Modes (Resolution) 40 Indicator 41 PROPER POSTURE 41 Proper posture for using the Monitor set 9 - TOR SOFTWARE 17 Installing The Screen Split 19 Installing The LG Color...
... cable holder 13 - Detaching the Stand Base 10 - ING 4 Unpacking 6 Parts and buttons 7 - Attaching the Stand Base 9 - D-SUB connection 14 - HDMI connection 15 Connecting to External Devices 16 - HDMI connection 16 Connecting to AV Devices 15 - Menu Settings 22 - -Quick Settings 24 - -Picture 26 - -General 27 - -Auto Configuration 28 - -Reset 29 - -Picture mode 30 TROUBLESHOOTING 32 SPECIFICATIONS 40 Preset Modes (Resolution) 40 Indicator 41 PROPER POSTURE 41 Proper posture for using the Monitor set 9 - TOR SOFTWARE 17 Installing The Screen Split 19 Installing The LG Color...
Owners Manual - English
Page 7
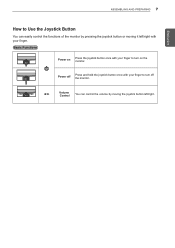
Basic Functions Power on the monitor. Power off Press and hold the joystick button once with your finger to turn on Press the joystick button once with your finger. ASSEMBLING AND PREPARING 7 ENEGNLGISH How to Use the Joystick Button You can control the volume by pressing the joystick button or moving the joystick button left /right with your finger to turn off the monitor. ◄/► Volume Control You can easily control the functions of the monitor by moving it left /right.
Basic Functions Power on the monitor. Power off Press and hold the joystick button once with your finger to turn on Press the joystick button once with your finger. ASSEMBLING AND PREPARING 7 ENEGNLGISH How to Use the Joystick Button You can control the volume by pressing the joystick button or moving the joystick button left /right with your finger to turn off the monitor. ◄/► Volume Control You can easily control the functions of the monitor by moving it left /right.
Owners Manual - English
Page 10
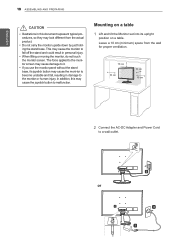
.... yyIf you use the monitor panel without the stand base, its upright position on a table. yyDo not carry the monitor upside down by just holding the stand base. yyWhen lifting or moving the monitor, do not touch the monitor screen. Leave a 10 cm (minimum) space from the actual product. The force applied to the monitor screen may cause damage to a wall outlet. (19 V ) or (19 V ) Mounting on...
.... yyIf you use the monitor panel without the stand base, its upright position on a table. yyDo not carry the monitor upside down by just holding the stand base. yyWhen lifting or moving the monitor, do not touch the monitor screen. Leave a 10 cm (minimum) space from the actual product. The force applied to the monitor screen may cause damage to a wall outlet. (19 V ) or (19 V ) Mounting on...
Owners Manual - English
Page 11
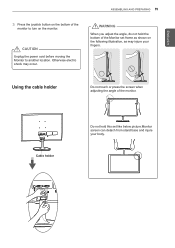
... of the Monitor set like below picture.Monitor screen can detach from stand base and injure your fingers. ENEGNLGISH ENGLISH ASSEMBLING AND PREPARING 11 3 Press the joystick button on the bottom of the monitor to another location. WARNING When you adjust the angle, do not hold this set frame as shown on the monitor. Using the cable holder Do not touch or press the screen when adjusting the angle...
... of the Monitor set like below picture.Monitor screen can detach from stand base and injure your fingers. ENEGNLGISH ENGLISH ASSEMBLING AND PREPARING 11 3 Press the joystick button on the bottom of the monitor to another location. WARNING When you adjust the angle, do not hold this set frame as shown on the monitor. Using the cable holder Do not touch or press the screen when adjusting the angle...
Owners Manual - English
Page 13
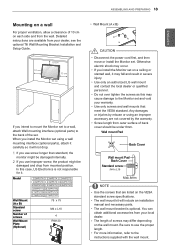
... Monitor set . Detailed instructions are available from mounted position. yyScrew length from outer surface of back cover should be damaged and drop from your dealer, see the optional Tilt Wall Mounting Bracket Installation and Setup Guide. 10 cm 10 cm 10 cm 10 cm If you use improper screw, the product might be damaged internally. 2 If you intend to mount the Monitor set to a wall, attach Wall mounting interface (optional parts...
... Monitor set . Detailed instructions are available from mounted position. yyScrew length from outer surface of back cover should be damaged and drop from your dealer, see the optional Tilt Wall Mounting Bracket Installation and Setup Guide. 10 cm 10 cm 10 cm 10 cm If you use improper screw, the product might be damaged internally. 2 If you intend to mount the Monitor set to a wall, attach Wall mounting interface (optional parts...

Owners Manual - English
Page 14
... VGA connector on , without device configuration or user intervention. Connect the PC and the Monitor set with the supplied D-sub 15 pin signal cable as shown in the following illustrations. yyMac adapter For Apple Macintosh use HDMI PC, it can cause compatibility problem. D-SUB connection Transmits analog video from your PC to the Monitor set . NOTE yyWhen using a D-Sub signal input cable connector for Macintosh HDMI connection Transmits the digital video and audio signals from your PC to the Monitor set . DVI-D connection Transmits a digital video signal...
... VGA connector on , without device configuration or user intervention. Connect the PC and the Monitor set with the supplied D-sub 15 pin signal cable as shown in the following illustrations. yyMac adapter For Apple Macintosh use HDMI PC, it can cause compatibility problem. D-SUB connection Transmits analog video from your PC to the Monitor set . NOTE yyWhen using a D-Sub signal input cable connector for Macintosh HDMI connection Transmits the digital video and audio signals from your PC to the Monitor set . DVI-D connection Transmits a digital video signal...

Owners Manual - English
Page 15
... on the screen. Connecting to use HDMI PC, it by turning the screws clockwise. NOTE yyIf you want to AV Devices HDMI connection Transmits the digital video and audio signals from your finger for a long period of time to the monitor. ENEGNLGISH USING THE MONITOR SET 15 CAUTION yyConnect the signal input cable and tighten it can cause compatibility problem. NOTE yyWhen you use two PC in our Monitor, please connect the signal cable(D-SUB/ DVI-D/HDMI) respectively...
... on the screen. Connecting to use HDMI PC, it by turning the screws clockwise. NOTE yyIf you want to AV Devices HDMI connection Transmits the digital video and audio signals from your finger for a long period of time to the monitor. ENEGNLGISH USING THE MONITOR SET 15 CAUTION yyConnect the signal input cable and tighten it can cause compatibility problem. NOTE yyWhen you use two PC in our Monitor, please connect the signal cable(D-SUB/ DVI-D/HDMI) respectively...

Owners Manual - English
Page 21
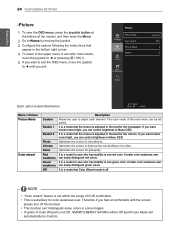
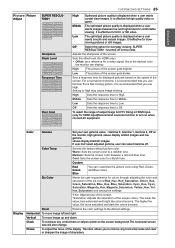
... the monitor this way at any time, including when the OSD is D-SUB. Select picture mode to the ideal setting. (Only supported in Analog Mode) Turns off Exit Description Configures the screen settings. Main Menu Features 22MP57D 23MP57D 24MP57D 22MP57HQ 23MP57H 24MP57HQ 22MP57A 23MP57A 22MP57VQ 23MP57HQ Pi2ct4urMe MPo5d7eVQ 27MP57HQ 23MP57VQ 27MP57VQ 27MP57HT Picture Mode Main Menu Menu Picture Mode Input Auto Monitor off the monitor. Press the Auto button to automatically adjust your display image to achieve the best display...
... the monitor this way at any time, including when the OSD is D-SUB. Select picture mode to the ideal setting. (Only supported in Analog Mode) Turns off Exit Description Configures the screen settings. Main Menu Features 22MP57D 23MP57D 24MP57D 22MP57HQ 23MP57H 24MP57HQ 22MP57A 23MP57A 22MP57VQ 23MP57HQ Pi2ct4urMe MPo5d7eVQ 27MP57HQ 23MP57VQ 27MP57VQ 27MP57HT Picture Mode Main Menu Menu Picture Mode Input Auto Monitor off the monitor. Press the Auto button to automatically adjust your display image to achieve the best display...

Owners Manual - English
Page 22
... the Menu. 2 Go to Quick Settings > Brightness by using luminance compensation algorithm. Menu > Quick Settings Brightness Contrast Volume 22MP57HQ 24MP57HQ 22MP57VQ 24MP57VQ 23MP57H 27MP57HQ 23MP57HQ 27MP57VQ 23MP57VQ 27MP57HT Description Adjusts the color contrast and brightness of the video signal input. High Enables SMART ENERGY SAVING you exit. Off Disables SMART ENERGY SAVING . * SMART ENERGY SAVING : Conserve energy by moving the joystick. 3 Configure the options following the instructions that appear in wide-screen, regardless of the screen. Low...
... the Menu. 2 Go to Quick Settings > Brightness by using luminance compensation algorithm. Menu > Quick Settings Brightness Contrast Volume 22MP57HQ 24MP57HQ 22MP57VQ 24MP57VQ 23MP57H 27MP57HQ 23MP57HQ 27MP57VQ 23MP57VQ 27MP57HT Description Adjusts the color contrast and brightness of the video signal input. High Enables SMART ENERGY SAVING you exit. Off Disables SMART ENERGY SAVING . * SMART ENERGY SAVING : Conserve energy by moving the joystick. 3 Configure the options following the instructions that appear in wide-screen, regardless of the screen. Low...
Owners Manual - English
Page 24
... turn off . If you want to exit the OSD menu, move the joystick to ◄ or pressing ( / OK) it. 5 If you want screen more bright, you can 't distinguish some colors in some images. yyIf option of Color Wizard is not Off , SMART ENERGY SAVING will be Off and Picture Mode will automatically be adjusted. It is a mode that the screen is adjusted to the best for user...
... turn off . If you want to exit the OSD menu, move the joystick to ◄ or pressing ( / OK) it. 5 If you want screen more bright, you can 't distinguish some colors in some images. yyIf option of Color Wizard is not Off , SMART ENERGY SAVING will be Off and Picture Mode will automatically be adjusted. It is a mode that the screen is adjusted to the best for user...
Owners Manual - English
Page 25
... quality video or game. Six Color Meets the user requirements for displayed pictures based on the screen background.The horizontal screen size will also change. Adjusts the sharpness of the screen gets brighter. It is recommended that you use Normal. The lower the value, less saturated and bright the colors become . Vertical To move image left and right. Warm: Sets the screen color to Off. High The picture of the screen. Reset Returns the color settings...
... quality video or game. Six Color Meets the user requirements for displayed pictures based on the screen background.The horizontal screen size will also change. Adjusts the sharpness of the screen gets brighter. It is recommended that you use Normal. The lower the value, less saturated and bright the colors become . Vertical To move image left and right. Warm: Sets the screen color to Off. High The picture of the screen. Reset Returns the color settings...
Owners Manual - English
Page 26
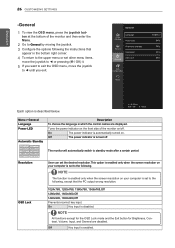
... Prevents incorrect key input. On Key input is set the desired resolution.This option is enabled only when the screen resolution on /off . NOTE All functions except for the OSD Lock mode and the Exit button for Brightness, Contrast, Volume, Input, and General are displayed. ENEGNLGISH 26 CUSTOMIZING SETTINGS -General 1 To view the OSD menu, press the joystick but- Turns the power indicator on the front side of the monitor and then...
... Prevents incorrect key input. On Key input is set the desired resolution.This option is enabled only when the screen resolution on /off . NOTE All functions except for the OSD Lock mode and the Exit button for Brightness, Contrast, Volume, Input, and General are displayed. ENEGNLGISH 26 CUSTOMIZING SETTINGS -General 1 To view the OSD menu, press the joystick but- Turns the power indicator on the front side of the monitor and then...

Owners Manual - English
Page 29
... can control brightness in Menu OSD. Optimizes the screen to ▲. 3 Configure the options following the instructions that appear in the bottom. The color mode of the main menu can control brightness in Menu OSD. Optimizes the screen for the newspaper. If you want screen more bright, you can be Off. NOTE yyIf option of Picture Mode is described below. CUSTOMIZING SETTINGS 29 -Picture mode 1 Press the joystick button on the bottom of the monitor...
... can control brightness in Menu OSD. Optimizes the screen to ▲. 3 Configure the options following the instructions that appear in the bottom. The color mode of the main menu can control brightness in Menu OSD. Optimizes the screen for the newspaper. If you want screen more bright, you can be Off. NOTE yyIf option of Picture Mode is described below. CUSTOMIZING SETTINGS 29 -Picture mode 1 Press the joystick button on the bottom of the monitor...

Owners Manual - English
Page 30
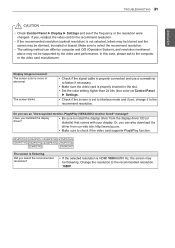
... appears when the signal from the PC (video card) is incorrect. yy When the monitor is connected properly to off. Can't you control some menu in any time by entering the OSD lock menu and changing items to the power outlet. No image appears Is the power cord of the display. Is the power indicator flickering? Is the power indicator light on the PC. yy Enter the Auto Configuration function and...
... appears when the signal from the PC (video card) is incorrect. yy When the monitor is connected properly to off. Can't you control some menu in any time by entering the OSD lock menu and changing items to the power outlet. No image appears Is the power cord of the display. Is the power indicator flickering? Is the power indicator light on the PC. yy Enter the Auto Configuration function and...
Owners Manual - English
Page 31
... the video card manufacturer. yy Check if the signal cable is HDMI 1080i 60/50 Hz, the screen may be dimmed, truncated or biased. yy If the selected resolution is properly connected and use a screwdriver to install the display driver from our web site: http://www.lg.com. TROUBLESHOOTING 31 ENEGNLGISH CAUTION yyCheck Control Panel ► Display ► Settings and see an "Unrecognized monitor, Plug&Play (VESA DDC) monitor found" message? yyThe setting method...
... the video card manufacturer. yy Check if the signal cable is HDMI 1080i 60/50 Hz, the screen may be dimmed, truncated or biased. yy If the selected resolution is properly connected and use a screwdriver to install the display driver from our web site: http://www.lg.com. TROUBLESHOOTING 31 ENEGNLGISH CAUTION yyCheck Control Panel ► Display ► Settings and see an "Unrecognized monitor, Plug&Play (VESA DDC) monitor found" message? yyThe setting method...
Owners Manual - English
Page 32
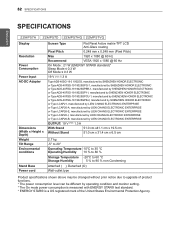
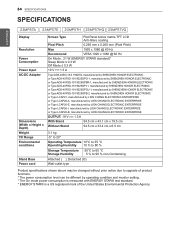
32 SPECIFICATIONS ENEGNLGISH SPECIFICATIONS 22MP57A 22MP57D 22MP57HQ 22MP57VQ Display Resolution Power Consumption Power Input AC-DC Adapter Dimensions (Width x Height x Depth) Weight Tilt Range Environmental conditions Stand Base Power cord Screen Type Flat Panel Active matrix-TFT LCD Anti-Glare coating Pixel Pitch Max 0.248 mm x 0.248 mm (Pixel Pitch) 1920 x 1080 @ 60 Hz Recommend VESA 1920 x 1080 @ 60 Hz On Mode : 21 W (ENERGY STAR® standard)* Sleep Mode ≤ 0.3 W Off Mode ≤ 0.3 W 19 V 1.3 A Type ADS-40SG-19...
32 SPECIFICATIONS ENEGNLGISH SPECIFICATIONS 22MP57A 22MP57D 22MP57HQ 22MP57VQ Display Resolution Power Consumption Power Input AC-DC Adapter Dimensions (Width x Height x Depth) Weight Tilt Range Environmental conditions Stand Base Power cord Screen Type Flat Panel Active matrix-TFT LCD Anti-Glare coating Pixel Pitch Max 0.248 mm x 0.248 mm (Pixel Pitch) 1920 x 1080 @ 60 Hz Recommend VESA 1920 x 1080 @ 60 Hz On Mode : 21 W (ENERGY STAR® standard)* Sleep Mode ≤ 0.3 W Off Mode ≤ 0.3 W 19 V 1.3 A Type ADS-40SG-19...
Owners Manual - English
Page 34
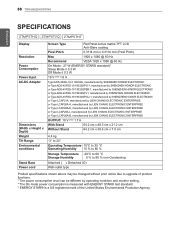
... 23MP57A 23MP57D 23MP57H 23MP57HQ 23MP57VQ Display Resolution Power Consumption Power Input AC-DC Adapter Dimensions (Width x Height x Depth) Weight Tilt Range Environmental conditions Stand Base Power cord Screen Type Flat Panel Active matrix-TFT LCD Anti-Glare coating Pixel Pitch Max 0.265 mm x 0.265 mm (Pixel Pitch) 1920 x 1080 @ 60 Hz Recommend VESA 1920 x 1080 @ 60 Hz On Mode : 21 W (ENERGY STAR® standard)* Sleep Mode ≤ 0.3 W Off Mode ≤ 0.3 W 19 V 1.3 A Type ADS-40SG-19...
... 23MP57A 23MP57D 23MP57H 23MP57HQ 23MP57VQ Display Resolution Power Consumption Power Input AC-DC Adapter Dimensions (Width x Height x Depth) Weight Tilt Range Environmental conditions Stand Base Power cord Screen Type Flat Panel Active matrix-TFT LCD Anti-Glare coating Pixel Pitch Max 0.265 mm x 0.265 mm (Pixel Pitch) 1920 x 1080 @ 60 Hz Recommend VESA 1920 x 1080 @ 60 Hz On Mode : 21 W (ENERGY STAR® standard)* Sleep Mode ≤ 0.3 W Off Mode ≤ 0.3 W 19 V 1.3 A Type ADS-40SG-19...

Owners Manual - English
Page 36
36 SPECIFICATIONS ENEGNLGISH SPECIFICATIONS 24MP57D 24MP57HQ 24MP57VQ Display Resolution Power Consumption Power Input AC-DC Adapter Dimensions (Width x Height x Depth) Weight Tilt Range Environmental conditions Stand Base Power cord Screen Type Flat Panel Active matrix-TFT LCD Anti-Glare coating Pixel Pitch 0.2745 mm x 0.2745 mm (Pixel Pitch) Max Recommend 1920 x 1080 @ 60 Hz VESA 1920 x 1080 @ 60 Hz On Mode : 22 W (ENERGY STAR® standard)* Sleep Mode ≤ 0.3 W Off Mode ≤ 0.3 W 19 V 1.3 A Type ADS-40SG-19-3 19025G...
36 SPECIFICATIONS ENEGNLGISH SPECIFICATIONS 24MP57D 24MP57HQ 24MP57VQ Display Resolution Power Consumption Power Input AC-DC Adapter Dimensions (Width x Height x Depth) Weight Tilt Range Environmental conditions Stand Base Power cord Screen Type Flat Panel Active matrix-TFT LCD Anti-Glare coating Pixel Pitch 0.2745 mm x 0.2745 mm (Pixel Pitch) Max Recommend 1920 x 1080 @ 60 Hz VESA 1920 x 1080 @ 60 Hz On Mode : 22 W (ENERGY STAR® standard)* Sleep Mode ≤ 0.3 W Off Mode ≤ 0.3 W 19 V 1.3 A Type ADS-40SG-19-3 19025G...
Owners Manual - English
Page 38
38 TROUBLESHOOTING ENEGNLGISH SPECIFICATIONS 27MP57HQ 27MP57VQ 27MP57HT Display Resolution Power Consumption Power Input AC-DC Adapter Dimensions (Width x Height x Depth) Weight Tilt Range Environmental conditions Stand Base Power cord Screen Type Flat Panel Active matrix-TFT LCD Anti-Glare coating Pixel Pitch 0.3114 mm x 0.3114 mm (Pixel Pitch) Max Recommend 1920 x 1080 @ 60 Hz VESA 1920 x 1080 @ 60 Hz On Mode : 27 W (ENERGY STAR® standard)* Sleep Mode ≤ 0.3 W Off Mode ≤ 0.3 W 19 V 1.6 A Type ADS-40SG-19-3 19032G, manufactured...
38 TROUBLESHOOTING ENEGNLGISH SPECIFICATIONS 27MP57HQ 27MP57VQ 27MP57HT Display Resolution Power Consumption Power Input AC-DC Adapter Dimensions (Width x Height x Depth) Weight Tilt Range Environmental conditions Stand Base Power cord Screen Type Flat Panel Active matrix-TFT LCD Anti-Glare coating Pixel Pitch 0.3114 mm x 0.3114 mm (Pixel Pitch) Max Recommend 1920 x 1080 @ 60 Hz VESA 1920 x 1080 @ 60 Hz On Mode : 27 W (ENERGY STAR® standard)* Sleep Mode ≤ 0.3 W Off Mode ≤ 0.3 W 19 V 1.6 A Type ADS-40SG-19-3 19032G, manufactured...


