
Owners Manual - English
Page 3
... 4 ASSEMBLING AND PREPAR- Mounting on a wall 13 USING THE MONITOR SET 13 Connecting to a PC 13 - ING 4 Unpacking 6 Parts and buttons 7 Moving and Lifting the Monitor 8 Setting up the Monitor set . Detaching the Stand Base 10 - HDMI connection 14 Connecting to External Devices 15 - Attaching the Stand Base 9 - Using the cable holder 12 - D-SUB connection 13 - DVI-D connection 14 - Peripheral device connection 16 CUSTOMIZING SETTINGS 17 Customizing Settings 17 - Menu Settings 19 -Picture 20 -Color 21 -Display 21 -Audio 22 -Others 23 READER Setting 24...
... 4 ASSEMBLING AND PREPAR- Mounting on a wall 13 USING THE MONITOR SET 13 Connecting to a PC 13 - ING 4 Unpacking 6 Parts and buttons 7 Moving and Lifting the Monitor 8 Setting up the Monitor set . Detaching the Stand Base 10 - HDMI connection 14 Connecting to External Devices 15 - Attaching the Stand Base 9 - Using the cable holder 12 - D-SUB connection 13 - DVI-D connection 14 - Peripheral device connection 16 CUSTOMIZING SETTINGS 17 Customizing Settings 17 - Menu Settings 19 -Picture 20 -Color 21 -Display 21 -Audio 22 -Others 23 READER Setting 24...
Owners Manual - English
Page 13
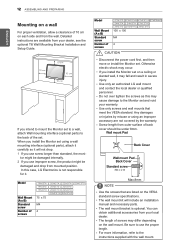
... it. yyIf you install the Monitor set on a ceiling or slanted wall, it will include an installation manual and necessary parts. yyUse only screws and wall mounts that are not covered by the warranty. You can obtain additional accessories from mounted position. Detailed instructions are available from the wall. tor might be damaged internally. 2 If you use the proper length. Model Wall Mount (A x B) Standard screw Number of screws 19M37A 19M37D 19M37H 75...
... it. yyIf you install the Monitor set on a ceiling or slanted wall, it will include an installation manual and necessary parts. yyUse only screws and wall mounts that are not covered by the warranty. You can obtain additional accessories from mounted position. Detailed instructions are available from the wall. tor might be damaged internally. 2 If you use the proper length. Model Wall Mount (A x B) Standard screw Number of screws 19M37A 19M37D 19M37H 75...

Owners Manual - English
Page 14
... turning the screws clockwise. Connect the PC and the Monitor set with the supplied D-sub 15 pin signal cable as shown in the following illustrations. yyAvoid displaying a fixed image on the screen for a long time as shown in the following illustrations. 19M37D 20M37D 22M37D 22MC37D 24M37D 27M37D 27MP37VQ 24MC37D NOTE RGB OUT PC yyWhen using a D-Sub signal input cable connector for Macintosh yyMac adapter For Apple Macintosh use, a separate plug adapter is needed...
... turning the screws clockwise. Connect the PC and the Monitor set with the supplied D-sub 15 pin signal cable as shown in the following illustrations. yyAvoid displaying a fixed image on the screen for a long time as shown in the following illustrations. 19M37D 20M37D 22M37D 22MC37D 24M37D 27M37D 27MP37VQ 24MC37D NOTE RGB OUT PC yyWhen using a D-Sub signal input cable connector for Macintosh yyMac adapter For Apple Macintosh use, a separate plug adapter is needed...
Owners Manual - English
Page 15
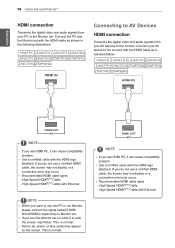
... 27MP36HQ HDMI IN Connecting to AV Devices HDMI connection Transmits the digital video and audio signals from your PC to the monitor. yySome red, green, or blue spots may appear on while it can cause compatibility problem. High-Speed HDMI®/TM Cable - yyIf you use a certified HDMI cable, the screen may not display or a connection error may occur. HDMI OUT A/V NOTE yyIf you turn the Monitor set on the screen. yyRecommended HDMI cable types - High-Speed HDMI®/TM Cable - yyUse a certified cable...
... 27MP36HQ HDMI IN Connecting to AV Devices HDMI connection Transmits the digital video and audio signals from your PC to the monitor. yySome red, green, or blue spots may appear on while it can cause compatibility problem. High-Speed HDMI®/TM Cable - yyIf you use a certified HDMI cable, the screen may not display or a connection error may occur. HDMI OUT A/V NOTE yyIf you turn the Monitor set on the screen. yyRecommended HDMI cable types - High-Speed HDMI®/TM Cable - yyUse a certified cable...
Owners Manual - English
Page 16
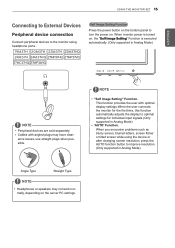
... to the monitor using the device or after changing screen resolution, press the AUTO function button to improve resolution. (Only supported in Analog Mode) Angle Type Straight Type NOTE yyHeadphones or speakers may have clear- ance issues, use straight plugs when possible. NOTE yy"Self Image Setting" Function. When monitor power is executed automatically. (Only supported in Analog Mode) yy'AUTO' Function. yyCables with optimal display settings.When the user connects the monitor for individual input signals.(Only supported in Analog Mode) NOTE...
... to the monitor using the device or after changing screen resolution, press the AUTO function button to improve resolution. (Only supported in Analog Mode) Angle Type Straight Type NOTE yyHeadphones or speakers may have clear- ance issues, use straight plugs when possible. NOTE yy"Self Image Setting" Function. When monitor power is executed automatically. (Only supported in Analog Mode) yy'AUTO' Function. yyCables with optimal display settings.When the user connects the monitor for individual input signals.(Only supported in Analog Mode) NOTE...
Owners Manual - English
Page 17
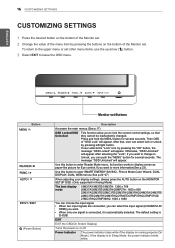
... MONITOR SETUP OSD. (Only supported in Sleep Mode, the power indicator blinks white. Its function works to enter Reader Mode menu. Use this button to display screen as paper-like picture for several seconds. AUTO INPUT EXIT Button (Power Button) Monitor set Buttons Description Accesses the main menus.(See p.17) OSD Locked/OSD Unlocked This function allow you want to Unlock, you can push the "MENU" button for Eye comfort.If you want . • When only one signal is connected, it is in Analog Mode) The best display mode...
... MONITOR SETUP OSD. (Only supported in Sleep Mode, the power indicator blinks white. Its function works to enter Reader Mode menu. Use this button to display screen as paper-like picture for several seconds. AUTO INPUT EXIT Button (Power Button) Monitor set Buttons Description Accesses the main menus.(See p.17) OSD Locked/OSD Unlocked This function allow you want to Unlock, you can push the "MENU" button for Eye comfort.If you want . • When only one signal is connected, it is in Analog Mode) The best display mode...
Owners Manual - English
Page 18
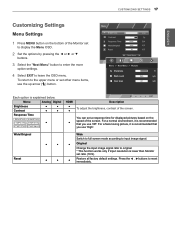
Wide/Original Reset Wide Switch to full screen mode according to input image signal. ● ● ● Original Change the input image signal ratio to original. * This function works only if input resolution is explained below. Press the◄ , ►buttons to leave the OSD menu. CUSTOMIZING SETTINGS 17 ENEGNLGISH Customizing Settings Menu Settings 1 Press MENU button on the ● speed of the screen. Each option is lower than Monitor set a response time for dis2p7laMyPe3d6HpQictures based on the bottom of...
Wide/Original Reset Wide Switch to full screen mode according to input image signal. ● ● ● Original Change the input image signal ratio to original. * This function works only if input resolution is explained below. Press the◄ , ►buttons to leave the OSD menu. CUSTOMIZING SETTINGS 17 ENEGNLGISH Customizing Settings Menu Settings 1 Press MENU button on the ● speed of the screen. Each option is lower than Monitor set a response time for dis2p7laMyPe3d6HpQictures based on the bottom of...
Owners Manual - English
Page 20
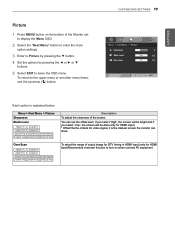
... select the range of output image for DTV timing in HDMI input.(only for video signal, it is the darkest screen the monitor can set other menu items, use the up arrow ( ) button. 27MP36HQ Each option is explained below. Menu > Next Menu > Picture Sharpness Black Level 19M37H 20M37H 22M37H 24M37H 22M37HQ 24M37HQ 27MP36HQ 27MP37HQ 27MP37VQ 27MC37HQ Description To adjust the clearness of the Monitor set to display the Menu OSD. 2 Select the "Next Menu" button to...
... select the range of output image for DTV timing in HDMI input.(only for video signal, it is the darkest screen the monitor can set other menu items, use the up arrow ( ) button. 27MP36HQ Each option is explained below. Menu > Next Menu > Picture Sharpness Black Level 19M37H 20M37H 22M37H 24M37H 22M37HQ 24M37HQ 27MP36HQ 27MP37HQ 27MP37VQ 27MC37HQ Description To adjust the clearness of the Monitor set to display the Menu OSD. 2 Select the "Next Menu" button to...

Owners Manual - English
Page 21
... input device. Medium: Set the screen to satisfy the color requirements of the Monitor set other menu items, use the up arrow ( ) button. Custom • Red:Set your own red color levels. • Green: Set your own green color levels. • Blue:Set your own gamma value. : Gamma 0, Gamma 1, Gamma 2, Off on the monitor, high gamma values display whitish images and low gamma values display blackish images. Resets the color settings to leave the OSD menu. ENEGNLGISH 20 CUSTOMIZING SETTINGS Color...
... input device. Medium: Set the screen to satisfy the color requirements of the Monitor set other menu items, use the up arrow ( ) button. Custom • Red:Set your own red color levels. • Green: Set your own green color levels. • Blue:Set your own gamma value. : Gamma 0, Gamma 1, Gamma 2, Off on the monitor, high gamma values display whitish images and low gamma values display blackish images. Resets the color settings to leave the OSD menu. ENEGNLGISH 20 CUSTOMIZING SETTINGS Color...
Owners Manual - English
Page 22
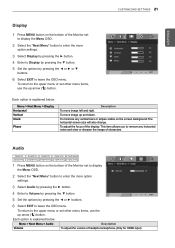
... to remove any vertical bars or stripes visible on the screen background.The horizontal screen size will also change. Each option is explained below . Menu > Next Menu > Display Horizontal Vertical Clock Phase Description To move image up arrow ( ) button. To adjust the focus of characters. Audio 19M37H 20M37H 22M37H 24M37H 27MP36HQ 22M37HQ 24M37HQ 27MP37HQ 27MP37VQ 27MC37HQ 1 Press MENU button on the bottom of the Monitor set to display the Menu OSD. 2 Select the "Next Menu" button...
... to remove any vertical bars or stripes visible on the screen background.The horizontal screen size will also change. Each option is explained below . Menu > Next Menu > Display Horizontal Vertical Clock Phase Description To move image up arrow ( ) button. To adjust the focus of characters. Audio 19M37H 20M37H 22M37H 24M37H 27MP36HQ 22M37HQ 24M37HQ 27MP37HQ 27MP37VQ 27MC37HQ 1 Press MENU button on the bottom of the Monitor set to display the Menu OSD. 2 Select the "Next Menu" button...
Owners Manual - English
Page 23
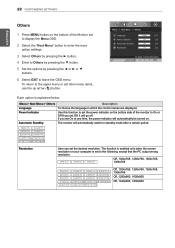
.... The monitor will automatically switch to standby mode after a certain period. 19M37H 20M37H 22M37H 24M37H 22M37HQ 24M37HQ 27MP37HQ 27MP37VQ 27MC37HQ 27MP36HQ Resolution User can set other menu items, use the up arrow ( ) button. 22 CUSTOMIZING SETTINGS ENEGNLGISH Others 1 Press MENU button on the bottom of the monitor to On or Off.If you set On at any time, the power indicator will automatically be turned on. Each...
.... The monitor will automatically switch to standby mode after a certain period. 19M37H 20M37H 22M37H 24M37H 22M37HQ 24M37HQ 27MP37HQ 27MP37VQ 27MC37HQ 27MP36HQ Resolution User can set other menu items, use the up arrow ( ) button. 22 CUSTOMIZING SETTINGS ENEGNLGISH Others 1 Press MENU button on the bottom of the monitor to On or Off.If you set On at any time, the power indicator will automatically be turned on. Each...
Owners Manual - English
Page 25
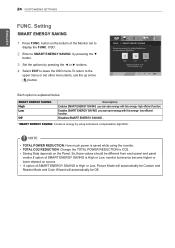
... of the Monitor set other menu items, use the up arrow ( ) button. Enables SMART ENERGY SAVING you can save energy with this energy- yyTOTAL CO2 REDUCTION: Change the TOTAL POWER REDUCTION to display the FUNC. yyIf option of SMART ENERGY SAVING is High or Low, Picture Mode will automatically be Custom and Reader Mode and Color Wizard will automatically be different from each panel and panel vendor...
... of the Monitor set other menu items, use the up arrow ( ) button. Enables SMART ENERGY SAVING you can save energy with this energy- yyTOTAL CO2 REDUCTION: Change the TOTAL POWER REDUCTION to display the FUNC. yyIf option of SMART ENERGY SAVING is High or Low, Picture Mode will automatically be Custom and Reader Mode and Color Wizard will automatically be different from each panel and panel vendor...

Owners Manual - English
Page 26
... a mode that the screen is adjusted to view the videos. It can adjust each element. CUSTOMIZING SETTINGS 25 27MP36HQ Each option is adjusted to the best to view the videos. Adjusts the video image for the retail environment by pressing the ◄ or ► buttons. 5 Select EXIT to leave the OSD menu.To return to view pictures. It is a mode that the user can adjust the color mode of the Monitor set other menu items, use the up arrow( )button...
... a mode that the screen is adjusted to view the videos. It can adjust each element. CUSTOMIZING SETTINGS 25 27MP36HQ Each option is adjusted to the best to view the videos. Adjusts the video image for the retail environment by pressing the ◄ or ► buttons. 5 Select EXIT to leave the OSD menu.To return to view pictures. It is a mode that the user can adjust the color mode of the Monitor set other menu items, use the up arrow( )button...
Owners Manual - English
Page 29
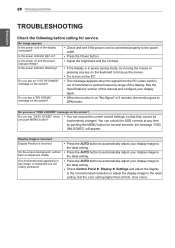
... incorrect Display Position is out of horizontal or vertical frequency range of the display connected? yy Check Control Panel ► Display ► Settings and adjust the display to the recommended resolution or adjust the display image to the ideal setting. 28 TROUBLESHOOTING ENEGNLGISH TROUBLESHOOTING Check the following before calling for several seconds: the message "OSD UNLOCKED" will appear. No image appears Is the power cord of the display. yy Check and see a "OSD LOCKED" message on the PC. yy Adjust the brightness and the contrast...
... incorrect Display Position is out of horizontal or vertical frequency range of the display connected? yy Check Control Panel ► Display ► Settings and adjust the display to the recommended resolution or adjust the display image to the ideal setting. 28 TROUBLESHOOTING ENEGNLGISH TROUBLESHOOTING Check the following before calling for several seconds: the message "OSD UNLOCKED" will appear. No image appears Is the power cord of the display. yy Check and see a "OSD LOCKED" message on the PC. yy Adjust the brightness and the contrast...
Owners Manual - English
Page 30
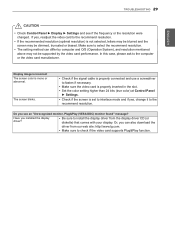
... video card performance. Display image is incorrect The screen color is set to interlace mode and if yes, change it to install the display driver from our web site: http://www.lg.com. yy Make sure to the recommend resolution. Do you installed the display driver? If yes, readjust the video card to check if the video card supports Plug&Play function. yy Check if the screen is mono or abnormal. TROUBLESHOOTING 29 ENEGNLGISH CAUTION yyCheck Control Panel ► Display ► Settings...
... video card performance. Display image is incorrect The screen color is set to interlace mode and if yes, change it to install the display driver from our web site: http://www.lg.com. yy Make sure to the recommend resolution. Do you installed the display driver? If yes, readjust the video card to check if the video card supports Plug&Play function. yy Check if the screen is mono or abnormal. TROUBLESHOOTING 29 ENEGNLGISH CAUTION yyCheck Control Panel ► Display ► Settings...
Owners Manual - English
Page 31
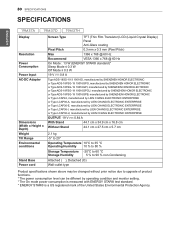
30 SPECIFICATIONS SPECIFICATIONS ENEGNLGISH 19M37A 19M37D 19M37H Display Resolution Power Consumption Power Input AC-DC Adapter Dimensions (Width x Height x Depth) Weight Tilt Range Environmental conditions Stand Base Power cord Screen Type TFT (Thin Film Transistor) LCD (Liquid Crystal Display) Panel Anti-Glare coating Pixel Pitch 0.3 mm x 0.3 mm (Pixel Pitch) Max Recommend 1366 x 768 @ 60 Hz VESA 1366 x 768 @ 60 Hz On Mode : 13 W (ENERGY STAR® standard)* Sleep Mode ≤ 0.3 W Off Mode ≤ 0.3 W 19 V 0.8 A Type ADS-18SG-19...
30 SPECIFICATIONS SPECIFICATIONS ENEGNLGISH 19M37A 19M37D 19M37H Display Resolution Power Consumption Power Input AC-DC Adapter Dimensions (Width x Height x Depth) Weight Tilt Range Environmental conditions Stand Base Power cord Screen Type TFT (Thin Film Transistor) LCD (Liquid Crystal Display) Panel Anti-Glare coating Pixel Pitch 0.3 mm x 0.3 mm (Pixel Pitch) Max Recommend 1366 x 768 @ 60 Hz VESA 1366 x 768 @ 60 Hz On Mode : 13 W (ENERGY STAR® standard)* Sleep Mode ≤ 0.3 W Off Mode ≤ 0.3 W 19 V 0.8 A Type ADS-18SG-19...
Owners Manual - English
Page 33
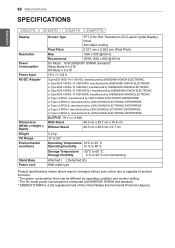
32 SPECIFICATIONS SPECIFICATIONS ENEGNLGISH 20M37A 20M37D 20M37H 20MP37A Display Resolution Power Consumption Power Input AC-DC Adapter Dimensions (Width x Height x Depth) Weight Tilt Range Environmental conditions Stand Base Power cord Screen Type TFT (Thin Film Transistor) LCD (Liquid Crystal Display) Panel Anti-Glare coating Pixel Pitch 0.271 mm x 0.262 mm (Pixel Pitch) Max Recommend 1600 x 900 @ 60 Hz VESA 1600 x 900 @ 60 Hz On Mode : 16 W (ENERGY STAR® standard)* Sleep Mode ≤ 0.3 W Off Mode ≤ 0.3 W 19 V 0.8 A Type...
32 SPECIFICATIONS SPECIFICATIONS ENEGNLGISH 20M37A 20M37D 20M37H 20MP37A Display Resolution Power Consumption Power Input AC-DC Adapter Dimensions (Width x Height x Depth) Weight Tilt Range Environmental conditions Stand Base Power cord Screen Type TFT (Thin Film Transistor) LCD (Liquid Crystal Display) Panel Anti-Glare coating Pixel Pitch 0.271 mm x 0.262 mm (Pixel Pitch) Max Recommend 1600 x 900 @ 60 Hz VESA 1600 x 900 @ 60 Hz On Mode : 16 W (ENERGY STAR® standard)* Sleep Mode ≤ 0.3 W Off Mode ≤ 0.3 W 19 V 0.8 A Type...
Owners Manual - English
Page 35
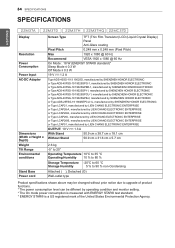
34 SPECIFICATIONS SPECIFICATIONS ENEGNLGISH 22M37A 22M37D 22M37H 22M37HQ 22MC37D Display Resolution Power Consumption Power Input AC-DC Adapter Dimensions (Width x Height x Depth) Weight Tilt Range Environmental conditions Stand Base Power cord Screen Type TFT (Thin Film Transistor) LCD (Liquid Crystal Display) Panel Anti-Glare coating Pixel Pitch 0.248 mm x 0.248 mm (Pixel Pitch) Max Recommend 1920 x 1080 @ 60 Hz VESA 1920 x 1080 @ 60 Hz On Mode : 18 W (ENERGY STAR® standard)* Sleep Mode ≤ 0.3 W Off Mode ≤ 0.3 W 19...
34 SPECIFICATIONS SPECIFICATIONS ENEGNLGISH 22M37A 22M37D 22M37H 22M37HQ 22MC37D Display Resolution Power Consumption Power Input AC-DC Adapter Dimensions (Width x Height x Depth) Weight Tilt Range Environmental conditions Stand Base Power cord Screen Type TFT (Thin Film Transistor) LCD (Liquid Crystal Display) Panel Anti-Glare coating Pixel Pitch 0.248 mm x 0.248 mm (Pixel Pitch) Max Recommend 1920 x 1080 @ 60 Hz VESA 1920 x 1080 @ 60 Hz On Mode : 18 W (ENERGY STAR® standard)* Sleep Mode ≤ 0.3 W Off Mode ≤ 0.3 W 19...

Owners Manual - English
Page 37
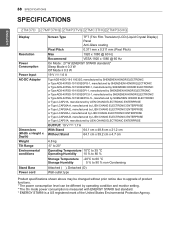
36 SPECIFICATIONS SPECIFICATIONS ENEGNLGISH 24M37A 24M37D 24M37H 24M37HQ 24MC37D Display Resolution Power Consumption Power Input AC-DC Adapter Dimensions (Width x Height x Depth) Weight Tilt Range Environmental conditions Stand Base Power cord Screen Type TFT (Thin Film Transistor) LCD (Liquid Crystal Display) Panel Anti-Glare coating Pixel Pitch 0.272 mm x 0.272 mm (Pixel Pitch) Max Recommend 1920 x 1080 @ 60 Hz VESA 1920 x 1080 @ 60 Hz On Mode : 19 W (ENERGY STAR® standard)* Sleep Mode ≤ 0.3 W Off Mode ≤ 0.3 W 19...
36 SPECIFICATIONS SPECIFICATIONS ENEGNLGISH 24M37A 24M37D 24M37H 24M37HQ 24MC37D Display Resolution Power Consumption Power Input AC-DC Adapter Dimensions (Width x Height x Depth) Weight Tilt Range Environmental conditions Stand Base Power cord Screen Type TFT (Thin Film Transistor) LCD (Liquid Crystal Display) Panel Anti-Glare coating Pixel Pitch 0.272 mm x 0.272 mm (Pixel Pitch) Max Recommend 1920 x 1080 @ 60 Hz VESA 1920 x 1080 @ 60 Hz On Mode : 19 W (ENERGY STAR® standard)* Sleep Mode ≤ 0.3 W Off Mode ≤ 0.3 W 19...
Owners Manual - English
Page 39
38 SPECIFICATIONS SPECIFICATIONS ENEGNLGISH 27M37D 27MP37HQ 27MP37VQ 27MC37HQ 27MP36HQ Display Resolution Power Consumption Power Input AC-DC Adapter Dimensions (Width x Height x Depth) Weight Tilt Range Environmental conditions Stand Base Power cord Screen Type TFT (Thin Film Transistor) LCD (Liquid Crystal Display) Panel Anti-Glare coating Pixel Pitch 0.311 mm x 0.311 mm (Pixel Pitch) Max Recommend 1920 x 1080 @ 60 Hz VESA 1920 x 1080 @ 60 Hz On Mode : 27 W (ENERGY STAR® standard)* Sleep Mode ≤ 0.3 W Off Mode ≤ 0.3 W 19 V 1.6 A Type...
38 SPECIFICATIONS SPECIFICATIONS ENEGNLGISH 27M37D 27MP37HQ 27MP37VQ 27MC37HQ 27MP36HQ Display Resolution Power Consumption Power Input AC-DC Adapter Dimensions (Width x Height x Depth) Weight Tilt Range Environmental conditions Stand Base Power cord Screen Type TFT (Thin Film Transistor) LCD (Liquid Crystal Display) Panel Anti-Glare coating Pixel Pitch 0.311 mm x 0.311 mm (Pixel Pitch) Max Recommend 1920 x 1080 @ 60 Hz VESA 1920 x 1080 @ 60 Hz On Mode : 27 W (ENERGY STAR® standard)* Sleep Mode ≤ 0.3 W Off Mode ≤ 0.3 W 19 V 1.6 A Type...


