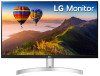
Owners Manual
Page 3
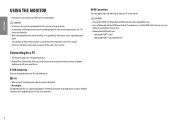
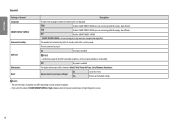
... monitor. Drivers and Software Installation Priority Monitor Driver Recommended OnScreen Control Recommended 3 The force applied to the monitor screen may cause the monitor to fall off the stand and could result in this manual are subject to change to improve the performance of unauthorized components. •• It is recommended to use the supplied components. •• If you purchased the product. •• The power cord...
... monitor. Drivers and Software Installation Priority Monitor Driver Recommended OnScreen Control Recommended 3 The force applied to the monitor screen may cause the monitor to fall off the stand and could result in this manual are subject to change to improve the performance of unauthorized components. •• It is recommended to use the supplied components. •• If you purchased the product. •• The power cord...

Owners Manual
Page 4
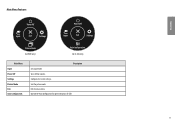
... the monitor frame firmly. How to Use the Joystick Button You can control the volume by moving the joystick button left/right. Basic Functions Power on Press the joystick button once with your finger to turn off Press and hold the panel itself. •• When holding the monitor, the screen should face away from you use the monitor panel without the stand base, its joystick button may...
... the monitor frame firmly. How to Use the Joystick Button You can control the volume by moving the joystick button left/right. Basic Functions Power on Press the joystick button once with your finger to turn off Press and hold the panel itself. •• When holding the monitor, the screen should face away from you use the monitor panel without the stand base, its joystick button may...
Owners Manual
Page 5
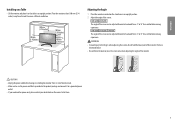
... the lower part of the monitor's frame as illustrated below. •• Be careful not to touch or press the screen area when adjusting the angle of electric shock. •• Make sure to use the power cord that is risk of the monitor. There is provided in the product package and connect it on the stand base in an upright position. 2 Adjust the angle...
... the lower part of the monitor's frame as illustrated below. •• Be careful not to touch or press the screen area when adjusting the angle of electric shock. •• Make sure to use the power cord that is risk of the monitor. There is provided in the product package and connect it on the stand base in an upright position. 2 Adjust the angle...

Owners Manual
Page 6
... system cable. Detailed installation instructions can obtain optional accessories from your local retail store. ENGLISH Using the Kensington Lock The Kensington security system connector is located at each side of the Monitor set up a tilting wall mounting bracket. Connect the monitor to the manual for the wall mount plate or other compatible devices. You can be obtained from most electronics stores. 100 mm (3.94 inches) 100 mm (3.94 inches) 100...
... system cable. Detailed installation instructions can obtain optional accessories from your local retail store. ENGLISH Using the Kensington Lock The Kensington security system connector is located at each side of the Monitor set up a tilting wall mounting bracket. Connect the monitor to the manual for the wall mount plate or other compatible devices. You can be obtained from most electronics stores. 100 mm (3.94 inches) 100 mm (3.94 inches) 100...
Owners Manual
Page 7
... the wall mounting bracket. Damage caused in the monitor falling off, which could lead to VESA standards. If you use of non-standard screws. •• The wall mount kit includes the installation guide and all necessary parts. •• The wall mounting bracket is securely fixed to the monitor and to the back of the Monitor Standard screw: M4 x L10 Max. 8 mm(0.3 inches) 7 ENGLISH To install the monitor to a wall, attach a wall mounting...
... the wall mounting bracket. Damage caused in the monitor falling off, which could lead to VESA standards. If you use of non-standard screws. •• The wall mount kit includes the installation guide and all necessary parts. •• The wall mounting bracket is securely fixed to the monitor and to the back of the Monitor Standard screw: M4 x L10 Max. 8 mm(0.3 inches) 7 ENGLISH To install the monitor to a wall, attach a wall mounting...
Owners Manual
Page 8
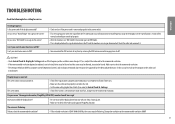
... not use a grounded (3-hole) power strip or a grounded power outlet. •• The monitor may flicker when turned on the supplied cable to reconfigure anything or install any manual drivers. High-Speed HDMI®/TM cable -- NOTE •• When using a D-Sub signal input cable connector for a prolonged time. This is normal. Use a PC screensaver if possible. •• When connecting the power cord to the outlet, use a certified HDMI cable, the screen may not display or a connection error...
... not use a grounded (3-hole) power strip or a grounded power outlet. •• The monitor may flicker when turned on the supplied cable to reconfigure anything or install any manual drivers. High-Speed HDMI®/TM cable -- NOTE •• When using a D-Sub signal input cable connector for a prolonged time. This is normal. Use a PC screensaver if possible. •• When connecting the power cord to the outlet, use a certified HDMI cable, the screen may not display or a connection error...
Owners Manual
Page 10
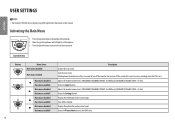
... main menu. Enters the Picture Mode feature. (for HDMI only)(24ML600S/27ML600S: HDMI + D-Sub) Enters the Input features. You can turn off the monitor. ENGLISH USER SETTINGS NOTE •• Your monitor's OSD (On Screen Display) may differ slightly from that shown in this way at any time, including when the OSD is on.) Adjusts the monitor volume level. (24ML600M/27ML600M/27MN60T: for HDMI only) 10 Adjusts the monitor volume level. (24ML600M/27ML600M/27MN60T: for HDMI...
... main menu. Enters the Picture Mode feature. (for HDMI only)(24ML600S/27ML600S: HDMI + D-Sub) Enters the Input features. You can turn off the monitor. ENGLISH USER SETTINGS NOTE •• Your monitor's OSD (On Screen Display) may differ slightly from that shown in this way at any time, including when the OSD is on.) Adjusts the monitor volume level. (24ML600M/27ML600M/27MN60T: for HDMI only) 10 Adjusts the monitor volume level. (24ML600M/27ML600M/27MN60T: for HDMI...
Owners Manual
Page 11
Exits the main menu. Operate the Auto configuration for D-SUB only) Main Menu Input Power Off Settings Picture Mode Exit Auto Configuration Description Sets input mode. ENGLISH Main Menu Features Power Off Power Off Input Exit Settings Input Exit Settings Picture Mode (for HDMI only) Auto Configuration (for optimal display in D-SUB. 11 Configures the screen settings. Turns off the monitor. Sets the picture mode.
Exits the main menu. Operate the Auto configuration for D-SUB only) Main Menu Input Power Off Settings Picture Mode Exit Auto Configuration Description Sets input mode. ENGLISH Main Menu Features Power Off Power Off Input Exit Settings Input Exit Settings Picture Mode (for HDMI only) Auto Configuration (for optimal display in D-SUB. 11 Configures the screen settings. Turns off the monitor. Sets the picture mode.

Owners Manual
Page 13
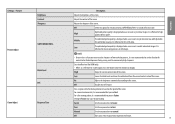
..., green, or blue by customization. The user can adjust it to Auto Configuration? Sets the screen color between a red and blue tone. Sets the screen color to a reddish tone. Adjusts the aspect ratio of the screen. ENGLISH Customizing settings Quick Settings Settings > Quick Settings Brightness Contrast Volume Color Temp Auto Configuration (D-SUB only) Input Settings > Input Input List Aspect Ratio Description Adjusts the color contrast and brightness of the screen. Yes Operate the Auto configuration for optimal display in wide-screen, regardless of the video signal...
..., green, or blue by customization. The user can adjust it to Auto Configuration? Sets the screen color between a red and blue tone. Sets the screen color to a reddish tone. Adjusts the aspect ratio of the screen. ENGLISH Customizing settings Quick Settings Settings > Quick Settings Brightness Contrast Volume Color Temp Auto Configuration (D-SUB only) Input Settings > Input Input List Aspect Ratio Description Adjusts the color contrast and brightness of the screen. Yes Operate the Auto configuration for optimal display in wide-screen, regardless of the video signal...

Owners Manual
Page 14
... between red and green. Optimizes the screen for viewing documents. Optimizes the screen to adjust each element. It enables users with the screen, please turn off this function. •• This function can't distinguish some colors in the OSD menu. Optimizes the screen for gameplay. The color mode of the main menu can brighten the screen in some images. 14 NOTE •• If the Picture Mode is changed, the screen may flicker or the resolution of a video. ENGLISH Picture Settings > Picture Picture Mode...
... between red and green. Optimizes the screen for viewing documents. Optimizes the screen to adjust each element. It enables users with the screen, please turn off this function. •• This function can't distinguish some colors in the OSD menu. Optimizes the screen for gameplay. The color mode of the main menu can brighten the screen in some images. 14 NOTE •• If the Picture Mode is changed, the screen may flicker or the resolution of a video. ENGLISH Picture Settings > Picture Picture Mode...
Owners Manual
Page 15
... you use Fast. It is effective for a video signal, this mode. Doing so may cause image sticking. On Adjusts the brightness automatically according to normal. Setting to Faster may result in this is displayed when a user wants images between low and high modes for everyday viewing. Middle Low The optimized picture quality is the darkest color the monitor can display. The optimized picture quality is displayed when a user wants crystal clear images. Off Disables...
... you use Fast. It is effective for a video signal, this mode. Doing so may cause image sticking. On Adjusts the brightness automatically according to normal. Setting to Faster may result in this is displayed when a user wants images between low and high modes for everyday viewing. Middle Low The optimized picture quality is the darkest color the monitor can display. The optimized picture quality is displayed when a user wants crystal clear images. Off Disables...

Owners Manual
Page 16
... dynamic contrast on the screen. 16 ENGLISH Game Adjust FreeSync Black Stabilizer Provides seamless and natural images by synchronizing the vertical frequency of the output signal. Increasing the Black Stabilizer value brightens the low gray level area on . CAUTION •• Supported Interface: HDMI •• Supported Graphic Card : A graphic card that of the input signal with that supports AMD's FreeSync is necessary. •• Supported Version : Make sure to update...
... dynamic contrast on the screen. 16 ENGLISH Game Adjust FreeSync Black Stabilizer Provides seamless and natural images by synchronizing the vertical frequency of the output signal. Increasing the Black Stabilizer value brightens the low gray level area on . CAUTION •• Supported Interface: HDMI •• Supported Graphic Card : A graphic card that of the input signal with that supports AMD's FreeSync is necessary. •• Supported Version : Make sure to update...

Owners Manual
Page 18
... need to red, green or blue by customization. ENGLISH Color Adjust Configuration Adjust (D-SUB only) Resolution (D-SUB only) Picture Reset 18 Gamma Color Temp Red Green Blue Horizontal Vertical Clock Phase Mode 1, Mode 2, The higher the gamma value, the darker the image becomes. Mode 4 If you want to reset your computer is enabled only when the screen resolution on your computer is set to the default settings. Selects the factory default picture color. Custom: The user can customize the picture color using Red, Green, and Blue colors. To move image...
... need to red, green or blue by customization. ENGLISH Color Adjust Configuration Adjust (D-SUB only) Resolution (D-SUB only) Picture Reset 18 Gamma Color Temp Red Green Blue Horizontal Vertical Clock Phase Mode 1, Mode 2, The higher the gamma value, the darker the image becomes. Mode 4 If you want to reset your computer is enabled only when the screen resolution on your computer is set to the default settings. Selects the factory default picture color. Custom: The user can customize the picture color using Red, Green, and Blue colors. To move image...

Owners Manual
Page 19
ENGLISH 24ML600S 27ML600S Sound Settings > Sound Volume Main Audio MaxxAudio Description To adjust the Volume of studio-quality sound tools for a superior listening experience. On MaxxAudio® by waves, recipient of a Technical GRAMMY Award® is a suite of headphone or speaker. Off Disables the MaxxAudio function. 19 To choose the audio source input.
ENGLISH 24ML600S 27ML600S Sound Settings > Sound Volume Main Audio MaxxAudio Description To adjust the Volume of studio-quality sound tools for a superior listening experience. On MaxxAudio® by waves, recipient of a Technical GRAMMY Award® is a suite of headphone or speaker. Off Disables the MaxxAudio function. 19 To choose the audio source input.
Owners Manual
Page 20
... except for the OSD Lock mode, brightness, Contrast, Input and Volume are displayed. The display information will automatically switch to standby mode after a certain period. Off Disables SMART ENERGY SAVING . * SMART ENERGY SAVING : Conserve energy by using luminance compensation algorithm. The monitor will be shown the Model, Total Power On Time, Serial Number, Resolution. Returns to reset your settings? ENGLISH General Settings > General Language SMART ENERGY SAVING Automatic Standby OSD Lock Information Reset Description To choose the language in which the...
... except for the OSD Lock mode, brightness, Contrast, Input and Volume are displayed. The display information will automatically switch to standby mode after a certain period. Off Disables SMART ENERGY SAVING . * SMART ENERGY SAVING : Conserve energy by using luminance compensation algorithm. The monitor will be shown the Model, Total Power On Time, Serial Number, Resolution. Returns to reset your settings? ENGLISH General Settings > General Language SMART ENERGY SAVING Automatic Standby OSD Lock Information Reset Description To choose the language in which the...
Owners Manual
Page 21
... install the display driver from the PC (video card) is out of horizontal or vertical frequency range of Range" message on "NO SIGNAL", the monitor goes to DPM mode. •• This is displayed when the signal cable between the PC and the monitor is set to interlace mode and if yes, change it . •• You can differ by entering the OSD lock menu and changing items to the computer or the video card manufacturer. Change the resolution...
... install the display driver from the PC (video card) is out of horizontal or vertical frequency range of Range" message on "NO SIGNAL", the monitor goes to DPM mode. •• This is displayed when the signal cable between the PC and the monitor is set to interlace mode and if yes, change it . •• You can differ by entering the OSD lock menu and changing items to the computer or the video card manufacturer. Change the resolution...

Owners Manual
Page 23
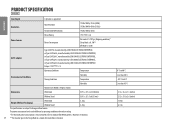
... and monitor setting. * The On mode power consumption is measured with LGE test standard (Full White pattern , Maximum resolution). ** The monitor goes to change without notice. ENGLISH Dimensions Weight (Without Packaging) Monitor Size (Width x Height x Depth) With Stand Without Stand With Stand Without Stand 539.1 x 415.3 x 182.0 (mm) 539.1 x 321.5 x 66.5 (mm) 3.1 kg 2.8 kg The specifications are subject to the Sleep Mode in a couple of minutes(Max 5 minutes). 21.2 x 16.3 x 7.1 (inches...
... and monitor setting. * The On mode power consumption is measured with LGE test standard (Full White pattern , Maximum resolution). ** The monitor goes to change without notice. ENGLISH Dimensions Weight (Without Packaging) Monitor Size (Width x Height x Depth) With Stand Without Stand With Stand Without Stand 539.1 x 415.3 x 182.0 (mm) 539.1 x 321.5 x 66.5 (mm) 3.1 kg 2.8 kg The specifications are subject to the Sleep Mode in a couple of minutes(Max 5 minutes). 21.2 x 16.3 x 7.1 (inches...
Owners Manual
Page 24
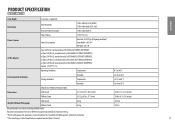
... LIEN CHANG ELECTRONIC ENTERPRISE, or Type LCAP26A-B, manufactured by operating condition and monitor setting. * The On mode power consumption is supported. ENGLISH PRODUCT SPECIFICATION 24ML600S Color Depth 8-bit color is measured with LGE test standard (Full White pattern , Maximum resolution). 24 ** The monitor goes to the Sleep Mode in a couple of minutes(Max 5 minutes). 0 °C to 40 °C Less than 85 % 21.2 x 16.3 x 7.1 (inches) 21.2 x 12.6 x 2.6 (inches) 7.0 lbs...
... LIEN CHANG ELECTRONIC ENTERPRISE, or Type LCAP26A-B, manufactured by operating condition and monitor setting. * The On mode power consumption is supported. ENGLISH PRODUCT SPECIFICATION 24ML600S Color Depth 8-bit color is measured with LGE test standard (Full White pattern , Maximum resolution). 24 ** The monitor goes to the Sleep Mode in a couple of minutes(Max 5 minutes). 0 °C to 40 °C Less than 85 % 21.2 x 16.3 x 7.1 (inches) 21.2 x 12.6 x 2.6 (inches) 7.0 lbs...
Owners Manual
Page 25
PRODUCT SPECIFICATION 27ML600M 27MN60T ENGLISH Color Depth 8-bit color is measured with LGE test standard (Full White pattern , Maximum resolution). ** The monitor goes to change without notice. Resolution Max Resolution Recommended Resolution 1920 x 1080 @ 75 Hz (HDMI) 1920 x 1080 @ 60 Hz (D-Sub) 1920 x 1080 @ 60 Hz Power Rating 19 V 1.6 A Power Sources Power Consumption On mode: 25.5 W Typ. (Outgoing condition)* Sleep Mode ≤ 0.3 W** Off Mode ≤ 0.3 W AC/DC adaptor Type LCAP21A, manufactured by LIEN CHANG ELECTRONIC...
PRODUCT SPECIFICATION 27ML600M 27MN60T ENGLISH Color Depth 8-bit color is measured with LGE test standard (Full White pattern , Maximum resolution). ** The monitor goes to change without notice. Resolution Max Resolution Recommended Resolution 1920 x 1080 @ 75 Hz (HDMI) 1920 x 1080 @ 60 Hz (D-Sub) 1920 x 1080 @ 60 Hz Power Rating 19 V 1.6 A Power Sources Power Consumption On mode: 25.5 W Typ. (Outgoing condition)* Sleep Mode ≤ 0.3 W** Off Mode ≤ 0.3 W AC/DC adaptor Type LCAP21A, manufactured by LIEN CHANG ELECTRONIC...

Owners Manual
Page 27
ENGLISH Dimensions Weight (Without Packaging) Monitor Size (Width x Height x Depth) With Stand Without Stand With Stand Without Stand 611.2 x 453.9 x 209.4 (mm) 611.2 x 362.6 x 72.7 (mm) 4.8 kg 4.3 kg The specifications are subject to the Sleep Mode in a couple of minutes(Max 5 minutes). 24.0 x 17.8 x 8.2 (inches) 24.0 x 14.2 x 2.8 (inches) 10.5 lbs 9.4 lbs 27 The power consumption level can be different by operating condition and monitor setting. * The On...
ENGLISH Dimensions Weight (Without Packaging) Monitor Size (Width x Height x Depth) With Stand Without Stand With Stand Without Stand 611.2 x 453.9 x 209.4 (mm) 611.2 x 362.6 x 72.7 (mm) 4.8 kg 4.3 kg The specifications are subject to the Sleep Mode in a couple of minutes(Max 5 minutes). 24.0 x 17.8 x 8.2 (inches) 24.0 x 14.2 x 2.8 (inches) 10.5 lbs 9.4 lbs 27 The power consumption level can be different by operating condition and monitor setting. * The On...


