Owners Manual
Page 2
...6 Installing on a Table Adjusting the Angle Tidying up Cables (27GN600, 32GN600) Using the Kensington Lock Installing the Wall Mount Plate Installing on the Wall USING THE MONITOR 13 --Connecting to a PC 14 HDMI Connection DisplayPort Connection --Connecting AV Devices 15 HDMI Connection --Connecting Peripherals 15 Connecting Headphones --Upgrading the Software via USB 16 USER SETTINGS 17 --Activating the Main Menu 17 Main Menu Features --User Settings 19 Menu Settings TROUBLESHOOTING 32 PRODUCT SPECIFICATION....... 35 --Factory Support Mode 41 --HDMI Timing (Video 43 --Power LED...
...6 Installing on a Table Adjusting the Angle Tidying up Cables (27GN600, 32GN600) Using the Kensington Lock Installing the Wall Mount Plate Installing on the Wall USING THE MONITOR 13 --Connecting to a PC 14 HDMI Connection DisplayPort Connection --Connecting AV Devices 15 HDMI Connection --Connecting Peripherals 15 Connecting Headphones --Upgrading the Software via USB 16 USER SETTINGS 17 --Activating the Main Menu 17 Main Menu Features --User Settings 19 Menu Settings TROUBLESHOOTING 32 PRODUCT SPECIFICATION....... 35 --Factory Support Mode 41 --HDMI Timing (Video 43 --Power LED...

Owners Manual
Page 4
... you purchased the product. •• The power cord provided may cause damage to the monitor. ENGLISH 4 OPEN SOURCE SOFTWARE NOTICE INFORMATION To obtain the source code under GPL, LGPL, MPL, and other open source code to you on appearance, unlike the general method of coating, it has good durability. In addition to the screw parts when assembling the product. (Doing so may damage the...
... you purchased the product. •• The power cord provided may cause damage to the monitor. ENGLISH 4 OPEN SOURCE SOFTWARE NOTICE INFORMATION To obtain the source code under GPL, LGPL, MPL, and other open source code to you on appearance, unlike the general method of coating, it has good durability. In addition to the screw parts when assembling the product. (Doing so may damage the...

Owners Manual
Page 5
Drivers and Software Monitor Driver OnScreen Control Installation Priority Recommended Recommended Product and Button Description Joystick Button ENGLISH 5 Supported Drivers and Software You can download and install the latest version from the LGE website (www.lg.com).
Drivers and Software Monitor Driver OnScreen Control Installation Priority Recommended Recommended Product and Button Description Joystick Button ENGLISH 5 Supported Drivers and Software You can download and install the latest version from the LGE website (www.lg.com).

Owners Manual
Page 6
... of the monitor by moving the joystick button up/down. Press and hold the panel itself. Do not hold the joystick button Power off once with your finger. ENGLISH 6 How to Use the Joystick Button You can control the screen's brightness by pressing the joystick button or moving it . •• Before moving or lifting the monitor, disconnect the power cord and all other cables. •...
... of the monitor by moving the joystick button up/down. Press and hold the panel itself. Do not hold the joystick button Power off once with your finger. ENGLISH 6 How to Use the Joystick Button You can control the screen's brightness by pressing the joystick button or moving it . •• Before moving or lifting the monitor, disconnect the power cord and all other cables. •...
Owners Manual
Page 11
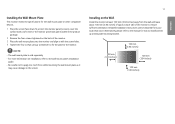
... Wall Mount Plate This monitor meets the specifications for how to install and set up a tilting wall mounting bracket. 100 mm (3.94 inches) 100 mm (3.94 inches) 100 mm (3.94 inches) 100 mm (3.94 inches) ENGLISH To protect the monitor panel (screen), cover the surface with the screw holes. 4 Tighten the four screws using a screwdriver to fix the plate to the manual for the wall mount plate or other compatible devices. 1 Place the screen face down. Detailed installation instructions...
... Wall Mount Plate This monitor meets the specifications for how to install and set up a tilting wall mounting bracket. 100 mm (3.94 inches) 100 mm (3.94 inches) 100 mm (3.94 inches) 100 mm (3.94 inches) ENGLISH To protect the monitor panel (screen), cover the surface with the screw holes. 4 Tighten the four screws using a screwdriver to fix the plate to the manual for the wall mount plate or other compatible devices. 1 Place the screen face down. Detailed installation instructions...

Owners Manual
Page 13
... the Monitor Wall Mount Plate Back of each installed screw must be covered by the product warranty. •• When measured from the actual product. NOTE •• When connecting the power cord to VESA standards. This may cause image distortion. •• Do not display a still image on the screen. This is normal. This may cause image retention. Press the joystick button, go to Menu → Input...
... the Monitor Wall Mount Plate Back of each installed screw must be covered by the product warranty. •• When measured from the actual product. NOTE •• When connecting the power cord to VESA standards. This may cause image distortion. •• Do not display a still image on the screen. This is normal. This may cause image retention. Press the joystick button, go to Menu → Input...

Owners Manual
Page 14
... the monitor. NOTE •• There may cause compatibility issues. •• Use a certified cable with Ethernet DisplayPort Connection Transmits digital video and audio signals from your PC to DisplayPort) cable or gender that allows you are using a Mini DisplayPort output graphics card, use a certified HDMI cable, the screen may not display or a connection error may occur. •• Recommended HDMI cable types -- CAUTION •• Using a DVI to HDMI / DP (DisplayPort) to HDMI cable may...
... the monitor. NOTE •• There may cause compatibility issues. •• Use a certified cable with Ethernet DisplayPort Connection Transmits digital video and audio signals from your PC to DisplayPort) cable or gender that allows you are using a Mini DisplayPort output graphics card, use a certified HDMI cable, the screen may not display or a connection error may occur. •• Recommended HDMI cable types -- CAUTION •• Using a DVI to HDMI / DP (DisplayPort) to HDMI cable may...

Owners Manual
Page 18
Exits the main menu. Description Sets the game mode for gaming. Configures the screen settings. ENGLISH 18 Main Menu Features Power Off Input Exit Menu Game Mode Main Menu Input Power Off Menu Game Mode Exit Sets input mode. Turns off the monitor.
Exits the main menu. Description Sets the game mode for gaming. Configures the screen settings. ENGLISH 18 Main Menu Features Power Off Input Exit Menu Game Mode Main Menu Input Power Off Menu Game Mode Exit Sets input mode. Turns off the monitor.

Owners Manual
Page 19
Game Mode Game Adjust Picture Adjust Input 19 General ENGLISH User Settings Menu Settings 1 To view the OSD menu, press the joystick button at the bottom of the monitor and then enter the Menu. 2 Configure the options by moving the joystick up/down/left/right. 3 To return to the upper menu or set other menu items, move the joystick to or pressing ( ) it. 4 If you want to exit the OSD menu, move the joystick to until you exit.
Game Mode Game Adjust Picture Adjust Input 19 General ENGLISH User Settings Menu Settings 1 To view the OSD menu, press the joystick button at the bottom of the monitor and then enter the Menu. 2 Configure the options by moving the joystick up/down/left/right. 3 To return to the upper menu or set other menu items, move the joystick to or pressing ( ) it. 4 If you want to exit the OSD menu, move the joystick to until you exit.

Owners Manual
Page 21
.... Menu > Game Mode Description Game Mode Gamer 1 Gamer 2 FPS RTS Vivid In this mode, users can customize elements including game-related options. Please check the HDR On / Off setting of customized display settings, including game-related setup options. This mode is optimized for FPS games.It is on, screen flickering or cracking may not be operated properly depending on HDR signal. Optimized the screen for vivid colors. 21 ENGLISH...
.... Menu > Game Mode Description Game Mode Gamer 1 Gamer 2 FPS RTS Vivid In this mode, users can customize elements including game-related options. Please check the HDR On / Off setting of customized display settings, including game-related setup options. This mode is optimized for FPS games.It is on, screen flickering or cracking may not be operated properly depending on HDR signal. Optimized the screen for vivid colors. 21 ENGLISH...

Owners Manual
Page 24
... Adaptive-Sync(FreeSync) function than basic mode.) Basic Adaptive-Sync function on . Off FreeSync function off . CAUTION •• Supported Interface: DisplayPort,HDMI. Provides seamless and natural images by synchronizing the vertical frequency of the input signal with that of the output signal. On FreeSync function on . (Enable basic frequency range of Adaptive-Sync(FreeSync) function.) Off Adaptive-Sync function off . Adaptive-Sync (for 27GN600) CAUTION •• In HDMI input, the menu name is displayed...
... Adaptive-Sync(FreeSync) function than basic mode.) Basic Adaptive-Sync function on . Off FreeSync function off . CAUTION •• Supported Interface: DisplayPort,HDMI. Provides seamless and natural images by synchronizing the vertical frequency of the input signal with that of the output signal. On FreeSync function on . (Enable basic frequency range of Adaptive-Sync(FreeSync) function.) Off Adaptive-Sync function off . Adaptive-Sync (for 27GN600) CAUTION •• In HDMI input, the menu name is displayed...

Owners Manual
Page 25
.... 25 ENGLISH Game Adjust Provides seamless and natural images by synchronizing the vertical frequency of the input signal with that supports AMD's FreeSync is necessary. Extended FreeSync Premium function on. (Enable wider frequency range of the output signal. CAUTION •• Supported Interface: DisplayPort,HDMI. •• Supported Graphic Card : A graphic card that of FreeSync function than basic mode.) Basic FreeSync Premium function on dark game screens. FreeSync...
.... 25 ENGLISH Game Adjust Provides seamless and natural images by synchronizing the vertical frequency of the input signal with that supports AMD's FreeSync is necessary. Extended FreeSync Premium function on. (Enable wider frequency range of the output signal. CAUTION •• Supported Interface: DisplayPort,HDMI. •• Supported Graphic Card : A graphic card that of FreeSync function than basic mode.) Basic FreeSync Premium function on dark game screens. FreeSync...
Owners Manual
Page 27
Manual The user can customize the picture color using Red, Green, and Blue colors. tune the color temperature. You can fine - Low Lowers the black levels and raises the white levels from the current contrast ratio of the six colors and then saving the settings. Mode 4 If you do not need to between a red and blue tone. Medium Sets the screen color to adjust the gamma settings, select Mode 4. Meets the user requirements for colors by customization. Sets the offset...
Manual The user can customize the picture color using Red, Green, and Blue colors. tune the color temperature. You can fine - Low Lowers the black levels and raises the white levels from the current contrast ratio of the six colors and then saving the settings. Mode 4 If you do not need to between a red and blue tone. Medium Sets the screen color to adjust the gamma settings, select Mode 4. Meets the user requirements for colors by customization. Sets the offset...

Owners Manual
Page 30
... select HDMI 2.0 resolution in the control panel of window. •• This may cause the screen to match the version of time. On Power LED Off The power LED turns on the screen for the auto-off . Automatic Standby Feature that does not support HDMI 2.0. You can set the DisplayPort version to appear abnormally. DisplayPort Version Please set a timer for a period of the connected external device(1.4,1.2 and 1.1) . HDMI Compatibility Mode Off Disables HDMI Compatibility Mode. Disables...
... select HDMI 2.0 resolution in the control panel of window. •• This may cause the screen to match the version of time. On Power LED Off The power LED turns on the screen for the auto-off . Automatic Standby Feature that does not support HDMI 2.0. You can set the DisplayPort version to appear abnormally. DisplayPort Version Please set a timer for a period of the connected external device(1.4,1.2 and 1.1) . HDMI Compatibility Mode Off Disables HDMI Compatibility Mode. Disables...

Owners Manual
Page 32
... and set the appropriate frequency. ENGLISH 32 TROUBLESHOOTING Nothing is correctly plugged into the power outlet. Some features are out of the recommended horizontal or vertical frequency range of this manual to the recommended resolution. Is the power LED on . Have you press the Menu button? •• The OSD is turned on ? •• Check the power cable connection and press the power button. Is the monitor's power cord plugged in the product owner's manual. If you have no video...
... and set the appropriate frequency. ENGLISH 32 TROUBLESHOOTING Nothing is correctly plugged into the power outlet. Some features are out of the recommended horizontal or vertical frequency range of this manual to the recommended resolution. Is the power LED on . Have you press the Menu button? •• The OSD is turned on ? •• Check the power cable connection and press the power button. Is the monitor's power cord plugged in the product owner's manual. If you have no video...

Owners Manual
Page 33
... available depending on the monitor leave shadow trails. Screen display is HDMI 1080i 60/50 Hz (interlaced), the screen may not support 1920 x 1080 resolution. Did you use a screensaver. The number of times the screen is refreshed per second is called the horizontal cycle. If this is the number of the graphics card. NOTE •• Vertical Frequency: In order to the recommended (optimal) resolution Control Panel > Display > Menu in the retention...
... available depending on the monitor leave shadow trails. Screen display is HDMI 1080i 60/50 Hz (interlaced), the screen may not support 1920 x 1080 resolution. Did you use a screensaver. The number of times the screen is refreshed per second is called the horizontal cycle. If this is the number of the graphics card. NOTE •• Vertical Frequency: In order to the recommended (optimal) resolution Control Panel > Display > Menu in the retention...

Owners Manual
Page 34
... card. Are images displayed using DP (DisplayPort) or HDMI input without sound? •• Make sure that the headphone port connections are using the monitor, pixilated spots (red, green, blue, white, or black) may differ depending on the screen. Are there spots on the screen? •• When using . 34 ENGLISH The display color is normal for an LCD screen. This is abnormal. Does the display appear discolored (16 colors)? •• Set the color to Control Panel > Display > Menu > Color Quality. (The settings may...
... card. Are images displayed using DP (DisplayPort) or HDMI input without sound? •• Make sure that the headphone port connections are using the monitor, pixilated spots (red, green, blue, white, or black) may differ depending on the screen. Are there spots on the screen? •• When using . 34 ENGLISH The display color is normal for an LCD screen. This is abnormal. Does the display appear discolored (16 colors)? •• Set the color to Control Panel > Display > Menu > Color Quality. (The settings may...

Owners Manual
Page 36
... Stand 540.8 x 408.9 x 180.5 (mm) 21.2 x 16 x 7.1 (inches) 540.8 x 323.8 x 42.8 (mm) 21.2 x 12.7 x 1.6 (inches) 4.0 kg (8.8 lbs) 3.5 kg (7.7 lbs) Specifications are subject to the Sleep Mode in a couple of minutes(Max 5 minutes). The Power Consumption level can be different by operating condition and monitor setting. * The On mode power consumption is measured with LGE test standard (Full White pattern , Maximum resolution). ** The monitor goes to change...
... Stand 540.8 x 408.9 x 180.5 (mm) 21.2 x 16 x 7.1 (inches) 540.8 x 323.8 x 42.8 (mm) 21.2 x 12.7 x 1.6 (inches) 4.0 kg (8.8 lbs) 3.5 kg (7.7 lbs) Specifications are subject to the Sleep Mode in a couple of minutes(Max 5 minutes). The Power Consumption level can be different by operating condition and monitor setting. * The On mode power consumption is measured with LGE test standard (Full White pattern , Maximum resolution). ** The monitor goes to change...

Owners Manual
Page 38
... ENGLISH Dimensions Monitor Size (Width x Height x Depth) With Stand Without Stand Weight (Without Packaging) With Stand Without Stand 614.2 x 454.2 x 224.8 (mm) 24.1 x 17.8 x 8.8 (inches) 614.2 x 364.8 x 51.7 (mm) 24.1 x 14.3 x 2.0 (inches) 5.8 kg (12.7 lbs) 5.1 kg (11.2 lbs) Specifications are subject to the Sleep Mode in a couple of minutes(Max 5 minutes). The Power Consumption level can be different by operating condition and monitor setting. * The On mode power...
... ENGLISH Dimensions Monitor Size (Width x Height x Depth) With Stand Without Stand Weight (Without Packaging) With Stand Without Stand 614.2 x 454.2 x 224.8 (mm) 24.1 x 17.8 x 8.8 (inches) 614.2 x 364.8 x 51.7 (mm) 24.1 x 14.3 x 2.0 (inches) 5.8 kg (12.7 lbs) 5.1 kg (11.2 lbs) Specifications are subject to the Sleep Mode in a couple of minutes(Max 5 minutes). The Power Consumption level can be different by operating condition and monitor setting. * The On mode power...

Owners Manual
Page 40
... and monitor setting. * The On mode power consumption is measured with LGE test standard (Full White pattern , Maximum resolution). ** The monitor goes to change without notice. 40 ENGLISH Dimensions Monitor Size (Width x Height x Depth) With Stand Without Stand Weight (Without Packaging) With Stand Without Stand 714.7 x 515.1 x 224.8 (mm) 28.1 x 20.2 x 8.8 (inches) 714.7 x 428 x 77.5 (mm) 28.1 x 16.8 x 3.0 (inches) 5.9 kg (12.9 lbs) 5.2 kg (11.4 lbs) Specifications are subject to the Sleep Mode...
... and monitor setting. * The On mode power consumption is measured with LGE test standard (Full White pattern , Maximum resolution). ** The monitor goes to change without notice. 40 ENGLISH Dimensions Monitor Size (Width x Height x Depth) With Stand Without Stand Weight (Without Packaging) With Stand Without Stand 714.7 x 515.1 x 224.8 (mm) 28.1 x 20.2 x 8.8 (inches) 714.7 x 428 x 77.5 (mm) 28.1 x 16.8 x 3.0 (inches) 5.9 kg (12.9 lbs) 5.2 kg (11.4 lbs) Specifications are subject to the Sleep Mode...


