

Owners Manual
Page 1
LED LCD MONITOR MODEL 22EA53V 23EA53V 24EA53V 27EA53V www.lg.com ENGLISH OWNER'S MANUAL LED LCD MONITOR Please read this manual carefully before operating your set and retain it for future reference.
LED LCD MONITOR MODEL 22EA53V 23EA53V 24EA53V 27EA53V www.lg.com ENGLISH OWNER'S MANUAL LED LCD MONITOR Please read this manual carefully before operating your set and retain it for future reference.
Owners Manual
Page 2
Detaching the Stand Base 7 - Mounting on a wall 10 USING THE MONITOR SET 10 Connecting to a PC 10 - Mounting on a table 7 - HDMI connection 12 CUSTOMIZING SETTINGS 13 Customizing Settings 13 - Using the cable holder 9 - DVI-D connection 10 - D-... 20 -SUPER ENERGY SAVING 21 -DUAL DISPLAY 21 -DUAL WEB 22 -MY KEY Setting 23 TROUBLESHOOTING 25 SPECIFICATIONS 25 22EA53V 26 23EA53V 27 24EA53V 28 27EA53V 29 Preset Modes (Resolution) 29 HDMI TIMING 29 Indicator 30 PROPER POSTURE 30 Proper posture for using the...
Detaching the Stand Base 7 - Mounting on a wall 10 USING THE MONITOR SET 10 Connecting to a PC 10 - Mounting on a table 7 - HDMI connection 12 CUSTOMIZING SETTINGS 13 Customizing Settings 13 - Using the cable holder 9 - DVI-D connection 10 - D-... 20 -SUPER ENERGY SAVING 21 -DUAL DISPLAY 21 -DUAL WEB 22 -MY KEY Setting 23 TROUBLESHOOTING 25 SPECIFICATIONS 25 22EA53V 26 23EA53V 27 24EA53V 28 27EA53V 29 Preset Modes (Resolution) 29 HDMI TIMING 29 Indicator 30 PROPER POSTURE 30 Proper posture for using the...

Owners Manual
Page 5
... with the screen side down on the surface to protect the screen from damage. 2 22EA53V/23EA53V/24EA53V 1 Attach the Stand Body to the monitor set . 3 Attach the Stand Base. 4 Tighten the screw to the right with a coin. Stand Body Stand Body Stand Base Stand Body Stand Base CAUTION Lay... a foam mat or soft protective cloth on a flat and cushioned surface. 27EA53V 1 Attach the Stand Body to the monitor set. 2 Use two screws to fix the Stand Body and monitor set . 2 Attach the Stand Base. 3 Tighten the screw to the right with a coin.
... with the screen side down on the surface to protect the screen from damage. 2 22EA53V/23EA53V/24EA53V 1 Attach the Stand Body to the monitor set . 3 Attach the Stand Base. 4 Tighten the screw to the right with a coin. Stand Body Stand Body Stand Base Stand Body Stand Base CAUTION Lay... a foam mat or soft protective cloth on a flat and cushioned surface. 27EA53V 1 Attach the Stand Body to the monitor set. 2 Use two screws to fix the Stand Body and monitor set . 2 Attach the Stand Base. 3 Tighten the screw to the right with a coin.
Owners Manual
Page 6
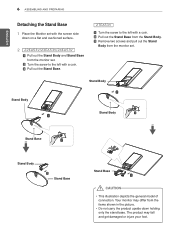
... flat and cushioned surface. 2 22EA53V/23EA53V/24EA53V 1 Pull out the Stand Body and Stand Base from the monitor set. 2 Turn the screw to the left with a coin. 3 Pull out the Stand Base. 27EA53V 1 Turn the screw to the left with the screen side down holding only the stand base. ENEGNLGISH 6 ...ASSEMBLING AND PREPARING Detaching the Stand Base 1 Place the Monitor set with a coin. 2 Pull out the Stand Base from the Stand...
... flat and cushioned surface. 2 22EA53V/23EA53V/24EA53V 1 Pull out the Stand Body and Stand Base from the monitor set. 2 Turn the screw to the left with a coin. 3 Pull out the Stand Base. 27EA53V 1 Turn the screw to the left with the screen side down holding only the stand base. ENEGNLGISH 6 ...ASSEMBLING AND PREPARING Detaching the Stand Base 1 Place the Monitor set with a coin. 2 Pull out the Stand Base from the Stand...
Owners Manual
Page 7
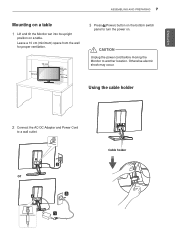
ENEGNLGISH ASSEMBLING AND PREPARING 7 Mounting on a table 1 Lift and tilt the Monitor set into its upright position on . or Cable holder CAUTION Unplug the power cord before moving the Monitor to a wall outlet. Otherwise electric shock may occur. Using the cable holder 2 Connect the AC-DC Adapter and Power Cord to another location. Leave a 10 cm (minimum) space from the wall for proper ventilation. 10 cm 10 cm 10 cm 10 cm 3 Press (Power) button on the bottom switch panel to turn the power on a table.
ENEGNLGISH ASSEMBLING AND PREPARING 7 Mounting on a table 1 Lift and tilt the Monitor set into its upright position on . or Cable holder CAUTION Unplug the power cord before moving the Monitor to a wall outlet. Otherwise electric shock may occur. Using the cable holder 2 Connect the AC-DC Adapter and Power Cord to another location. Leave a 10 cm (minimum) space from the wall for proper ventilation. 10 cm 10 cm 10 cm 10 cm 3 Press (Power) button on the bottom switch panel to turn the power on a table.
Owners Manual
Page 8
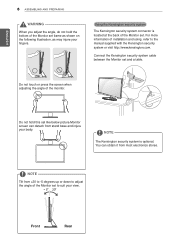
... from stand base and injure your body. NOTE Tilt from most electronics stores. For more information of the monitor. Connect the Kensington security system cable between the Monitor set frame as shown on the following illustration, as may injure your fingers. ENEGNLGISH 8 ASSEMBLING AND PREPARING ...of installation and using, refer to suit your view. Do not hold the bottom of the Monitor set. NOTE The Kensington security system is located at the back of the Monitor set and a table. Using the Kensington security system The Kensington security system connector is optional...
... from stand base and injure your body. NOTE Tilt from most electronics stores. For more information of the monitor. Connect the Kensington security system cable between the Monitor set frame as shown on the following illustration, as may injure your fingers. ENEGNLGISH 8 ASSEMBLING AND PREPARING ...of installation and using, refer to suit your view. Do not hold the bottom of the Monitor set. NOTE The Kensington security system is located at the back of the Monitor set and a table. Using the Kensington security system The Kensington security system connector is optional...
Owners Manual
Page 9
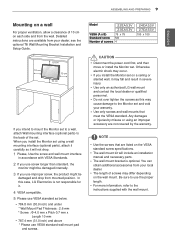
...interface in severe injury. Model 22EA53V 23EA53V VESA (A x B) 75 x 75 Standard screw M4 Number of screws 4 24EA53V 27EA53V 100 x 100 CAUTION yyDisconnect the power cord first, and then move or install the Monitor set and void your warranty. Any damages or injuries by the warranty. You can obtain additional accessories from...a clearance of 10 cm on the VESA standard screw specifications. yyThe length of screws may cause damage to use VESA standard as this case, LG Electronics is optional. Detailed instructions are listed on each side and from your local dealer.
...interface in severe injury. Model 22EA53V 23EA53V VESA (A x B) 75 x 75 Standard screw M4 Number of screws 4 24EA53V 27EA53V 100 x 100 CAUTION yyDisconnect the power cord first, and then move or install the Monitor set and void your warranty. Any damages or injuries by the warranty. You can obtain additional accessories from...a clearance of 10 cm on the VESA standard screw specifications. yyThe length of screws may cause damage to use VESA standard as this case, LG Electronics is optional. Detailed instructions are listed on each side and from your local dealer.
Owners Manual
Page 10
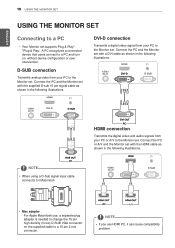
... using a D-Sub signal input cable connector for Macintosh HDMI connection Transmits the digital video and audio signals from your PC or A/V to the Monitor set with a DVI cable as shown in the following illustrations. yyMac adapter For Apple Macintosh use HDMI PC, it can cause compatibility problem. ...Connect the PC and the Monitor set . NOTE yyIf you use , a separate plug adapter is needed to change the 15 pin high density (3 row) D-SUB VGA connector on...
... using a D-Sub signal input cable connector for Macintosh HDMI connection Transmits the digital video and audio signals from your PC or A/V to the Monitor set with a DVI cable as shown in the following illustrations. yyMac adapter For Apple Macintosh use HDMI PC, it can cause compatibility problem. ...Connect the PC and the Monitor set . NOTE yyIf you use , a separate plug adapter is needed to change the 15 pin high density (3 row) D-SUB VGA connector on...
Owners Manual
Page 11
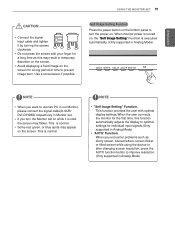
... screensaver if possible. When you want to turn the Monitor set . yyDo not press the screen with optimal display settings.When the user connects the monitor for a long period of time to prevent image burn. USING THE MONITOR SET 11 Self Image Setting Function Press the power button... screen may flicker. This is executed automatically. (Only supported in temporary distortion on , the "Self Image Setting" Function is normal. When monitor power is turned on the screen. NOTE yy"Self Image Setting" Function. yyAvoid displaying a fixed image on the screen for the first time...
... screensaver if possible. When you want to turn the Monitor set . yyDo not press the screen with optimal display settings.When the user connects the monitor for a long period of time to prevent image burn. USING THE MONITOR SET 11 Self Image Setting Function Press the power button... screen may flicker. This is executed automatically. (Only supported in temporary distortion on , the "Self Image Setting" Function is normal. When monitor power is turned on the screen. NOTE yy"Self Image Setting" Function. yyAvoid displaying a fixed image on the screen for the first time...
Owners Manual
Page 12
...• When two input signals are connected, you can unlock the OSD controls at any time by pressing the buttons on the bottom of the Monitor set. If the display is D-SUB. Press and hold the MENU button for several seconds. Exit Exit the OSD(On Screen Display). Power Indicator ... signal is connected, it is running properly (On Mode). ENEGNLGISH 12 CUSTOMIZING SETTINGS CUSTOMIZING SETTINGS 1 Press the desired button on the bottom of the Monitor set. 2 Change the value of the menu item by pushing the MENU button for several seconds. To return to the upper menu or set other...
...• When two input signals are connected, you can unlock the OSD controls at any time by pressing the buttons on the bottom of the Monitor set. If the display is D-SUB. Press and hold the MENU button for several seconds. Exit Exit the OSD(On Screen Display). Power Indicator ... signal is connected, it is running properly (On Mode). ENEGNLGISH 12 CUSTOMIZING SETTINGS CUSTOMIZING SETTINGS 1 Press the desired button on the bottom of the Monitor set. 2 Change the value of the menu item by pushing the MENU button for several seconds. To return to the upper menu or set other...
Owners Manual
Page 13
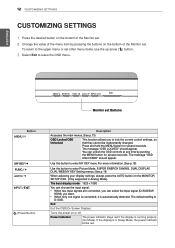
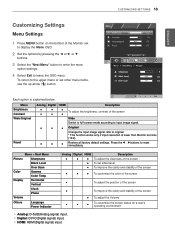
...◄ , ►buttons to leave the OSD menu. yyHDMI: HDMI(Digital signal) input. CUSTOMIZING SETTINGS 13 Each option is lower than Monitor set ratio (16:9). ● ● ● Restore all factory default settings. Menu Brightness Contrast Wide/Original Reset Analog Digital HDMI Description...customize the color of the screen ● To adjust the position of the screen ● To improve the clarity and stability of the Monitor set other menu items, use the up arrow ( ) button. yyDigital: DVI-D(Digital signal) input. ENEGNLGISH Customizing Settings Menu Settings 1 ...
...◄ , ►buttons to leave the OSD menu. yyHDMI: HDMI(Digital signal) input. CUSTOMIZING SETTINGS 13 Each option is lower than Monitor set ratio (16:9). ● ● ● Restore all factory default settings. Menu Brightness Contrast Wide/Original Reset Analog Digital HDMI Description...customize the color of the screen ● To adjust the position of the screen ● To improve the clarity and stability of the Monitor set other menu items, use the up arrow ( ) button. yyDigital: DVI-D(Digital signal) input. ENEGNLGISH Customizing Settings Menu Settings 1 ...
Owners Manual
Page 14
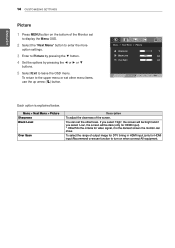
... range of output image for DTV timing in HDMI input.(only for video signal, it is explained below. Each option is the darkest screen the monitor can set other menu items, use the up arrow ( ) button. You can show. To return to the upper menu or set the offset level. Menu... > Next Menu > Picture Sharpness Black Level Over Scan Description To adjust the clearness of the Monitor set to display the Menu OSD. 2 Select the "Next Menu" button to enter the more option settings. 3 Enter to Picture by pressing the ▼ button...
... range of output image for DTV timing in HDMI input.(only for video signal, it is explained below. Each option is the darkest screen the monitor can set other menu items, use the up arrow ( ) button. You can show. To return to the upper menu or set the offset level. Menu... > Next Menu > Picture Sharpness Black Level Over Scan Description To adjust the clearness of the Monitor set to display the Menu OSD. 2 Select the "Next Menu" button to enter the more option settings. 3 Enter to Picture by pressing the ▼ button...
Owners Manual
Page 15
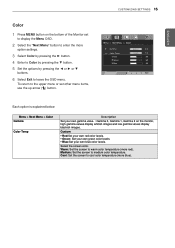
...your own blue color levels. Medium: Set the screen to cool color temperature (more blue). ENEGNLGISH Color 1 Press MENU button on the monitor, high gamma values display whitish images and low gamma values display blackish images. Cool: Set the screen to medium color temperature. Custom &#...8226; Green: Set your own green color levels. • Blue:Set your own gamma value. : Gamma 0, Gamma 1, Gamma 2 on the bottom of the Monitor set other menu items, use the up arrow ( ) button. CUSTOMIZING SETTINGS 15 Menu > Next Menu > Color Gamma Color Temp Red Green Blue Gamma 1 Custom...
...your own blue color levels. Medium: Set the screen to cool color temperature (more blue). ENEGNLGISH Color 1 Press MENU button on the monitor, high gamma values display whitish images and low gamma values display blackish images. Cool: Set the screen to medium color temperature. Custom &#...8226; Green: Set your own green color levels. • Blue:Set your own gamma value. : Gamma 0, Gamma 1, Gamma 2 on the bottom of the Monitor set other menu items, use the up arrow ( ) button. CUSTOMIZING SETTINGS 15 Menu > Next Menu > Color Gamma Color Temp Red Green Blue Gamma 1 Custom...
Owners Manual
Page 16
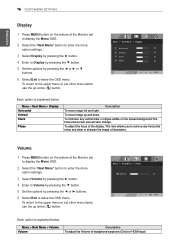
... screen background.The horizontal screen size will also change. To move image left and right. EXIT Volume 1 Press MENU button on the bottom of the Monitor set to display the Menu OSD. 2 Select the "Next Menu" button to enter the more option settings. 3 Select Volume by pressing the ►... buttons. 6 Select Exit to leave the OSD menu. 16 CUSTOMIZING SETTINGS Display ENEGNLGISH olor Gamma 1 Custom 1 Press MENU button on the bottom of the Monitor set to display the Menu OSD. 2 Select the "Next Menu" button to enter the more 2/3 option settings. 1/4 350 Select Display by pressing the ...
... screen background.The horizontal screen size will also change. To move image left and right. EXIT Volume 1 Press MENU button on the bottom of the Monitor set to display the Menu OSD. 2 Select the "Next Menu" button to enter the more option settings. 3 Select Volume by pressing the ►... buttons. 6 Select Exit to leave the OSD menu. 16 CUSTOMIZING SETTINGS Display ENEGNLGISH olor Gamma 1 Custom 1 Press MENU button on the bottom of the Monitor set to display the Menu OSD. 2 Select the "Next Menu" button to enter the more 2/3 option settings. 1/4 350 Select Display by pressing the ...
Owners Manual
Page 17
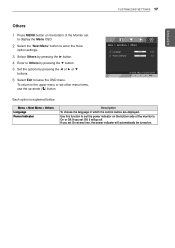
...; or ► or ▼ buttons. 6 Select Exit to On or Off.If you set Off, it will automatically be turned on the bottom of the Monitor set other menu items, use the up arrow ( ) button. EXIT Each option is explained below. CUSTOMIZING SETTINGS 17 ENEGNLGISH Others 1 Press MENU button on . Power...
...; or ► or ▼ buttons. 6 Select Exit to On or Off.If you set Off, it will automatically be turned on the bottom of the Monitor set other menu items, use the up arrow ( ) button. EXIT Each option is explained below. CUSTOMIZING SETTINGS 17 ENEGNLGISH Others 1 Press MENU button on . Power...
Owners Manual
Page 18
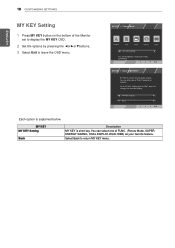
You can select one of the Monitor set to display the MY KEY OSD. 2 Set the options by pressing the ◄or►or▼buttons. 3 Select Exit to return MY KEY menu. Select Back to leave the OSD menu. ENEGNLGISH 18 CUSTOMIZING SETTINGS MY KEY Setting 1 Press MY KEY button on the bottom of FUNC. (Picture Mode, SUPER ENERGY SAVING, DUAL DISPLAY, DUAL WEB) as your favorite feature. MY KEY MY KEY Setting Back Description MY KEY is explained below. Each option is short key.
You can select one of the Monitor set to display the MY KEY OSD. 2 Set the options by pressing the ◄or►or▼buttons. 3 Select Exit to return MY KEY menu. Select Back to leave the OSD menu. ENEGNLGISH 18 CUSTOMIZING SETTINGS MY KEY Setting 1 Press MY KEY button on the bottom of FUNC. (Picture Mode, SUPER ENERGY SAVING, DUAL DISPLAY, DUAL WEB) as your favorite feature. MY KEY MY KEY Setting Back Description MY KEY is explained below. Each option is short key.
Owners Manual
Page 19
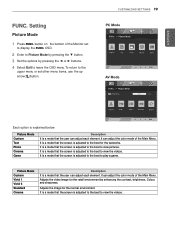
... mode of the Main Menu. It is adjusted to the best to the best for the textworks. It can adjust the color mode of the Monitor set other menu items, use the up arrow( )button. ENEGNLGISH FUNC. It is a mode that the screen is adjusted to the best to play a game...
... mode of the Main Menu. It is adjusted to the best to the best for the textworks. It can adjust the color mode of the Monitor set other menu items, use the up arrow( )button. ENEGNLGISH FUNC. It is a mode that the screen is adjusted to the best to play a game...
Owners Manual
Page 20
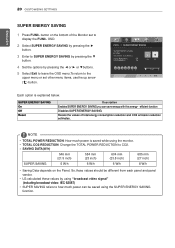
... to the upper menu or set to how much power is explained below. button on the Panel. So,those values should be saved using the monitor. NOTE yyTOTAL POWER REDUCTION: How much power can save energy with this energy- yyLG calculated these values by pressing the ◄ or ► or ▼.... 4 Set the options by using "broadcast video signal" (including broadcast video: IEC 62087) yySUPER SAVING refers to display the FUNC. Resets the values of the Monitor set other menu items, use the up arrow ( ) button.
... to the upper menu or set to how much power is explained below. button on the Panel. So,those values should be saved using the monitor. NOTE yyTOTAL POWER REDUCTION: How much power can save energy with this energy- yyLG calculated these values by pressing the ◄ or ► or ▼.... 4 Set the options by using "broadcast video signal" (including broadcast video: IEC 62087) yySUPER SAVING refers to display the FUNC. Resets the values of the Monitor set other menu items, use the up arrow ( ) button.
Owners Manual
Page 21
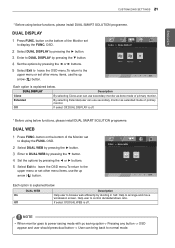
.... Help to control dividedwindows ratio. Help user to arrange and move windowson screen. By selecting Extended,user can use secondary monitor as extended mode of the Monitor set other menu items, use the up arrow ( ) button. DUAL WEB 1 Press FUNC. button on the bottom of primary... using below functions, please install DUAL SMART SOLUTION programme. Gamma 1 Custom DUAL DISPLAY 1 Press FUNC. button on the bottom of primary monitor. FUNC. > DUAL WEB On Off EXIT Each option is explained below. DUAL WEB On Off Description Help user to normal mode. NOTE yyWhen...
.... Help to control dividedwindows ratio. Help user to arrange and move windowson screen. By selecting Extended,user can use secondary monitor as extended mode of the Monitor set other menu items, use the up arrow ( ) button. DUAL WEB 1 Press FUNC. button on the bottom of primary... using below functions, please install DUAL SMART SOLUTION programme. Gamma 1 Custom DUAL DISPLAY 1 Press FUNC. button on the bottom of primary monitor. FUNC. > DUAL WEB On Off EXIT Each option is explained below. DUAL WEB On Off Description Help user to normal mode. NOTE yyWhen...
Owners Manual
Page 22
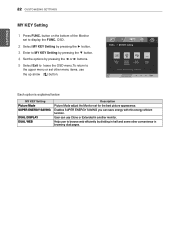
button on the bottom of the Monitor set other convenience in another monitor. User can save energy with this energy-effcient function. t>tinDgUAbL WyEpBressing the ► button. 3 Enter to MY KEY Setting by pressing the ▼ button. 4 Set ... the FUNC. EXIT Each option is explained below. MY KEY Setting Picture Mode SUPER ENERGY SAVING DUAL DISPLAY DUAL WEB Description Picture Mode adjust the Monitor set for the best picture appearance. ENEGNLGISH 22 CUSTOMIZING SETTINGS MY KEY Setting 1 Press FUNC.
button on the bottom of the Monitor set other convenience in another monitor. User can save energy with this energy-effcient function. t>tinDgUAbL WyEpBressing the ► button. 3 Enter to MY KEY Setting by pressing the ▼ button. 4 Set ... the FUNC. EXIT Each option is explained below. MY KEY Setting Picture Mode SUPER ENERGY SAVING DUAL DISPLAY DUAL WEB Description Picture Mode adjust the Monitor set for the best picture appearance. ENEGNLGISH 22 CUSTOMIZING SETTINGS MY KEY Setting 1 Press FUNC.


