
Owners Manual - English
Page 2
... 32 TROUBLESHOOTING 34 SPECIFICATIONS 44 Factory Support Mode (Preset Mode, D-SUB/DVI/HDMI PC) 45 HDMI Timing(Video) 45 Indicator 46 PROPER POSTURE 46 Proper posture for using the Monitor set 9 - Mounting on a wall 16 USING THE MONITOR SET 16 Connecting to a PC 16 - DVI-D connection 17 - D-SUB connection 16 - HDMI connection 18 Connecting to AV Devices 17 - HDMI connection 17 Connecting to External Devices 18 - Peripheral device connection 19 CUSTOMIZING SETTINGS 21 Customizing Settings 21 - Menu Settings 23 -Picture 24 -Color 25 -Display 25 -Audio 26...
... 32 TROUBLESHOOTING 34 SPECIFICATIONS 44 Factory Support Mode (Preset Mode, D-SUB/DVI/HDMI PC) 45 HDMI Timing(Video) 45 Indicator 46 PROPER POSTURE 46 Proper posture for using the Monitor set 9 - Mounting on a wall 16 USING THE MONITOR SET 16 Connecting to a PC 16 - DVI-D connection 17 - D-SUB connection 16 - HDMI connection 18 Connecting to AV Devices 17 - HDMI connection 17 Connecting to External Devices 18 - Peripheral device connection 19 CUSTOMIZING SETTINGS 21 Customizing Settings 21 - Menu Settings 23 -Picture 24 -Color 25 -Display 25 -Audio 26...

Owners Manual - English
Page 15
... severe injury. Wall mount Pad Back Cover Wall mount Pad Back Cover Standard screw Max.8mm NOTE y yUse the screws that meet the VESA standard. y yThe wall mount kit will not drop. 1 If you install the Monitor set on the VESA standard screw specifications. In this may occur. y yDo not over tighten the screws as this case, LG Electronics is optional. ASSEMBLING AND PREPARING 15 ENEGNLGISH Mounting on a wall For proper ventilation...
... severe injury. Wall mount Pad Back Cover Wall mount Pad Back Cover Standard screw Max.8mm NOTE y yUse the screws that meet the VESA standard. y yThe wall mount kit will not drop. 1 If you install the Monitor set on the VESA standard screw specifications. In this may occur. y yDo not over tighten the screws as this case, LG Electronics is optional. ASSEMBLING AND PREPARING 15 ENEGNLGISH Mounting on a wall For proper ventilation...
Owners Manual - English
Page 16
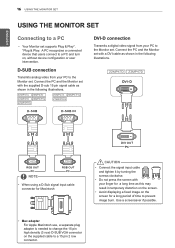
... using a D-Sub signal input cable connector for a long period of time to prevent image burn. ENEGNLGISH 16 USING THE MONITOR SET USING THE MONITOR SET Connecting to a PC y yYour Monitor set . Use a screensaver if possible. Connect the PC and the Monitor set with your PC to the Monitor set supports Plug & Play*. *Plug & Play: A PC recognizes a connected device that users connect to a PC and turn on the screen. y yMac adapter For Apple Macintosh use, a separate plug adapter is needed to a 15 pin 2 row connector. DVI-D connection Transmits a digital video signal...
... using a D-Sub signal input cable connector for a long period of time to prevent image burn. ENEGNLGISH 16 USING THE MONITOR SET USING THE MONITOR SET Connecting to a PC y yYour Monitor set . Use a screensaver if possible. Connect the PC and the Monitor set with your PC to the Monitor set supports Plug & Play*. *Plug & Play: A PC recognizes a connected device that users connect to a PC and turn on the screen. y yMac adapter For Apple Macintosh use, a separate plug adapter is needed to a 15 pin 2 row connector. DVI-D connection Transmits a digital video signal...

Owners Manual - English
Page 17
... you turn the Monitor set with the HDMI cable as shown in Monitor set . y yIf you use HDMI PC, it can cause compatibility problem. y ySome red, green, or blue spots may flicker. If you use HDMI PC, it is cold, the screen may appear on while it can cause compatibility problem. This is normal. NOTE y yIf you do not use a certified HDMI cable, the screen may not display or a connection error may occur. y yUse a certified cable with the HDMI...
... you turn the Monitor set with the HDMI cable as shown in Monitor set . y yIf you use HDMI PC, it can cause compatibility problem. y ySome red, green, or blue spots may flicker. If you use HDMI PC, it is cold, the screen may appear on while it can cause compatibility problem. This is normal. NOTE y yIf you do not use a certified HDMI cable, the screen may not display or a connection error may occur. y yUse a certified cable with the HDMI...

Owners Manual - English
Page 18
..., use straight plugs when possible. y yCables with optimal display settings.When the user connects the monitor for the first time, this function automatically adjusts the display to optimal settings for individual input signals.(Only supported in Analog Mode) y y'AUTO' Function. NOTE y y"Self Image Setting" Function. 18 USING THE MONITOR SET Connecting to External Devices Peripheral device connection Connect peripheral devices to the monitor using the device or after changing screen resolution, press the AUTO function button to improve resolution. (Only supported in Analog Mode...
..., use straight plugs when possible. y yCables with optimal display settings.When the user connects the monitor for the first time, this function automatically adjusts the display to optimal settings for individual input signals.(Only supported in Analog Mode) y y'AUTO' Function. NOTE y y"Self Image Setting" Function. 18 USING THE MONITOR SET Connecting to External Devices Peripheral device connection Connect peripheral devices to the monitor using the device or after changing screen resolution, press the AUTO function button to improve resolution. (Only supported in Analog Mode...

Owners Manual - English
Page 20
... OSD of "OSD Lock" will appear. Otherwise, "OSD Unlocked" will appear. Its function works to lock the current control settings, so that , user can select the input signal (D-SUB/DVI-D/ HDMI) you to display screen as paper-like picture for Eye comfort.If you can push the "MENU" button for several seconds. Power Indicator The power indicator stays white if the display is running properly (On Mode). Turns the power on the MONITOR SETUP OSD. (Only supported in Sleep Mode, the power indicator blinks white...
... OSD of "OSD Lock" will appear. Otherwise, "OSD Unlocked" will appear. Its function works to lock the current control settings, so that , user can select the input signal (D-SUB/DVI-D/ HDMI) you to display screen as paper-like picture for Eye comfort.If you can push the "MENU" button for several seconds. Power Indicator The power indicator stays white if the display is running properly (On Mode). Turns the power on the MONITOR SETUP OSD. (Only supported in Sleep Mode, the power indicator blinks white...

Owners Manual - English
Page 21
.... * This function works only if input resolution is recommended that you use the up arrow ( ) button. For a fast-moving picture, it is lower than Monitor set other menu items, use 'Off'. Menu Analog Digital Brightness ● ● Contrast ● ● Response Time 22MP47HQ 24MP47HQ 23MP47HQ 27MP47HQ ● Wide/Original ● ● Reset ● ● HDMI ● ● Description To adjust the brightness, contrast of the screen. CUSTOMIZING SETTINGS 21 ENEGNLGISH Customizing Settings Menu Settings 1 Press MENU button on the...
.... * This function works only if input resolution is recommended that you use the up arrow ( ) button. For a fast-moving picture, it is lower than Monitor set other menu items, use 'Off'. Menu Analog Digital Brightness ● ● Contrast ● ● Response Time 22MP47HQ 24MP47HQ 23MP47HQ 27MP47HQ ● Wide/Original ● ● Reset ● ● HDMI ● ● Description To adjust the brightness, contrast of the screen. CUSTOMIZING SETTINGS 21 ENEGNLGISH Customizing Settings Menu Settings 1 Press MENU button on the...
Owners Manual - English
Page 23
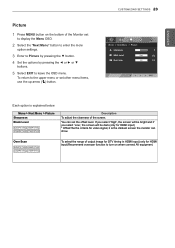
... HDMI input) * Offset?As the criteria for HDMI input)Recommend overscan function to leave the OSD menu. ENEGNLGISH Picture 1 Press MENU button on when connect AV equipment. Menu > Next Menu > Picture Sharpness Black Level 22MP47HQ 24MP47HQ 23MP47HQ 27MP47HQ Description To adjust the clearness of output image for DTV timing in HDMI input.(only for video signal, it is explained below. To return to the upper menu or set to display the Menu OSD. 2 Select the "Next Menu" button...
... HDMI input) * Offset?As the criteria for HDMI input)Recommend overscan function to leave the OSD menu. ENEGNLGISH Picture 1 Press MENU button on when connect AV equipment. Menu > Next Menu > Picture Sharpness Black Level 22MP47HQ 24MP47HQ 23MP47HQ 27MP47HQ Description To adjust the clearness of output image for DTV timing in HDMI input.(only for video signal, it is explained below. To return to the upper menu or set to display the Menu OSD. 2 Select the "Next Menu" button...
Owners Manual - English
Page 24
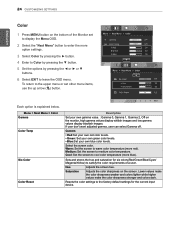
... set to display the Menu OSD. 2 Select the "Next Menu" button to enter the more red). Sets and stores the hue and saturation for six colors(Red/Green/Blue/Cyan/ Magenta/Yellow) to the factory default settings for the current input device. Lower values make the color sharpness weaker and colors lighter while higher values make the color sharpness stronger and colors dark. Resets the color settings to satisfy the color requirements of the Monitor set other menu items, use...
... set to display the Menu OSD. 2 Select the "Next Menu" button to enter the more red). Sets and stores the hue and saturation for six colors(Red/Green/Blue/Cyan/ Magenta/Yellow) to the factory default settings for the current input device. Lower values make the color sharpness weaker and colors lighter while higher values make the color sharpness stronger and colors dark. Resets the color settings to satisfy the color requirements of the Monitor set other menu items, use...
Owners Manual - English
Page 25
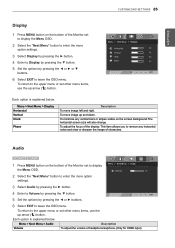
... horizontal noise and clear or sharpen the image of the display. This item allows you to the upper menu or set other menu items, use the up and down. To move image left and right. Menu > Next Menu > Audio Description Volume To adjust the volume of headphone/earphone.(Only for HDMI input) To return to remove any vertical bars or stripes visible on the screen background.The horizontal screen size will also change...
... horizontal noise and clear or sharpen the image of the display. This item allows you to the upper menu or set other menu items, use the up and down. To move image left and right. Menu > Next Menu > Audio Description Volume To adjust the volume of headphone/earphone.(Only for HDMI input) To return to remove any vertical bars or stripes visible on the screen background.The horizontal screen size will also change...
Owners Manual - English
Page 26
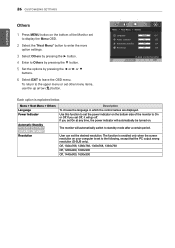
... the upper menu or set other menu items, use the up arrow ( ) button. User can set the desired resolution. Each option is set to On or Off.If you set On at any time, the power indicator will automatically switch to standby mode after a certain period. To return to leave the OSD menu. 26 CUSTOMIZING SETTINGS ENEGNLGISH Others 1 Press MENU button on the bottom of the monitor to the...
... the upper menu or set other menu items, use the up arrow ( ) button. User can set the desired resolution. Each option is set to On or Off.If you set On at any time, the power indicator will automatically switch to standby mode after a certain period. To return to leave the OSD menu. 26 CUSTOMIZING SETTINGS ENEGNLGISH Others 1 Press MENU button on the bottom of the monitor to the...
Owners Manual - English
Page 27
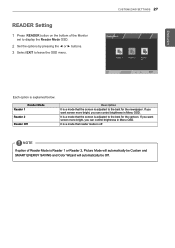
... Monitor set to display the Reader Mode OSD. 2 Set the options by pressing the ◄ or ► buttons. 3 Select EXIT to the best for the cartoon. If you want screen more bright, you can control brightness in Menu OSD. It is a mode that the screen is adjusted to the best for the newspaper. If you want screen more bright, you can control brightness in Menu OSD. CUSTOMIZING SETTINGS 27 Each option is adjusted to leave the OSD menu...
... Monitor set to display the Reader Mode OSD. 2 Set the options by pressing the ◄ or ► buttons. 3 Select EXIT to the best for the cartoon. If you want screen more bright, you can control brightness in Menu OSD. It is a mode that the screen is adjusted to the best for the newspaper. If you want screen more bright, you can control brightness in Menu OSD. CUSTOMIZING SETTINGS 27 Each option is adjusted to leave the OSD menu...
Owners Manual - English
Page 29
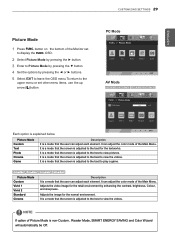
... Description It is adjusted to view the videos. It is a mode that the user can adjust each element. OSD. 2 Select Picture Mode by pressing the ► button. 3 Enter to Picture Mode by pressing the ▼ button. 4 Set the options by enhancing the contrast, brightness, Colour, and sharpness. It is a mode that the screen is a mode that the screen is adjusted to the best to play a game. 22MP47HQ 23MP47HQ 24MP47HQ 27MP47HQ Picture Mode Custom Vivid 1 Vivid...
... Description It is adjusted to view the videos. It is a mode that the user can adjust each element. OSD. 2 Select Picture Mode by pressing the ► button. 3 Enter to Picture Mode by pressing the ▼ button. 4 Set the options by enhancing the contrast, brightness, Colour, and sharpness. It is a mode that the screen is a mode that the screen is adjusted to the best to play a game. 22MP47HQ 23MP47HQ 24MP47HQ 27MP47HQ Picture Mode Custom Vivid 1 Vivid...

Owners Manual - English
Page 32
... you see "OSD LOCKED" when y y You can unlock the OSD controls at any image or characters are visible. y y This message appears when the signal from the PC (video card) is incorrect. y y When the monitor is connected properly to DPM mode. inadvertently changed. Display image is incorrect Display Position is out of horizontal or vertical frequency range of the display. Any horizontal noise appearing in 5 minutes, the monitor goes to the power outlet. Set the color setting higher than 24...
... you see "OSD LOCKED" when y y You can unlock the OSD controls at any image or characters are visible. y y This message appears when the signal from the PC (video card) is incorrect. y y When the monitor is connected properly to DPM mode. inadvertently changed. Display image is incorrect Display Position is out of horizontal or vertical frequency range of the display. Any horizontal noise appearing in 5 minutes, the monitor goes to the power outlet. Set the color setting higher than 24...

Owners Manual - English
Page 33
... installed the display driver? Change the resolution to the computer or the video card manufacturer. y y Check if the signal cable is flickering. y yIf the recommended resolution (optimal resolution) is HDMI 1080i 60/50 Hz, the screen may be supported by computer and O/S (Operation System), and resolution mentioned above may not be dimmed, truncated or biased. The screen blinks. TROUBLESHOOTING 33 ENEGNLGISH CAUTION y yCheck Control Panel ► Display ► Settings and see an "Unrecognized monitor, Plug&Play (VESA DDC) monitor...
... installed the display driver? Change the resolution to the computer or the video card manufacturer. y y Check if the signal cable is flickering. y yIf the recommended resolution (optimal resolution) is HDMI 1080i 60/50 Hz, the screen may be supported by computer and O/S (Operation System), and resolution mentioned above may not be dimmed, truncated or biased. The screen blinks. TROUBLESHOOTING 33 ENEGNLGISH CAUTION y yCheck Control Panel ► Display ► Settings and see an "Unrecognized monitor, Plug&Play (VESA DDC) monitor...

Owners Manual - English
Page 34
34 SPECIFICATIONS ENEGNLGISH SPECIFICATIONS 20MP47A Display Resolution Power Consumption Power Input AC-DC Adapter Dimensions (Width x Height x Depth) Weight Tilt Range Environmental conditions Stand Base Power cord Screen Type Flat Panel Active matrix-TFT LCD Anti-Glare coating Pixel Pitch Max 0.0969 mm x RGB x 0.2915 mm (Pixel Pitch) 1440 x 900 @ 60 Hz Recommend VESA 1440 x 900 @ 60 Hz On Mode : 15 W (ENERGY STAR® standard)* Sleep Mode ≤ 0.3 W Off Mode ≤ 0.3 W 19 V 0.8 A Type ADS-18SG-19-3 19016G, manufactured by...
34 SPECIFICATIONS ENEGNLGISH SPECIFICATIONS 20MP47A Display Resolution Power Consumption Power Input AC-DC Adapter Dimensions (Width x Height x Depth) Weight Tilt Range Environmental conditions Stand Base Power cord Screen Type Flat Panel Active matrix-TFT LCD Anti-Glare coating Pixel Pitch Max 0.0969 mm x RGB x 0.2915 mm (Pixel Pitch) 1440 x 900 @ 60 Hz Recommend VESA 1440 x 900 @ 60 Hz On Mode : 15 W (ENERGY STAR® standard)* Sleep Mode ≤ 0.3 W Off Mode ≤ 0.3 W 19 V 0.8 A Type ADS-18SG-19-3 19016G, manufactured by...
Owners Manual - English
Page 36
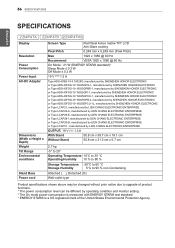
36 SPECIFICATIONS ENEGNLGISH SPECIFICATIONS 22MP47A 22MP47D 22MP47HQ Display Resolution Power Consumption Power Input AC-DC Adapter Dimensions (Width x Height x Depth) Weight Tilt Range Environmental conditions Stand Base Power cord Screen Type Flat Panel Active matrix-TFT LCD Anti-Glare coating Pixel Pitch Max 0.248 mm x 0.248 mm (Pixel Pitch) 1920 x 1080 @ 60 Hz Recommend VESA 1920 x 1080 @ 60 Hz On Mode : 21 W (ENERGY STAR® standard)* Sleep Mode ≤ 0.3 W Off Mode ≤ 0.3 W 19 V 1.2 A Type ADS-40SG-19-3 19025G...
36 SPECIFICATIONS ENEGNLGISH SPECIFICATIONS 22MP47A 22MP47D 22MP47HQ Display Resolution Power Consumption Power Input AC-DC Adapter Dimensions (Width x Height x Depth) Weight Tilt Range Environmental conditions Stand Base Power cord Screen Type Flat Panel Active matrix-TFT LCD Anti-Glare coating Pixel Pitch Max 0.248 mm x 0.248 mm (Pixel Pitch) 1920 x 1080 @ 60 Hz Recommend VESA 1920 x 1080 @ 60 Hz On Mode : 21 W (ENERGY STAR® standard)* Sleep Mode ≤ 0.3 W Off Mode ≤ 0.3 W 19 V 1.2 A Type ADS-40SG-19-3 19025G...
Owners Manual - English
Page 38
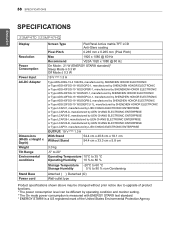
38 SPECIFICATIONS ENEGNLGISH SPECIFICATIONS 23MP47D 23MP47HQ Display Resolution Power Consumption Power Input AC-DC Adapter Dimensions (Width x Height x Depth) Weight Tilt Range Environmental conditions Stand Base Power cord Screen Type Flat Panel Active matrix-TFT LCD Anti-Glare coating Pixel Pitch 0.265 mm x 0.265 mm (Pixel Pitch) Max Recommend 1920 x 1080 @ 60 Hz VESA 1920 x 1080 @ 60 Hz On Mode : 21 W (ENERGY STAR® standard)* Sleep Mode ≤ 0.3 W Off Mode ≤ 0.3 W 19 V 1.3 A Type ADS-40SG-19-3 19025G, manufactured...
38 SPECIFICATIONS ENEGNLGISH SPECIFICATIONS 23MP47D 23MP47HQ Display Resolution Power Consumption Power Input AC-DC Adapter Dimensions (Width x Height x Depth) Weight Tilt Range Environmental conditions Stand Base Power cord Screen Type Flat Panel Active matrix-TFT LCD Anti-Glare coating Pixel Pitch 0.265 mm x 0.265 mm (Pixel Pitch) Max Recommend 1920 x 1080 @ 60 Hz VESA 1920 x 1080 @ 60 Hz On Mode : 21 W (ENERGY STAR® standard)* Sleep Mode ≤ 0.3 W Off Mode ≤ 0.3 W 19 V 1.3 A Type ADS-40SG-19-3 19025G, manufactured...
Owners Manual - English
Page 40
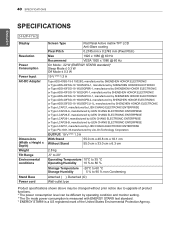
40 SPECIFICATIONS ENEGNLGISH SPECIFICATIONS 24MP47HQ Display Resolution Power Consumption Power Input AC-DC Adapter Dimensions (Width x Height x Depth) Weight Tilt Range Environmental conditions Stand Base Power cord Screen Type Flat Panel Active matrix-TFT LCD Anti-Glare coating Pixel Pitch Max 0.2745 mm x 0.2745 mm (Pixel Pitch) 1920 x 1080 @ 60 Hz Recommend VESA 1920 x 1080 @ 60 Hz On Mode : 22 W (ENERGY STAR® standard)* Sleep Mode ≤ 0.3 W Off Mode ≤ 0.3 W 19 V 1.3 A Type ADS-40SG-19-3 19025G, manufactured by SHENZHEN...
40 SPECIFICATIONS ENEGNLGISH SPECIFICATIONS 24MP47HQ Display Resolution Power Consumption Power Input AC-DC Adapter Dimensions (Width x Height x Depth) Weight Tilt Range Environmental conditions Stand Base Power cord Screen Type Flat Panel Active matrix-TFT LCD Anti-Glare coating Pixel Pitch Max 0.2745 mm x 0.2745 mm (Pixel Pitch) 1920 x 1080 @ 60 Hz Recommend VESA 1920 x 1080 @ 60 Hz On Mode : 22 W (ENERGY STAR® standard)* Sleep Mode ≤ 0.3 W Off Mode ≤ 0.3 W 19 V 1.3 A Type ADS-40SG-19-3 19025G, manufactured by SHENZHEN...
Owners Manual - English
Page 42
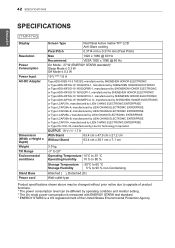
42 SPECIFICATIONS ENEGNLGISH SPECIFICATIONS 27MP47HQ Display Resolution Power Consumption Power Input AC-DC Adapter Dimensions (Width x Height x Depth) Weight Tilt Range Environmental conditions Stand Base Power cord Screen Type Flat Panel Active matrix-TFT LCD Anti-Glare coating Pixel Pitch Max 0.3114 mm x 0.3114 mm (Pixel Pitch) 1920 x 1080 @ 60 Hz Recommend VESA 1920 x 1080 @ 60 Hz On Mode : 27 W (ENERGY STAR® standard)* Sleep Mode ≤ 0.3 W Off Mode ≤ 0.3 W 19 V 1.6 A Type ADS-40SG-19-3 19032G, manufactured by...
42 SPECIFICATIONS ENEGNLGISH SPECIFICATIONS 27MP47HQ Display Resolution Power Consumption Power Input AC-DC Adapter Dimensions (Width x Height x Depth) Weight Tilt Range Environmental conditions Stand Base Power cord Screen Type Flat Panel Active matrix-TFT LCD Anti-Glare coating Pixel Pitch Max 0.3114 mm x 0.3114 mm (Pixel Pitch) 1920 x 1080 @ 60 Hz Recommend VESA 1920 x 1080 @ 60 Hz On Mode : 27 W (ENERGY STAR® standard)* Sleep Mode ≤ 0.3 W Off Mode ≤ 0.3 W 19 V 1.6 A Type ADS-40SG-19-3 19032G, manufactured by...


